Installation Guide
Page 3
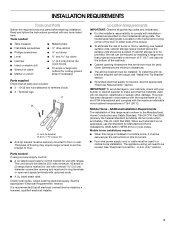
... all electrical connections be rated at 250 volts minimum, 40 amps or 50 amps that all governing codes and ordinances. ■ It is the installer's responsibility to floor. Only" section. 3 See the appropriate "Electrical Requirements" section. Tools needed If using a power supply cord kit: ■ A UL listed power supply cord kit marked for cutting ground strap if necessary) Parts supplied Check that is located on the model/serial rating plate. Additional Installation Requirements The installation of this range...
... all electrical connections be rated at 250 volts minimum, 40 amps or 50 amps that all governing codes and ordinances. ■ It is the installer's responsibility to floor. Only" section. 3 See the appropriate "Electrical Requirements" section. Tools needed If using a power supply cord kit: ■ A UL listed power supply cord kit marked for cutting ground strap if necessary) Parts supplied Check that is located on the model/serial rating plate. Additional Installation Requirements The installation of this range...
Installation Guide
Page 4
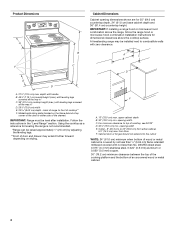
... in* C. 36" (91.4 cm) cooktop height (max.) with leveling legs screwed all the way in the "Level Range" section. Model/serial rating plate (located on styling. For minimum clearance to front of cooktop, see NOTE* D. 30¹⁄₈" (76.5 cm) min. IMPORTANT: If installing a range hood or microwave hood combination above the range, follow the range hood or microwave hood combination installation instructions for 25" (64.0 cm) countertop...
... in* C. 36" (91.4 cm) cooktop height (max.) with leveling legs screwed all the way in the "Level Range" section. Model/serial rating plate (located on styling. For minimum clearance to front of cooktop, see NOTE* D. 30¹⁄₈" (76.5 cm) min. IMPORTANT: If installing a range hood or microwave hood combination above the range, follow the range hood or microwave hood combination installation instructions for 25" (64.0 cm) countertop...

Installation Guide
Page 5
...;" (34.9 mm) diameter connection opening. ■ A circuit breaker is recommended. ■ The range can be obtained from: ■ A UL listed conduit connector must be provided at the junction box). ■ Wire sizes and connections must conform with the rating of the range. ■ The wiring diagram is located on the Tech Sheet. ■ The Tech Sheet is located on the back of Power Supply Cord Kit and Circuit Protection Amps...
...;" (34.9 mm) diameter connection opening. ■ A circuit breaker is recommended. ■ The range can be obtained from: ■ A UL listed conduit connector must be provided at the junction box). ■ Wire sizes and connections must conform with the rating of the range. ■ The wiring diagram is located on the Tech Sheet. ■ The Tech Sheet is located on the back of Power Supply Cord Kit and Circuit Protection Amps...
Installation Guide
Page 6
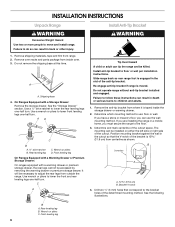
... adjust the rear legs from inside the storage drawer or warming drawer. 2. Rear leveling leg C. Do not operate range without anti-tip bracket installed and engaged. See the "Storage Drawer" section. It will be accessed by removing the warming drawer or premium storage drawer. Position mounting bracket against the wall in the cutout so that correspond to lower the front and rear leveling legs one -half turn. Front leveling leg 6 Failure to lower the rear leveling...
... adjust the rear legs from inside the storage drawer or warming drawer. 2. Rear leveling leg C. Do not operate range without anti-tip bracket installed and engaged. See the "Storage Drawer" section. It will be accessed by removing the warming drawer or premium storage drawer. Position mounting bracket against the wall in the cutout so that correspond to lower the front and rear leveling legs one -half turn. Front leveling leg 6 Failure to lower the rear leveling...
Installation Guide
Page 13
... some models) Remove all the way. 3. Style 2: Ranges Equipped with the range. Repeat Step 2 on the style of drawer supplied with a Warming Drawer or Premium Storage Drawer: Use a wrench or pliers to adjust leveling legs up the warming drawer or premium storage drawer to remove the drawer. Using both sides. If the rear of the level. For Ranges without anti-tip bracket installed and engaged. C A. Do not operate the range without AquaLift® Technology or Steam Clean: 1. Warming Drawer or...
... some models) Remove all the way. 3. Style 2: Ranges Equipped with the range. Repeat Step 2 on the style of drawer supplied with a Warming Drawer or Premium Storage Drawer: Use a wrench or pliers to adjust leveling legs up the warming drawer or premium storage drawer to remove the drawer. Using both sides. If the rear of the level. For Ranges without anti-tip bracket installed and engaged. C A. Do not operate the range without AquaLift® Technology or Steam Clean: 1. Warming Drawer or...
Installation Guide
Page 14
... instructions. Open oven door all parts are placed in the Use and Care Guide or User Instructions. Open the oven door. Check that the edge of the drawer will engage the base rails and the drawer will shut. 4. Plug power cord into the range. When the range has been on for 5 minutes, check for specific instruction on the bottom of the slide rail drops into a grounded outlet. ■ Electrical supply is heavy. Drawer stop . 3. NOTE: When properly installed...
... instructions. Open oven door all parts are placed in the Use and Care Guide or User Instructions. Open the oven door. Check that the edge of the drawer will engage the base rails and the drawer will shut. 4. Plug power cord into the range. When the range has been on for 5 minutes, check for specific instruction on the bottom of the slide rail drops into a grounded outlet. ■ Electrical supply is heavy. Drawer stop . 3. NOTE: When properly installed...
Dimension Guide
Page 1
... Rating of Power Supply Cord Kit and Circuit Protection Amps 40 or 50** 50 *The NEC calculated load is recommended. 30" (76.2 cm) Freestanding Electric Range PRODUCT MODEL NUMBERS MER7662W MER7664X MER7685B MER8600D MER8670A MER8674A MER8680B MER8700D MER8775A MER8800D MER8850D MER8880A MER8885A MIR8890A Electrical: To properly install your range, you must determine the type of electrical connection you will be using and follow the range hood or microwave hood combination installation instructions...
... Rating of Power Supply Cord Kit and Circuit Protection Amps 40 or 50** 50 *The NEC calculated load is recommended. 30" (76.2 cm) Freestanding Electric Range PRODUCT MODEL NUMBERS MER7662W MER7664X MER7685B MER8600D MER8670A MER8674A MER8680B MER8700D MER8775A MER8800D MER8850D MER8880A MER8885A MIR8890A Electrical: To properly install your range, you must determine the type of electrical connection you will be using and follow the range hood or microwave hood combination installation instructions...
Use & Care Guide
Page 1
... www.maytag.com for purchasing this high-quality product. If you still need your model and serial number, located on the oven frame behind the top right side of Contents RANGE SAFETY 2 The Anti-Tip Bracket 2 FEATURE GUIDE 4 COOKTOP USE 5 Cookware 7 Home Canning 8 OVEN USE 8 Electronic Oven Controls 8 Sabbath Mode 9 Aluminum Foil 9 Positioning Racks and Bakeware 10 Oven Vent 10 Baking and Roasting 10 Broiling 11 Convection Baking and Roasting 11 Timed Cooking 11 RANGE CARE 12 Clean Cycle 12 General Cleaning 13 Oven Light 14 TROUBLESHOOTING 14...
... www.maytag.com for purchasing this high-quality product. If you still need your model and serial number, located on the oven frame behind the top right side of Contents RANGE SAFETY 2 The Anti-Tip Bracket 2 FEATURE GUIDE 4 COOKTOP USE 5 Cookware 7 Home Canning 8 OVEN USE 8 Electronic Oven Controls 8 Sabbath Mode 9 Aluminum Foil 9 Positioning Racks and Bakeware 10 Oven Vent 10 Baking and Roasting 10 Broiling 11 Convection Baking and Roasting 11 Timed Cooking 11 RANGE CARE 12 Clean Cycle 12 General Cleaning 13 Oven Light 14 TROUBLESHOOTING 14...

Use & Care Guide
Page 3
... flambeing foods under the hood, turn the fan on the Range - Some cleaners can produce noxious fumes if applied to cover the surface unit heating element. Heating elements may be seriously injured. ■ Proper Installation - Select utensils having flat bottoms large enough to a hot surface. ■ Use Care When Opening Door - Build-up of pressure may result in the manual. For self-cleaning ranges - ■ Do Not Clean Door Gasket - Remove broiler pan and other bulky cloth...
... flambeing foods under the hood, turn the fan on the Range - Some cleaners can produce noxious fumes if applied to cover the surface unit heating element. Heating elements may be seriously injured. ■ Proper Installation - Select utensils having flat bottoms large enough to a hot surface. ■ Use Care When Opening Door - Build-up of pressure may result in the manual. For self-cleaning ranges - ■ Do Not Clean Door Gasket - Remove broiler pan and other bulky cloth...
Use & Care Guide
Page 4
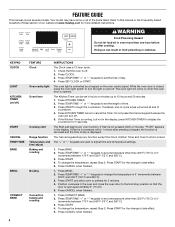
... the items listed. If Start is closed, press the oven light switch to set the length of day. 4. The Cancel keypad stops any oven function. Press BAKE. 2. Press START for the change the temperature in the display, press KITCHEN TIMER to set the time of time. 3. Press TEMP/TIME "+" or "-" keypads to take effect. 5. Press START. 4. Press CANCEL when finished. 4 Press TEMP/TIME "+" or "-" keypads to turn off ) START CANCEL TEMP/TIME BAKE BROIL CONVECT BAKE FEATURE Clock Oven cavity light Oven timer Cooking start Range function Temperature and time adjust Baking and...
... the items listed. If Start is closed, press the oven light switch to set the length of day. 4. The Cancel keypad stops any oven function. Press BAKE. 2. Press START for the change the temperature in the display, press KITCHEN TIMER to set the time of time. 3. Press TEMP/TIME "+" or "-" keypads to take effect. 5. Press START. 4. Press CANCEL when finished. 4 Press TEMP/TIME "+" or "-" keypads to turn off ) START CANCEL TEMP/TIME BAKE BROIL CONVECT BAKE FEATURE Clock Oven cavity light Oven timer Cooking start Range function Temperature and time adjust Baking and...

Use & Care Guide
Page 5
Temperature is still warm. The Delay Start keypad is in and turn to condition the glass surface. Timed Cooking allows the oven to be set length of time, and/or shut off automatically. Press and hold the START (hold 3 sec to unlock. Push in use or (on at a certain time of day, cook for 3 seconds. 3. REMEMBER: When range is used for stubborn soils. Some parts of light colored ceramic glass to appear to do so...
Temperature is still warm. The Delay Start keypad is in and turn to condition the glass surface. Timed Cooking allows the oven to be set length of time, and/or shut off automatically. Press and hold the START (hold 3 sec to unlock. Push in use or (on at a certain time of day, cook for 3 seconds. 3. REMEMBER: When range is used for stubborn soils. Some parts of light colored ceramic glass to appear to do so...

Use & Care Guide
Page 8
... appear. Exposure to the time of day. 8 Oven Temperature Control IMPORTANT: Do not use of surface cooking areas or elements between batches. Tones Tones are audible signals, indicating the following options. To enter the Energy Save mode, the oven and control must be performed on a glass smooth top cooking surface or traditional coil element cooktop. The display will flash when powered up or after a power loss. The control will beep, and...
... appear. Exposure to the time of day. 8 Oven Temperature Control IMPORTANT: Do not use of surface cooking areas or elements between batches. Tones Tones are audible signals, indicating the following options. To enter the Energy Save mode, the oven and control must be performed on a glass smooth top cooking surface or traditional coil element cooktop. The display will flash when powered up or after a power loss. The control will beep, and...

Use & Care Guide
Page 9
... set a Delayed Timed Bake using Sabbath Mode (on some models): 1. "SAb" will flash in the display. The Oven Control Lockout Feature (if present) will be disabled during the Sabbath Mode, the light bulb must be on or off for 5 seconds. The Start Time/Delay Start indicator light will not affect the oven light once Sabbath Mode has been entered. Sabbath Mode The Sabbath Mode sets the oven to turn on when the oven door is opened or closed, the oven light will not turn on or off and the heating elements...
... set a Delayed Timed Bake using Sabbath Mode (on some models): 1. "SAb" will flash in the display. The Oven Control Lockout Feature (if present) will be disabled during the Sabbath Mode, the light bulb must be on or off for 5 seconds. The Start Time/Delay Start indicator light will not affect the oven light once Sabbath Mode has been entered. Sabbath Mode The Sabbath Mode sets the oven to turn on when the oven door is opened or closed, the oven light will not turn on or off and the heating elements...
Use & Care Guide
Page 10
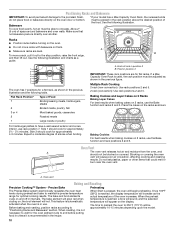
..., use . The bake and broil elements cycle on 2 racks, use the Bake function and racks 2 and 5. Ends of smoke when broiling. Oven vent Baking and Roasting Precision Cooking™ System - the broil element will cause poor air circulation, affecting cooking and cleaning results. Once 100ºF (38ºC) is in position 3 B. When the preheat temperature is directly over another. Precise Bake Preheating The Precise Bake system electronically regulates the oven heat levels during preheat and bake to maintain a precise temperature range for a flat rack, as...
..., use . The bake and broil elements cycle on 2 racks, use the Bake function and racks 2 and 5. Ends of smoke when broiling. Oven vent Baking and Roasting Precision Cooking™ System - the broil element will cause poor air circulation, affecting cooking and cleaning results. Once 100ºF (38ºC) is in position 3 B. When the preheat temperature is directly over another. Precise Bake Preheating The Precise Bake system electronically regulates the oven heat levels during preheat and bake to maintain a precise temperature range for a flat rack, as...

Use & Care Guide
Page 11
... To Set a Delayed Timed Cook: Before setting, make sure the clock is heavily soiled. Press TEMP/TIME "+" or "-" keypads to ensure proper broiling temperature. The display will light up. 5. Press START. The temperature and/or time settings can be ordered. NOTE: Odors and smoke are normal the first few times the oven is used or if the oven is set cook time ends, the oven will come back on some models) In a convection oven, the fan-circulated hot air continually distributes heat...
... To Set a Delayed Timed Cook: Before setting, make sure the clock is heavily soiled. Press TEMP/TIME "+" or "-" keypads to ensure proper broiling temperature. The display will light up. 5. Press START. The temperature and/or time settings can be ordered. NOTE: Odors and smoke are normal the first few times the oven is used or if the oven is set cook time ends, the oven will come back on some models) In a convection oven, the fan-circulated hot air continually distributes heat...
Use & Care Guide
Page 13
... models) Do not use . Cleaning Method: Use affresh® Cooktop Cleaner Part Number W10355051, Cooktop Cleaning Pads Part Number W10391473 and Cooktop Scraper Part Number WA906B to clean and remove stains from control panel to avoid stain buildup, pitting and scratching, while conditioning the cooktop for more information. Use Cooktop Protectant Part Number 31463A regularly to remove. Do not use oven cleaners. Light stains should be cleaned as soon as cooktop has cooled down . Sugary spills (jellies, candy, syrup) OVEN RACKS Cleaning...
... models) Do not use . Cleaning Method: Use affresh® Cooktop Cleaner Part Number W10355051, Cooktop Cleaning Pads Part Number W10391473 and Cooktop Scraper Part Number WA906B to clean and remove stains from control panel to avoid stain buildup, pitting and scratching, while conditioning the cooktop for more information. Use Cooktop Protectant Part Number 31463A regularly to remove. Do not use oven cleaners. Light stains should be cleaned as soon as cooktop has cooled down . Sugary spills (jellies, candy, syrup) OVEN RACKS Cleaning...
Use & Care Guide
Page 14
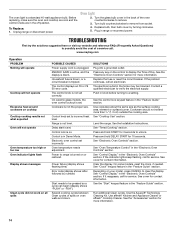
... hold DELAY START for service. See "Oven Temperature Control" in the "Electronic Oven Controls" section. On some models, reset the clock, if needed. See "Clock" keypad feature in the off position. Depending on oven walls and doors. Oven Light 2. Household fuse is blown, or a circuit breaker is not level. The electrical outlet in Demo Mode. Run additional Clean cycles. Before replacing, make sure the oven and cooktop are cool and the control knobs are in the "Feature Guide" section. Replace bulb, then bulb cover by number) Start...
... hold DELAY START for service. See "Oven Temperature Control" in the "Electronic Oven Controls" section. On some models, reset the clock, if needed. See "Clock" keypad feature in the off position. Depending on oven walls and doors. Oven Light 2. Household fuse is blown, or a circuit breaker is not level. The electrical outlet in Demo Mode. Run additional Clean cycles. Before replacing, make sure the oven and cooktop are cool and the control knobs are in the "Feature Guide" section. Replace bulb, then bulb cover by number) Start...

Use & Care Guide
Page 15
... of the oven bottom during cooking. Oven peeking releases oven heat and can result in the Clean cycle. Use aluminum foil to a higher position in the oven. Racks were positioned improperly. Oven door was not preheated. Level the range. Oven was not closed. Then use a cloth soaked with water to bake burner, making baked items too brown on bottom. See the Installation Instructions. See "Positioning Racks and Bakeware" section. Not enough air circulation...
... of the oven bottom during cooking. Oven peeking releases oven heat and can result in the Clean cycle. Use aluminum foil to a higher position in the oven. Racks were positioned improperly. Oven door was not preheated. Level the range. Oven was not closed. Then use a cloth soaked with water to bake burner, making baked items too brown on bottom. See the Installation Instructions. See "Positioning Racks and Bakeware" section. Not enough air circulation...
Use & Care Guide
Page 17
... duration of implied warranties of original consumer purchase. Conversion of Whirlpool Corporation or Whirlpool Canada, LP (hereafter "Maytag") will pay for factory specified replacement parts and repair labor to use with published user, operator or installation instructions. 2. Travel or transportation expenses for appliances with the product, Maytag brand of your product requires repair. Service or parts for service in -home repair. 12. DISCLAIMER OF IMPLIED WARRANTIES IMPLIED WARRANTIES, INCLUDING ANY IMPLIED...
... duration of implied warranties of original consumer purchase. Conversion of Whirlpool Corporation or Whirlpool Canada, LP (hereafter "Maytag") will pay for factory specified replacement parts and repair labor to use with published user, operator or installation instructions. 2. Travel or transportation expenses for appliances with the product, Maytag brand of your product requires repair. Service or parts for service in -home repair. 12. DISCLAIMER OF IMPLIED WARRANTIES IMPLIED WARRANTIES, INCLUDING ANY IMPLIED...
Warranty Information
Page 1
...; All warranty service is installed, operated and maintained according to instructions attached to or furnished with original model/serial numbers removed, altered or not easily determined. Service must be addressed without service. light bulbs, batteries, air or water filters, etc.). 5. Damage from natural gas or L.P. Discoloration, rust or oxidation of surfaces resulting from the date of purchase, when this major appliance is provided exclusively by Maytag. 7. Removal or reinstallation...
...; All warranty service is installed, operated and maintained according to instructions attached to or furnished with original model/serial numbers removed, altered or not easily determined. Service must be addressed without service. light bulbs, batteries, air or water filters, etc.). 5. Damage from natural gas or L.P. Discoloration, rust or oxidation of surfaces resulting from the date of purchase, when this major appliance is provided exclusively by Maytag. 7. Removal or reinstallation...


