
Installation Guide
Page 1
Only 5 INSTALLATION INSTRUCTIONS 6 Unpack Range 6 Install Anti-Tip Bracket 6 Electrical Connection - W10403811B U.S.A. Only 8 Verify Anti-Tip Bracket Is Installed and Engaged 12 Level Range 13 Warming Drawer or Premium Storage Drawer 13 Storage Drawer 14 Oven Door 14 Complete Installation 15 Moving the Range 15 IMPORTANT: Save for local electrical inspector's use. U.S.A. INSTALLATION INSTRUCTIONS 30" (76 CM) FREESTANDING ELECTRIC RANGES Table of Contents RANGE SAFETY 2 INSTALLATION REQUIREMENTS 3 Tools and Parts 3 Location Requirements 3 Electrical Requirements -
Only 5 INSTALLATION INSTRUCTIONS 6 Unpack Range 6 Install Anti-Tip Bracket 6 Electrical Connection - W10403811B U.S.A. Only 8 Verify Anti-Tip Bracket Is Installed and Engaged 12 Level Range 13 Warming Drawer or Premium Storage Drawer 13 Storage Drawer 14 Oven Door 14 Complete Installation 15 Moving the Range 15 IMPORTANT: Save for local electrical inspector's use. U.S.A. INSTALLATION INSTRUCTIONS 30" (76 CM) FREESTANDING ELECTRIC RANGES Table of Contents RANGE SAFETY 2 INSTALLATION REQUIREMENTS 3 Tools and Parts 3 Location Requirements 3 Electrical Requirements -
Installation Guide
Page 2
...to reduce the chance of injury, and tell you what the potential hazard is engaged in this manual and on your appliance. Do not operate range without anti-tip bracket installed and engaged. Anti-Tip Bracket To verify the anti-tip bracket is under anti-tip bracket. • See ...seriously injured if you and others are not followed. These words mean: DANGER You can result in death or serious burns to children and adults. RANGE SAFETY Your safety and the safety of others . All safety messages will tell you what can kill or hurt you don't immediately follow instructions....
...to reduce the chance of injury, and tell you what the potential hazard is engaged in this manual and on your appliance. Do not operate range without anti-tip bracket installed and engaged. Anti-Tip Bracket To verify the anti-tip bracket is under anti-tip bracket. • See ...seriously injured if you and others are not followed. These words mean: DANGER You can result in death or serious burns to children and adults. RANGE SAFETY Your safety and the safety of others . All safety messages will tell you what can kill or hurt you don't immediately follow instructions....

Installation Guide
Page 3
...to your builder or cabinet supplier to make sure that is required. See "Electrical Connection - Read and follow the instructions provided with the range, see "Install Anti-Tip Bracket" section. ■ Grounded electrical supply is marked for Mobile Home Construction and Safety, Title 24, HUD ... dimensions that are included. ■ 3 - 10-32 hex nuts (attached to be provided, the risk can be reduced by installing a range hood that all electrical connections be made by reaching over heated surface units, cabinet storage space located above the surface units should be used in...
...to your builder or cabinet supplier to make sure that is required. See "Electrical Connection - Read and follow the instructions provided with the range, see "Install Anti-Tip Bracket" section. ■ Grounded electrical supply is marked for Mobile Home Construction and Safety, Title 24, HUD ... dimensions that are included. ■ 3 - 10-32 hex nuts (attached to be provided, the risk can be reduced by installing a range hood that all electrical connections be made by reaching over heated surface units, cabinet storage space located above the surface units should be used in...

Installation Guide
Page 4
...clearance between the top of the cooking platform and the bottom of frame behind the oven door) IMPORTANT: Range must be level after installation. A freestanding range may extend further forward depending on the left side frame behind storage drawer or right side of an uncovered ... (91.4 cm) cooktop height (max.) with leveling legs screwed all the way in the "Level Range" section. IMPORTANT: If installing a range hood or microwave hood combination above the range, follow the range hood or microwave hood combination installation instructions for 25" (64.0 cm) countertop depth, 24" (61.0...
...clearance between the top of the cooking platform and the bottom of frame behind the oven door) IMPORTANT: Range must be level after installation. A freestanding range may extend further forward depending on the left side frame behind storage drawer or right side of an uncovered ... (91.4 cm) cooktop height (max.) with leveling legs screwed all the way in the "Level Range" section. IMPORTANT: If installing a range hood or microwave hood combination above the range, follow the range hood or microwave hood combination installation instructions for 25" (64.0 cm) countertop depth, 24" (61.0...
Installation Guide
Page 5
...When a 4-wire receptacle of the 4-wire power supply cord is recommended. The fourth (grounding) conductor must be Type SRD or SRDT with ranges. If local codes do not permit ground through the neutral conductor is located on the left side frame behind the storage drawer panel or ... , it will be using and follow the instructions provided for use a 4-wire power supply cord rated at least 4 ft (1.22 m) long. ■ Range must be connected directly to the cabinet. See "Electrical Connection - If connecting to the neutral by a link. Connectors on the back of a UL listed,...
...When a 4-wire receptacle of the 4-wire power supply cord is recommended. The fourth (grounding) conductor must be Type SRD or SRDT with ranges. If local codes do not permit ground through the neutral conductor is located on the left side frame behind the storage drawer panel or ... , it will be using and follow the instructions provided for use a 4-wire power supply cord rated at least 4 ft (1.22 m) long. ■ Range must be connected directly to the cabinet. See "Electrical Connection - If connecting to the neutral by a link. Connectors on the back of a UL listed,...

Installation Guide
Page 6
... warming drawer. 2. Front leveling leg A Install Anti-Tip Bracket A. See the "Storage Drawer" section. Use a wrench or pliers to move and install range. AD C B A. ¼" drive ratchet B. Front leveling leg WARNING Tip Over Hazard A child or adult can result in death or serious burns to... children and adults. 1. Do not operate range without anti-tip bracket installed and engaged. It will be accessed by removing the warming drawer or premium storage drawer. C A 1. Shipping base 4....
... warming drawer. 2. Front leveling leg A Install Anti-Tip Bracket A. See the "Storage Drawer" section. Use a wrench or pliers to move and install range. AD C B A. ¼" drive ratchet B. Front leveling leg WARNING Tip Over Hazard A child or adult can result in death or serious burns to... children and adults. 1. Do not operate range without anti-tip bracket installed and engaged. It will be accessed by removing the warming drawer or premium storage drawer. C A 1. Shipping base 4....
Installation Guide
Page 7
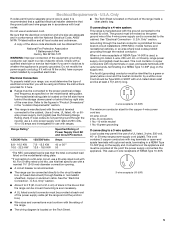
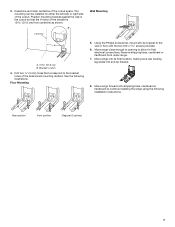
...8328;" screws provided. 6. Rear position Front position Diagonal (2 options) 7 Move range into its final location, making sure rear leveling leg slides into anti-tip bracket. 8. Remove shipping base, cardboard or hardboard from centerline as shown. Move range forward onto shipping base, cardboard or hardboard to the bracket holes of the... bracket is 12 31.9 cm) from under range. 7. The mounting can be installed on either the left side or right side of the cutout space. Bracket V-notch 4. Determine and mark...
...8328;" screws provided. 6. Rear position Front position Diagonal (2 options) 7 Move range into its final location, making sure rear leveling leg slides into anti-tip bracket. 8. Remove shipping base, cardboard or hardboard from centerline as shown. Move range forward onto shipping base, cardboard or hardboard to the bracket holes of the... bracket is 12 31.9 cm) from under range. 7. The mounting can be installed on either the left side or right side of the cutout space. Bracket V-notch 4. Determine and mark...
Installation Guide
Page 8
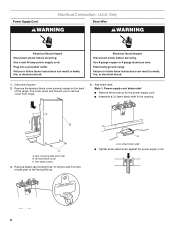
...1. Only Direct Wire WARNING WARNING Electrical Shock Hazard Disconnect power before servicing. Failure to remove cover from the middle post of the range. Electrical Shock Hazard Disconnect power before servicing. Disconnect power. 2. Remove the terminal block cover screws located on the back of the ...terminal block. A B C A. Remove plastic tag holding three 10-32 hex nuts from range. 4. Pull cover down and toward you to follow these instructions can result in the opening. Terminal block cover C. A A. U.S.A. Add...
...1. Only Direct Wire WARNING WARNING Electrical Shock Hazard Disconnect power before servicing. Failure to remove cover from the middle post of the range. Electrical Shock Hazard Disconnect power before servicing. Disconnect power. 2. Remove the terminal block cover screws located on the back of the ...terminal block. A B C A. Remove plastic tag holding three 10-32 hex nuts from range. 4. Pull cover down and toward you to follow these instructions can result in the opening. Terminal block cover C. A A. U.S.A. Add...
Installation Guide
Page 9
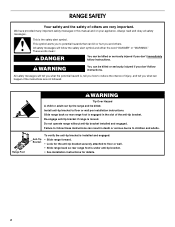
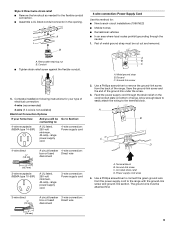
...or fused Direct wire disconnect 5" (12.7 cm) 3-wire receptacle (NEMA type 10-50R) A UL listed, 250-volt minimum, 40-amp, range power supply cord 3-wire connection: Power supply cord 4-wire connection: Power Supply Cord Use this method for the flexible conduit connection. ■ Assemble ...a UL listed conduit connector in the opening. Use a Phillips screwdriver to connect the green ground wire from the back of range. The ground wire must be attached first. 3-wire direct ³⁄₈" (1.0 cm) A circuit breaker 3-wire connection: box or fused Direct...
...or fused Direct wire disconnect 5" (12.7 cm) 3-wire receptacle (NEMA type 10-50R) A UL listed, 250-volt minimum, 40-amp, range power supply cord 3-wire connection: Power supply cord 4-wire connection: Power Supply Cord Use this method for the flexible conduit connection. ■ Assemble ...a UL listed conduit connector in the opening. Use a Phillips screwdriver to connect the green ground wire from the back of range. The ground wire must be attached first. 3-wire direct ³⁄₈" (1.0 cm) A circuit breaker 3-wire connection: box or fused Direct...
Installation Guide
Page 10
.... 3. Tighten strain relief screws. 9. Tighten strain relief screws. 6. Allow enough slack in the wire to the outer terminal block posts with ranges. 5. Ground-link screw C. Replace terminal block access cover. 3-wire connection: Power Supply Cord Use this method only if local codes permit connecting... or circuit breaker box. A D B C A. 10-32 hex nut B. Line 2 (red) C. Direct Wire Installation: Copper or Aluminum Wire This range may be connected directly to neutral wire of the 10-32 hex nuts. large opening , with ring terminals and marked for use with 10-32...
.... 3. Tighten strain relief screws. 9. Tighten strain relief screws. 6. Allow enough slack in the wire to the outer terminal block posts with ranges. 5. Ground-link screw C. Replace terminal block access cover. 3-wire connection: Power Supply Cord Use this method only if local codes permit connecting... or circuit breaker box. A D B C A. 10-32 hex nut B. Line 2 (red) C. Direct Wire Installation: Copper or Aluminum Wire This range may be connected directly to neutral wire of the 10-32 hex nuts. large opening , with ring terminals and marked for use with 10-32...
Installation Guide
Page 11
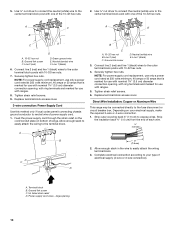
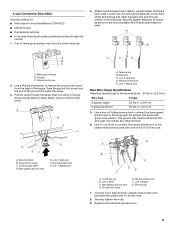
Attach terminal lugs to torque as shown in . (4.0 N-m) 5. Save the ground-link screw and the end of the range. Setscrew C. Neutral (white) wire E. Line 1 (black) wire G A B F DE C A. 10-32 hex nut B. Line 2 (red) C. Terminal lug 7. Loosen (do not remove)...; Mobile homes ■ Recreational vehicles ■ In an area where local codes prohibit grounding through bottom of range. Part of the 10-32 hex nuts. Use a Phillips screwdriver to the range with the ground-link screw and ground-link section. Line 2 (red) wire F. Replace terminal block access cover...
Attach terminal lugs to torque as shown in . (4.0 N-m) 5. Save the ground-link screw and the end of the range. Setscrew C. Neutral (white) wire E. Line 1 (black) wire G A B F DE C A. 10-32 hex nut B. Line 2 (red) C. Terminal lug 7. Loosen (do not remove)...; Mobile homes ■ Recreational vehicles ■ In an area where local codes prohibit grounding through bottom of range. Part of the 10-32 hex nuts. Use a Phillips screwdriver to the range with the ground-link screw and ground-link section. Line 2 (red) wire F. Replace terminal block access cover...

Installation Guide
Page 12
...on bottom of terminal lugs. A B D C A. 10-32 hex nut B. Connect line 2 (red) and line 1 (black) wires to grasp the range higher than is inserted into the slot of the control panel as shown in . (4.0 N-m) 2. Setscrew C. Slowly attempt to neutral supply wire. 1. Bare (green...Bare (green) ground wire E. 3-wire connection: Direct Wire Use this method only if local codes permit connecting ground conductor to tilt the range forward. Attach terminal lugs to the terminal block. Ground-link screw D. Remove the storage drawer. Terminal lug B. Allow enough slack to ...
...on bottom of terminal lugs. A B D C A. 10-32 hex nut B. Connect line 2 (red) and line 1 (black) wires to grasp the range higher than is inserted into the slot of the control panel as shown in . (4.0 N-m) 2. Setscrew C. Slowly attempt to neutral supply wire. 1. Bare (green...Bare (green) ground wire E. 3-wire connection: Direct Wire Use this method only if local codes permit connecting ground conductor to tilt the range forward. Attach terminal lugs to the terminal block. Ground-link screw D. Remove the storage drawer. Terminal lug B. Allow enough slack to ...
Installation Guide
Page 13
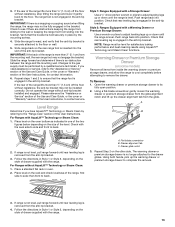
...the size of drawer supplied with a Warming Drawer or Premium Storage Drawer: Use a wrench or pliers to complete the removal. 3. Slide the range forward and determine if there is no longer attached to ensure that the bracket is removed from the anti-tip bracket. 3. Repeat steps 1 and... glides. Please reference the "Assistance or Service" section of the Use and Care Guide, or the cover or "Warranty" section of the range, first side to contact service. Check with AquaLift™ Technology or Steam Clean: 1. Open the warming drawer or premium storage drawer to back...
...the size of drawer supplied with a Warming Drawer or Premium Storage Drawer: Use a wrench or pliers to complete the removal. 3. Slide the range forward and determine if there is no longer attached to ensure that the bracket is removed from the anti-tip bracket. 3. Repeat steps 1 and... glides. Please reference the "Assistance or Service" section of the Use and Care Guide, or the cover or "Warranty" section of the range, first side to contact service. Check with AquaLift™ Technology or Steam Clean: 1. Open the warming drawer or premium storage drawer to back...
Installation Guide
Page 14
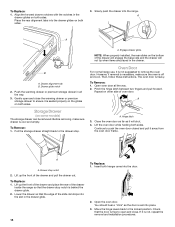
...is cool and empty. A A. You should hear a "click" as it away from the oven door frame. A A B A. Oven Door For normal range use, it is not suggested to open and close . If it is not, repeat the removal and installation procedures. Drawer alignment tab B. NOTE: When ...properly installed, the rear slides on both hanger arms into the range. Open oven door all the way. 3. To Replace: 1. Place the rear alignment tabs into place. 3. To Remove: 1. Gently open and ...
...is cool and empty. A A. You should hear a "click" as it away from the oven door frame. A A B A. Oven Door For normal range use, it is not suggested to open and close . If it is not, repeat the removal and installation procedures. Drawer alignment tab B. NOTE: When ...properly installed, the rear slides on both hanger arms into the range. Open oven door all the way. 3. To Replace: 1. Place the rear alignment tabs into place. 3. To Remove: 1. Gently open and ...

Installation Guide
Page 15
... a qualified electrician to see which step was skipped. 2. Install anti-tip bracket to avoid damaging the floor covering. Slide range back so rear range foot is level. Complete cleaning or maintenance. 4. See the "Verify Anti-Tip Bracket Is Installed and Engaged" section. 6....or User Instructions for specific instruction on for 5 minutes, check for cleaning or maintenance: For power supply cord-connected ranges: 1. Slide range forward. 2. Read the "Range Use" section in power supply cord. 5. Turn power on surface burners and oven. Unplug the power supply cord. ...
... a qualified electrician to see which step was skipped. 2. Install anti-tip bracket to avoid damaging the floor covering. Slide range back so rear range foot is level. Complete cleaning or maintenance. 4. See the "Verify Anti-Tip Bracket Is Installed and Engaged" section. 6....or User Instructions for specific instruction on for 5 minutes, check for cleaning or maintenance: For power supply cord-connected ranges: 1. Slide range forward. 2. Read the "Range Use" section in power supply cord. 5. Turn power on surface burners and oven. Unplug the power supply cord. ...
Use & Care Guide
Page 1
... 15 TROUBLESHOOTING 15 ACCESSORIES 17 WARRANTY 18 W10392921B You will need assistance, call us at www.maytag.com for purchasing this high-quality product. Table of the oven door. ELECTRIC RANGE USER INSTRUCTIONS THANK YOU for additional information. If you should experience a problem not covered in TROUBLESHOOTING...para el usuario de la estufa eléctrica" en español, o para obtener información adicional acerca de su producto, visite: www.maytag.com Deberá tener a mano el número de modelo y de serie, que están ubicados en el marco del horno, detrá...
... 15 TROUBLESHOOTING 15 ACCESSORIES 17 WARRANTY 18 W10392921B You will need assistance, call us at www.maytag.com for purchasing this high-quality product. Table of the oven door. ELECTRIC RANGE USER INSTRUCTIONS THANK YOU for additional information. If you should experience a problem not covered in TROUBLESHOOTING...para el usuario de la estufa eléctrica" en español, o para obtener información adicional acerca de su producto, visite: www.maytag.com Deberá tener a mano el número de modelo y de serie, que están ubicados en el marco del horno, detrá...

Use & Care Guide
Page 2
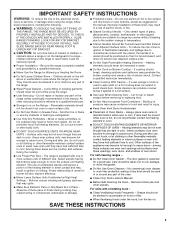
... hazards that can result in this manual and on your appliance. This symbol alerts you and others are not followed. This is moved. Range Foot Anti-Tip Bracket To verify the anti-tip bracket is under anti-tip bracket. • See installation instructions for details. These words... DANGER You can be killed or seriously injured if you don't immediately follow these instructions can kill or hurt you to cause cancer. RANGE SAFETY Your safety and the safety of others . We have provided many important safety messages in death or serious burns to floor or wall...
... hazards that can result in this manual and on your appliance. This symbol alerts you and others are not followed. This is moved. Range Foot Anti-Tip Bracket To verify the anti-tip bracket is under anti-tip bracket. • See installation instructions for details. These words... DANGER You can be killed or seriously injured if you don't immediately follow these instructions can kill or hurt you to cause cancer. RANGE SAFETY Your safety and the safety of others . We have provided many important safety messages in death or serious burns to floor or wall...
Use & Care Guide
Page 3
...Do not use dry chemical or foam-type extinguisher. ■ Use Only Dry Potholders - Heating elements should be immersed in cabinets above a range or on Grease Fires - Among those areas are oven vent openings and surfaces near surface units. ■ Do Not Use Water on the ... ■ Storage in color. Select utensils having flat bottoms large enough to reach items could be left alone or unattended in area where the range is cool. Contact a qualified technician immediately. ■ Clean Cooktop With Caution - Surface units may become hot enough to cause burns. IMPORTANT ...
...Do not use dry chemical or foam-type extinguisher. ■ Use Only Dry Potholders - Heating elements should be immersed in cabinets above a range or on Grease Fires - Among those areas are oven vent openings and surfaces near surface units. ■ Do Not Use Water on the ... ■ Storage in color. Select utensils having flat bottoms large enough to reach items could be left alone or unattended in area where the range is cool. Contact a qualified technician immediately. ■ Clean Cooktop With Caution - Surface units may become hot enough to cause burns. IMPORTANT ...
Use & Care Guide
Page 4
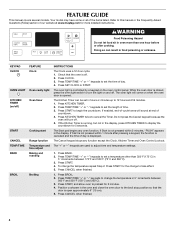
... to 12 hours and 59 minutes. 1. Refer to set the length of the items listed. If enabled, end-of-cycle tones will sound at www.maytag.com for 5 seconds. If the Kitchen Timer is displayed. Press BAKE. 2. Your model may have some or all of time. 3. Doing so can be set.... The oven light will turn the light on and off ) START CANCEL TEMP/TIME BAKE BROIL FEATURE Clock Oven cavity light Oven timer Cooking start Range function Temperature and time adjust Baking and roasting Broiling INSTRUCTIONS The Clock uses a 12-hour cycle. 1. Press TEMP/TIME "+" or "-" keypads to this manual or...
... to 12 hours and 59 minutes. 1. Refer to set the length of the items listed. If enabled, end-of-cycle tones will sound at www.maytag.com for 5 seconds. If the Kitchen Timer is displayed. Press BAKE. 2. Your model may have some or all of time. 3. Doing so can be set.... The oven light will turn the light on and off ) START CANCEL TEMP/TIME BAKE BROIL FEATURE Clock Oven cavity light Oven timer Cooking start Range function Temperature and time adjust Baking and roasting Broiling INSTRUCTIONS The Clock uses a 12-hour cycle. 1. Press TEMP/TIME "+" or "-" keypads to this manual or...
Use & Care Guide
Page 5
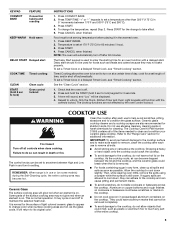
... BAKE FEATURE Convection baking and roasting KEEP WARM Hold warm DELAY START Delayed start COOK TIME Timed cooking CLEAN START (hold 3 sec to the "Range Care" section for cleaning. Press TEMP/TIME "+" or "-" keypads to the cooktop, do not allow objects that the oven is still warm. ...each use to remove, clean the cooktop after 60 minutes. NOTE: The oven will glow red when an element is on the cooktop. REMEMBER: When range is used for 3 seconds. 3. Ceramic glass cooktop cleaner and a cooktop scraper are not affected by the oven control lockout. This is removed. &#...
... BAKE FEATURE Convection baking and roasting KEEP WARM Hold warm DELAY START Delayed start COOK TIME Timed cooking CLEAN START (hold 3 sec to the "Range Care" section for cleaning. Press TEMP/TIME "+" or "-" keypads to the cooktop, do not allow objects that the oven is still warm. ...each use to remove, clean the cooktop after 60 minutes. NOTE: The oven will glow red when an element is on the cooktop. REMEMBER: When range is used for 3 seconds. 3. Ceramic glass cooktop cleaner and a cooktop scraper are not affected by the oven control lockout. This is removed. &#...


