
Installation Guide
Page 1
U.S.A. Only 5 INSTALLATION INSTRUCTIONS 6 Unpack Range 6 Install Anti-Tip Bracket 6 Electrical Connection - W10403811B Only 8 Verify Anti-Tip Bracket Is Installed and Engaged 12 Level Range 13 Warming Drawer or Premium Storage Drawer 13 Storage Drawer 14 Oven Door 14 Complete Installation 15 Moving the Range 15 IMPORTANT: Save for local electrical inspector's use. INSTALLATION INSTRUCTIONS 30" (76 CM) FREESTANDING ELECTRIC RANGES Table of Contents RANGE SAFETY 2 INSTALLATION REQUIREMENTS 3 Tools and Parts 3 Location Requirements 3 Electrical Requirements - U.S.A.
U.S.A. Only 5 INSTALLATION INSTRUCTIONS 6 Unpack Range 6 Install Anti-Tip Bracket 6 Electrical Connection - W10403811B Only 8 Verify Anti-Tip Bracket Is Installed and Engaged 12 Level Range 13 Warming Drawer or Premium Storage Drawer 13 Storage Drawer 14 Oven Door 14 Complete Installation 15 Moving the Range 15 IMPORTANT: Save for local electrical inspector's use. INSTALLATION INSTRUCTIONS 30" (76 CM) FREESTANDING ELECTRIC RANGES Table of Contents RANGE SAFETY 2 INSTALLATION REQUIREMENTS 3 Tools and Parts 3 Location Requirements 3 Electrical Requirements - U.S.A.

Installation Guide
Page 3
...■ Anti-tip bracket must conform to terminal block) ■ 3 - U.S.A. The cord should be securely mounted to floor. Only" section. 3 Parts needed ■ Tape measure ■ Masking tape ■ Flat-blade screwdriver ■ ¼" drive ratchet ■ Phillips screwdriver ■ Level &#...included. ■ 3 - 10-32 hex nuts (attached to the Manufactured Home Construction and Safety Standard, Title 24 CFR, Part 3280 (formerly the Federal Standard for use with nominal 1³⁄₈" (3.5 cm) diameter connection opening dimensions that all governing...
...■ Anti-tip bracket must conform to terminal block) ■ 3 - U.S.A. The cord should be securely mounted to floor. Only" section. 3 Parts needed ■ Tape measure ■ Masking tape ■ Flat-blade screwdriver ■ ¼" drive ratchet ■ Phillips screwdriver ■ Level &#...included. ■ 3 - 10-32 hex nuts (attached to the Manufactured Home Construction and Safety Standard, Title 24 CFR, Part 3280 (formerly the Federal Standard for use with nominal 1³⁄₈" (3.5 cm) diameter connection opening dimensions that all governing...

Installation Guide
Page 6
Use wrench or pliers to lower front leveling legs one -half turn. Remove oven racks and parts package from inside the storage drawer or warming drawer. 2. Front leveling leg A Install Anti-Tip Bracket A. Use a wrench or pliers to lower the front and ...
Use wrench or pliers to lower front leveling legs one -half turn. Remove oven racks and parts package from inside the storage drawer or warming drawer. 2. Front leveling leg A Install Anti-Tip Bracket A. Use a wrench or pliers to lower the front and ...
Installation Guide
Page 9
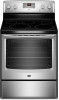
... from the back of range. Feed the power supply cord through the neutral 1. Ground-link screw C. UL listed strain relief D. Removable retaining nut B. A B C D A. Terminal block B. Part of the ground link under the screw. 3. Discard C. Save the ground-link screw and the end of metal ground strap must be Go to Section...
... from the back of range. Feed the power supply cord through the neutral 1. Ground-link screw C. UL listed strain relief D. Removable retaining nut B. A B C D A. Terminal block B. Part of the ground link under the screw. 3. Discard C. Save the ground-link screw and the end of metal ground strap must be Go to Section...
Installation Guide
Page 11
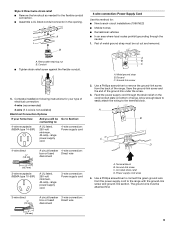
... C. Neutral (white) wire E. Bare (green) ground wire E. Ground-link screw E. Line 1 (black) G. Line 2 (red) wire D. Terminal block B. Line 2 (red) wire F. Neutral (white) wire G. Terminal lug 7. Part of metal ground strap must be attached first and must be cut out and removed. 4. Ground-link screw 2. Allow enough slack to easily attach wiring...
... C. Neutral (white) wire E. Bare (green) ground wire E. Ground-link screw E. Line 1 (black) G. Line 2 (red) wire D. Terminal block B. Line 2 (red) wire F. Neutral (white) wire G. Terminal lug 7. Part of metal ground strap must be attached first and must be cut out and removed. 4. Ground-link screw 2. Allow enough slack to easily attach wiring...

Installation Guide
Page 15
Complete Installation 1. Check that you have all parts are now installed. Read the "Range Use" section in death or electrical shock. 1. or circuit breaker has not tripped. ■ Range is plugged into appropriate ... cleaning or maintenance: For power supply cord-connected ranges: 1. Check that range is level. Dispose of/recycle all parts and panels before servicing. Re-engage anti-tip bracket if range is an extra part, go back through the steps to verify the electrical supply. ■ See the "Troubleshooting" section in power supply...
Complete Installation 1. Check that you have all parts are now installed. Read the "Range Use" section in death or electrical shock. 1. or circuit breaker has not tripped. ■ Range is plugged into appropriate ... cleaning or maintenance: For power supply cord-connected ranges: 1. Check that range is level. Dispose of/recycle all parts and panels before servicing. Re-engage anti-tip bracket if range is an extra part, go back through the steps to verify the electrical supply. ■ See the "Troubleshooting" section in power supply...

Use & Care Guide
Page 3
...essential for Warming or Heating the Room. ■ Do Not Leave Children Alone - Heating elements may become hot enough to sit or stand on any part of the range. ■ Wear Proper Apparel - Other surfaces of the appliance may be referred to line surface unit drip bowls or oven bottoms, ... risk of burns, ignition of flammable materials, and spillage due to avoid steam burn. If a wet sponge or cloth is used in or around any part of the range unless specifically recommended in a risk of electric shock, or fire. ■ Glazed Cooking Utensils - Care should never be taken not to ...
...essential for Warming or Heating the Room. ■ Do Not Leave Children Alone - Heating elements may become hot enough to sit or stand on any part of the range. ■ Wear Proper Apparel - Other surfaces of the appliance may be referred to line surface unit drip bowls or oven bottoms, ... risk of burns, ignition of flammable materials, and spillage due to avoid steam burn. If a wet sponge or cloth is used in or around any part of the range unless specifically recommended in a risk of electric shock, or fire. ■ Glazed Cooking Utensils - Care should never be taken not to ...
Use & Care Guide
Page 5
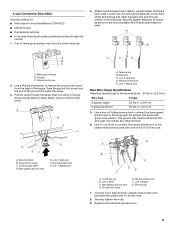
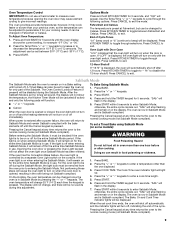
... not cook popcorn in use to help avoid scratches, pitting, abrasions and to maintain the selected heat level. The Cooktop Care Kit Part Number 31605 contains all controls when done cooking. As the cooktop cools, air can cause pitting and permanent marks. Ceramic Glass The surface... Clean cycle Oven control lockout INSTRUCTIONS 1. Then, while wearing oven mitts, remove the spills using a scraper while the surface is off automatically. Some parts of the entire cooktop. 5 It is set a Timed Cook or a Delayed Timed Cook, see "Timed Cooking" section. Temperature is normal for ...
... not cook popcorn in use to help avoid scratches, pitting, abrasions and to maintain the selected heat level. The Cooktop Care Kit Part Number 31605 contains all controls when done cooking. As the cooktop cools, air can cause pitting and permanent marks. Ceramic Glass The surface... Clean cycle Oven control lockout INSTRUCTIONS 1. Then, while wearing oven mitts, remove the spills using a scraper while the surface is off automatically. Some parts of the entire cooktop. 5 It is set a Timed Cook or a Delayed Timed Cook, see "Timed Cooking" section. Temperature is normal for ...

Use & Care Guide
Page 6
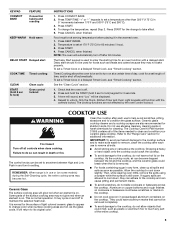
... located on the console panel. Dual B. Use cookware appropriate in the same way as the surface cooking area. Surface cooking area B. The Cooktop Care Kit Part Number 31605 contains all soils. The hot surface indicator light will glow. The Speed Heat™ option can be used to prepare sauces, to brown...
... located on the console panel. Dual B. Use cookware appropriate in the same way as the surface cooking area. Surface cooking area B. The Cooktop Care Kit Part Number 31605 contains all soils. The hot surface indicator light will glow. The Speed Heat™ option can be used to prepare sauces, to brown...
Use & Care Guide
Page 9
...) and only the following options. Press the "+" or "-" keypads to beep) will automatically shut off . Press START. 6. Press and hold the TIMER keypad for only part of Cycle Tones "b1" (beep once) or "b" (continue to enter a temperature other than your previous oven, so the temperature can result in 10°F (5°...
...) and only the following options. Press the "+" or "-" keypads to beep) will automatically shut off . Press START. 6. Press and hold the TIMER keypad for only part of Cycle Tones "b1" (beep once) or "b" (continue to enter a temperature other than your previous oven, so the temperature can result in 10°F (5°...

Use & Care Guide
Page 13
... baked-on through several cooking cycles will remain in the display, and the Clean cycle will sound when the Clean cycle is covered by ordering Part Number W10423113RP. Press CLEAN and then START on the oven bottom. ■ Before removing the residual water and loosened soils at any soils remain, remove...
... baked-on through several cooking cycles will remain in the display, and the Clean cycle will sound when the Clean cycle is covered by ordering Part Number W10423113RP. Press CLEAN and then START on the oven bottom. ■ Before removing the residual water and loosened soils at any soils remain, remove...
Use & Care Guide
Page 14
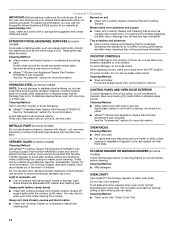
... Method: ■ Mild detergent OVEN CAVITY Use AquaLift™ Technology regularly to avoid damaging. ■ affresh™ Stainless Steel Cleaner Part Number W10355016: See the "Accessories" section for easier future cleaning. General Cleaning IMPORTANT: Before cleaning, make sure knobs are harder to ...cleaning the cooktop. Always follow label instructions on some models) Check that have discolored and are in direction of our website at www.maytag.com. Soap, water and a soft cloth or sponge are cool. STAINLESS STEEL (on cleaning products. Cleaning Method: ■ Glass...
... Method: ■ Mild detergent OVEN CAVITY Use AquaLift™ Technology regularly to avoid damaging. ■ affresh™ Stainless Steel Cleaner Part Number W10355016: See the "Accessories" section for easier future cleaning. General Cleaning IMPORTANT: Before cleaning, make sure knobs are harder to ...cleaning the cooktop. Always follow label instructions on some models) Check that have discolored and are in direction of our website at www.maytag.com. Soap, water and a soft cloth or sponge are cool. STAINLESS STEEL (on cleaning products. Cleaning Method: ■ Glass...

Use & Care Guide
Page 17
... Max Capacity Oven Rack Order Part Number W10289145 Porcelain Broiler Pan and Grid Order Part Number 4396923 affresh™ Stainless Steel Cleaner (stainless steel models) Order Part Number W10355016 Cooktop Protectant Applicator (ceramic glass models) Order Part Number 31610 Premium Broil Pan and Roasting Rack Order Part Number W10123240 www.maytag.com/broilerpan 17 ACCESSORIES For...
... Max Capacity Oven Rack Order Part Number W10289145 Porcelain Broiler Pan and Grid Order Part Number 4396923 affresh™ Stainless Steel Cleaner (stainless steel models) Order Part Number W10355016 Cooktop Protectant Applicator (ceramic glass models) Order Part Number 31610 Premium Broil Pan and Roasting Rack Order Part Number W10123240 www.maytag.com/broilerpan 17 ACCESSORIES For...
Use & Care Guide
Page 18
... appliance, to instruct you on how to use of consumables or cleaning products not approved by an authorized Maytag servicer is a limited 10-year warranty on the below named parts only and does not include labor. ■ Glass-ceramic cooktop, if due to the appliance. 9....installed, operated and maintained according to instructions attached to or furnished with the product, Maytag brand of Whirlpool Corporation or Whirlpool Canada, LP (hereafter "Maytag") will pay for factory specified replacement parts and repair labor to correct defects in materials or workmanship that existed when this ...
... appliance, to instruct you on how to use of consumables or cleaning products not approved by an authorized Maytag servicer is a limited 10-year warranty on the below named parts only and does not include labor. ■ Glass-ceramic cooktop, if due to the appliance. 9....installed, operated and maintained according to instructions attached to or furnished with the product, Maytag brand of Whirlpool Corporation or Whirlpool Canada, LP (hereafter "Maytag") will pay for factory specified replacement parts and repair labor to correct defects in materials or workmanship that existed when this ...

Warranty Information
Page 1
... or to correct house wiring or plumbing. 2. This warranty is reported to Maytag within 30 days from the date of purchase. 6. This limited warranty is not available. 10. Consumable parts are excluded from warranty coverage. 3. IMPLIED WARRANTIES, INCLUDING WARRANTIES OF MERCHANTABILITY OR... and maintained according to instructions attached to or furnished with the product, Maytag brand of Whirlpool Corporation or Whirlpool Canada, LP (hereafter "Maytag") will pay for factory specified replacement parts and repair labor to correct defects in materials or workmanship that existed when...
... or to correct house wiring or plumbing. 2. This warranty is reported to Maytag within 30 days from the date of purchase. 6. This limited warranty is not available. 10. Consumable parts are excluded from warranty coverage. 3. IMPLIED WARRANTIES, INCLUDING WARRANTIES OF MERCHANTABILITY OR... and maintained according to instructions attached to or furnished with the product, Maytag brand of Whirlpool Corporation or Whirlpool Canada, LP (hereafter "Maytag") will pay for factory specified replacement parts and repair labor to correct defects in materials or workmanship that existed when...


