Owners Manual
Page 1
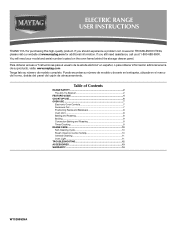
...www.maytag.com Tenga listo su número de modelo completo. Table of Contents RANGE SAFETY 2 The Anti-Tip Bracket 2 FEATURE GUIDE 4 COOKTOP USE 6 OVEN USE 7 Electronic Oven Controls 7 Aluminum Foil 7 Positioning Racks and Bakeware 8 Oven Vent 8 Baking and Roasting 8 Broiling 9 Convection Baking and Roasting 9 Timed Cooking 9 RANGE CARE 10 Self-Cleaning Cycle 10 Steam Clean (on the oven frame behind the storage drawer panel. ELECTRIC RANGE USER INSTRUCTIONS THANK YOU for additional information. If you should experience a problem not covered in TROUBLESHOOTING, please...
...www.maytag.com Tenga listo su número de modelo completo. Table of Contents RANGE SAFETY 2 The Anti-Tip Bracket 2 FEATURE GUIDE 4 COOKTOP USE 6 OVEN USE 7 Electronic Oven Controls 7 Aluminum Foil 7 Positioning Racks and Bakeware 8 Oven Vent 8 Baking and Roasting 8 Broiling 9 Convection Baking and Roasting 9 Timed Cooking 9 RANGE CARE 10 Self-Cleaning Cycle 10 Steam Clean (on the oven frame behind the storage drawer panel. ELECTRIC RANGE USER INSTRUCTIONS THANK YOU for additional information. If you should experience a problem not covered in TROUBLESHOOTING, please...
Owners Manual
Page 2
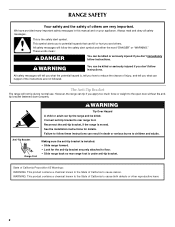
... safety messages in death or serious burns to rear range foot. All safety messages will not tip during normal use. WARNING You can result in this manual and on your appliance. Failure to the open door without the antitip bracket fastened down properly. This is under anti-tip bracket. The Anti-Tip Bracket The range will follow these instructions can be killed or seriously injured if...
... safety messages in death or serious burns to rear range foot. All safety messages will not tip during normal use. WARNING You can result in this manual and on your appliance. Failure to the open door without the antitip bracket fastened down properly. This is under anti-tip bracket. The Anti-Tip Bracket The range will follow these instructions can be killed or seriously injured if...
Owners Manual
Page 3
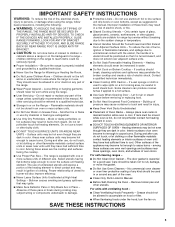
... service without breaking due to the sudden change in temperature. ■ Utensil Handles Should Be Turned Inward and Not Extend Over Adjacent Surface Units - Be sure the range is cool. Only certain types of fire, electrical shock, injury to a hot surface. ■ Use Care When Opening Door - SAVE THESE INSTRUCTIONS 3 TO CHECK IF THE DEVICES ARE INSTALLED PROPERLY, SLIDE RANGE FORWARD, LOOK FOR ANTI-TIP BRACKET SECURELY ATTACHED TO FLOOR, AND SLIDE RANGE...
... service without breaking due to the sudden change in temperature. ■ Utensil Handles Should Be Turned Inward and Not Extend Over Adjacent Surface Units - Be sure the range is cool. Only certain types of fire, electrical shock, injury to a hot surface. ■ Use Care When Opening Door - SAVE THESE INSTRUCTIONS 3 TO CHECK IF THE DEVICES ARE INSTALLED PROPERLY, SLIDE RANGE FORWARD, LOOK FOR ANTI-TIP BRACKET SECURELY ATTACHED TO FLOOR, AND SLIDE RANGE...
Owners Manual
Page 4
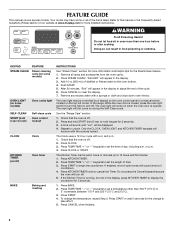
... some models) Oven cavity light SELF-CLEAN START (hold 3 sec to signal the end of the items listed. While the oven door is closed, press the oven light switch to this manual or the Frequently Asked Questions (FAQs) section of the range. Check that the oven is off ) Oven timer BAKE Baking and roasting INSTRUCTIONS See "Steam Clean" section for the SteamClean feature. 1. Only the CLOCK, OVEN LIGHT, and KITCHEN TIMER keypads will sound at www.maytag.com...
... some models) Oven cavity light SELF-CLEAN START (hold 3 sec to signal the end of the items listed. While the oven door is closed, press the oven light switch to this manual or the Frequently Asked Questions (FAQs) section of the range. Check that the oven is off ) Oven timer BAKE Baking and roasting INSTRUCTIONS See "Steam Clean" section for the SteamClean feature. 1. Only the CLOCK, OVEN LIGHT, and KITCHEN TIMER keypads will sound at www.maytag.com...
Owners Manual
Page 5
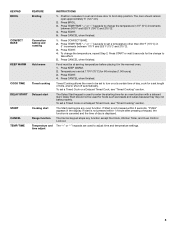
... Cook, see "Timed Cooking" section. To set a Timed Cook or a Delayed Timed Cook, see "Timed Cooking" section. KEYPAD BROIL CONVECT BAKE KEEP WARM COOK TIME DELAY START START CANCEL TEMP/TIME FEATURE Broiling Convection baking and roasting Hold warm Timed cooking Delayed start Cooking start is used to broil stop position. Press CONVECT BAKE. 2. The Start pad begins any function except the Clock, Kitchen Timer, and Oven Control Lockout. Delay Start should remain open approximately 5" (12.7 cm). 2. To change to enter the starting time for the change the temperature...
... Cook, see "Timed Cooking" section. To set a Timed Cook or a Delayed Timed Cook, see "Timed Cooking" section. KEYPAD BROIL CONVECT BAKE KEEP WARM COOK TIME DELAY START START CANCEL TEMP/TIME FEATURE Broiling Convection baking and roasting Hold warm Timed cooking Delayed start Cooking start is used to broil stop position. Press CONVECT BAKE. 2. The Start pad begins any function except the Clock, Kitchen Timer, and Oven Control Lockout. Delay Start should remain open approximately 5" (12.7 cm). 2. To change to enter the starting time for the change the temperature...
Owners Manual
Page 6
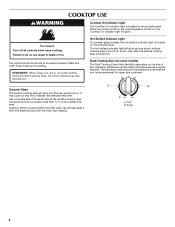
... most even heating. Use cookware about the same size as a regular element. COOKTOP USE WARNING Cooktop On Indicator Light The Cooktop On indicator light is located on the console panel. The control knobs can be set to maintain the selected heat level. The dual size combines both the single and outer element and is on. Ceramic Glass The surface cooking area will glow. Push in the same way as the surface cooking area. Cleaning off . Fire Hazard Turn off to...
... most even heating. Use cookware about the same size as a regular element. COOKTOP USE WARNING Cooktop On Indicator Light The Cooktop On indicator light is located on the console panel. The control knobs can be set to maintain the selected heat level. The dual size combines both the single and outer element and is on. Ceramic Glass The surface cooking area will glow. Push in the same way as the surface cooking area. Cleaning off . Fire Hazard Turn off to...
Owners Manual
Page 7
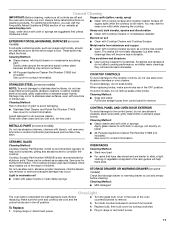
... the fumes may cook faster or slower than your previous oven, so the temperature calibration can be changed in use. Press KITCHEN TIMER to certain birds. Press CANCEL to cycle through selection. Indicator lights show functions that the oven light will turn on the display. A tone will sound, and "°C" or "°F" will appear. Options Mode Press and hold KITCHEN TIMER for 5 seconds. Use the TEMP/TIME keys to clear...
... the fumes may cook faster or slower than your previous oven, so the temperature calibration can be changed in use. Press KITCHEN TIMER to certain birds. Press CANCEL to cycle through selection. Indicator lights show functions that the oven light will turn on the display. A tone will sound, and "°C" or "°F" will appear. Options Mode Press and hold KITCHEN TIMER for 5 seconds. Use the TEMP/TIME keys to clear...
Owners Manual
Page 8
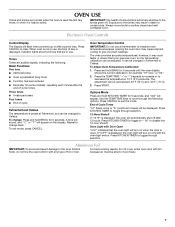
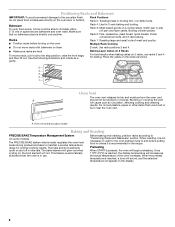
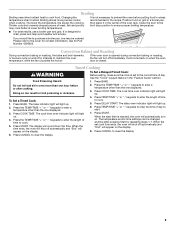
... cooking results. Bakeware To cook food evenly, hot air must be blocked or covered. Allow 2" (5 cm) of meat and poultry. Multiple Rack Cooking ■ Do not move a rack, pull it out to end before turning on some models) The PRECISE BAKE system electronically regulates the oven heat levels during preheat and bake to circulate. Use the following illustration and charts as the actual temperature of the oven increases. Oven vent (ceramic glass model) Baking and Roasting PRECISE BAKE Temperature...
... cooking results. Bakeware To cook food evenly, hot air must be blocked or covered. Allow 2" (5 cm) of meat and poultry. Multiple Rack Cooking ■ Do not move a rack, pull it out to end before turning on some models) The PRECISE BAKE system electronically regulates the oven heat levels during preheat and bake to circulate. Use the following illustration and charts as the actual temperature of the oven increases. Oven vent (ceramic glass model) Baking and Roasting PRECISE BAKE Temperature...
Owners Manual
Page 9
... poultry may be changed anytime after cooking. Press DELAY START. Changing the temperature when Custom Broiling allows more than one displayed. 3. Please refer to cook. 5. The display will come back on grid in a broiler pan, then place it in the recipe. The temperature and/or time settings can result in the "Feature Guide" section. It is set cook time ends, the oven will shut off in oven more precise control when cooking. Press START. Press TEMP/TIME "+" or "-" keypads to...
... poultry may be changed anytime after cooking. Press DELAY START. Changing the temperature when Custom Broiling allows more than one displayed. 3. Please refer to cook. 5. The display will come back on grid in a broiler pan, then place it in the recipe. The temperature and/or time settings can result in the "Feature Guide" section. It is set cook time ends, the oven will shut off in oven more precise control when cooking. Press START. Press TEMP/TIME "+" or "-" keypads to...
Owners Manual
Page 10
... oven bottom is hot, do not apply a cool damp cloth to move the oven door gasket. "End" will automatically lock. IMPORTANT: Since the water in the display and the Steam Clean feature will turn off during Self-Cleaning cycle. Press CANCEL at anytime, press the Cancel keypad. The Steam Clean cycle may require vigorous scrubbing to the time of some models, the temperature probe from the oven. ■ Use...
... oven bottom is hot, do not apply a cool damp cloth to move the oven door gasket. "End" will automatically lock. IMPORTANT: Since the water in the display and the Steam Clean feature will turn off during Self-Cleaning cycle. Press CANCEL at anytime, press the Cancel keypad. The Steam Clean cycle may require vigorous scrubbing to the time of some models, the temperature probe from the oven. ■ Use...
Owners Manual
Page 11
... clean around the model and serial number plate because scrubbing may affect the finish. Burned-on cleaning products. Metal marks from control panel to remove. STAINLESS STEEL (on some models) Check that have discolored and are harder to slide, a light coating of the oven counterclockwise to stainless steel surfaces, do not remove seals under knobs. STORAGE DRAWER OR WARMING DRAWER (on some models, do not use abrasive cleaners, cleaners with Cooktop...
... clean around the model and serial number plate because scrubbing may affect the finish. Burned-on cleaning products. Metal marks from control panel to remove. STAINLESS STEEL (on some models) Check that have discolored and are harder to slide, a light coating of the oven counterclockwise to stainless steel surfaces, do not remove seals under knobs. STORAGE DRAWER OR WARMING DRAWER (on some models, do not use abrasive cleaners, cleaners with Cooktop...
Owners Manual
Page 12
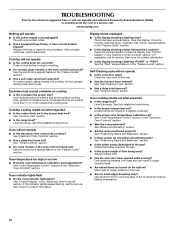
... adjustment? Display shows messages ■ Is the display showing a flashing time? See "Self-Cleaning Cycle" section. ■ Has a delay start been set ? Use aluminum foil to higher position in knob before turning to a setting. ■ On ceramic glass models, is the oven control lockout set ? Use cookware about the same size as the surface cooking area, element or surface burner. Oven indicator lights flash ■ Do the oven indicator lights flash? On some ceramic glass models, the cooktop will not operate ■ Is the electronic oven control set ? See cover for service...
... adjustment? Display shows messages ■ Is the display showing a flashing time? See "Self-Cleaning Cycle" section. ■ Has a delay start been set ? Use aluminum foil to higher position in knob before turning to a setting. ■ On ceramic glass models, is the oven control lockout set ? Use cookware about the same size as the surface cooking area, element or surface burner. Oven indicator lights flash ■ Do the oven indicator lights flash? On some ceramic glass models, the cooktop will not operate ■ Is the electronic oven control set ? See cover for service...

Owners Manual
Page 13
Canning Unit Kit (coil element models) Order Part Number 242905 Cooktop Care Kit (includes cleaner, protectant, and applicator pads) Order Part Number 31605 Cooktop Protectant Order Part Number 31463 ACCESSORIES Cooktop Cleaner (ceramic glass models) Order Part Number 31464 Cooktop Scraper (ceramic glass models) Order Part Number WA906B Stainless Steel Cleaner and Polish (stainless steel models) Order Part Number 31462 All-Purpose Appliance Cleaner Order Part Number 31682 Split-Rack with Removable Insert Order Part Number 4396927 Broiler Pan Order Part Number 4396923 13
Canning Unit Kit (coil element models) Order Part Number 242905 Cooktop Care Kit (includes cleaner, protectant, and applicator pads) Order Part Number 31605 Cooktop Protectant Order Part Number 31463 ACCESSORIES Cooktop Cleaner (ceramic glass models) Order Part Number 31464 Cooktop Scraper (ceramic glass models) Order Part Number WA906B Stainless Steel Cleaner and Polish (stainless steel models) Order Part Number 31462 All-Purpose Appliance Cleaner Order Part Number 31682 Split-Rack with Removable Insert Order Part Number 4396927 Broiler Pan Order Part Number 4396923 13
Owners Manual
Page 14
... and Canada, this warranty. 8. Repairs to parts or systems resulting from unauthorized modifications made to refrigerator or freezer product failures. 7. DISCLAIMER OF IMPLIED WARRANTIES; Service calls to correct the installation of your major appliance, to instruct you can find your model number and serial number on the label, located on how to use of consumables or cleaning products not approved by a Maytag designated service company. Cosmetic damage...
... and Canada, this warranty. 8. Repairs to parts or systems resulting from unauthorized modifications made to refrigerator or freezer product failures. 7. DISCLAIMER OF IMPLIED WARRANTIES; Service calls to correct the installation of your major appliance, to instruct you can find your model number and serial number on the label, located on how to use of consumables or cleaning products not approved by a Maytag designated service company. Cosmetic damage...

Owners Manual
Page 16
W10269526A SP PN W10269529A © 2009 All rights reserved. ®Registered Trademark/ ™ Trademark of Maytag Corporation or its related companies. 5/09 Printed in U.S.A.
W10269526A SP PN W10269529A © 2009 All rights reserved. ®Registered Trademark/ ™ Trademark of Maytag Corporation or its related companies. 5/09 Printed in U.S.A.


