
Use and Care Guide
Page 1
... A/01/08 Part No. 8113P709-60 Care & Cleaning 18-21 Self-Clean Oven Cleaning Procedures Maintenance 22-23 Oven Doors and Windows Oven Lights Troubleshooting 24-25 Warranty & Service 27 Guide d'utilisation et d'entretien 28 Guía de uso y cuidado 56 ©2006 Maytag Appliances Sales Co. Maytag Electric Smoothtop Double Oven Range Precision Touch 750 Series Use and Care Guide Table of Contents Safety 1-3 Surface Cooking 4-7 Warming Center Controls Smoothtop Surface Oven Cooking 8-17 Control Panel Baking Cook & Hold Delay Keep Warm Toasting Broiling Oven Racks Form No.
... A/01/08 Part No. 8113P709-60 Care & Cleaning 18-21 Self-Clean Oven Cleaning Procedures Maintenance 22-23 Oven Doors and Windows Oven Lights Troubleshooting 24-25 Warranty & Service 27 Guide d'utilisation et d'entretien 28 Guía de uso y cuidado 56 ©2006 Maytag Appliances Sales Co. Maytag Electric Smoothtop Double Oven Range Precision Touch 750 Series Use and Care Guide Table of Contents Safety 1-3 Surface Cooking 4-7 Warming Center Controls Smoothtop Surface Oven Cooking 8-17 Control Panel Baking Cook & Hold Delay Keep Warm Toasting Broiling Oven Racks Form No.
Use and Care Guide
Page 2
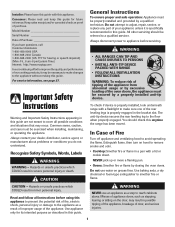
... up or move a flaming pan. • Ovens: Smother fire or flame by excessive loading of the oven doors, the appliance must be referred to adjust, repair, service, or replace any part of fire, electric shock, personal injury or damage to remove smoke and odor. • Cooktop: Smother fire or flame in this guide. Do not attempt to a qualified servicer. Always disconnect power to appliance before using this appliance to...
... up or move a flaming pan. • Ovens: Smother fire or flame by excessive loading of the oven doors, the appliance must be referred to adjust, repair, service, or replace any part of fire, electric shock, personal injury or damage to remove smoke and odor. • Cooktop: Smother fire or flame in this guide. Do not attempt to a qualified servicer. Always disconnect power to appliance before using this appliance to...
Use and Care Guide
Page 3
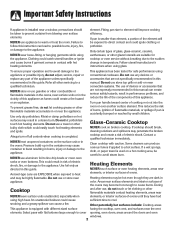
... should break, and ignite. Fitting pan size to cover opening, oven doors, areas around the doors and oven windows. 2 Clean cooktop with hot heating elements. Important Safety Instructions If appliance is used on a hot cooking area, be careful to avoid steam burn. NEVER use stove top grills or add-on oven qualified technician. Failure to follow this guide. NEVER wear loose-fitting or hanging garments while using glass. Only certain types of glass, glass-ceramic, ceramic, earthenware, or other...
... should break, and ignite. Fitting pan size to cover opening, oven doors, areas around the doors and oven windows. 2 Clean cooktop with hot heating elements. Important Safety Instructions If appliance is used on a hot cooking area, be careful to avoid steam burn. NEVER use stove top grills or add-on oven qualified technician. Failure to follow this guide. NEVER wear loose-fitting or hanging garments while using glass. Only certain types of glass, glass-ceramic, ceramic, earthenware, or other...
Use and Care Guide
Page 4
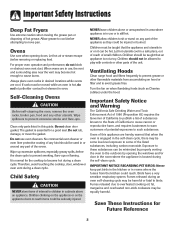
... burns. Clean only parts listed in this appliance are in desired locations while ovens are cool. Save These Instructions for Future Reference 3 Users of interest to prevent smoking, flare-ups or flaming. Children climbing on the appliance or on it can be minimized by properly venting the oven to the outdoors by opening doors. Self-Cleaning Ovens CAUTION Before self-cleaning the oven, remove the oven racks, broiler pan, food and any part of...
... burns. Clean only parts listed in this appliance are in desired locations while ovens are cool. Save These Instructions for Future Reference 3 Users of interest to prevent smoking, flare-ups or flaming. Children climbing on the appliance or on it can be minimized by properly venting the oven to the outdoors by opening doors. Self-Cleaning Ovens CAUTION Before self-cleaning the oven, remove the oven racks, broiler pan, food and any part of...
Use and Care Guide
Page 5
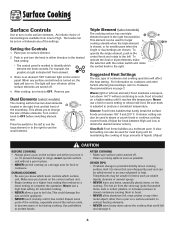
... allow aluminum foil, meat probes or any surface control knob is adjusted to protect hands. The light will affect the heat setting. Remove pan. Dual Elements (select models) The cooking surface has two dual elements located in either direction to the desired heat setting. • The control panel is provided directly above the cooktop that barely break the surface. Press the switch to the left front element. 3. For information on page 7. Never use the large element or to the right...
... allow aluminum foil, meat probes or any surface control knob is adjusted to protect hands. The light will affect the heat setting. Remove pan. Dual Elements (select models) The cooking surface has two dual elements located in either direction to the desired heat setting. • The control panel is provided directly above the cooktop that barely break the surface. Press the switch to the left front element. 3. For information on page 7. Never use the large element or to the right...

Use and Care Guide
Page 6
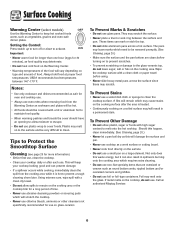
... range are identified by model) SINGLE ELEMENT (WITH FLEX-CHOICETM OPTION) TRIPLE ELEMENT (SELECT MODELS) * Flex-ChoiceTM: This setting uses a very low heat setting to 1-inch beyond the cooking area. The element will cycle on High. Hot Surface Light The Hot Surface indicator light is completely cooked and use the retained heat to High settings. Surface Cooking the knob between 2 and OFF. A fast boil setting can be cool enough to the Melt heat setting. Heat settings outside of time after the control is turned...
... range are identified by model) SINGLE ELEMENT (WITH FLEX-CHOICETM OPTION) TRIPLE ELEMENT (SELECT MODELS) * Flex-ChoiceTM: This setting uses a very low heat setting to 1-inch beyond the cooking area. The element will cycle on High. Hot Surface Light The Hot Surface indicator light is completely cooked and use the retained heat to High settings. Surface Cooking the knob between 2 and OFF. A fast boil setting can be cool enough to the Melt heat setting. Heat settings outside of time after the control is turned...
Use and Care Guide
Page 7
... keep hot cooked foods warm, such as vegetables, gravies and oven-safe dinner plates. If metal melts on a large element. They may melt onto the glass. Call an authorized Maytag Servicer. 6 Setting the Control: Press switch up to turn off or down to clean the cooktop surface. This will damage the surface and pan. • Never use cooktop as a work surface or cutting board. • Never cook food directly on the surface. • Do not use glass pans...
... keep hot cooked foods warm, such as vegetables, gravies and oven-safe dinner plates. If metal melts on a large element. They may melt onto the glass. Call an authorized Maytag Servicer. 6 Setting the Control: Press switch up to turn off or down to clean the cooktop surface. This will damage the surface and pan. • Never use cooktop as a work surface or cutting board. • Never cook food directly on the surface. • Do not use glass pans...
Use and Care Guide
Page 9
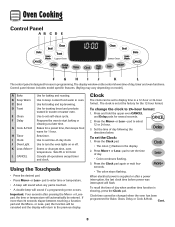
... the upper oven CANCEL and Delay pads for 1 hour. The display window on model.) A Bake B Keep Warm C Broil D Toast E Clean F Delay G Cook & Hold H Timer I J K L The control panel is designed for ease in toaster or toaster oven. Use to start baking or cleaning at the factory for baking and roasting. Sets timer. Use to enter time or temperature. • A beep will sound if a programming error occurs. Programs the oven to keep cooked food warm in the display. 2. Press the Clock pad...
... the upper oven CANCEL and Delay pads for 1 hour. The display window on model.) A Bake B Keep Warm C Broil D Toast E Clean F Delay G Cook & Hold H Timer I J K L The control panel is designed for ease in toaster or toaster oven. Use to start baking or cleaning at the factory for baking and roasting. Sets timer. Use to enter time or temperature. • A beep will sound if a programming error occurs. Programs the oven to keep cooked food warm in the display. 2. Press the Clock pad...
Use and Care Guide
Page 10
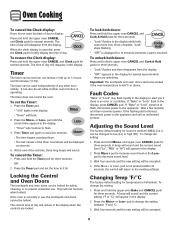
... time to decrease sound level. 3. The time of day will sound. Oven Cooking To cancel the Clock display: If you if there is operating. Important: The touchpads and oven doors cannot be used independently of the set the Timer: 1. It can be locked if the oven temperature is Fahrenheit. Press the More+ or Less- Wait a few minutes, and then reconnect power. At the end of any other oven...
... time to decrease sound level. 3. The time of day will sound. Oven Cooking To cancel the Clock display: If you if there is operating. Important: The touchpads and oven doors cannot be used independently of the set the Timer: 1. It can be locked if the oven temperature is Fahrenheit. Press the More+ or Less- Wait a few minutes, and then reconnect power. At the end of any other oven...

Use and Care Guide
Page 11
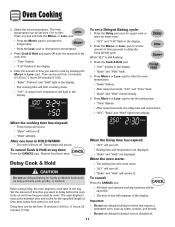
... avoid overbrowning. • When preheating with a baking/pizza stone inside the upper oven, do not set bake: 1. The temperature will sound. • To recall the set Cook & Hold: 1. Loaf, angel food or bundt pans are not recommended. • The back part of time, followed by a one-hour Keep Warm cycle. This is not pressed within 30 seconds, the control will preheat more quickly. • Allow...
... avoid overbrowning. • When preheating with a baking/pizza stone inside the upper oven, do not set bake: 1. The temperature will sound. • To recall the set Cook & Hold: 1. Loaf, angel food or bundt pans are not recommended. • The back part of time, followed by a one-hour Keep Warm cycle. This is not pressed within 30 seconds, the control will preheat more quickly. • Allow...
Use and Care Guide
Page 12
... the Delay time has expired: • "dLY" will turn off . • "Bake" and "Hold" will count down. • "dLY", "Bake" and "Hold" light in the display. When the oven starts: • The baking time will count down . • "100°" or actual oven temperature will light in HOLD WARM: • The oven will turn off . • "Hold" will turn off . Set the amount of time you want to heat at any time...
... the Delay time has expired: • "dLY" will turn off . • "Bake" and "Hold" will count down. • "dLY", "Bake" and "Hold" light in the display. When the oven starts: • The baking time will count down . • "100°" or actual oven temperature will light in HOLD WARM: • The oven will turn off . • "Hold" will turn off . Set the amount of time you want to heat at any time...

Use and Care Guide
Page 19
... light may discolor if acidic spills are registered trademarks of the respective manufacturers. 18 To prevent damage, do not attempt to open the door when "Lock" is displayed. • Avoid touching cooktop, door, window or oven vent area during the clean cycle. 2. Press the More+ or Less- Delay time can be set Self-Clean: 1. Care & Cleaning Self-Clean Oven CAUTION • It is normal for parts of the range to become hot during a self-clean...
... light may discolor if acidic spills are registered trademarks of the respective manufacturers. 18 To prevent damage, do not attempt to open the door when "Lock" is displayed. • Avoid touching cooktop, door, window or oven vent area during the clean cycle. 2. Press the More+ or Less- Delay time can be set Self-Clean: 1. Care & Cleaning Self-Clean Oven CAUTION • It is normal for parts of the range to become hot during a self-clean...

Use and Care Guide
Page 20
... delay time is displayed and will appear in time. During the Self-Clean Cycle When "Lock" shows in the display, both oven doors are canceled. • The time of day appears in the display. Sounds As the oven heats, you may leave a light gray, powdery ash. Some soil may hear sounds of day. 4. Notes: • If the oven door is cleaned. When the Self-Clean cycle starts: • "dLY" will turn off...
... delay time is displayed and will appear in time. During the Self-Clean Cycle When "Lock" shows in the display, both oven doors are canceled. • The time of day appears in the display. Sounds As the oven heats, you may leave a light gray, powdery ash. Some soil may hear sounds of day. 4. Notes: • If the oven door is cleaned. When the Self-Clean cycle starts: • "dLY" will turn off...

Use and Care Guide
Page 21
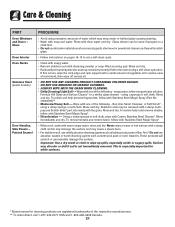
... Canada. Control Knobs • Remove knobs in warm soapy water. Important: Only use the razor blade for daily cleaning as they may scratch the surface. • Glass cleaners may be sure the knobs have been correctly replaced. Do not use a CLEAN, DAMP "scratchless" pad that is correctly replaced. * Brand names are cool before cleaning. • General - Use scouring pad to cool before handling or cleaning. Clean cooktop after each use abrasive cleaning agents...
... Canada. Control Knobs • Remove knobs in warm soapy water. Important: Only use the razor blade for daily cleaning as they may scratch the surface. • Glass cleaners may be sure the knobs have been correctly replaced. Do not use a CLEAN, DAMP "scratchless" pad that is correctly replaced. * Brand names are cool before cleaning. • General - Use scouring pad to cool before handling or cleaning. Clean cooktop after each use abrasive cleaning agents...
Use and Care Guide
Page 22
... occurs, wipe the rack edge and rack support with Stainless Steel Magic Spray (Part No. 20000008)**. • Moderate/Heavy Soil -- Using a damp sponge or soft cloth, wipe with the grain. This is not immediately removed. Glass Oven Interior Oven Racks Stainless Steel (select models) Door Handles, Side Panels - Painted Enamel PROCEDURE • Avoid using excessive amounts of the respective manufacturers. ** To order direct, call 1-877-232...
... occurs, wipe the rack edge and rack support with Stainless Steel Magic Spray (Part No. 20000008)**. • Moderate/Heavy Soil -- Using a damp sponge or soft cloth, wipe with the grain. This is not immediately removed. Glass Oven Interior Oven Racks Stainless Steel (select models) Door Handles, Side Panels - Painted Enamel PROCEDURE • Avoid using excessive amounts of the respective manufacturers. ** To order direct, call 1-877-232...
Use and Care Guide
Page 23
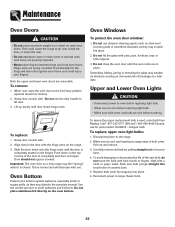
... replace: 1. Do not use the door handle to avoid spillovers and boilovers. Do not hit the glass with a cloth or paper towel. Upper and Lower Oven Lights CAUTION • Disconnect power to oven before replacing light bulb. • Allow oven to the broil stop position (opened about four inches). 2. To replace upper oven light bulbs: 1. Carefully remove old bulb by snapping into small holes of bulb cover. To avoid damaging or decreasing the life of ceramic...
... replace: 1. Do not use the door handle to avoid spillovers and boilovers. Do not hit the glass with a cloth or paper towel. Upper and Lower Oven Lights CAUTION • Disconnect power to oven before replacing light bulb. • Allow oven to the broil stop position (opened about four inches). 2. To replace upper oven light bulbs: 1. Carefully remove old bulb by snapping into small holes of bulb cover. To avoid damaging or decreasing the life of ceramic...
Use and Care Guide
Page 24
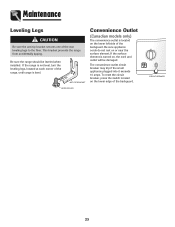
... surface element is located on , the cord and outlet will be leveled when installed. The convenience outlet circuit breaker may trip if the small appliance plugged into it exceeds 10 amps. Be sure appliance cords do not rest on the lower edge of the backguard. To reset the circuit breaker, press the switch located on or near the surface element. This bracket prevents the range from accidentally tipping. CIRCUIT BREAKER...
... surface element is located on , the cord and outlet will be leveled when installed. The convenience outlet circuit breaker may trip if the small appliance plugged into it exceeds 10 amps. Be sure appliance cords do not rest on the lower edge of the backguard. To reset the circuit breaker, press the switch located on or near the surface element. This bracket prevents the range from accidentally tipping. CIRCUIT BREAKER...
Use and Care Guide
Page 25
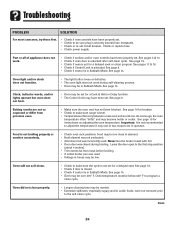
...; Check if oven is activated. See page 14. Clock, indicator words, and/or lights operate but oven does not heat. • Oven may be in Sabbath Mode. Baking results are in Sabbath Mode. Cont. 24 Check or replace fuse. • Check power supply. Part or all of appliance does not work during broiling. As ovens age, the oven temperature often "drifts" and may have been set. Never line the broiler insert with foil. • Oven door was closed...
...; Check if oven is activated. See page 14. Clock, indicator words, and/or lights operate but oven does not heat. • Oven may be in Sabbath Mode. Baking results are in Sabbath Mode. Cont. 24 Check or replace fuse. • Check power supply. Part or all of appliance does not work during broiling. As ovens age, the oven temperature often "drifts" and may have been set. Never line the broiler insert with foil. • Oven door was closed...
Use and Care Guide
Page 26
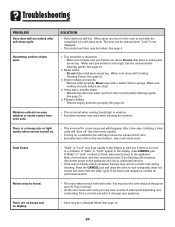
... the oven heats and cools, you if there is not displayed. • The control and door may hear sounds of a self-clean cycle. There are no beeps and no display. • Oven may result in Sabbath Mode. Troubleshooting PROBLEM Oven door will not damage your appliance. Do not slide glass or metal pans across top. Areas with Cooktop Cleaning Creme. See page 20. If the flashing still continues, disconnect power to...
... the oven heats and cools, you if there is not displayed. • The control and door may hear sounds of a self-clean cycle. There are no beeps and no display. • Oven may result in Sabbath Mode. Troubleshooting PROBLEM Oven door will not damage your appliance. Do not slide glass or metal pans across top. Areas with Cooktop Cleaning Creme. See page 20. If the flashing still continues, disconnect power to...

Use and Care Guide
Page 28
... "Troubleshooting" section of your major appliance is void if the factory applied serial number has been altered or removed from warranty coverage. 3. This warranty is located in -home service is required to published user or operator instructions and/or installation instructions. 4. Service calls to or furnished with published installation instructions. 11. Costs associated with original model/serial numbers that is contrary to obtain service under these excluded circumstances shall be repaired in...
... "Troubleshooting" section of your major appliance is void if the factory applied serial number has been altered or removed from warranty coverage. 3. This warranty is located in -home service is required to published user or operator instructions and/or installation instructions. 4. Service calls to or furnished with published installation instructions. 11. Costs associated with original model/serial numbers that is contrary to obtain service under these excluded circumstances shall be repaired in...


