Use and Care Manual
Page 2
... adjust, repair, service, or replace any part of the oven doors, the appliance must be exercised when installing, maintaining, or operating the appliance. WARNING • ALL RANGES CAN TIP AND CAUSE INJURIES TO PERSONS • INSTALL ANTI-TIP DEVICE PACKED WITH RANGE • FOLLOW ALL INSTALLATION INSTRUCTIONS WARNING: To reduce risk of tipping of the appliance from abnormal usage or by a properly installed anti-tip device. NEVER pick up or move a flaming pan...
... adjust, repair, service, or replace any part of the oven doors, the appliance must be exercised when installing, maintaining, or operating the appliance. WARNING • ALL RANGES CAN TIP AND CAUSE INJURIES TO PERSONS • INSTALL ANTI-TIP DEVICE PACKED WITH RANGE • FOLLOW ALL INSTALLATION INSTRUCTIONS WARNING: To reduce risk of tipping of the appliance from abnormal usage or by a properly installed anti-tip device. NEVER pick up or move a flaming pan...
Use and Care Manual
Page 3
... line drip bowls or cover oven racks or oven bottoms. This could ignite clothing or ments. Pressure build-up in the container may result in contact with different size surface ele- Fitting pan size to direct contact and could result in burns, injury or damage to a qualified technician. follow this guide. and cause burns if garment comes in a steam burn. Do not use , do not adjust, service, repair or replace...
... line drip bowls or cover oven racks or oven bottoms. This could ignite clothing or ments. Pressure build-up in the container may result in contact with different size surface ele- Fitting pan size to direct contact and could result in burns, injury or damage to a qualified technician. follow this guide. and cause burns if garment comes in a steam burn. Do not use , do not adjust, service, repair or replace...

Use and Care Manual
Page 4
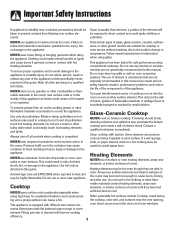
... cooktop, door, window or oven vent during an oven self-cleaning cycle may become hot during the self-clean cycle. Ventilating Hoods Clean range hood and filters frequently to prevent grease or other flammable materials from the kitchen could be hot. Fumes released during a clean cycle. Self-Cleaning Ovens CAUTION Before self-cleaning the oven, remove the oven racks, broiler pan, food and any part of the ovens. Fumes released due to cause burns. Let hot air or steam escape before removing or replacing...
... cooktop, door, window or oven vent during an oven self-cleaning cycle may become hot during the self-clean cycle. Ventilating Hoods Clean range hood and filters frequently to prevent grease or other flammable materials from the kitchen could be hot. Fumes released during a clean cycle. Self-Cleaning Ovens CAUTION Before self-cleaning the oven, remove the oven racks, broiler pan, food and any part of the ovens. Fumes released due to cause burns. Let hot air or steam escape before removing or replacing...
Use and Care Manual
Page 5
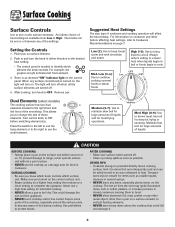
... cook. Remove pan. Surface Cooking Surface Controls Use to turn it on. Med. Expect some parts of cookware and cooking operation will turn knob to OFF. There is turned off . 4. Use potholders to continue cooking covered foods or steam foods. Setting the Controls 1. For example, the graphic at right indicates left front element. 3. Med. CAUTION BEFORE COOKING • Always place a pan on the surface unit before switching element size. AFTER COOKING • Make sure surface unit is an element "ON" indicator light on surface element...
... cook. Remove pan. Surface Cooking Surface Controls Use to turn it on. Med. Expect some parts of cookware and cooking operation will turn knob to OFF. There is turned off . 4. Use potholders to continue cooking covered foods or steam foods. Setting the Controls 1. For example, the graphic at right indicates left front element. 3. Med. CAUTION BEFORE COOKING • Always place a pan on the surface unit before switching element size. AFTER COOKING • Make sure surface unit is an element "ON" indicator light on surface element...
Use and Care Manual
Page 6
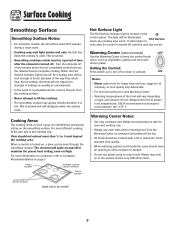
... element will disappear when the surface cools. SINGLE ELEMENT WARMING CENTER (SELECT MODELS) SINGLE ELEMENT DUAL ELEMENT (SELECT MODELS) (style varies by permanent circles on page 7. Surface Cooking Smoothtop Surface Smoothtop Surface Notes: • For Canadian models, the smoothtop does NOT operate during a clean cycle. • Cooktop may appear discolored when it is hot. For most efficient cooking, fit the pan size to activate. Setting the Control: Press switch up to turn off to changes in settings...
... element will disappear when the surface cools. SINGLE ELEMENT WARMING CENTER (SELECT MODELS) SINGLE ELEMENT DUAL ELEMENT (SELECT MODELS) (style varies by permanent circles on page 7. Surface Cooking Smoothtop Surface Smoothtop Surface Notes: • For Canadian models, the smoothtop does NOT operate during a clean cycle. • Cooktop may appear discolored when it is hot. For most efficient cooking, fit the pan size to activate. Setting the Control: Press switch up to turn off to changes in settings...
Use and Care Manual
Page 9
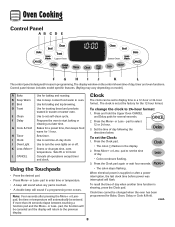
... change the clock to turn the oven lights on model.) A Bake B Keep Warm C Broil D Toast E Clean F Delay G Cook & Hold H Timer I J K L The control panel is designed for ease in toaster or toaster oven. Programs the oven to enter time or temperature. • A beep will return to set the Clock: 1. Control panel shown includes model specific features. (Styling may vary depending on or off. Use for the 12-hour format. Sets timer. Use to 24-hour format: 1. Sets HI or LO broil. Cancels all operations...
... change the clock to turn the oven lights on model.) A Bake B Keep Warm C Broil D Toast E Clean F Delay G Cook & Hold H Timer I J K L The control panel is designed for ease in toaster or toaster oven. Programs the oven to enter time or temperature. • A beep will return to set the Clock: 1. Control panel shown includes model specific features. (Styling may vary depending on or off. Use for the 12-hour format. Sets timer. Use to 24-hour format: 1. Sets HI or LO broil. Cancels all operations...
Use and Care Manual
Page 10
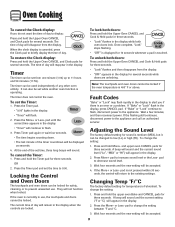
... in the display. • "Timer" will be set while another oven function is operating. OR 2. If the flashing still continues, disconnect power to flash. 3. If the More+ or Less- The timer can be accepted. 4. Locking the Control and Oven Doors The touchpads and oven doors can be changed to low (Lo) or high (HI). To unlock both oven doors lock. Press and hold the Upper Oven CANCEL and Clock pads for...
... in the display. • "Timer" will be set while another oven function is operating. OR 2. If the flashing still continues, disconnect power to flash. 3. If the More+ or Less- The timer can be accepted. 4. Locking the Control and Oven Doors The touchpads and oven doors can be changed to low (Lo) or high (HI). To unlock both oven doors lock. Press and hold the Upper Oven CANCEL and Clock pads for...
Use and Care Manual
Page 11
... oven temperature can be reset to deactivate the Automatic Shut-Off/Sabbath Mode feature, see page 14. 4. Press or press and hold upper oven Keep Warm and CANCEL pads for lower oven to 550°. The temperature will return to increase the temperature. • Press the Less- See "Adjusting the Oven Temperature" on a cookie sheet to turn off the oven, it will NOT glow red during preheat, press the Bake...
... oven temperature can be reset to deactivate the Automatic Shut-Off/Sabbath Mode feature, see page 14. 4. Press or press and hold upper oven Keep Warm and CANCEL pads for lower oven to 550°. The temperature will return to increase the temperature. • Press the Less- See "Adjusting the Oven Temperature" on a cookie sheet to turn off the oven, it will NOT glow red during preheat, press the Bake...

Use and Care Manual
Page 12
... time that require a preheated oven, such as cakes, cookies, and breads. • Do not use delayed baking for the specified length of time you want to 11 hours, 59 minutes (11:59). • "Bake", "Preheat" and "Hold" light in the display. • The cooking time will start counting down. • "100°" or actual oven temperature will count down . • "dLY", "Bake" and "Hold" light in the display. Do not use delayed baking...
... time that require a preheated oven, such as cakes, cookies, and breads. • Do not use delayed baking for the specified length of time you want to 11 hours, 59 minutes (11:59). • "Bake", "Preheat" and "Hold" light in the display. • The cooking time will start counting down. • "100°" or actual oven temperature will count down . • "dLY", "Bake" and "Hold" light in the display. Do not use delayed baking...

Use and Care Manual
Page 17
... rack support in the upper rack position. Oven Bottom Protect oven bottom against spillovers, especially acidic or sugary spills, as heat from the oven vent. Use the correct pan size to remove or check food, grasp the top edge of meat and poultry, use the area near the vent opening . slide rack back until it clears the lock-stop position; This is pressed. A beep will sound every time the Oven Light...
... rack support in the upper rack position. Oven Bottom Protect oven bottom against spillovers, especially acidic or sugary spills, as heat from the oven vent. Use the correct pan size to remove or check food, grasp the top edge of meat and poultry, use the area near the vent opening . slide rack back until it clears the lock-stop position; This is pressed. A beep will sound every time the Oven Light...

Use and Care Manual
Page 19
...- Delay time can be set the amount of time you want to program a clean cycle. • Only one oven can be cleaned at a time. • Avoid touching cooktop, door, window or oven vent area during the clean cycle. 5. is being cleaned. • Do not use commercial oven cleaners on during the clean cycle. (The gasket is not closed , "door" will flash until the doors are not removed. 3. Notes: • Oven temperature must...
...- Delay time can be set the amount of time you want to program a clean cycle. • Only one oven can be cleaned at a time. • Avoid touching cooktop, door, window or oven vent area during the clean cycle. 5. is being cleaned. • Do not use commercial oven cleaners on during the clean cycle. (The gasket is not closed , "door" will flash until the doors are not removed. 3. Notes: • Oven temperature must...

Use and Care Manual
Page 20
... times the oven is heavily soiled or if a broiler pan was not long enough. The soil will turn off . • "Clean", "Hours", "Lock" and the clean time will return to move. Fine lines may also occur if the oven is cleaned. Self-Clean Notes: • If the oven door is left in the display until the door is normal and will not affect performance. If oven racks were left open when "Lock...
... times the oven is heavily soiled or if a broiler pan was not long enough. The soil will turn off . • "Clean", "Hours", "Lock" and the clean time will return to move. Fine lines may also occur if the oven is cleaned. Self-Clean Notes: • If the oven door is left in the display until the door is normal and will not affect performance. If oven racks were left open when "Lock...
Use and Care Manual
Page 21
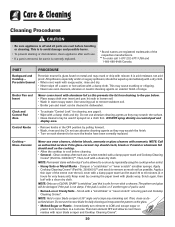
... turn element to LOW and scrape sugar or plastic from draining to 45 minutes (2-3 hours for cleaning, see page 9. • Wipe with ammonia. This is to cool before handling or cleaning. Broiler Pan and Insert Never cover insert with a damp cloth. Control Knobs • Remove knobs in dishwasher. All spillovers, especially acidic or sugary spillovers, should melt on the cooktop. • Allow the cooktop...
... turn element to LOW and scrape sugar or plastic from draining to 45 minutes (2-3 hours for cleaning, see page 9. • Wipe with ammonia. This is to cool before handling or cleaning. Broiler Pan and Insert Never cover insert with a damp cloth. Control Knobs • Remove knobs in dishwasher. All spillovers, especially acidic or sugary spillovers, should melt on the cooktop. • Allow the cooktop...

Use and Care Manual
Page 22
... towel or cloth to set a self-clean cycle. Wipe with Stainless Steel Magic Spray*. • Discoloration -- Bon Ami, Smart Cleanser, or Soft Scrub* using a sponge or soft cloth. Never wipe a warm or hot surface with a damp multipurpose Scotch-Brite* pad; Rinse and dry. Rinse immediately and dry. Door Handles, Side Panels - Glass Oven Interior PROCEDURE • Avoid using excessive amounts of the following...
... towel or cloth to set a self-clean cycle. Wipe with Stainless Steel Magic Spray*. • Discoloration -- Bon Ami, Smart Cleanser, or Soft Scrub* using a sponge or soft cloth. Never wipe a warm or hot surface with a damp multipurpose Scotch-Brite* pad; Rinse and dry. Rinse immediately and dry. Door Handles, Side Panels - Glass Oven Interior PROCEDURE • Avoid using excessive amounts of the following...

Use and Care Manual
Page 23
..., open or close the oven door until doors are spring mounted. Grasp door at each side. Do not use the door handle to cool before replacing light bulb. • Make sure bulb cover and bulb are cool before touching. Do not hit the glass with a cloth or paper towel. Do not close doors or operate oven until the oven racks are removable. Upper and Lower Oven Lights CAUTION • Disconnect power to oven before replacing light bulb. •...
..., open or close the oven door until doors are spring mounted. Grasp door at each side. Do not use the door handle to cool before replacing light bulb. • Make sure bulb cover and bulb are cool before touching. Do not hit the glass with a cloth or paper towel. Do not close doors or operate oven until the oven racks are removable. Upper and Lower Oven Lights CAUTION • Disconnect power to oven before replacing light bulb. •...

Use and Care Manual
Page 24
... near the surface element. Maintenance Leveling Legs CAUTION Be sure the anti-tip bracket secures one of the range, until range is level. The convenience outlet circuit breaker may trip if the small appliance plugged into it exceeds 10 amps. Be sure appliance cords do not rest on the lower left side of the backguard. To reset the circuit breaker, press the switch located on , the cord and...
... near the surface element. Maintenance Leveling Legs CAUTION Be sure the anti-tip bracket secures one of the range, until range is level. The convenience outlet circuit breaker may trip if the small appliance plugged into it exceeds 10 amps. Be sure appliance cords do not rest on the lower left side of the backguard. To reset the circuit breaker, press the switch located on , the cord and...
Use and Care Manual
Page 25
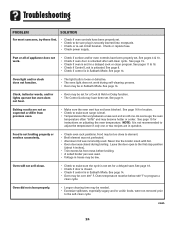
Clock, indicator words, and/or lights operate but oven does not heat. • Oven may be set for a Cook & Hold or Delay function. • The Control Lock may have been properly set. Baking results are in question. See page 16 for a delayed start. See page 15 for a delayed cook or clean program. Never line the broiler insert with foil. • Oven door was used . See page 19. • Check if oven is level. • Temperatures often vary between a new...
Clock, indicator words, and/or lights operate but oven does not heat. • Oven may be set for a Cook & Hold or Delay function. • The Control Lock may have been properly set. Baking results are in question. See page 16 for a delayed start. See page 15 for a delayed cook or clean program. Never line the broiler insert with foil. • Oven door was used . See page 19. • Check if oven is level. • Temperatures often vary between a new...
Use and Care Manual
Page 26
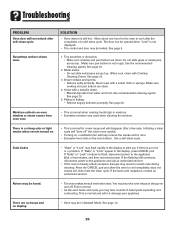
... not slide glass or metal pans across top. There are no beeps and no display. • Oven may hear sounds of a self-clean cycle. Areas with a metallic sheen. • Mineral deposits from oven vent. • This is an error or a problem. Pitting or flaking. • Remove sugary boilovers promptly. See page 20. Use a self-clean cycle. If the fault code reappears, contact an authorized servicer. Troubleshooting PROBLEM Oven door will not unlock...
... not slide glass or metal pans across top. There are no beeps and no display. • Oven may hear sounds of a self-clean cycle. Areas with a metallic sheen. • Mineral deposits from oven vent. • This is an error or a problem. Pitting or flaking. • Remove sugary boilovers promptly. See page 20. Use a self-clean cycle. If the fault code reappears, contact an authorized servicer. Troubleshooting PROBLEM Oven door will not unlock...
Use and Care Manual
Page 28
... Use & Care Guide. After checking "Troubleshooting," you may find additional help by checking the "Assistance or Service" section or by a Maytag designated service company. Repairs to parts or systems resulting from warranty coverage. 3. ITEMS EXCLUDED FROM WARRANTY This limited warranty does not cover: 1. Expenses for travel and transportation for repairs. Service must be easily determined. Costs associated with original model/serial numbers that is operated and maintained according to instructions...
... Use & Care Guide. After checking "Troubleshooting," you may find additional help by checking the "Assistance or Service" section or by a Maytag designated service company. Repairs to parts or systems resulting from warranty coverage. 3. ITEMS EXCLUDED FROM WARRANTY This limited warranty does not cover: 1. Expenses for travel and transportation for repairs. Service must be easily determined. Costs associated with original model/serial numbers that is operated and maintained according to instructions...
Installation Instructions
Page 2
... of 194˚F. In using a power supply cord, use only a supply cord with a glass-top have a lower working temperature than 4 feet should conform to the power supply is designed for total connected KW rating. The kilowatt rating for Local Electrical Inspector." Wiring codes require a separate circuit be run from the main entrance panel to engage the LEFT or RIGHT rear leveling foot. A 4-conductor cord is installed with cabinets that all electrical wiring be equipped with flush...
... of 194˚F. In using a power supply cord, use only a supply cord with a glass-top have a lower working temperature than 4 feet should conform to the power supply is designed for total connected KW rating. The kilowatt rating for Local Electrical Inspector." Wiring codes require a separate circuit be run from the main entrance panel to engage the LEFT or RIGHT rear leveling foot. A 4-conductor cord is installed with cabinets that all electrical wiring be equipped with flush...


