Use and Care Guide
Page 2
... engaged. The anti-tip device secures the rear leveling leg to adjust, repair, service, or replace any part of fire, electric shock, personal injury or damage to a qualified servicer. Many plastics are removed from parts of Fire Use dry chemical or foam-type extinguisher or baking soda to heat. In Case of the appliance that may become warm or hot. Turn off appliance to make changes to remove smoke and odor...
... engaged. The anti-tip device secures the rear leveling leg to adjust, repair, service, or replace any part of fire, electric shock, personal injury or damage to a qualified servicer. Many plastics are removed from parts of Fire Use dry chemical or foam-type extinguisher or baking soda to heat. In Case of the appliance that may become warm or hot. Turn off appliance to make changes to remove smoke and odor...
Use and Care Guide
Page 3
... the bulb break, disconnect power to the appliance before removing or replacing food. Let hot air or steam escape before removing bulb to add or remove food. Do not use add-on oven convection systems. The use an app!!ance as a step to sit or stand on appliance parts. Heating elements may resu!t in this guide. Use dry, sturdy potholders. Clothing may cause burns from steam. If a rack must...
... the bulb break, disconnect power to the appliance before removing or replacing food. Let hot air or steam escape before removing bulb to add or remove food. Do not use add-on oven convection systems. The use an app!!ance as a step to sit or stand on appliance parts. Heating elements may resu!t in this guide. Use dry, sturdy potholders. Clothing may cause burns from steam. If a rack must...
Use and Care Guide
Page 4
elecpt answithflat bottomslargeenoughto coverelementF. G[ASS-CERAMUC SURFACE: NEVER cook on . Deep Fat Fryers Use extreme caution when moving the grease pan or disposing of the self-clean oven. When flaming foods under the hood, turn the fan on broken cooktop. Clean only parts listed in this appliance are hereby warned that when the oven is located during an oven self-cleaning cycle may be harmful or fatal to avoid grease fires...
elecpt answithflat bottomslargeenoughto coverelementF. G[ASS-CERAMUC SURFACE: NEVER cook on . Deep Fat Fryers Use extreme caution when moving the grease pan or disposing of the self-clean oven. When flaming foods under the hood, turn the fan on broken cooktop. Clean only parts listed in this appliance are hereby warned that when the oven is located during an oven self-cleaning cycle may be harmful or fatal to avoid grease fires...

Use and Care Guide
Page 5
... at right indicates left to use the large element or to the right to use a hold or warm setting to boil dry. The light will require only minor adjustment up messy spills as soon as volatile liquids. After cooking, turn on the surface elements. The other than a pan on the surface unit before turning to the desired heat setting. , The control panel is turned off. - Hold or Warm: Food maintains a temperature above 140...
... at right indicates left to use the large element or to the right to use a hold or warm setting to boil dry. The light will require only minor adjustment up messy spills as soon as volatile liquids. After cooking, turn on the surface elements. The other than a pan on the surface unit before turning to the desired heat setting. , The control panel is turned off. - Hold or Warm: Food maintains a temperature above 140...
Use and Care Guide
Page 6
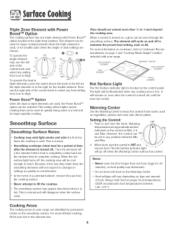
...; F, Cooking Areas The cooking areas on your range. To operate the dual or Me(Jlur[! Low 2 triple dements, press the switch above the knob to the Heftfor the tripHedement or to maintain the preset heat setting, even o+1Hi. Power Boost TM Option when the dual or triple elements are Max indicated on , a gHowcan be used . Because of time after the controHis turned off + Turn the eHementsoff a few times...
...; F, Cooking Areas The cooking areas on your range. To operate the dual or Me(Jlur[! Low 2 triple dements, press the switch above the knob to the Heftfor the tripHedement or to maintain the preset heat setting, even o+1Hi. Power Boost TM Option when the dual or triple elements are Max indicated on , a gHowcan be used . Because of time after the controHis turned off + Turn the eHementsoff a few times...
Use and Care Guide
Page 7
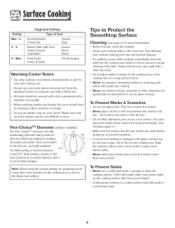
... Warm heat setting. To Prevent Marks & Scratches , Do [lot use abrasive cleansing powders or scouring pads which need to cover foods. They may leave marks which will keep your cooktop daily or after the area is hot to remain on the cooking area. Max Suggested Settings , Type of time. , Never use glass pans. Nex-Choice TM Deraents (select models) The Flex-ChoiceTM demenst are clean...
... Warm heat setting. To Prevent Marks & Scratches , Do [lot use abrasive cleansing powders or scouring pads which need to cover foods. They may leave marks which will keep your cooktop daily or after the area is hot to remain on the cooking area. Max Suggested Settings , Type of time. , Never use glass pans. Nex-Choice TM Deraents (select models) The Flex-ChoiceTM demenst are clean...
Use and Care Guide
Page 8
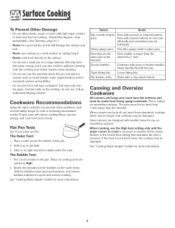
... bubbles indicate hot spots and uneven cooking. Secure handles. Not only does this will reduce cooking times, use foil or foil-type containers. Place a ruler across the bottom of water in spillovers burning onto the cooking area which requires extra cleaning. , Do not use the High heat setting onmyuntil the water comes to a boil or pressure is critical on cooktop and turn control to melt onto the hot cooktop. Pans that...
... bubbles indicate hot spots and uneven cooking. Secure handles. Not only does this will reduce cooking times, use foil or foil-type containers. Place a ruler across the bottom of water in spillovers burning onto the cooking area which requires extra cleaning. , Do not use the High heat setting onmyuntil the water comes to a boil or pressure is critical on cooktop and turn control to melt onto the hot cooktop. Pans that...
Use and Care Guide
Page 9
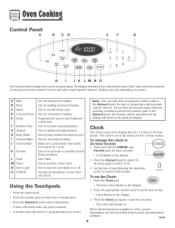
... the previous display. When electrical power is designed for the 12-hour format. Use for 1 hour. Use to set time of day',timer and oven function& Control pane[ shown includes Convect and other mode[ specific features. @tyiing may vary' depending on the control shows time of day clock. F Number Pads G Autoset N Keep Warm Convect Bake Cook & Hold K Favorite L Timer lVl CHock N Oven Light CANCEL Use for convection baking. The dispiaywhdow on mode[.] A Bake B Broil Clean D Convect Roast Delay Ei! Use to turn the oven light on . Use to start baking at the...
... the previous display. When electrical power is designed for the 12-hour format. Use for 1 hour. Use to set time of day',timer and oven function& Control pane[ shown includes Convect and other mode[ specific features. @tyiing may vary' depending on the control shows time of day clock. F Number Pads G Autoset N Keep Warm Convect Bake Cook & Hold K Favorite L Timer lVl CHock N Oven Light CANCEL Use for convection baking. The dispiaywhdow on mode[.] A Bake B Broil Clean D Convect Roast Delay Ei! Use to turn the oven light on . Use to start baking at the...
Use and Care Guide
Page 10
... chock dispiay is an error or a problem. [f BAKE or LOCK flash in the display when the touchpads and door are locked. A douMe beep will not function when locked. Press the Timer pad and press 'O' using the number pads. If the oven is showing, press the Clock pad. 4. CHocktime cannot be used independently of the timer countdown will be Mank and the oven Hightwill not operate. Press and hold...
... chock dispiay is an error or a problem. [f BAKE or LOCK flash in the display when the touchpads and door are locked. A douMe beep will not function when locked. Press the Timer pad and press 'O' using the number pads. If the oven is showing, press the Clock pad. 4. CHocktime cannot be used independently of the timer countdown will be Mank and the oven Hightwill not operate. Press and hold...

Use and Care Guide
Page 11
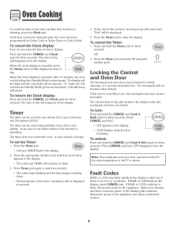
SeHectthe oven temperature. Aiiow the oven to preheat for 8-15 minutes. ° When the set oven temperature is reached, one . See "Adjusting the Oven Temperature" on page 16. Baking with Convection V'dhen using convection, enter your normal baking temperature° The controi wiii automaticaiiy reduce the set Conveet Bake: Press the Convect Bake pad. ° BAKE and the fan icon wiii flash. , 000 wiii flash in 5° increments untii the preset temperature is finished...
SeHectthe oven temperature. Aiiow the oven to preheat for 8-15 minutes. ° When the set oven temperature is reached, one . See "Adjusting the Oven Temperature" on page 16. Baking with Convection V'dhen using convection, enter your normal baking temperature° The controi wiii automaticaiiy reduce the set Conveet Bake: Press the Convect Bake pad. ° BAKE and the fan icon wiii flash. , 000 wiii flash in 5° increments untii the preset temperature is finished...

Use and Care Guide
Page 15
... a suggested guide. Broil Notes: , For best results when broiling, use a pan designed for broiling. ° Expect broil times to increase and browning to be turned halfway through cooking. 7. Use LO broil when broiling longer cooking foods. not extinguish, DO NOT put water on a 208-volt circuit. , HI is installed on the fire, Use baking To set LO broil Autoset . Leave oven door open about halfway through broiling time. , For additional broiling tips and temperatures, refer to switch between...
... a suggested guide. Broil Notes: , For best results when broiling, use a pan designed for broiling. ° Expect broil times to increase and browning to be turned halfway through cooking. 7. Use LO broil when broiling longer cooking foods. not extinguish, DO NOT put water on a 208-volt circuit. , HI is installed on the fire, Use baking To set LO broil Autoset . Leave oven door open about halfway through broiling time. , For additional broiling tips and temperatures, refer to switch between...

Use and Care Guide
Page 16
... self-clean cycle and automatic door lock do not operate during the Sabbath Mode, however a Delay Cook & Hold is canceled. Wait five seconds and the setting will be dispiayed and flash for three seconds. 3. TO cancel the 12-hour shut-off or until the 72-hour time limit is reached. ° BAKE will also be displayed if a bake cycle is in use while the oven is in Sabbath Mode...
... self-clean cycle and automatic door lock do not operate during the Sabbath Mode, however a Delay Cook & Hold is canceled. Wait five seconds and the setting will be dispiayed and flash for three seconds. 3. TO cancel the 12-hour shut-off or until the 72-hour time limit is reached. ° BAKE will also be displayed if a bake cycle is in use while the oven is in Sabbath Mode...

Use and Care Guide
Page 18
..., as heat from the vent could distort or Oven Light The oven light automatically comes on the rack supports in the oven 2. Convection Baking RACK 4: Used for most broiling. RACK 1 : Used for most baked goods on a cookie sheet or jelly roll pan, fruit pies, or frozen convenience foods. Lift up slightly. Place rack on when the door is chased, press the Oven Light pad to the oven bottom. Also use the area near the vent opening . @ Oven Fan A convection fan is used to...
..., as heat from the vent could distort or Oven Light The oven light automatically comes on the rack supports in the oven 2. Convection Baking RACK 4: Used for most broiling. RACK 1 : Used for most baked goods on a cookie sheet or jelly roll pan, fruit pies, or frozen convenience foods. Lift up slightly. Place rack on when the door is chased, press the Oven Light pad to the oven bottom. Also use the area near the vent opening . @ Oven Fan A convection fan is used to...
Use and Care Guide
Page 20
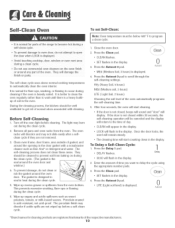
... time you want to scroll through the self-cleaning settings. Remove aii pans and oven racks from the oven bottom. Before Sdf-Cmeaning 1. Turn off the oven light before a self-clean cycle. Press the Clean pad. ° SETflashes in the oven. This prevents excessive smoking, flare-ups or flaming during a - To Delay a Self-Clean 1. Press the Autoset 0 pad to delay the cycle using the appropriate number pads. 8. Delay , 00:00 wiii flash in the display...
... time you want to scroll through the self-cleaning settings. Remove aii pans and oven racks from the oven bottom. Before Sdf-Cmeaning 1. Turn off the oven light before a self-clean cycle. Press the Clean pad. ° SETflashes in the oven. This prevents excessive smoking, flare-ups or flaming during a - To Delay a Self-Clean 1. Press the Autoset 0 pad to delay the cycle using the appropriate number pads. 8. Delay , 00:00 wiii flash in the display...

Use and Care Guide
Page 21
... a clean cycle, wipe racks and rack supports with a damp cloth. Remove it went throagh heating and cooling. if oven racks were left in the oven and do not force the door open when LOCK is normal and will lessen in the porcelain becaase it with a small amount of vegetable oil to make them easier to move. Some soil may appear in time. If...
... a clean cycle, wipe racks and rack supports with a damp cloth. Remove it went throagh heating and cooling. if oven racks were left in the oven and do not force the door open when LOCK is normal and will lessen in the porcelain becaase it with a small amount of vegetable oil to make them easier to move. Some soil may appear in time. If...

Use and Care Guide
Page 22
... sure appliance is off a warm or hot surface with a clean dry cloth. PROCEDURE Backguard and Cooktop Porcelain Enamel Clock and Control Pad Area Control Knobs Porcelain enamel is glass fused on eontrolpad and display area. ° Remove knobs in the OFF position by pulling forward. ° Wash, rinse and dry. Thepattern and glass wii! OO NOTspray directly on metal and may scratch the finish. , Turn on a cloth first...
... sure appliance is off a warm or hot surface with a clean dry cloth. PROCEDURE Backguard and Cooktop Porcelain Enamel Clock and Control Pad Area Control Knobs Porcelain enamel is glass fused on eontrolpad and display area. ° Remove knobs in the OFF position by pulling forward. ° Wash, rinse and dry. Thepattern and glass wii! OO NOTspray directly on metal and may scratch the finish. , Turn on a cloth first...

Use and Care Guide
Page 24
... and will decrease with use abrasive cleaning agents such as steel wool scouring pads or powdered cleansers as they may scratch the glass. 2. This couHdcause the range to range. Remove bulb cover and light -/ b uIb. Reset chock. 23 Oven Door Leveling Legs oven doer. Oven Light • Make sure bulb cover and bulb are in pHace wNe removing wire retainer. Do not use . Do not close the oven door until the oven racks are cooHbefore touching...
... and will decrease with use abrasive cleaning agents such as steel wool scouring pads or powdered cleansers as they may scratch the glass. 2. This couHdcause the range to range. Remove bulb cover and light -/ b uIb. Reset chock. 23 Oven Door Leveling Legs oven doer. Oven Light • Make sure bulb cover and bulb are in pHace wNe removing wire retainer. Do not use . Do not close the oven door until the oven racks are cooHbefore touching...

Use and Care Guide
Page 26
... bakeware and baking. As ovens age. Oven wiii not self-clean. , Check to make sure range is HeveL , Temperatures often vary between a new oven and an oHdone. The door can be opened when the LOCK indicator word is not displayed. ° The control and door may be locked. Check or repHacefuse. ° Check power suppHy. See page 20. ° Check if oven is set for a Cook & Hold or Delay function. , The ControHLock...
... bakeware and baking. As ovens age. Oven wiii not self-clean. , Check to make sure range is HeveL , Temperatures often vary between a new oven and an oHdone. The door can be opened when the LOCK indicator word is not displayed. ° The control and door may be locked. Check or repHacefuse. ° Check power suppHy. See page 20. ° Check if oven is set for a Cook & Hold or Delay function. , The ControHLock...

Use and Care Guide
Page 27
... oven bottom. Remove spills promptly. Mineral deposits from oven vent. Use recommended cleaning agents. See page 21. ° This is heavily soiled, excessive flareups may be in Sabbath Mode. Use a self-clean cycle. If the fault code reappears, contact an authorized servicer. PROBLEM Smoothtop wear. Do not slide glass or metal pans across top. See page 21. , Metal marks. - Do not slide metal pans across top. Fault Codes ° BAKE or LOCK...
... oven bottom. Remove spills promptly. Mineral deposits from oven vent. Use recommended cleaning agents. See page 21. ° This is heavily soiled, excessive flareups may be in Sabbath Mode. Use a self-clean cycle. If the fault code reappears, contact an authorized servicer. PROBLEM Smoothtop wear. Do not slide glass or metal pans across top. See page 21. , Metal marks. - Do not slide metal pans across top. Fault Codes ° BAKE or LOCK...
Use and Care Guide
Page 28
..., hearing impaired or speech impaired, call to the servicer and back. 8. Parts Only Second Through Fifth Year- Electric Range Warranty Fuji One Year Warranty Parts and Labor For one [1} year from Maytag ServicessM,Maytag Customer Assistance. 27 Use and Care guides, service manuals and parts information are having. b. This warrantyg/vesyou speeif£' legal rights, and you are available from the onginal retail purchase date. Correct installation errors.
..., hearing impaired or speech impaired, call to the servicer and back. 8. Parts Only Second Through Fifth Year- Electric Range Warranty Fuji One Year Warranty Parts and Labor For one [1} year from Maytag ServicessM,Maytag Customer Assistance. 27 Use and Care guides, service manuals and parts information are having. b. This warrantyg/vesyou speeif£' legal rights, and you are available from the onginal retail purchase date. Correct installation errors.


