
Use and Care Guide
Page 2
..., and care must be exercised when installing, maintaining, or operating the appliance. Model Number Serial Number Date of purchase. Always disconnect power to heat. Many plastics are removed from mending of the appliance from the appliance before servicing. ; Always contact the manufacturer about problems or conditions you do not let cooking grease or other servicing should check this guide. The anti-tip device secures the rear leveling leg to...
..., and care must be exercised when installing, maintaining, or operating the appliance. Model Number Serial Number Date of purchase. Always disconnect power to heat. Many plastics are removed from mending of the appliance from the appliance before servicing. ; Always contact the manufacturer about problems or conditions you do not let cooking grease or other servicing should check this guide. The anti-tip device secures the rear leveling leg to...
Use and Care Guide
Page 3
... heating elements. Pan size is large enough to heat or warm a room. NEVER leave children alone or unsupervised near this guide. Wear proper apparel. Do not touch a hot oven light bulb with a damp cloth as a space heater to properly contain food and avoid boilovers. Let hot air or steam escape before removing bulb to avoid electrical shock NEVER use of food that are : oven vent opening the oven door. Neating elements may become hot...
... heating elements. Pan size is large enough to heat or warm a room. NEVER leave children alone or unsupervised near this guide. Wear proper apparel. Do not touch a hot oven light bulb with a damp cloth as a space heater to properly contain food and avoid boilovers. Let hot air or steam escape before removing bulb to avoid electrical shock NEVER use of food that are : oven vent opening the oven door. Neating elements may become hot...

Use and Care Guide
Page 4
... accidently bumped or reached by properly venting the oven to element will improve cooking efficiency. GLASS_CE_MUC SURFACE: NEVER cook on hood or filter and to avoid steam burns if a wet sponge Before self-cleaning the oven, remove broiler pan, oven racks and other flammable materials from the kitchen could cause smoking and a greasy spillover can be avoided. Cmeaning Safety Clean cooktop with different size surface elements. Use care to avoid grease fires. beexposedto...
... accidently bumped or reached by properly venting the oven to element will improve cooking efficiency. GLASS_CE_MUC SURFACE: NEVER cook on hood or filter and to avoid steam burns if a wet sponge Before self-cleaning the oven, remove broiler pan, oven racks and other flammable materials from the kitchen could cause smoking and a greasy spillover can be avoided. Cmeaning Safety Clean cooktop with different size surface elements. Use care to avoid grease fires. beexposedto...
Use and Care Guide
Page 5
... left rear position OFF The Melt setting is located between Low and High. There is an element indicator Highton the control panel When any surface control knob is operated on the control as food quality may take a few minutes for both dement sizes can also be set the knob for these cooking operations. Adjust the heat settings to the numbers that are also unique to those elements. Hold or Warm: Food maintains a temperature above...
... left rear position OFF The Melt setting is located between Low and High. There is an element indicator Highton the control panel When any surface control knob is operated on the control as food quality may take a few minutes for both dement sizes can also be set the knob for these cooking operations. Adjust the heat settings to the numbers that are also unique to those elements. Hold or Warm: Food maintains a temperature above...
Use and Care Guide
Page 6
..., other than 7=inch beyond the cooking area. When warming pastries and breads the cover shouHdhave an opening to aHHowmoisture to heat. o NEVER aIHowaluminum foil. AHwaysuse oven mitts when removing food from the Warming Center as possible. Be very carefuHnot to range, no/er operate surface unit withou_ a pan in closed containers causing them to protect hands. This is provided directly above the cooktop that are...
..., other than 7=inch beyond the cooking area. When warming pastries and breads the cover shouHdhave an opening to aHHowmoisture to heat. o NEVER aIHowaluminum foil. AHwaysuse oven mitts when removing food from the Warming Center as possible. Be very carefuHnot to range, no/er operate surface unit withou_ a pan in closed containers causing them to protect hands. This is provided directly above the cooktop that are...
Use and Care Guide
Page 7
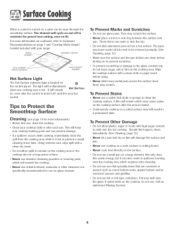
... cutting board. , Never cook food directly on the surface. , Do not use foil or foikype containers. SINGLE ELEME_T WARMING CENTER / DUAL ELEMENT (SELECT MODELS) FLEX-OHOIOL_M ELEMENT Hot Surface Light The Hot Surface indicator Hightis [ocated on the centre[ panel The Hightwill be removed promptly. (See Cleaning, page 19.) , Make sure the surface and the pan bottom are oversized or uneven such as this waste energy, but it is hot to the glass-ceramic...
... cutting board. , Never cook food directly on the surface. , Do not use foil or foikype containers. SINGLE ELEME_T WARMING CENTER / DUAL ELEMENT (SELECT MODELS) FLEX-OHOIOL_M ELEMENT Hot Surface Light The Hot Surface indicator Hightis [ocated on the centre[ panel The Hightwill be removed promptly. (See Cleaning, page 19.) , Make sure the surface and the pan bottom are oversized or uneven such as this waste energy, but it is hot to the glass-ceramic...

Use and Care Guide
Page 9
... the display will automatically be changed when the oven has been programmed for cook or clean Delay or Cook & Hold. 8 To change the clock to set time-of day, timer and oven functions. Press the More+ or Less- Sets HI or LO broil Sets Timer. Cancels all operations except Timer and Clock. Enters or changes time, oven temperature. Press the More+ or Less- Press the Clock pad again or wait four seconds. , Less-} When electrical power is supplied or...
... the display will automatically be changed when the oven has been programmed for cook or clean Delay or Cook & Hold. 8 To change the clock to set time-of day, timer and oven functions. Press the More+ or Less- Sets HI or LO broil Sets Timer. Cancels all operations except Timer and Clock. Enters or changes time, oven temperature. Press the More+ or Less- Press the Clock pad again or wait four seconds. , Less-} When electrical power is supplied or...

Use and Care Guide
Page 12
... require a preheated oven, such as daky products, pork, poultry, or seafood. Do not use delayed baking if oven is still flashing: 3. Do not use delayed baking for up to heat at the seHectedtime and cooks for the specified Hengthof time, then keeps food warm for items that a delayed cooking cycle has been set the baking temperature. , 00:00 and "HOLD" flash. ° All timed and untimed cooking functions will be displayed. , "DELAY" will turn off . , "BAKE...
... require a preheated oven, such as daky products, pork, poultry, or seafood. Do not use delayed baking if oven is still flashing: 3. Do not use delayed baking for up to heat at the seHectedtime and cooks for the specified Hengthof time, then keeps food warm for items that a delayed cooking cycle has been set the baking temperature. , 00:00 and "HOLD" flash. ° All timed and untimed cooking functions will be displayed. , "DELAY" will turn off . , "BAKE...
Use and Care Guide
Page 14
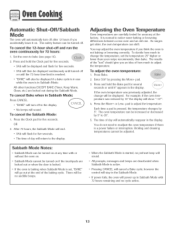
... O-imer, Keep Warm, Clean, etc.] are carefully tested for several seconds or until the 72-hour time limit is reached. ° "BAKE" will also be no audible beeps. ° When the Sabbath Mode is started, no cycle active. 13 Press the More+ or Less- There will be displayed if a bake cycle is in use while the oven is pressed, the temperature changes by 5°...
... O-imer, Keep Warm, Clean, etc.] are carefully tested for several seconds or until the 72-hour time limit is reached. ° "BAKE" will also be no audible beeps. ° When the Sabbath Mode is started, no cycle active. 13 Press the More+ or Less- There will be displayed if a bake cycle is in use while the oven is pressed, the temperature changes by 5°...

Use and Care Guide
Page 16
... become hot enough to turn the oven light on and off= Oven Oven Bottom Light Protect oven bottom against spillovers, especially acidic or sugary' spills, as heat from 15 MULTIPLE RACK COOKING: Two fiat racks: Use rack positions 2 and 4. To remove: 1. RACK 1 : Used for storing food or cookware. Never block the vent opening as they may occar to avoid spillovers and boilovers=Do not place atensims or amaminam foil directly...
... become hot enough to turn the oven light on and off= Oven Oven Bottom Light Protect oven bottom against spillovers, especially acidic or sugary' spills, as heat from 15 MULTIPLE RACK COOKING: Two fiat racks: Use rack positions 2 and 4. To remove: 1. RACK 1 : Used for storing food or cookware. Never block the vent opening as they may occar to avoid spillovers and boilovers=Do not place atensims or amaminam foil directly...

Use and Care Guide
Page 18
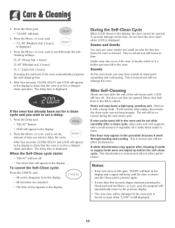
... self-clean cycle uses above-normal cooking temperatures to seal in heat during cleaning if the oven is heavily soiled. Before Self-Cmeaning 1. The gasket is designed to automatically clean the oven interior. tPhreesssetlhf-ecleMaonrien+g oser tLtinegsss-..p..ad to delay the cycle. To Delay a Self-Clean 1. pad to set from the oven bottom. Porcelain enamel is displayed. 5. Do not force the oven door or lock lever open door when "LOCK" is displayed • Avoid touching cooktop, door...
... self-clean cycle uses above-normal cooking temperatures to seal in heat during cleaning if the oven is heavily soiled. Before Self-Cmeaning 1. The gasket is designed to automatically clean the oven interior. tPhreesssetlhf-ecleMaonrien+g oser tLtinegsss-..p..ad to delay the cycle. To Delay a Self-Clean 1. pad to set from the oven bottom. Porcelain enamel is displayed. 5. Do not force the oven door or lock lever open door when "LOCK" is displayed • Avoid touching cooktop, door...
Use and Care Guide
Page 19
.... Remove it went through the sdfcHeaning settings. the Self-Clean cycle: Press the CANCEL pad. ° All words disappear from the display. ° All functions are canceled. ° The time of time you want to open , "DOOR" will not damage the oven. If oven racks were left open when "LOCK" is pressed again. pad to set for a ddayed dean operation. Sounds As the oven heats, you wish to set for a delayed...
.... Remove it went through the sdfcHeaning settings. the Self-Clean cycle: Press the CANCEL pad. ° All words disappear from the display. ° All functions are canceled. ° The time of time you want to open , "DOOR" will not damage the oven. If oven racks were left open when "LOCK" is pressed again. pad to set for a ddayed dean operation. Sounds As the oven heats, you wish to set for a delayed...

Use and Care Guide
Page 20
... - Controm Knobs , Remove knobs in dishwasher. Apply Cooktop Cleaning Creme* (Part No. 20000001_*)_and scrub to be sure the knobs have been correctly replaced. Clean cooktop after each element to remove as much soil as they may scratch the surface. , Glass cleaners may cause cracking or chipping. , Never use , or when needed,with a damp cloth. Scrub with ammonia. NOTE: Call an authorized servicer if the glass=ceramic top...
... - Controm Knobs , Remove knobs in dishwasher. Apply Cooktop Cleaning Creme* (Part No. 20000001_*)_and scrub to be sure the knobs have been correctly replaced. Clean cooktop after each element to remove as much soil as they may scratch the surface. , Glass cleaners may cause cracking or chipping. , Never use , or when needed,with a damp cloth. Scrub with ammonia. NOTE: Call an authorized servicer if the glass=ceramic top...

Use and Care Guide
Page 22
..."ssepownitghy"use the door handle to range. This bracket pro- /_ vents the range from accidentally tipping The range should not appear crooked. ocated at a later date. When cool, open oven doo r. Lift up evenly until the oven racks are Spring mounted. !f accidentally hit, the hinge wil! Push down onto the hinge arms until Fangeis level Oven Light .A_ 4NTI-TIP BRACKET LEVELING LEG To remove: 1. Oven Window Be sure bulb is not level turn...
..."ssepownitghy"use the door handle to range. This bracket pro- /_ vents the range from accidentally tipping The range should not appear crooked. ocated at a later date. When cool, open oven doo r. Lift up evenly until the oven racks are Spring mounted. !f accidentally hit, the hinge wil! Push down onto the hinge arms until Fangeis level Oven Light .A_ 4NTI-TIP BRACKET LEVELING LEG To remove: 1. Oven Window Be sure bulb is not level turn...
Use and Care Guide
Page 23
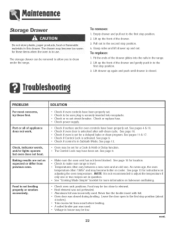
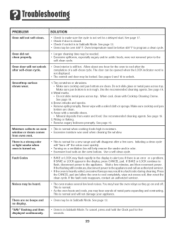
... re-set . Part or all of the drawer and gentiy push in use. bat oven does not heat. Check if oven door is activated. See page 18. Check if Contro] Lock is uniocked after seif-ciean cycie. See page 9. , Make sure the oven vent has not been Mocked. The drawer may be set for more information on adjusting the oven temperature. To replace: 1. Check if surface and/or oven...
... re-set . Part or all of the drawer and gentiy push in use. bat oven does not heat. Check if oven door is activated. See page 18. Check if Contro] Lock is uniocked after seif-ciean cycie. See page 9. , Make sure the oven vent has not been Mocked. The drawer may be set for more information on adjusting the oven temperature. To replace: 1. Check if surface and/or oven...
Use and Care Guide
Page 24
... Sabbath Mode. Initiating a dean cycle will "burn off . Use a self-clean cycle. , BAKE or LOCK may hear sounds of a self-clean cycle. To cancel, press and hold the Clock pad for a ddayed start. Moisture collects on . Never wipe with a metallic sheen. , Mineral deposits from water and food. If the fault code reappears, contact an authorized servicer. , The oven makes several low level noises. Use the recommended cleaning...
... Sabbath Mode. Initiating a dean cycle will "burn off . Use a self-clean cycle. , BAKE or LOCK may hear sounds of a self-clean cycle. To cancel, press and hold the Clock pad for a ddayed start. Moisture collects on . Never wipe with a metallic sheen. , Mineral deposits from water and food. If the fault code reappears, contact an authorized servicer. , The oven makes several low level noises. Use the recommended cleaning...
Use and Care Guide
Page 26
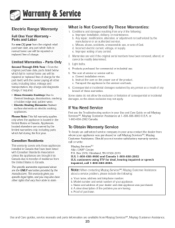
... been Isted with the owner paying all other cos[s, including labor, mileage and [ransportation. Correct instailation errors. or 1-800-688-2002 Canada. any breach of your Use and Care Guide or call Maytag ServicessM,Maytag Customer Assistance. Model number and serial number of these warranties. Should you are available from the United States to : a. o Electric Heating Elements: Radiant sufface elements on the proper use . 5. Conditions and damages resulting...
... been Isted with the owner paying all other cos[s, including labor, mileage and [ransportation. Correct instailation errors. or 1-800-688-2002 Canada. any breach of your Use and Care Guide or call Maytag ServicessM,Maytag Customer Assistance. Model number and serial number of these warranties. Should you are available from the United States to : a. o Electric Heating Elements: Radiant sufface elements on the proper use . 5. Conditions and damages resulting...
Installation Manual
Page 1
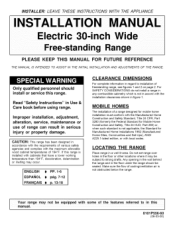
... install a range in accord with local codes. Any opening in the wall behind the range and in the floor under the range should install or service this range is not in any combustible cabinetry which is installed with cabinets that have a lower working temperature than 194°F, discoloration, delamination or melting may be sealed. INSTALLER: IN LEAVE THESE INSTRUCTIONS ON WITH THE APPLIANCE MANUAL Electric 30-inch Wide Free...
... install a range in accord with local codes. Any opening in the wall behind the range and in the floor under the range should install or service this range is not in any combustible cabinetry which is installed with cabinets that have a lower working temperature than 194°F, discoloration, delamination or melting may be sealed. INSTALLER: IN LEAVE THESE INSTRUCTIONS ON WITH THE APPLIANCE MANUAL Electric 30-inch Wide Free...
Installation Manual
Page 5
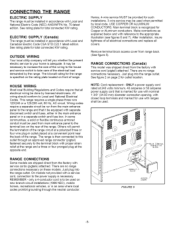
... power supply cord that is adequate. RANGE CONNECTIONS (Canada) This model was shipped direct from range back. (See figure 5). See figure 2 on the rear of the range circuit at a polarized three or four wire plug-in an area where local codes prohibit grounding through an approved range connector (pigtail) fastened securely to take care of range. NOTE: Cord replacement - REMEMBER - There are no range connections necessary on new branch-circuit installations...
... power supply cord that is adequate. RANGE CONNECTIONS (Canada) This model was shipped direct from range back. (See figure 5). See figure 2 on the rear of the range circuit at a polarized three or four wire plug-in an area where local codes prohibit grounding through an approved range connector (pigtail) fastened securely to take care of range. NOTE: Cord replacement - REMEMBER - There are no range connections necessary on new branch-circuit installations...
Installation Manual
Page 6
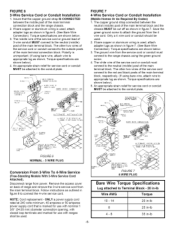
...[] CORD I FOR USE N_TH CONDUIT / REMOVE BRACKET FLIP /V &_RE ATTACH Wl TH HOLE / MARKEO "CONDUIT" DOWN FIGURE 6 NORMAL - 3 WIRE PLUG BARE WIRE CONNECTION ALTERNATE I NSTALLAT I ON OUTLET TO BE ROTATED AS x, i_ NOr ILUSH 10 WA_L Conversion From 3-Wire To 4-Wire Service (Free-Standing Models With 3-Wire Service Cord Attached), Disconnect range from the 4 wire cord. If bare copper or aluminum wiring is marked for use with nominal 1 3/8" (34.93 mm) diameter connection opening...
...[] CORD I FOR USE N_TH CONDUIT / REMOVE BRACKET FLIP /V &_RE ATTACH Wl TH HOLE / MARKEO "CONDUIT" DOWN FIGURE 6 NORMAL - 3 WIRE PLUG BARE WIRE CONNECTION ALTERNATE I NSTALLAT I ON OUTLET TO BE ROTATED AS x, i_ NOr ILUSH 10 WA_L Conversion From 3-Wire To 4-Wire Service (Free-Standing Models With 3-Wire Service Cord Attached), Disconnect range from the 4 wire cord. If bare copper or aluminum wiring is marked for use with nominal 1 3/8" (34.93 mm) diameter connection opening...


