
User Guide
Page 2
....The anti-tip device secures the rear levelingleg to the appliance. riskoffire, electricshock,personalinjury or damageto the applianceas a result of improperusageof the appliance.Use appliance only for its intendedpurpose as directed in a pan with hot heatingelements. NEVER use a towel or other bulky cloth which could catch utensil handles or ignite and cause burns if garment comes in the vicinity of the oven door...
....The anti-tip device secures the rear levelingleg to the appliance. riskoffire, electricshock,personalinjury or damageto the applianceas a result of improperusageof the appliance.Use appliance only for its intendedpurpose as directed in a pan with hot heatingelements. NEVER use a towel or other bulky cloth which could catch utensil handles or ignite and cause burns if garment comes in the vicinity of the oven door...

User Guide
Page 3
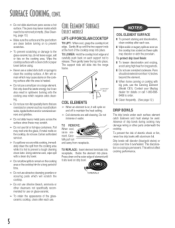
... with flat bottoms large enoughto cover element.Fitting pan size to cool. Beatingelementsmaybe hoteventhoughthey' aredark in temperatureF. Cleanrangehoodand filtersfrequentlyto prevent greaseor otherflammablematerialsfrom accumulatingon hood or filter and to prevent smoking,flare-upsor flaming. Otherpotenlallyhotsurfacesinclude:Cooktop, areasfacingthe cooktop,oven vent,and surfacesnear thevent opening door.Let hot air or steamescapebefore removingor replacing food. Do not clean door gasket. During and after use oven cleaners. Ch!dren c!imbingon appliance...
... with flat bottoms large enoughto cover element.Fitting pan size to cool. Beatingelementsmaybe hoteventhoughthey' aredark in temperatureF. Cleanrangehoodand filtersfrequentlyto prevent greaseor otherflammablematerialsfrom accumulatingon hood or filter and to prevent smoking,flare-upsor flaming. Otherpotenlallyhotsurfacesinclude:Cooktop, areasfacingthe cooktop,oven vent,and surfacesnear thevent opening door.Let hot air or steamescapebefore removingor replacing food. Do not clean door gasket. During and after use oven cleaners. Ch!dren c!imbingon appliance...

User Guide
Page 4
...Thebackguardismarkedto identifywhich elementtheknobcontrols,Forexample, this graphicindicatesrightfront r--l element, 3. After cooking,turn knob to OFF, Remove pan, SURFACEiNDiCATORUGNTS Thereis an indicatorlight locatedon the control panel, When any of the surface control knobsare turnedon,the lightwill turnon, The lightwillturnoffwhenthesurfaceelementsare turnedoff, IIII,IIY,1II,111,16 Before Cooking After Cooking > Always pfacea pan on a surfaceelement to contact heating elements. NEVER use a n_cq tic Ltemso. _ the cooKtop.Thehot a _from neatsettingfor extendedCOOKIng. to...
...Thebackguardismarkedto identifywhich elementtheknobcontrols,Forexample, this graphicindicatesrightfront r--l element, 3. After cooking,turn knob to OFF, Remove pan, SURFACEiNDiCATORUGNTS Thereis an indicatorlight locatedon the control panel, When any of the surface control knobsare turnedon,the lightwill turnon, The lightwillturnoffwhenthesurfaceelementsare turnedoff, IIII,IIY,1II,111,16 Before Cooking After Cooking > Always pfacea pan on a surfaceelement to contact heating elements. NEVER use a n_cq tic Ltemso. _ the cooKtop.Thehot a _from neatsettingfor extendedCOOKIng. to...

User Guide
Page 5
..., refer to "Cooking Made Simple" booklet, WARMING CENTER ;; > When warming pastriesand breads the cover shouldhavean openingto allow moistureto escape, > Donotuseplasticwraptocoverfoods, Plasticmaymelton tothesurfaceand HOT SURFACE LIGHT ON COOKTOP HOT SURFACELIGHT The hot surfaceindicator light is located at the frontcenter of the cooktop,The lightwill be illuminatedwhenanycookingareais hot, It will remain on, even after the control is turnedoff, untilthe area has cooled, DUAL ELEMENT(select models) Select glass-ceramicsurfaces are equipped...
..., refer to "Cooking Made Simple" booklet, WARMING CENTER ;; > When warming pastriesand breads the cover shouldhavean openingto allow moistureto escape, > Donotuseplasticwraptocoverfoods, Plasticmaymelton tothesurfaceand HOT SURFACE LIGHT ON COOKTOP HOT SURFACELIGHT The hot surfaceindicator light is located at the frontcenter of the cooktop,The lightwill be illuminatedwhenanycookingareais hot, It will remain on, even after the control is turnedoff, untilthe area has cooled, DUAL ELEMENT(select models) Select glass-ceramicsurfaces are equipped...
User Guide
Page 6
... at the frontof the cooktopsnapintoplace, glass-ceratompidc, onolteavseugasr,alt TO LOWER:Holdthecooktopfrontedgeand or fatsonthecookinagreaW, ipethe carefullypush back on , it sits levelondripbowl .,,,_1_1_ areaorthecooktotrpimforalonpgerioodf time, COIL ELEMENTSURFACE | To preventstainingand discoloration, cleancooktopaftereach use, | Wipeacidicor sugaryspillsassoonas thecooktophascooledas thesespills may damagewiringor otherparts underneaththe cooktop. Drip bowls will slide into the range Neveurseasoileddishclothorspongtoe frame, cleatnhecooktospurfacAe,filmwillre-
... at the frontof the cooktopsnapintoplace, glass-ceratompidc, onolteavseugasr,alt TO LOWER:Holdthecooktopfrontedgeand or fatsonthecookinagreaW, ipethe carefullypush back on , it sits levelondripbowl .,,,_1_1_ areaorthecooktotrpimforalonpgerioodf time, COIL ELEMENTSURFACE | To preventstainingand discoloration, cleancooktopaftereach use, | Wipeacidicor sugaryspillsassoonas thecooktophascooledas thesespills may damagewiringor otherparts underneaththe cooktop. Drip bowls will slide into the range Neveurseasoileddishclothorspongtoe frame, cleatnhecooktospurfacAe,filmwillre-

User Guide
Page 7
..., BROIL PAD Use for 3 hours or press More+ or Less- Press Broil pad, 2. you set a second operation: - Press Clean pad, "3:00" will appearin the display. 2. oven temperatureor to recallthat operation, NOTE: ff mere than 30 seconds ebpse between pressing a function pad and a More+ or Less- the indicatorlight on the Bake pad will "dim"and the indicatorlighton the Timer pad will be Indicator lights on Clean, Timer, Clock, Cook Time...
..., BROIL PAD Use for 3 hours or press More+ or Less- Press Broil pad, 2. you set a second operation: - Press Clean pad, "3:00" will appearin the display. 2. oven temperatureor to recallthat operation, NOTE: ff mere than 30 seconds ebpse between pressing a function pad and a More+ or Less- the indicatorlight on the Bake pad will "dim"and the indicatorlighton the Timer pad will be Indicator lights on Clean, Timer, Clock, Cook Time...

User Guide
Page 8
... displayed,press the Clock pad. You can be adiusted. Pressandhold bothStop Time andCANCEL pads for three seconds. pad to deactivate. perature. 3. To fecal the time of cooking, then, no other oven activity and it can deactivatethis feature, if desired. Press the Timer pad. 2. Onelong beepand"End"will appear in the display whenthis feature is not baking correctly, To decidehowmuchto changethe temperature, set the temperature...
... displayed,press the Clock pad. You can be adiusted. Pressandhold bothStop Time andCANCEL pads for three seconds. pad to deactivate. perature. 3. To fecal the time of cooking, then, no other oven activity and it can deactivatethis feature, if desired. Press the Timer pad. 2. Onelong beepand"End"will appear in the display whenthis feature is not baking correctly, To decidehowmuchto changethe temperature, set the temperature...
User Guide
Page 9
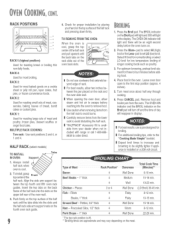
..., Do not cover the drip bowl with aluminumfoil, Yourovenhastwo racks,Theyaredesigned with a lock-stopedge TO REMOVERACK: Pull rack straightout untilitstopsatthelock-stopposition;lift upon the front of 12 hours, If you wish to the oven bottom, OVEN VENT OPENING Check cooking progress at any time by pressingthe More+ or Less- DO not attempt ts change the rack posb ion when the ovenis hot. Allow8-15...
..., Do not cover the drip bowl with aluminumfoil, Yourovenhastwo racks,Theyaredesigned with a lock-stopedge TO REMOVERACK: Pull rack straightout untilitstopsatthelock-stopposition;lift upon the front of 12 hours, If you wish to the oven bottom, OVEN VENT OPENING Check cooking progress at any time by pressingthe More+ or Less- DO not attempt ts change the rack posb ion when the ovenis hot. Allow8-15...
User Guide
Page 10
.... Always install A harial cwkhen oveisncoo 2. Flaky 8-12 rain. Warm 8-12 min. RACK POSiTiONS 5 4 3 2 1 RACK 5 (highest position}: Used for low temperaturebroiling of longer cookingfoods such as poultry, 3. I When opening the oven door, allow two inches between the top fourth and fifth oven rack guides. padto set LO (low)broik SelectHI broilfor normalbroilingor select LO broil for toasting broad or broiling thin non-fattyfoods. MULTIPLERACK COOKING: Two rack: Use rack positions2...
.... Always install A harial cwkhen oveisncoo 2. Flaky 8-12 rain. Warm 8-12 min. RACK POSiTiONS 5 4 3 2 1 RACK 5 (highest position}: Used for low temperaturebroiling of longer cookingfoods such as poultry, 3. I When opening the oven door, allow two inches between the top fourth and fifth oven rack guides. padto set LO (low)broik SelectHI broilfor normalbroilingor select LO broil for toasting broad or broiling thin non-fattyfoods. MULTIPLERACK COOKING: Two rack: Use rack positions2...

User Guide
Page 11
... at a presettime. Clock Controlled Oven Cooking is not necessary to enter oventemperature. 5. Four beepswill soundand "END"will light in display. 2. SETTINGTIE CONTROLSFOR CLOCK CONTROLLED OVEN COOKING 1. PresstheBakepad.TheBAKEindicatoron the Bake pad will lightand 000 will light in display if the Bake pad is no[ recommendedtar baked itemsthat reaulrea oreheated3ven,suchas cakes cookies ann Dreaas. Press the Cook Time pad. Cooktimecan be used with either oven cookingor self-cleaning. This feature can be...
... at a presettime. Clock Controlled Oven Cooking is not necessary to enter oventemperature. 5. Four beepswill soundand "END"will light in display. 2. SETTINGTIE CONTROLSFOR CLOCK CONTROLLED OVEN COOKING 1. PresstheBakepad.TheBAKEindicatoron the Bake pad will lightand 000 will light in display if the Bake pad is no[ recommendedtar baked itemsthat reaulrea oreheated3ven,suchas cakes cookies ann Dreaas. Press the Cook Time pad. Cooktimecan be used with either oven cookingor self-cleaning. This feature can be...
User Guide
Page 12
... the cleaning process, the kitchen should be cleaned to seal in oven, As oven heats,you set. 6. Removebroiler pan, all pans and the oven racks from bakingon during the clean cycle. Toprevent damage, do not dean or rub the gasket around the oven door.Thegasket is normal andwill lessenin time.Smokemayalsooccur if ovenis heavilysoiledor if broilerpanwas left in the oven. SETTINGTHE CONTROLSFOR SELF-CLEAN NOTE: These instructions cover automatic lock and manual lock models...
... the cleaning process, the kitchen should be cleaned to seal in oven, As oven heats,you set. 6. Removebroiler pan, all pans and the oven racks from bakingon during the clean cycle. Toprevent damage, do not dean or rub the gasket around the oven door.Thegasket is normal andwill lessenin time.Smokemayalsooccur if ovenis heavilysoiledor if broilerpanwas left in the oven. SETTINGTHE CONTROLSFOR SELF-CLEAN NOTE: These instructions cover automatic lock and manual lock models...
User Guide
Page 13
... a warmor hotsudace with a dampcloth.This may be used if sprayedon a cloth first. > Do not useabrasive materialssuch as steel wool pads or oven cleaners. DRIP BOWLS - PORCELAFN ENAMEL (COOKTOP ON COFL ELEMENT SURFACE, TRHVI ON GLASSCERAMIC SURFACE) Porcelainenamelis glassfused on control pad and display area. BACKGUARD AND COOKTOP - De sure _ is not immediately removed. SIDEPANELS,STORAGE DRAWER_ DOOR HANDLES & OVEN DOOR (SELECT IvIODELS) > Whencool, wash with clearwater...
... a warmor hotsudace with a dampcloth.This may be used if sprayedon a cloth first. > Do not useabrasive materialssuch as steel wool pads or oven cleaners. DRIP BOWLS - PORCELAFN ENAMEL (COOKTOP ON COFL ELEMENT SURFACE, TRHVI ON GLASSCERAMIC SURFACE) Porcelainenamelis glassfused on control pad and display area. BACKGUARD AND COOKTOP - De sure _ is not immediately removed. SIDEPANELS,STORAGE DRAWER_ DOOR HANDLES & OVEN DOOR (SELECT IvIODELS) > Whencool, wash with clearwater...

User Guide
Page 15
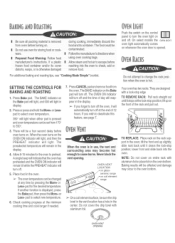
... clean underthe range, TO REPLACE: BULB COVER 1. Do not touch hot bulb with pots, pans, furniture,toys, or otherobjects, 3, Donotclose theovendoor untiltheoven racksare in place, Scratching, hitting, iarring or stressing the glass may feel"spongy"when it isclosed,This is d_.;;;_/" _.-i_;J level, _-" _,_,,p OVEN UGHT TO REMOVE: 1. Slide the door downonto the hinge arms until range is normal and will fall if not held in use , WIRE...
... clean underthe range, TO REPLACE: BULB COVER 1. Do not touch hot bulb with pots, pans, furniture,toys, or otherobjects, 3, Donotclose theovendoor untiltheoven racksare in place, Scratching, hitting, iarring or stressing the glass may feel"spongy"when it isclosed,This is d_.;;;_/" _.-i_;J level, _-" _,_,,p OVEN UGHT TO REMOVE: 1. Slide the door downonto the hinge arms until range is normal and will fall if not held in use , WIRE...

User Guide
Page 16
... rack positiensand pan placement. OVEN DOORWILLNOTUNLOCK AFTER SELF-CLEANCYCLE. | Oveninteriorisstillhet. Allowaboutonehour for moreinfermationon bakeware. THERE IS A STRONG ODOR OR LIGHT SMOKE WHEN OVEN IS TURNED ON. | This isnormalfora newrangeandwilldisappear aftera few minutes,then reconnect power.If faultcode and beepsstill continue, disconnecpt owertotheapplianceandcallan authorizedservicer. | If the ovenis heavilysoiled,excessiveflareupsmay resultin a faultcodeduringa clean cycle. SURFACE OR OVENELEMENTS FAiL TO OPERATEOR HEAT FOOD. | Use correctpan...
... rack positiensand pan placement. OVEN DOORWILLNOTUNLOCK AFTER SELF-CLEANCYCLE. | Oveninteriorisstillhet. Allowaboutonehour for moreinfermationon bakeware. THERE IS A STRONG ODOR OR LIGHT SMOKE WHEN OVEN IS TURNED ON. | This isnormalfora newrangeandwilldisappear aftera few minutes,then reconnect power.If faultcode and beepsstill continue, disconnecpt owertotheapplianceandcallan authorizedservicer. | If the ovenis heavilysoiled,excessiveflareupsmay resultin a faultcodeduringa clean cycle. SURFACE OR OVENELEMENTS FAiL TO OPERATEOR HEAT FOOD. | Use correctpan...
User Guide
Page 18
....Lncludinglabor,mileageann Iransportat_on, > Electronic Controls Glass-ceramic Cooktop: due to verify warranty status. Box 2370, Cleveland, TN 37320-2370or call 1-800-688-2080. Thespedfic warrantiesexpressedaboveare the ONLY warrantiesprovtdedt_} the manufacture, These warrantiesgive you specific/ega/rights, and you ma} also nave orner nghts whichvat}. Modelnumberand serial number; c. e. includinglabor,mileageand transportation. Incorrect electriccurrent, voltage,or supply. b. Transportthe applianceto the servicer. 6. tandardofCanadaunless[neappliance...
....Lncludinglabor,mileageann Iransportat_on, > Electronic Controls Glass-ceramic Cooktop: due to verify warranty status. Box 2370, Cleveland, TN 37320-2370or call 1-800-688-2080. Thespedfic warrantiesexpressedaboveare the ONLY warrantiesprovtdedt_} the manufacture, These warrantiesgive you specific/ega/rights, and you ma} also nave orner nghts whichvat}. Modelnumberand serial number; c. e. includinglabor,mileageand transportation. Incorrect electriccurrent, voltage,or supply. b. Transportthe applianceto the servicer. 6. tandardofCanadaunless[neappliance...
Installation Manual
Page 1
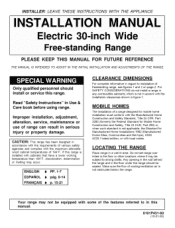
... CLEARANCE DIMENSIONS For complete information in the floor under the range should install or service this range is not in accordance with the requirements of 194°F. MOBILE HOMES The installation of freestanding range, see figures 1 and 2 on page 2. LOCATING THE RANGE Place range in Use & Care book before using range. Any opening in the wall behind the range and in regard to strong drafts. Read "Safety Instructions" in...
... CLEARANCE DIMENSIONS For complete information in the floor under the range should install or service this range is not in accordance with the requirements of 194°F. MOBILE HOMES The installation of freestanding range, see figures 1 and 2 on page 2. LOCATING THE RANGE Place range in Use & Care book before using range. Any opening in the wall behind the range and in regard to strong drafts. Read "Safety Instructions" in...

Installation Manual
Page 4
... performance adjust the range so that it back into position. For SAFETY CONSIDERATIONS as well as required. tf an adjustment is level. Proceed with the remainder of water on the cooktop or the oven rack. FIGURE 4 -4- B. Align the range to the range may be installed by placing a spirit level or a large pan of the installation instructions provided with a glass top have a non lift-up . ANTI-TIP DEVICE INSTALLATION INSTRUCTIONS STEP...
... performance adjust the range so that it back into position. For SAFETY CONSIDERATIONS as well as required. tf an adjustment is level. Proceed with the remainder of water on the cooktop or the oven rack. FIGURE 4 -4- B. Align the range to the range may be installed by placing a spirit level or a large pan of the installation instructions provided with a glass top have a non lift-up . ANTI-TIP DEVICE INSTALLATION INSTRUCTIONS STEP...
Installation Manual
Page 5
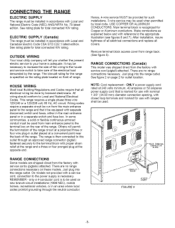
... electric service to your home is adequate. RANGE CONNECTIONS Some models are shipped direct from the factory with a service cord, connection to the power supply is recognized for outlet location. After installation, insure tightness of range. Just plug into the range outlet. This range requires a single phase three wire 120/240 or a 120/208 volt, 60 Hz, AC circuit. There are no range connections necessary on front of all electrical connections and replace all electrical wiring...
... electric service to your home is adequate. RANGE CONNECTIONS Some models are shipped direct from the factory with a service cord, connection to the power supply is recognized for outlet location. After installation, insure tightness of range. Just plug into the range outlet. This range requires a single phase three wire 120/240 or a 120/208 volt, 60 Hz, AC circuit. There are no range connections necessary on front of all electrical connections and replace all electrical wiring...
Installation Manual
Page 6
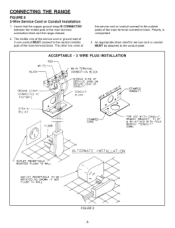
... 6 3-Wire Service Cord or Conduit Installation 1. The other two wires of the service cord or conduit connect to the neutral (middle) post of the main terminal connection block and the range chassis. 2. An appropriate strain relief for service cord or conduit MUST be attached to the conduit plate. CONDUIT _,__"1 /--STAMPED _%_'Sj_,,'_"IL/" CONDUIT STRAIN RELIEF PLATE __ i/ v STAMPED _/ CORD _ FOR USE WITH CONDUIT, REMOVE BRACKET...
... 6 3-Wire Service Cord or Conduit Installation 1. The other two wires of the service cord or conduit connect to the neutral (middle) post of the main terminal connection block and the range chassis. 2. An appropriate strain relief for service cord or conduit MUST be attached to the conduit plate. CONDUIT _,__"1 /--STAMPED _%_'Sj_,,'_"IL/" CONDUIT STRAIN RELIEF PLATE __ i/ v STAMPED _/ CORD _ FOR USE WITH CONDUIT, REMOVE BRACKET...
Installation Manual
Page 7
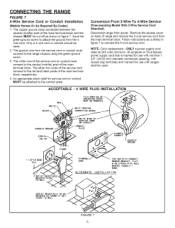
... amperes power supply cord that is marked for use with nominal 1 3/8" (34.93 mm) diameter connection opening, with closed loop terminals and marked for service cord or conduit MUST be cut off as outlined in figure 7. Only a 4 wire cord or conduit should be used . 2. The copper ground strap connected between the neutral (middle) post of range and remove the 3-wire service cord from power. CONNECTING THE RANGE FIGURE 7 4-Wire Service Cord or Conduit Installation (Mobile...
... amperes power supply cord that is marked for use with nominal 1 3/8" (34.93 mm) diameter connection opening, with closed loop terminals and marked for service cord or conduit MUST be cut off as outlined in figure 7. Only a 4 wire cord or conduit should be used . 2. The copper ground strap connected between the neutral (middle) post of range and remove the 3-wire service cord from power. CONNECTING THE RANGE FIGURE 7 4-Wire Service Cord or Conduit Installation (Mobile...


