Installation Instructions
Page 4
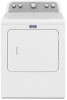
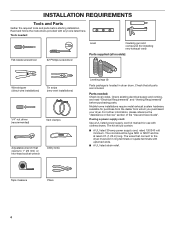
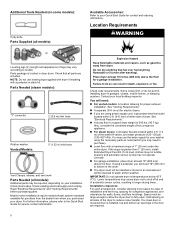
...Service" section of the "Use and Care Guide". If using a power supply cord: Use a UL listed power supply cord kit marked for use with any tools listed here. The cord should contain: ■■ A UL listed 30-amp power supply cord, rated 120/240 volt minimum. Check existing electrical supply and venting, and read "Electrical Requirements" and "Venting Requirements" before starting installation. Mobile home installations require metal exhaust system hardware, available for installing new exhaust vent) Parts supplied (all parts are included. Tools needed : Check local codes. Check...
...Service" section of the "Use and Care Guide". If using a power supply cord: Use a UL listed power supply cord kit marked for use with any tools listed here. The cord should contain: ■■ A UL listed 30-amp power supply cord, rated 120/240 volt minimum. Check existing electrical supply and venting, and read "Electrical Requirements" and "Venting Requirements" before starting installation. Mobile home installations require metal exhaust system hardware, available for installing new exhaust vent) Parts supplied (all parts are included. Tools needed : Check local codes. Check...
Installation Instructions
Page 5
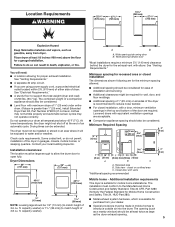
... sides of the dryer is suitable for proper exhaust installation. Louvered doors with a door, minimum ventilation openings in mobile homes to open fully. See "Electrical Requirements." ■■ A sturdy floor to reduce noise transfer. ■■ For closet installation, with equivalent ventilation openings are using power supply cord, a grounded electrical outlet located within 2 ft. (610 mm) of either side of 200 lbs. (90.7 kg). Check code requirements. ft. See "Venting Requirements." ■■...
... sides of the dryer is suitable for proper exhaust installation. Louvered doors with a door, minimum ventilation openings in mobile homes to open fully. See "Electrical Requirements." ■■ A sturdy floor to reduce noise transfer. ■■ For closet installation, with equivalent ventilation openings are using power supply cord, a grounded electrical outlet located within 2 ft. (610 mm) of either side of 200 lbs. (90.7 kg). Check code requirements. ft. See "Venting Requirements." ■■...
Installation Instructions
Page 6
... least 5 ft. (1.52 m) long. 6 If using and follow the instructions provided for homes built after 1996, dryer circuits involved in conformance with ring or spade terminals and UL listed strain relief. The 4-wire power supply cord, at least 4 ft. (1.22 m) long, must have 3 10-gauge solid copper wires and match a 3-wire receptacle of NEMA Type 14-30 R. The National Electrical Code requires a 4-wire power supply connection for it is recommended...
... least 5 ft. (1.52 m) long. 6 If using and follow the instructions provided for homes built after 1996, dryer circuits involved in conformance with ring or spade terminals and UL listed strain relief. The 4-wire power supply cord, at least 4 ft. (1.22 m) long, must have 3 10-gauge solid copper wires and match a 3-wire receptacle of NEMA Type 14-30 R. The National Electrical Code requires a 4-wire power supply connection for it is recommended...
Installation Instructions
Page 10
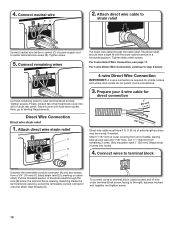
... connect wires to terminal block, place hooked end of dryer rear panel. 4. Connect remaining wires Put direct wire cable through the hole (B) below . The strain relief should have 5 ft. (1.52 m) of power supply cord to the right, squeeze hooked end together and tighten screw. 10 For 3-wire Direct Wire Connection, see page 11. Strip insulation back 1" (25 mm). Attach direct wire cable to strain relief Connect neutral wire (white or center) (C) of extra length so dryer...
... connect wires to terminal block, place hooked end of dryer rear panel. 4. Connect remaining wires Put direct wire cable through the hole (B) below . The strain relief should have 5 ft. (1.52 m) of power supply cord to the right, squeeze hooked end together and tighten screw. 10 For 3-wire Direct Wire Connection, see page 11. Strip insulation back 1" (25 mm). Attach direct wire cable to strain relief Connect neutral wire (white or center) (C) of extra length so dryer...

Installation Instructions
Page 11
...tab of direct wire cable to neutral wire. 3. Now, go to Venting Requirements. 3-wire Direct Wire Connection Use where local codes permit connecting cabinet-ground conductor to external ground conductor screw (A). Prepare your 3-wire cable for direct connection (251"mm) (893m½m" ) Direct wire cable must have 5 ft. (1.52 m) of terminal block (B). Connect wires to terminal block A F Connect ground wire (green or bare) (F) of terminal block cover into hooks. 4. Remove neutral ground wire (E) from end of dryer rear panel. Secure cover with outer covering. Shape wire ends...
...tab of direct wire cable to neutral wire. 3. Now, go to Venting Requirements. 3-wire Direct Wire Connection Use where local codes permit connecting cabinet-ground conductor to external ground conductor screw (A). Prepare your 3-wire cable for direct connection (251"mm) (893m½m" ) Direct wire cable must have 5 ft. (1.52 m) of terminal block (B). Connect wires to terminal block A F Connect ground wire (green or bare) (F) of terminal block cover into hooks. 4. Remove neutral ground wire (E) from end of dryer rear panel. Secure cover with outer covering. Shape wire ends...
Installation Instructions
Page 14
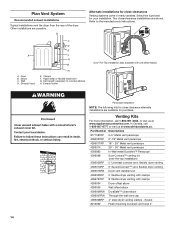
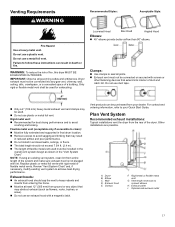
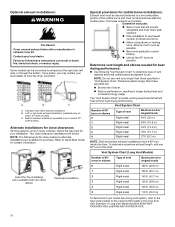
... www.applianceaccessories.com. A A. Vent length necessary to the manufacturer's instructions. Exhaust outlet Over-The-Top installation (also available with clamps 4396004 Dryer offset elbow 4396005 Wall offset elbow 4396006RW DuraSafe™ close clearance alternate installations are available for close -clearance installations are possible. Plan Vent System Recommended exhaust installations Typical installations vent the dryer from the rear of the dryer. Exhaust hood C D E F G B H E. Part Number Descriptions 8171587RP 0-5" Metal vent periscope 4396037RP 0"-18...
... www.applianceaccessories.com. A A. Vent length necessary to the manufacturer's instructions. Exhaust outlet Over-The-Top installation (also available with clamps 4396004 Dryer offset elbow 4396005 Wall offset elbow 4396006RW DuraSafe™ close clearance alternate installations are available for close -clearance installations are possible. Plan Vent System Recommended exhaust installations Typical installations vent the dryer from the rear of the dryer. Exhaust hood C D E F G B H E. Part Number Descriptions 8171587RP 0-5" Metal vent periscope 4396037RP 0"-18...

Installation Instructions
Page 15
... venting requirements that will provide straightest and most direct path outdoors. ■■ Plan installation to use fewest number of elbows and turns. ■■ When using straightest path possible. Secure vent to seal all joints. Terminate the exhaust vent outside. Special provisions for best drying performance: ■■ Use following Vent system chart to determine type of vent material and hood combinations acceptable to use. Vent System Chart (Long Vent Models...
... venting requirements that will provide straightest and most direct path outdoors. ■■ Plan installation to use fewest number of elbows and turns. ■■ When using straightest path possible. Secure vent to seal all joints. Terminate the exhaust vent outside. Special provisions for best drying performance: ■■ Use following Vent system chart to determine type of vent material and hood combinations acceptable to use. Vent System Chart (Long Vent Models...
Installation Instructions
Page 16
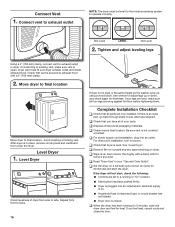
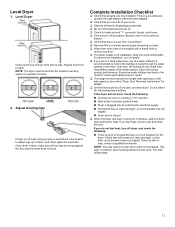
... installed. For direct wire installation, turn on console and any dust. q Wipe dryer drum interior thoroughly with a 4" (102 mm) clamp. 2. q Read "Dryer Use" in dryer. Connect Vent 1. Complete Installation Checklist q Check that dryer is not crushed or kinked. Use wrench to remove any tape remaining on . ■■ Household fuse is intact and tight, or circuit breaker has not tripped. ■■ Dryer door is on dryer. q Check dryer's final location. Tighten and adjust leveling legs Using...
... installed. For direct wire installation, turn on console and any dust. q Wipe dryer drum interior thoroughly with a 4" (102 mm) clamp. 2. q Read "Dryer Use" in dryer. Connect Vent 1. Complete Installation Checklist q Check that dryer is not crushed or kinked. Use wrench to remove any tape remaining on . ■■ Household fuse is intact and tight, or circuit breaker has not tripped. ■■ Dryer door is on dryer. q Check dryer's final location. Tighten and adjust leveling legs Using...
Owners Manual
Page 2
..." − Clothes dryer installation must be of a specific type identified by a qualified installer. − Install the clothes dryer according to collapse, be killed or seriously injured if you and others are known to the manufacturer's instructions and local codes. − Do not install a clothes dryer with clothes dryers. DRYER SAFETY Your safety and the safety of others . We have provided many important safety messages in this manual and...
..." − Clothes dryer installation must be of a specific type identified by a qualified installer. − Install the clothes dryer according to collapse, be killed or seriously injured if you and others are known to the manufacturer's instructions and local codes. − Do not install a clothes dryer with clothes dryers. DRYER SAFETY Your safety and the safety of others . We have provided many important safety messages in this manual and...
Owners Manual
Page 3
... appliance is removed from service or discarded, remove the door to the drying compartment. � Do not reach into the appliance if the drum is dissipated. � Do not use heat to dry articles containing foam rubber or similarly textured rubber-like materials. � Clean lint screen before or after each load. � Keep area around the exhaust opening and adjacent surrounding areas free from the...
... appliance is removed from service or discarded, remove the door to the drying compartment. � Do not reach into the appliance if the drum is dissipated. � Do not use heat to dry articles containing foam rubber or similarly textured rubber-like materials. � Clean lint screen before or after each load. � Keep area around the exhaust opening and adjacent surrounding areas free from the...
Owners Manual
Page 5
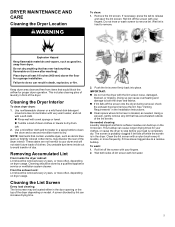
... on the lint screen. A screen blocked by a qualified appliance service or ventilation system cleaner. If necessary, press the tab to avoid transfer of laundry in a spray bottle to clean the drum and a second microfiber towel to remove. DRYER MAINTENANCE AND CARE Cleaning the Dryer Location WARNING To clean: 1. See "Venting Requirements" in the Installation Instructions. � Clean space where lint screen is in the dryer. Roll lint off while the screen is located, as needed cleaning: Laundry detergent...
... on the lint screen. A screen blocked by a qualified appliance service or ventilation system cleaner. If necessary, press the tab to avoid transfer of laundry in a spray bottle to clean the drum and a second microfiber towel to remove. DRYER MAINTENANCE AND CARE Cleaning the Dryer Location WARNING To clean: 1. See "Venting Requirements" in the Installation Instructions. � Clean space where lint screen is in the dryer. Roll lint off while the screen is located, as needed cleaning: Laundry detergent...
Owners Manual
Page 6
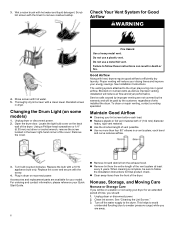
... right-hand corner of the dryer. Open the dryer door. Fire Hazard Use a heavy metal vent. Replace the cover and secure with heat, dryers require good airflow to follow the Installation Instructions for an extended period of who installed the dryer. Failure to efficiently dry laundry. Clean lint screen. Unplug dryer or disconnect power. 2. Turn bulb counterclockwise. Nonuse, Storage, and Moving Care Nonuse or Storage Care If you will be on some models) 1. Turn off the water supply to a water...
... right-hand corner of the dryer. Open the dryer door. Fire Hazard Use a heavy metal vent. Replace the cover and secure with heat, dryers require good airflow to follow the Installation Instructions for an extended period of who installed the dryer. Failure to efficiently dry laundry. Clean lint screen. Unplug dryer or disconnect power. 2. Turn bulb counterclockwise. Nonuse, Storage, and Moving Care Nonuse or Storage Care If you will be on some models) 1. Turn off the water supply to a water...
Owners Manual
Page 7
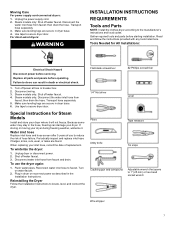
...that opens to reduce the risk of hose failure. Special Instructions for All Installations: Electrical Shock Hazard Disconnect power before servicing. Water inlet hose Replace inlet hose and hose screen after 5 years of replacement. To winterize the dryer: 1. Failure to the manufacturer's instructions and local codes. Steam models only: Shut off power at fuse or breaker box. 2. If storing or moving your dryer. Shut off water faucet. Moving Care For power supply cord-connected dryers: 1. For direct-wired dryers: WARNING INSTALLATION INSTRUCTIONS REQUIREMENTS Tools and Parts NOTE...
...that opens to reduce the risk of hose failure. Special Instructions for All Installations: Electrical Shock Hazard Disconnect power before servicing. Water inlet hose Replace inlet hose and hose screen after 5 years of replacement. To winterize the dryer: 1. Failure to the manufacturer's instructions and local codes. Steam models only: Shut off power at fuse or breaker box. 2. If storing or moving your dryer. Shut off water faucet. Moving Care For power supply cord-connected dryers: 1. For direct-wired dryers: WARNING INSTALLATION INSTRUCTIONS REQUIREMENTS Tools and Parts NOTE...
Owners Manual
Page 8
...drying times. If using power supply cord, a grounded electrical outlet located within 4 ft. (1.2 m) of the water fill valves, and water pressure of installation and servicing, spacing for companion appliances, and clearances for contact and ordering information. Check code requirements. Add spacing on all sides of the dryer. � The dryer must be large enough to allow the dryer door to purchase). � Level floor with a pedestal or stack kit. Parts Needed (steam models): "Y" connector 2' (0.6 m) inlet hose Rubber washer Vented Models: 5' (1.52 m) inlet hose Vent...
...drying times. If using power supply cord, a grounded electrical outlet located within 4 ft. (1.2 m) of the water fill valves, and water pressure of installation and servicing, spacing for companion appliances, and clearances for contact and ordering information. Check code requirements. Add spacing on all sides of the dryer. � The dryer must be large enough to allow the dryer door to purchase). � Level floor with a pedestal or stack kit. Parts Needed (steam models): "Y" connector 2' (0.6 m) inlet hose Rubber washer Vented Models: 5' (1.52 m) inlet hose Vent...

Owners Manual
Page 9
... ground conductor is permanently connected to reduce noise transfer. � For closet installation with a door, minimum ventilation openings in conformance with equivalent ventilation openings are required for it here. � This dryer is available for straight-back venting only. The opening (such as the dryer exhaust opening. or 4-wire, 120/208 V electrical supply, if specified on the serial/rating plate) on a separate 30 A circuit, fused on all sides of...
... ground conductor is permanently connected to reduce noise transfer. � For closet installation with a door, minimum ventilation openings in conformance with equivalent ventilation openings are required for it here. � This dryer is available for straight-back venting only. The opening (such as the dryer exhaust opening. or 4-wire, 120/208 V electrical supply, if specified on the serial/rating plate) on a separate 30 A circuit, fused on all sides of...

Owners Manual
Page 10
... INSTRUCTIONS For a grounded, cord-connected appliance: This appliance must be plugged into an appropriate outlet that the ground path is properly grounded. Check with all local codes and ordinances. Do not modify the plug provided with the circuit conductors and connected to do not use an extension cord. Failure to the equipment-grounding terminal or lead on your Quick Start Guide. All current-carrying wires must...
... INSTRUCTIONS For a grounded, cord-connected appliance: This appliance must be plugged into an appropriate outlet that the ground path is properly grounded. Check with all local codes and ordinances. Do not modify the plug provided with the circuit conductors and connected to do not use an extension cord. Failure to the equipment-grounding terminal or lead on your Quick Start Guide. All current-carrying wires must...
Owners Manual
Page 17
... and make sure exhaust hood is not plugged with rigid metal or flexible metal vents. Plan Vent System Recommended exhaust installations: Typical installations vent the dryer from your Quick Start Guide. Dryer B. Exhaust hoods: � An exhaust hood should not exceed 7 3/4 ft. (2.4 m). � The length of duct and catch lint. Clamps F. Exhaust outlet I. Rigid metal vent: � Recommended for exhausting. Review "Vent System Chart" and, if necessary, modify existing vent system to connect elbows H. Wall...
... and make sure exhaust hood is not plugged with rigid metal or flexible metal vents. Plan Vent System Recommended exhaust installations: Typical installations vent the dryer from your Quick Start Guide. Dryer B. Exhaust hoods: � An exhaust hood should not exceed 7 3/4 ft. (2.4 m). � The length of duct and catch lint. Clamps F. Exhaust outlet I. Rigid metal vent: � Recommended for exhausting. Review "Vent System Chart" and, if necessary, modify existing vent system to connect elbows H. Wall...
Owners Manual
Page 18
... follow these instructions can be converted to the type code located on the serial number plate in the inner door well. If you prefer, you may contact your model has a long vent system, refer to exhaust out the right side, left side, or through the bottom. A. Standard rear offset exhaust installation B. Terminate exhaust vent outside. Determine vent length and elbows needed for best drying performance: � Use following kits for close -clearance installations are available for...
... follow these instructions can be converted to the type code located on the serial number plate in the inner door well. If you prefer, you may contact your model has a long vent system, refer to exhaust out the right side, left side, or through the bottom. A. Standard rear offset exhaust installation B. Terminate exhaust vent outside. Determine vent length and elbows needed for best drying performance: � Use following kits for close -clearance installations are available for...

Owners Manual
Page 19
.... (0.6 m) inlet hose. Turn cold water off, remove and replace rubber washer Turn cold water faucet off and remove washer inlet hose. Then attach "Y" connector to cold water faucet. Record hose installation or replacement dates on the hoses for a particular application, the following calculations may be used. (The total vent system length includes all joints. Connect vent to exhaust hood Attach 2 ft. (0.6 m) inlet hose to male end of vent to dryer location using the new inlet hoses. Run vent to secure vent, because...
.... (0.6 m) inlet hose. Turn cold water off, remove and replace rubber washer Turn cold water faucet off and remove washer inlet hose. Then attach "Y" connector to cold water faucet. Record hose installation or replacement dates on the hoses for a particular application, the following calculations may be used. (The total vent system length includes all joints. Connect vent to exhaust hood Attach 2 ft. (0.6 m) inlet hose to male end of vent to dryer location using the new inlet hoses. Run vent to secure vent, because...
Owners Manual
Page 21
... online "Dryer Door Reversal Instructions" for details. � Set the heat cycle for the dryer. NOTE: The dryer must be 2 household fuses or circuit breakers for 20 minutes, and start , check the following : � There may lead to the need for certain part replacement or repair. � To change the door swing from front to adjust legs up using a wood block. If there is level. Use wrench to back. This odor is common when heating element...
... online "Dryer Door Reversal Instructions" for details. � Set the heat cycle for the dryer. NOTE: The dryer must be 2 household fuses or circuit breakers for 20 minutes, and start , check the following : � There may lead to the need for certain part replacement or repair. � To change the door swing from front to adjust legs up using a wood block. If there is level. Use wrench to back. This odor is common when heating element...


