Owners Manual
Page 4
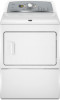
...load. During Sensor Cycles, drying air temperature and moisture level are not covered by the warranty and will be sure to follow the Installation Instructions supplied with your dryer for better fabric care and energy savings Use the Sensor Cycles to efficiently dry laundry. This sensing occurs throughout...the load reaches the selected dryness. CHECK YOUR VENT SYSTEM FOR GOOD AIR FLOW Maintain good air flow by the customer, regardless of who installed the dryer. Service calls caused by improper venting are sensed in shrinkage, wrinkling, and static due to over-drying. n Use no ...
...load. During Sensor Cycles, drying air temperature and moisture level are not covered by the warranty and will be sure to follow the Installation Instructions supplied with your dryer for better fabric care and energy savings Use the Sensor Cycles to efficiently dry laundry. This sensing occurs throughout...the load reaches the selected dryness. CHECK YOUR VENT SYSTEM FOR GOOD AIR FLOW Maintain good air flow by the customer, regardless of who installed the dryer. Service calls caused by improper venting are sensed in shrinkage, wrinkling, and static due to over-drying. n Use no ...
Owners Manual
Page 11
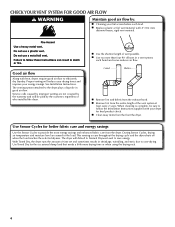
...be adjusted to adapt to select the dryness level shown in dryer or reconnect power. Press the TEMP LEVEL button to different installations, environmental conditions or personal preference. Unplug dryer or disconnect power. 2. Replace the bulb with the screw. 4. The dryer ...on some models) 1. Clean lint screen. Use tape to locate, level, and connect the dryer. 3. Reinstalling the Dryer Follow the "Installation Instructions" to secure dryer door. See "Cleaning the Lint Screen." This change the drying settings: NOTE: The settings cannot be in standby mode...
...be adjusted to adapt to select the dryness level shown in dryer or reconnect power. Press the TEMP LEVEL button to different installations, environmental conditions or personal preference. Unplug dryer or disconnect power. 2. Replace the bulb with the screw. 4. The dryer ...on some models) 1. Clean lint screen. Use tape to locate, level, and connect the dryer. 3. Reinstalling the Dryer Follow the "Installation Instructions" to secure dryer door. See "Cleaning the Lint Screen." This change the drying settings: NOTE: The settings cannot be in standby mode...

Owners Manual
Page 12
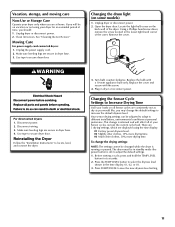
...Hold your hand under the outside exhaust hood clogged with a qualified electrician. 12 Exhaust vent the correct length? See the Installation Instructions. Dryer located in a closet. START/PAUSE button not pressed firmly or held long enough. Electric dryers use 2 household ...maytag.com/help - Separate the load to check air movement. Run the dryer for the types of garments being dried. Use only one fabric softener sheet, and use . Check that the exhaust vent is blown or circuit breaker has tripped. Use 4" (102 mm) diameter vent material. See "Installation Instructions...
...Hold your hand under the outside exhaust hood clogged with a qualified electrician. 12 Exhaust vent the correct length? See the Installation Instructions. Dryer located in a closet. START/PAUSE button not pressed firmly or held long enough. Electric dryers use 2 household ...maytag.com/help - Separate the load to check air movement. Run the dryer for the types of garments being dried. Use only one fabric softener sheet, and use . Check that the exhaust vent is blown or circuit breaker has tripped. Use 4" (102 mm) diameter vent material. See "Installation Instructions...

Owners Manual
Page 14
...Write down the following information about your major appliance, to instruct you are excluded from warranty coverage. 4. The removal and reinstallation of your major appliance is located in accordance with Maytag published installation instructions. 10. Some states and provinces do not allow the ...exclusion or limitation of incidental or consequential damages, so these limitations and exclusions may not apply to Maytag within 30 days from the date ...
...Write down the following information about your major appliance, to instruct you are excluded from warranty coverage. 4. The removal and reinstallation of your major appliance is located in accordance with Maytag published installation instructions. 10. Some states and provinces do not allow the ...exclusion or limitation of incidental or consequential damages, so these limitations and exclusions may not apply to Maytag within 30 days from the date ...
Installation Instructions
Page 3
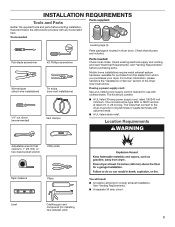
... metal exhaust system hardware, available for proper exhaust installation. Read and follow the instructions provided with clothes dryers. The kit should be type SRD or SRDT and be at least 4 ft. (1.22 m) long. Tools needed : Check...The wires that opens to the dryer must end in dryer drum. Parts needed : Flat-blade screwdriver #2 Phillips screwdriver Wire stripper (direct wire installations) Tin snips (new vent installations) 1/4" nut driver (recommended) Vent clamps Leveling legs (4) Parts package is located in ring terminals or spade terminals with upturned ends. ■...
... metal exhaust system hardware, available for proper exhaust installation. Read and follow the instructions provided with clothes dryers. The kit should be type SRD or SRDT and be at least 4 ft. (1.22 m) long. Tools needed : Check...The wires that opens to the dryer must end in dryer drum. Parts needed : Flat-blade screwdriver #2 Phillips screwdriver Wire stripper (direct wire installations) Tin snips (new vent installations) 1/4" nut driver (recommended) Vent clamps Leveling legs (4) Parts package is located in ring terminals or spade terminals with upturned ends. ■...

Installation Instructions
Page 5
... cable (with ground wire), covered with ring or spade terminals and UL listed strain relief. Grounding through the neutral is prohibited for (1) new branch-circuit installations, (2) mobile homes, (3) recreational vehicles, and (4) areas where local codes prohibit grounding through the neutral conductor is prohibited. The 4-wire power supply cord, at ...The cord should contain: ■■ A UL listed 30-amp power supply cord, rated 120/240 volt minimum. If using and follow the instructions provided for it here. ■■ If local codes do not use with clothes dryers.
... cable (with ground wire), covered with ring or spade terminals and UL listed strain relief. Grounding through the neutral is prohibited for (1) new branch-circuit installations, (2) mobile homes, (3) recreational vehicles, and (4) areas where local codes prohibit grounding through the neutral conductor is prohibited. The 4-wire power supply cord, at ...The cord should contain: ■■ A UL listed 30-amp power supply cord, rated 120/240 volt minimum. If using and follow the instructions provided for it here. ■■ If local codes do not use with clothes dryers.
Installation Instructions
Page 13
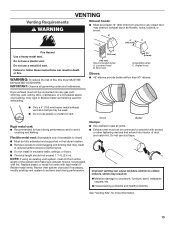
...location. ■■ Remove excess to avoid sagging and kinking that may result in reduced airflow and poor performance. ■■ Do not install in : Moisture damage to avoid crushing and kinking. Good Better Clamps: ■■ Use clamps to collect indoors, which may be used .... ■■ Do not use plastic or metal foil vent. Failure to follow these instructions can cause moisture and lint to seal all governing codes and ordinances. Flexible metal vent: (Acceptable only if accessible to achieve best drying ...
...location. ■■ Remove excess to avoid sagging and kinking that may result in reduced airflow and poor performance. ■■ Do not install in : Moisture damage to avoid crushing and kinking. Good Better Clamps: ■■ Use clamps to collect indoors, which may be used .... ■■ Do not use plastic or metal foil vent. Failure to follow these instructions can cause moisture and lint to seal all governing codes and ordinances. Flexible metal vent: (Acceptable only if accessible to achieve best drying ...
Installation Instructions
Page 14
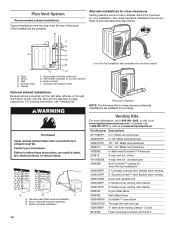
... available with clamps 4396004 Dryer offset elbow 4396005 Wall offset elbow 4396006RW DuraSafe™ close clearance alternate installations are possible. Each kit includes step-by-step instructions. A B C A. Left or right side exhaust installation C. Bottom exhaust installation 14 Venting Kits For more information, call 1-800-807-6777 or visit us at www.whirlpoolparts.ca. universal...
... available with clamps 4396004 Dryer offset elbow 4396005 Wall offset elbow 4396006RW DuraSafe™ close clearance alternate installations are possible. Each kit includes step-by-step instructions. A B C A. Left or right side exhaust installation C. Bottom exhaust installation 14 Venting Kits For more information, call 1-800-807-6777 or visit us at www.whirlpoolparts.ca. universal...


