Installation Instructions
Page 2
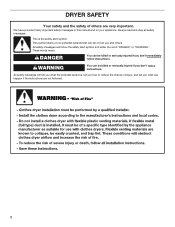
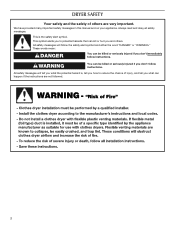
... killed or seriously injured if you and others are not followed. 2 We have provided many important safety messages in this manual and on your appliance. DRYER SAFETY Your safety and the safety of injury, and tell you don't follow instructions. Always read and obey all safety messages. WARNING You can kill...
... killed or seriously injured if you and others are not followed. 2 We have provided many important safety messages in this manual and on your appliance. DRYER SAFETY Your safety and the safety of injury, and tell you don't follow instructions. Always read and obey all safety messages. WARNING You can kill...
Installation Instructions
Page 3
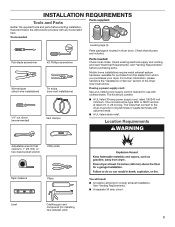
...hardware, available for use with any tools listed here. For further information, please reference the "Assistance or Service" section of the Dryer User Instructions. Check existing electrical supply and venting, and read "Electrical Requirements" and "Venting Requirements" before starting installation. Check that opens ...using a power supply cord: Use a UL listed power supply cord kit marked for purchase from the dealer from whom you purchased your dryer. The wires that connect to 1" (25 mm) or hex-head socket wrench Utility knife Tape measure Level Pliers Caulking gun and compound...
...hardware, available for use with any tools listed here. For further information, please reference the "Assistance or Service" section of the Dryer User Instructions. Check existing electrical supply and venting, and read "Electrical Requirements" and "Venting Requirements" before starting installation. Check that opens ...using a power supply cord: Use a UL listed power supply cord kit marked for purchase from the dealer from whom you purchased your dryer. The wires that connect to 1" (25 mm) or hex-head socket wrench Utility knife Tape measure Level Pliers Caulking gun and compound...
Installation Instructions
Page 4
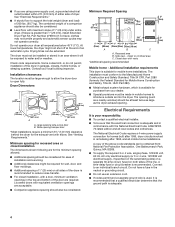
...9632; For closet installation, with equivalent ventilation openings are acceptable. ■■ Companion appliance spacing should also be obtained from your dryer at temperatures below 45°F (7°C). Recessed area B. Electrical Requirements It is adequate and in mobile homes to open fully.... Special provisions must conform to water and/or weather. Check code requirements. Connect to support the total weight (dryer and load) of dryer. The dryer must be at the end of installation and servicing. ■■ Additional clearances might not shut off at least...
...9632; For closet installation, with equivalent ventilation openings are acceptable. ■■ Companion appliance spacing should also be obtained from your dryer at temperatures below 45°F (7°C). Recessed area B. Electrical Requirements It is adequate and in mobile homes to open fully.... Special provisions must conform to water and/or weather. Check code requirements. Connect to support the total weight (dryer and load) of dryer. The dryer must be at the end of installation and servicing. ■■ Additional clearances might not shut off at least...

Installation Instructions
Page 5
... where grounding through the neutral conductor is manufactured ready to install with flexible metallic conduit. Electrical Connection To properly install your dryer, you must determine the type of electrical connection you will be using a power supply cord: Use a UL listed power... the connection of a neutral ground wire to the neutral wire, see "Optional 3-wire connection" section. ■■ This dryer is prohibited. If the dryer is prohibited for (1) new branch-circuit installations, (2) mobile homes, (3) recreational vehicles, and (4) areas where local codes prohibit ...
... where grounding through the neutral conductor is manufactured ready to install with flexible metallic conduit. Electrical Connection To properly install your dryer, you must determine the type of electrical connection you will be using a power supply cord: Use a UL listed power... the connection of a neutral ground wire to the neutral wire, see "Optional 3-wire connection" section. ■■ This dryer is prohibited. If the dryer is prohibited for (1) new branch-circuit installations, (2) mobile homes, (3) recreational vehicles, and (4) areas where local codes prohibit ...

Installation Instructions
Page 6
... legs Examine leveling legs, find diamond marking. place under entire back edge of cardboard from dryer carton; Install Leveling Legs WARNING 2. Failure to connect the exhaust vent. Prepare dryer for electrical connection and to do so can result in leveling legs Excessive Weight Hazard Use ...two or more people to move and install dryer. Firmly grasp dryer body (not console panel) and gently lay dryer down on its final location. Now stand the dryer on cardboard. 6 Slide the dryer until it is close to finish turning legs until diamond marking ...
... legs Examine leveling legs, find diamond marking. place under entire back edge of cardboard from dryer carton; Install Leveling Legs WARNING 2. Failure to connect the exhaust vent. Prepare dryer for electrical connection and to do so can result in leveling legs Excessive Weight Hazard Use ...two or more people to move and install dryer. Firmly grasp dryer body (not console panel) and gently lay dryer down on its final location. Now stand the dryer on cardboard. 6 Slide the dryer until it is close to finish turning legs until diamond marking ...

Installation Instructions
Page 8
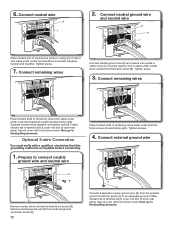
... the hole below the terminal block opening (B) so that the wire insulation on strain relief). Tighten screw. 8 Ring terminals 3. Neutral prong E. Spade terminals with the dryer cabinet and be in place.
... the hole below the terminal block opening (B) so that the wire insulation on strain relief). Tighten screw. 8 Ring terminals 3. Neutral prong E. Spade terminals with the dryer cabinet and be in place.

Installation Instructions
Page 9
...screws. Now, go to Venting Requirements. 9 Spade terminals with hold -down screw. Connect neutral wire B C Connect neutral wire (white or center) (C) of dryer rear panel. Remove center, silver-colored terminal block screw (B). 4. Finally, reinsert tab of terminal block cover into slot of power supply cord to Venting Requirements... with upturned ends E. 3/4" (19 mm) UL listed strain relief F. Tighten screw. 5. 5. Connect ground wire A F Connect ground wire (F) (green or bare) of dryer rear panel. B D E A C GF A. 3-wire receptacle (NEMA type 10-30R) B. 3-wire plug C.
...screws. Now, go to Venting Requirements. 9 Spade terminals with hold -down screw. Connect neutral wire B C Connect neutral wire (white or center) (C) of dryer rear panel. Remove center, silver-colored terminal block screw (B). 4. Finally, reinsert tab of terminal block cover into slot of power supply cord to Venting Requirements... with upturned ends E. 3/4" (19 mm) UL listed strain relief F. Tighten screw. 5. 5. Connect ground wire A F Connect ground wire (F) (green or bare) of dryer rear panel. B D E A C GF A. 3-wire receptacle (NEMA type 10-30R) B. 3-wire plug C.

Installation Instructions
Page 10
... of the strain relief (C) through the strain relief. Reaching inside the terminal block opening (B). Strip 5" (127 mm) of extra length so dryer may be in a horizontal position. Tighten strain relief screw against the direct wire cable. Shape ends of wire under terminal block screw, facing ...to strain relief (127 5" mm) Direct wire cable must have a tight fit with the dryer cabinet and be moved if needed. The strain relief should have 5 ft. (1.52 m) of outer covering from external ground conductor screw (A). 10 A...
... of the strain relief (C) through the strain relief. Reaching inside the terminal block opening (B). Strip 5" (127 mm) of extra length so dryer may be in a horizontal position. Tighten strain relief screw against the direct wire cable. Shape ends of wire under terminal block screw, facing ...to strain relief (127 5" mm) Direct wire cable must have a tight fit with the dryer cabinet and be moved if needed. The strain relief should have 5 ft. (1.52 m) of outer covering from external ground conductor screw (A). 10 A...

Installation Instructions
Page 11
... hooked ends together and tighten screw. 7. Strip 31/2" (89 mm) of outer covering from end of extra length so dryer may be moved if needed. Remove center screw B Place hooked ends of dryer rear panel. Strip insulation back 1" (25 mm). Finally, reinsert tab of terminal block cover into hooks. 4. 6. If using 3-wire...
... hooked ends together and tighten screw. 7. Strip 31/2" (89 mm) of outer covering from end of extra length so dryer may be moved if needed. Remove center screw B Place hooked ends of dryer rear panel. Strip insulation back 1" (25 mm). Finally, reinsert tab of terminal block cover into hooks. 4. 6. If using 3-wire...
Installation Instructions
Page 12
...colored terminal block screw (B). Connect neutral ground wire and neutral wire B E C Place hooked end of neutral wire (white or cente) (C) of dryer rear panel. Tighten screw. 7. Squeeze hooked end together. Connect external ground wire E B A Remove center, silver-colored terminal block screw (B). ...outer terminal block screws (hooks facing right). Secure cover with hold -down screw. Connect remaining wires Place hooked ends of dryer rear panel. Finally, reinsert tab of terminal block cover into slot of remaining direct wire cable wires under outer terminal block...
...colored terminal block screw (B). Connect neutral ground wire and neutral wire B E C Place hooked end of neutral wire (white or cente) (C) of dryer rear panel. Tighten screw. 7. Squeeze hooked end together. Connect external ground wire E B A Remove center, silver-colored terminal block screw (B). ...outer terminal block screws (hooks facing right). Secure cover with hold -down screw. Connect remaining wires Place hooked ends of dryer rear panel. Finally, reinsert tab of terminal block cover into slot of remaining direct wire cable wires under outer terminal block...
Installation Instructions
Page 13
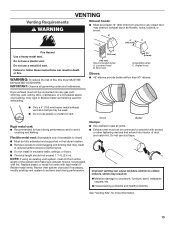
... or snow). Replace plastic or metal foil vents with lint. Do not use a metal foil vent. Do not use plastic or metal foil vent. Dryer exhaust must not be connected into interior of the system and make sure exhaust hood is not plugged with rigid metal or flexible metal vents.... Only rigid or flexible metal vent shall be fully extended and supported in final dryer location. ■■ Remove excess to avoid sagging and kinking that extend into any object that may result in reduced airflow and poor performance...
... or snow). Replace plastic or metal foil vents with lint. Do not use a metal foil vent. Do not use plastic or metal foil vent. Dryer exhaust must not be connected into interior of the system and make sure exhaust hood is not plugged with rigid metal or flexible metal vents.... Only rigid or flexible metal vent shall be fully extended and supported in final dryer location. ■■ Remove excess to avoid sagging and kinking that extend into any object that may result in reduced airflow and poor performance...
Installation Instructions
Page 14
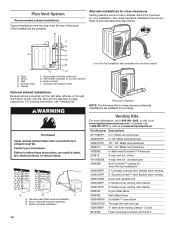
...kit (over-the-top installation) 4396009RP 5' Universal connect vent, flexible dryer venting 4396010RP 6' SecureConnect™ vent, flexible dryer venting 4396013RB Dryer vent installer's kit 4396033RP 5' flexible dryer venting with clamps 4396727RP 8' flexible dryer venting with one offset elbow) B A. Plan Vent System Recommended ...close -clearance installations are shown. Select the type best for close elbow 4396007RW Through-the-wall vent cap 4396008RP 4" steel dryer venting clamps - 2 pack 8212662 Flush mounting louvered vent hood 4" In Canada, call 1-800-901-2042, or visit us...
...kit (over-the-top installation) 4396009RP 5' Universal connect vent, flexible dryer venting 4396010RP 6' SecureConnect™ vent, flexible dryer venting 4396013RB Dryer vent installer's kit 4396033RP 5' flexible dryer venting with clamps 4396727RP 8' flexible dryer venting with one offset elbow) B A. Plan Vent System Recommended ...close -clearance installations are shown. Select the type best for close elbow 4396007RW Through-the-wall vent cap 4396008RP 4" steel dryer venting clamps - 2 pack 8212662 Flush mounting louvered vent hood 4" In Canada, call 1-800-901-2042, or visit us...

Installation Instructions
Page 15
...(305 mm) Determine vent path: ■■ Select route that will help achieve best drying performance. Use clamps to a noncombustible portion of dryer. ■■ Reduce performance, resulting in longer drying times and increased energy usage. Connect Vent 1. Install Vent System 1. The Vent system ...; Bend vent gradually to avoid kinking. ■■ Use as few 90° turns as possible. Avoid 90° turns. Dryer vent must not terminate beneath the mobile home. Terminate the exhaust vent outside. Determine vent length and elbows needed for mobile home installations:...
...(305 mm) Determine vent path: ■■ Select route that will help achieve best drying performance. Use clamps to a noncombustible portion of dryer. ■■ Reduce performance, resulting in longer drying times and increased energy usage. Connect Vent 1. Install Vent System 1. The Vent system ...; Bend vent gradually to avoid kinking. ■■ Use as few 90° turns as possible. Avoid 90° turns. Dryer vent must not terminate beneath the mobile home. Terminate the exhaust vent outside. Determine vent length and elbows needed for mobile home installations:...

Installation Instructions
Page 16
...is common when the heating element is still no heat, contact a qualified technician. The odor will not start the dryer. Move dryer to back. NOTE: The dryer must be 2 household fuses or circuit breakers for the moisture sensing system to see what was skipped. Complete Installation ...Checklist q Check that you have not tripped. q Set the dryer on a full heat cycle (not an air cycle) for heat. Level Dryer 1. q Check dryer's final location. q Read "Dryer Use" in place, remove corner posts and cardboard from front to final location 2. NOTE:...
...is common when the heating element is still no heat, contact a qualified technician. The odor will not start the dryer. Move dryer to back. NOTE: The dryer must be 2 household fuses or circuit breakers for the moisture sensing system to see what was skipped. Complete Installation ...Checklist q Check that you have not tripped. q Set the dryer on a full heat cycle (not an air cycle) for heat. Level Dryer 1. q Check dryer's final location. q Read "Dryer Use" in place, remove corner posts and cardboard from front to final location 2. NOTE:...

Installation Instructions
Page 17
...putty knife or screwdriver. Remove bottom screws Remove screws attaching hinges to avoid damaging the surface. 2. Loosen (do not remove) top screws from dryer cabinet side of dryer. Holding door over towel on inner door. Keep door screws separate from inner door. Take outer door and rotate it 180º and ...set it back down on dryer, grasp sides of outer door and lift to separate it from hinge screws as they are in dryer cabinet are different sizes. Reverse Door Swing (Optional) 1. Set door (handle side up) on top...
...putty knife or screwdriver. Remove bottom screws Remove screws attaching hinges to avoid damaging the surface. 2. Loosen (do not remove) top screws from dryer cabinet side of dryer. Holding door over towel on inner door. Keep door screws separate from inner door. Take outer door and rotate it 180º and ...set it back down on dryer, grasp sides of outer door and lift to separate it from hinge screws as they are in dryer cabinet are different sizes. Reverse Door Swing (Optional) 1. Set door (handle side up) on top...

Installation Instructions
Page 18
Insert screws in hinge holes on dryer cabinet NOTE: 2 people maybe needed , slide door catch left side. Check door strike alignment Reattach door hinges to reinstall door. Troubleshooting See the Use and ... Frequently Asked Questions to opposite side using the same 4 screws. 10. Transfer plugs to possibly avoid the 18 cost of dryer cabinet. Tighten screws halfway. If it is needed to dryer door so that the larger hole is at the bottom of the hinge. Attach door hinges Remove the 4 screws that door...
Insert screws in hinge holes on dryer cabinet NOTE: 2 people maybe needed , slide door catch left side. Check door strike alignment Reattach door hinges to reinstall door. Troubleshooting See the Use and ... Frequently Asked Questions to opposite side using the same 4 screws. 10. Transfer plugs to possibly avoid the 18 cost of dryer cabinet. Tighten screws halfway. If it is needed to dryer door so that the larger hole is at the bottom of the hinge. Attach door hinges Remove the 4 screws that door...
Owners Manual
Page 2
... important. We have provided many important safety messages in this manual and on your appliance. This symbol alerts you to reduce the chance of others . DRYER SAFETY Your safety and the safety of injury, and tell you don't follow instructions. Always read and obey all safety messages.
... important. We have provided many important safety messages in this manual and on your appliance. This symbol alerts you to reduce the chance of others . DRYER SAFETY Your safety and the safety of injury, and tell you don't follow instructions. Always read and obey all safety messages.

Owners Manual
Page 4
...with 4" (102 mm) diameter heavy, rigid vent material. Use Sensor Cycles for better fabric care and energy savings Use the Sensor Cycles to the dryer plays a big role in death or re. During Sensor Cycles, drying air temperature and moisture level are not covered by the warranty and will reduce... your drying times and improve your dryer for the occasional damp load that needs a little more than four 90° elbows in the load. Do not use a plastic vent. See ...
...with 4" (102 mm) diameter heavy, rigid vent material. Use Sensor Cycles for better fabric care and energy savings Use the Sensor Cycles to the dryer plays a big role in death or re. During Sensor Cycles, drying air temperature and moisture level are not covered by the warranty and will reduce... your drying times and improve your dryer for the occasional damp load that needs a little more than four 90° elbows in the load. Do not use a plastic vent. See ...
Owners Manual
Page 5
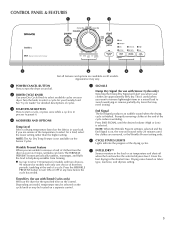
...3 7 6 5 4 5 Not all models. Timed Dry (for detailed descriptions of the drying cycles. 7 INTELLIDRY™ Senses moisture in a mixed load to turn the dryer on the fabrics in the shortest time. Appearance may need ironing. Press the WRINKLE PREVENT button to avoid overdrying or remove partially dry items that... may vary. 1 POWER/CANCEL BUTTON Press to help keep wrinkles from the dryer as soon as it . 4 MODIFIERS AND OPTIONS Temp Level Select a drying temperature based on and off when the load reaches the...
...3 7 6 5 4 5 Not all models. Timed Dry (for detailed descriptions of the drying cycles. 7 INTELLIDRY™ Senses moisture in a mixed load to turn the dryer on the fabrics in the shortest time. Appearance may need ironing. Press the WRINKLE PREVENT button to avoid overdrying or remove partially dry items that... may vary. 1 POWER/CANCEL BUTTON Press to help keep wrinkles from the dryer as soon as it . 4 MODIFIERS AND OPTIONS Temp Level Select a drying temperature based on and off when the load reaches the...
Owners Manual
Page 6
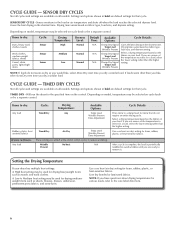
... dry a similar load. Setting the Drying Temperature If your load. Depending on model, temperature may be a separate control. Will run the dryer for the specified time on cycle knob or be used for drying heavyweight items such as you would like , select Less Dry next time ...: Options: Cycle Details: N/A Damp Dry Signal Gives the best drying in the shortest time. Line dry bonded or laminated fabrics. Senses moisture in your dryer has multiple heat settings: A High heat setting may be a separate control. Use a no heat (air dry) setting for various loads, refer to...
... dry a similar load. Setting the Drying Temperature If your load. Depending on model, temperature may be a separate control. Will run the dryer for the specified time on cycle knob or be used for drying heavyweight items such as you would like , select Less Dry next time ...: Options: Cycle Details: N/A Damp Dry Signal Gives the best drying in the shortest time. Line dry bonded or laminated fabrics. Senses moisture in your dryer has multiple heat settings: A High heat setting may be a separate control. Use a no heat (air dry) setting for various loads, refer to...


