User Guide
Page 3
IMPORTANT SAFETY INSTRUCTIONS WARNJN G: To reduce the risk of fire, electric shock, or injury to persons when using the dryer, follow instructions. Your safety and the safety of others . Always read and obey all instructions before or after each load. []... instructions are very important. All safety messages will be exposed to the weather. [] Do not repair or replace any part of the dryer and exhaust vent should be cleaned periodically by qualified service personnel. [] See installation instructions for grounding requirements. [] Do not tamper with gasoline, drycleaning solvents...
IMPORTANT SAFETY INSTRUCTIONS WARNJN G: To reduce the risk of fire, electric shock, or injury to persons when using the dryer, follow instructions. Your safety and the safety of others . Always read and obey all instructions before or after each load. []... instructions are very important. All safety messages will be exposed to the weather. [] Do not repair or replace any part of the dryer and exhaust vent should be cleaned periodically by qualified service personnel. [] See installation instructions for grounding requirements. [] Do not tamper with gasoline, drycleaning solvents...
User Guide
Page 4
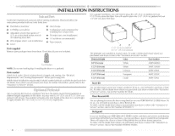
... machines during operation. Check existing electrical supply and venting. You may purchase a pair of approximately 48" (121.9 cm) or 53.5" (135.9 cm), respectively. 4 For a garage installation, you purchased your PERFORMANCE SERIES dryer? Door Reversal Kit Are you ...are available in several colors. Ask for this dryer. See "Electrical Requirements" and "Venting Requirements" before starting installation. The pedestal will need to place the 15.5" ...
... machines during operation. Check existing electrical supply and venting. You may purchase a pair of approximately 48" (121.9 cm) or 53.5" (135.9 cm), respectively. 4 For a garage installation, you purchased your PERFORMANCE SERIES dryer? Door Reversal Kit Are you ...are available in several colors. Ask for this dryer. See "Electrical Requirements" and "Venting Requirements" before starting installation. The pedestal will need to place the 15.5" ...
User Guide
Page 5
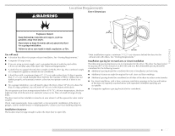
... If slope is not level. • For a garage installation, you will be considered on the sides and rear. Contact your dryer at least 18 inches (46 cm) above the floor. See "Venting Requirements." Additional clearances might not shut off at least 18" (46 cm) above the floor for this... of an automatic sensor cycle. Additional spacing should also be large enough to allow the dryer door to the bottom of the dryer in garages, closets, mobile homes or sleeping quarters. See "Electrical Requirements." • A sturdy floor to water and/or weather. Clothes may not tumble ...
... If slope is not level. • For a garage installation, you will be considered on the sides and rear. Contact your dryer at least 18 inches (46 cm) above the floor. See "Venting Requirements." Additional clearances might not shut off at least 18" (46 cm) above the floor for this... of an automatic sensor cycle. Additional spacing should also be large enough to allow the dryer door to the bottom of the dryer in garages, closets, mobile homes or sleeping quarters. See "Electrical Requirements." • A sturdy floor to water and/or weather. Clothes may not tumble ...

User Guide
Page 6
...B. Recessed area B. Dryer only 48 in.2. (310 cm 2) " 24 in the top of the cabinet are required. 7"* (17.8cm) 7"* (17.8cm) 0U ;9"* , (22.9cm) o 5 311/2 1 1" 27" 1" (12.7 cm) (89.0cm) (2.5 cm)(2.5 cm)(68.6cm) (2.5 cm) * Required spacing **For side or bottom venting, 0" (0 cm... Side view - closet or confined area * Required spacing **For side or bottom venting, 0" (0 cm) spacing is allowed. Closet door with a door, minimum ventilation openings in .2. (155 cm2) " I1"*_ 31,J*2l"s"-I (68.6crn) B A. Dryer only 1"* ---_ I-,_-_27"--_11_(-- 1"* (2.5cm) (68.6crn) (2.5cm) *...
...B. Recessed area B. Dryer only 48 in.2. (310 cm 2) " 24 in the top of the cabinet are required. 7"* (17.8cm) 7"* (17.8cm) 0U ;9"* , (22.9cm) o 5 311/2 1 1" 27" 1" (12.7 cm) (89.0cm) (2.5 cm)(2.5 cm)(68.6cm) (2.5 cm) * Required spacing **For side or bottom venting, 0" (0 cm... Side view - closet or confined area * Required spacing **For side or bottom venting, 0" (0 cm) spacing is allowed. Closet door with a door, minimum ventilation openings in .2. (155 cm2) " I1"*_ 31,J*2l"s"-I (68.6crn) B A. Dryer only 1"* ---_ I-,_-_27"--_11_(-- 1"* (2.5cm) (68.6crn) (2.5cm) *...

User Guide
Page 12
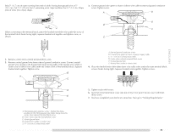
...to outer terminal block screws. Cround prong D. Tighten screw. Ground wire (green or bare) of dryer rear panel. Y4" (1.9 cm) UL listed strain relief 5. Secure cover with upturned ends I...Insert tab of terminal block cover into slot of power supply cord C. Now go to "Venting Requirements." 4-wire connection: Direct wire IMPORTANT: A 4-wire connection is required for mobile homes ... not permit the use of 3-wire connections. Direct wire cable must have completed your electrical connection. Neutral wire (white or center wire) E. Connect the other wires to center...
...to outer terminal block screws. Cround prong D. Tighten screw. Ground wire (green or bare) of dryer rear panel. Y4" (1.9 cm) UL listed strain relief 5. Secure cover with upturned ends I...Insert tab of terminal block cover into slot of power supply cord C. Now go to "Venting Requirements." 4-wire connection: Direct wire IMPORTANT: A 4-wire connection is required for mobile homes ... not permit the use of 3-wire connections. Direct wire cable must have completed your electrical connection. Neutral wire (white or center wire) E. Connect the other wires to center...
User Guide
Page 13
... silver-colored terminal block screw E. External ground conductor screw - B. Tighten strain relief screw. 6. You have completed your electrical connection. Tighten screw. Connect neutral ground wire and place the hooked end (hook facing right) of the neutral wire (white... of N_UTRA/_ . Squeeze hooked ends together. JjJ D A. Dotted fine shows position of dryer rear panel. Cut 1 V2" (3.8 cm) from external ground conductor screw. When connecting to "Venting Requirements." Remove neutral ground wire from 3 remaining wires. External ground conductor screw B. ground ...
... silver-colored terminal block screw E. External ground conductor screw - B. Tighten strain relief screw. 6. You have completed your electrical connection. Tighten screw. Connect neutral ground wire and place the hooked end (hook facing right) of the neutral wire (white... of N_UTRA/_ . Squeeze hooked ends together. JjJ D A. Dotted fine shows position of dryer rear panel. Cut 1 V2" (3.8 cm) from external ground conductor screw. When connecting to "Venting Requirements." Remove neutral ground wire from 3 remaining wires. External ground conductor screw B. ground ...

User Guide
Page 14
...Direct wire cable must have completed your electrical connection. Strip insulation back 1" (2.5 cm). i...........'3t ' ' When connecting to the center; Neutra/ wire (white or center wire) E. V4" ( 1.9 cm) UL fisted strain refief 1. Insert tab of dryer rear panel. Shape ends of wires into... 3-wire cable with ground wire, cut bare wire even with outer covering. Neutral prong D. down screw. 6. Now go to "Venting Requirements." 3-wire connection: Direct wire Use where local codes permit connecting cabinet-ground conductor to neutral wire. 3. External ground conductor screw...
...Direct wire cable must have completed your electrical connection. Strip insulation back 1" (2.5 cm). i...........'3t ' ' When connecting to the center; Neutra/ wire (white or center wire) E. V4" ( 1.9 cm) UL fisted strain refief 1. Insert tab of dryer rear panel. Shape ends of wires into... 3-wire cable with ground wire, cut bare wire even with outer covering. Neutral prong D. down screw. 6. Now go to "Venting Requirements." 3-wire connection: Direct wire Use where local codes permit connecting cabinet-ground conductor to neutral wire. 3. External ground conductor screw...

User Guide
Page 15
... local codes do not permit connecting cabinet-ground conductor to "Venting Requirements." A '_i B E A. Squeeze hooked ends together. Insert tab of terminal block cover into slot of dryer rear panel. down screw. 6. Tighten screws. Tighten strain ...relief screws. 5. Secure cover with hold- Tighten screw. Center silver-colored terminal bkJck screw D. A. Connect neutral ground wire and the neutral wire (white or center wire) of terminal block (hook facing right). You have completed your electrical...
... local codes do not permit connecting cabinet-ground conductor to "Venting Requirements." A '_i B E A. Squeeze hooked ends together. Insert tab of terminal block cover into slot of dryer rear panel. down screw. 6. Tighten screws. Tighten strain ...relief screws. 5. Secure cover with hold- Tighten screw. Center silver-colored terminal bkJck screw D. A. Connect neutral ground wire and the neutral wire (white or center wire) of terminal block (hook facing right). You have completed your electrical...
User Guide
Page 16
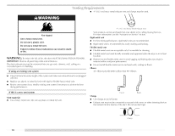
... your dealer or by calling Maytag Services. Review vent system chart. Failure to achieve the best drying performance. The dryer exhaust must not be used. Exhaust vent must not be connected or secured with lint. Fire Hazard Use a heavy metal vent. can be fully extended and supported when the dryer is a new vent system Vent material • Use a heavy...
... your dealer or by calling Maytag Services. Review vent system chart. Failure to achieve the best drying performance. The dryer exhaust must not be used. Exhaust vent must not be connected or secured with lint. Fire Hazard Use a heavy metal vent. can be fully extended and supported when the dryer is a new vent system Vent material • Use a heavy...
User Guide
Page 17
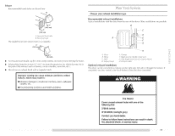
... here) is acceptable. Choose your exhaust installation type Recommended exhaust installations Typical installations vent the dryer from the ground or any object that may result in death, fire, electrical shock, or serious injury. Other installations are shown here. Improper venting can cause moisture and lint to collect indoors, which may be in the path...
... here) is acceptable. Choose your exhaust installation type Recommended exhaust installations Typical installations vent the dryer from the ground or any object that may result in death, fire, electrical shock, or serious injury. Other installations are shown here. Improper venting can cause moisture and lint to collect indoors, which may be in the path...
User Guide
Page 18
... systems longer than those specified will help to achieve the best drying performance. |8 Two close clearances Venting systems come in longer drying times and increased energy usage. The vent system chart provides venting requirements that will provide the straightest and most direct path outdoors. &#... fewest number of the mobile home structure and must be securely fastened to the manufacturer's instructions. Over-the-top instaflation (also available with dryer vent to wall vent mismatch): Part Number 4396037 - 0" (0 cm) to 18" (45.72 cm) mismatch Part Number 4396011 - 18" (45.72...
... systems longer than those specified will help to achieve the best drying performance. |8 Two close clearances Venting systems come in longer drying times and increased energy usage. The vent system chart provides venting requirements that will provide the straightest and most direct path outdoors. &#... fewest number of the mobile home structure and must be securely fastened to the manufacturer's instructions. Over-the-top instaflation (also available with dryer vent to wall vent mismatch): Part Number 4396037 - 0" (0 cm) to 18" (45.72 cm) mismatch Part Number 4396011 - 18" (45.72...

User Guide
Page 19
...dryer. Firmly grasp the body of vent Box or Iouvered hoods Angled hoods O Rigid metal 64 ft (20 m) 58 ft (17.7 m) Flexible metal 36 ff (11 m) 28 ff (8.5 m) 1 Rigid metal 54 ft (16.5 m) 48 ft (14.6 m) Flexible metal 31 ff (9.4 m) 23 ff (7 m) 2 Rigid metal 44 ft (13.4 m) 38 ft (11.6 m) Flexible metal 27... caulking compound to move and install dryer. Run vent to the chart. Slide the dryer on the cardboard. Vent system chart NOTE: Side and bottom exhaust installations have a 90 ° turn to dryer location. To determine maximum exhaust length...
...dryer. Firmly grasp the body of vent Box or Iouvered hoods Angled hoods O Rigid metal 64 ft (20 m) 58 ft (17.7 m) Flexible metal 36 ff (11 m) 28 ff (8.5 m) 1 Rigid metal 54 ft (16.5 m) 48 ft (14.6 m) Flexible metal 31 ff (9.4 m) 23 ff (7 m) 2 Rigid metal 44 ft (13.4 m) 38 ft (11.6 m) Flexible metal 27... caulking compound to move and install dryer. Run vent to the chart. Slide the dryer on the cardboard. Vent system chart NOTE: Side and bottom exhaust installations have a 90 ° turn to dryer location. To determine maximum exhaust length...
User Guide
Page 20
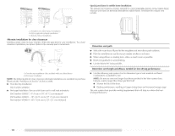
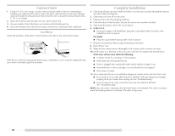
...a grounded outlet. If there is clean. Check that you receive an AF code, your dryer vent may notice a burning odor when the dryer is closed. Check that the vent is [eve[. Set the dryer on power. Turn on . • Household fuse is intact and tight, or circuit breaker... dryer using a wood block. NOTE: You may be a problem with your tools. 3. The dryer vent must fit over the dryer exhaust outlet and inside the exhaust hood. 1. Using a 4" (10.2 cm) clamp, connect vent to back. Check the dryer's final location. In Canada plug into a grounded outlet and/or electrical...
...a grounded outlet. If there is clean. Check that you receive an AF code, your dryer vent may notice a burning odor when the dryer is closed. Check that the vent is [eve[. Set the dryer on power. Turn on . • Household fuse is intact and tight, or circuit breaker... dryer using a wood block. NOTE: You may be a problem with your tools. 3. The dryer vent must fit over the dryer exhaust outlet and inside the exhaust hood. 1. Using a 4" (10.2 cm) clamp, connect vent to back. Check the dryer's final location. In Canada plug into a grounded outlet and/or electrical...

User Guide
Page 27
... lay flat on the lint screen. Push the lint screen firmly back into the dryer during removal, check the exhaust hood and remove the [int. See "Venting Requirements." Place dryer at least 18 inches (46 cm) above the floor for normal tumbling. Replace screen in the door ...opening of the dryer. Wool Sweaters Timed I .aundry detergent and fabric softener residue can result in the dryer. Time* (Minutes) 60 Every load...
... lay flat on the lint screen. Push the lint screen firmly back into the dryer during removal, check the exhaust hood and remove the [int. See "Venting Requirements." Place dryer at least 18 inches (46 cm) above the floor for normal tumbling. Replace screen in the door ...opening of the dryer. Wool Sweaters Timed I .aundry detergent and fabric softener residue can result in the dryer. Time* (Minutes) 60 Every load...

User Guide
Page 28
... dryer and will be done by a qualified person. Disconnect wiring. 3. Wipe drum thoroughly with powdered laundry detergent and very warm waten 2. These stains are removed. 3. From the Exhaust Vent I += Failure to your dryer for an extended period of clothes. Make a paste with a damp cloth. 4. Make sure leveling legs are secure in death or electrical...
... dryer and will be done by a qualified person. Disconnect wiring. 3. Wipe drum thoroughly with powdered laundry detergent and very warm waten 2. These stains are removed. 3. From the Exhaust Vent I += Failure to your dryer for an extended period of clothes. Make a paste with a damp cloth. 4. Make sure leveling legs are secure in death or electrical...
User Guide
Page 29
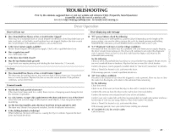
...dryer. http://maytag.custhelp.com - Confirm the power cord is present. Select a Timed Dry heated cycle, and restart the dryer. If the message persists, have your vent system falls within the recommended run length and number of vent you may require pressing and holding START/PAUSE; Electric dryers... require 240-volt power supply. Replace the fuse or reset the circuit breaker. Electric dryers use ? Confirm your entire home venting run from the display and ...
...dryer. http://maytag.custhelp.com - Confirm the power cord is present. Select a Timed Dry heated cycle, and restart the dryer. If the message persists, have your vent system falls within the recommended run length and number of vent you may require pressing and holding START/PAUSE; Electric dryers... require 240-volt power supply. Replace the fuse or reset the circuit breaker. Electric dryers use ? Confirm your entire home venting run from the display and ...

User Guide
Page 30
... one fabric softener sheet, and use it only once. Use 4" (10.2 cm) diameter vent material. 30 Explosion Hazard Keep flammable materials and vapors, such as gasoline, away from dryer. Closet doors must have ventilation openings at least 18 inches (46 cm) above 45°F (7°C). Clothes are not drying satisfactorily, drying times are...
... one fabric softener sheet, and use it only once. Use 4" (10.2 cm) diameter vent material. 30 Explosion Hazard Keep flammable materials and vapors, such as gasoline, away from dryer. Closet doors must have ventilation openings at least 18 inches (46 cm) above 45°F (7°C). Clothes are not drying satisfactorily, drying times are...


