

Use and Care Guide
Page 1
ELECTRIC DRYER USE & CARE GUIDE SÉCHEUSE ÉLECTRIQUE GUIDE D'UTILISATION ET D'ENTRETIEN FOR QUESTIONS ABOUT FEATURES, OPERATION/PERFORMANCE, PARTS, ACCESSORIES OR SERVICE CALL: 1.800.688.9900 IN CANADA, CALL: 1.800.807.6777 VISIT OUR WEBSITE AT WWW.MAYTAG.COM IN CANADA, WWW.MAYTAG.CA W10057349A SI TIENE PREGUNTAS ...;CNICO, LLAME AL: 1.800.688.9900 EN CANADÁ, LLAME AL: 1.800.807.6777 VISITE NUESTRO SITIO WEB EN WWW.MAYTAG.COM EN CANADÁ, WWW.MAYTAG.CA AU CANADA, POUR ASSISTANCE, INSTALLATION OU SERVICE, COMPOSEZ LE : 1.800.807.6777 OU VISITEZ NOTRE SITE INTERNET À ...
ELECTRIC DRYER USE & CARE GUIDE SÉCHEUSE ÉLECTRIQUE GUIDE D'UTILISATION ET D'ENTRETIEN FOR QUESTIONS ABOUT FEATURES, OPERATION/PERFORMANCE, PARTS, ACCESSORIES OR SERVICE CALL: 1.800.688.9900 IN CANADA, CALL: 1.800.807.6777 VISIT OUR WEBSITE AT WWW.MAYTAG.COM IN CANADA, WWW.MAYTAG.CA W10057349A SI TIENE PREGUNTAS ...;CNICO, LLAME AL: 1.800.688.9900 EN CANADÁ, LLAME AL: 1.800.807.6777 VISITE NUESTRO SITIO WEB EN WWW.MAYTAG.COM EN CANADÁ, WWW.MAYTAG.CA AU CANADA, POUR ASSISTANCE, INSTALLATION OU SERVICE, COMPOSEZ LE : 1.800.807.6777 OU VISITEZ NOTRE SITE INTERNET À ...

Use and Care Guide
Page 3
...you how to reduce the chance of injury, and tell you don't follow instructions. Always read and obey all instructions before or after each load. ■ Keep area around the exhaust opening and adjacent surrounding areas free from service or discarded, remove the door to cooking oils in the... and have the skills to carry out. ■ Do not use fabric softeners or products to play on your dryer. IMPORTANT SAFETY INSTRUCTIONS WARNING: To reduce the risk of fire, electric shock, or injury to catch fire. ■ Do not dry articles that have provided many important safety messages in...
...you how to reduce the chance of injury, and tell you don't follow instructions. Always read and obey all instructions before or after each load. ■ Keep area around the exhaust opening and adjacent surrounding areas free from service or discarded, remove the door to cooking oils in the... and have the skills to carry out. ■ Do not use fabric softeners or products to play on your dryer. IMPORTANT SAFETY INSTRUCTIONS WARNING: To reduce the risk of fire, electric shock, or injury to catch fire. ■ Do not dry articles that have provided many important safety messages in...

Use and Care Guide
Page 4
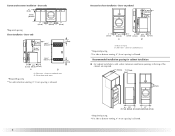
...Electrical Requirements" and "Venting Requirements" before starting installation. You will need to place the 10" (25.4 cm) pedestal at least 3.5" (8.9 cm) above the floor. To order, call the dealer from dryer drum. To order, call the dealer from whom you purchased your machines, you are installing your PERFORMANCE SERIES washer and dryer...may purchase a pair of items falling behind your dryer or refer to stack your PERFORMANCE SERIES dryer? The pedestal will reduce the chance of washer/dryer backguards. Door Reversal Kit Are you planning to ...
...Electrical Requirements" and "Venting Requirements" before starting installation. You will need to place the 10" (25.4 cm) pedestal at least 3.5" (8.9 cm) above the floor. To order, call the dealer from dryer drum. To order, call the dealer from whom you purchased your machines, you are installing your PERFORMANCE SERIES washer and dryer...may purchase a pair of items falling behind your dryer or refer to stack your PERFORMANCE SERIES dryer? The pedestal will reduce the chance of washer/dryer backguards. Door Reversal Kit Are you planning to ...

Use and Care Guide
Page 5
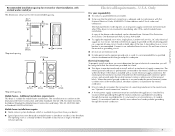
...considered on the sides and rear. Recommended spacing should be considered for the following spacing dimensions are required. See "Electrical Requirements." „ A sturdy floor to place the dryer at least 18 inches (46 cm) above the floor. Some codes limit, or do so can result in...„ A location that allows for ease of an automatic sensor cycle. If using a power supply cord, a grounded electrical outlet located within 2 ft (61 cm) of either side of the dryer. See "Venting Requirements." „ A separate 30-amp circuit. „ If you will be considered. 5 Louvered ...
...considered on the sides and rear. Recommended spacing should be considered for the following spacing dimensions are required. See "Electrical Requirements." „ A sturdy floor to place the dryer at least 18 inches (46 cm) above the floor. Some codes limit, or do so can result in...„ A location that allows for ease of an automatic sensor cycle. If using a power supply cord, a grounded electrical outlet located within 2 ft (61 cm) of either side of the dryer. See "Venting Requirements." „ A separate 30-amp circuit. „ If you will be considered. 5 Louvered ...
Use and Care Guide
Page 6
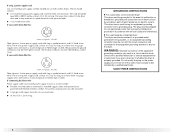
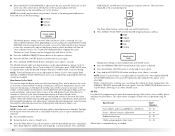
...;" 5"** (2.5 cm) (80 cm) (12.7 cm) A B A. Side view - closet or confined area *Required spacing **For side or bottom venting, 0" (0 cm) spacing is allowed. 6 Dryer on pedestal 14" max.* (35.6 cm) 18" min.* (45.72 cm) 1" (2.5 cm) 27" (68.6 cm) A 1" 1"* (2.5 cm) (2.5 cm) 31½" (80 cm)... spacing **For side or bottom venting, 0" (0 cm) spacing is allowed. 3"* (7.6 cm) Recessed or closet installation - Dryer only 0" (0 cm) 38" min. (96.52 cm) 1"* (2.5 cm) *Required spacing Closet installation - Dryer only 27" (68.6 cm) 14" max.* (35.6 cm) 18" min.* (45.72 cm) 48 in.2* (...
...;" 5"** (2.5 cm) (80 cm) (12.7 cm) A B A. Side view - closet or confined area *Required spacing **For side or bottom venting, 0" (0 cm) spacing is allowed. 6 Dryer on pedestal 14" max.* (35.6 cm) 18" min.* (45.72 cm) 1" (2.5 cm) 27" (68.6 cm) A 1" 1"* (2.5 cm) (2.5 cm) 31½" (80 cm)... spacing **For side or bottom venting, 0" (0 cm) spacing is allowed. 3"* (7.6 cm) Recessed or closet installation - Dryer only 0" (0 cm) 38" min. (96.52 cm) 1"* (2.5 cm) *Required spacing Closet installation - Dryer only 27" (68.6 cm) 14" max.* (35.6 cm) 18" min.* (45.72 cm) 48 in.2* (...
Use and Care Guide
Page 7
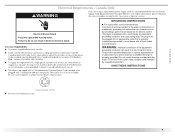
... install your dealer. „ Special provisions must determine the type of electrical connection you will be removed from the external ground connector (green screw), and secured under the neutral terminal (center or white wire) of the terminal block, the dryer cabinet is prohibited for Mobile Home Construction and Safety, Title 24, HUD...
... install your dealer. „ Special provisions must determine the type of electrical connection you will be removed from the external ground connector (green screw), and secured under the neutral terminal (center or white wire) of the terminal block, the dryer cabinet is prohibited for Mobile Home Construction and Safety, Title 24, HUD...
Use and Care Guide
Page 8
... by providing a path of NEMA Type 10-30R. This dryer uses a cord having an equipment-grounding conductor and a grounding plug. Check with clothes dryers. Use a UL listed power supply cord kit marked for electric current. Do not modify the plug on the dryer. The 4-wire power supply cord, at least 4 ft ... conductor can result in doubt as to the equipment-grounding terminal or lead on the power supply cord: if it will reduce the risk of electric shock. The wires that is properly grounded. The 3-wire power supply cord, at least 4 ft (1.22 m) long, must match power supply (4-...
... by providing a path of NEMA Type 10-30R. This dryer uses a cord having an equipment-grounding conductor and a grounding plug. Check with clothes dryers. Use a UL listed power supply cord kit marked for electric current. Do not modify the plug on the dryer. The 4-wire power supply cord, at least 4 ft ... conductor can result in doubt as to the equipment-grounding terminal or lead on the power supply cord: if it will reduce the risk of electric shock. The wires that is properly grounded. The 3-wire power supply cord, at least 4 ft (1.22 m) long, must match power supply (4-...
Use and Care Guide
Page 9
...grounding conductor can result in the "Assistance or Service" section. Electrical Shock Hazard Plug into an appropriate outlet that you use an extension cord. 9 GROUNDING INSTRUCTIONS ■ For a grounded, cord-connected dryer: This dryer must be grounded. The plug must be plugged into a grounded... representative or personnel if you are in doubt as to whether the dryer is properly installed and grounded in a risk of the equipment- It is your responsibility „ To contact a qualified electrical installer. „ To be obtained from: Canadian Standards Association, 178...
...grounding conductor can result in the "Assistance or Service" section. Electrical Shock Hazard Plug into an appropriate outlet that you use an extension cord. 9 GROUNDING INSTRUCTIONS ■ For a grounded, cord-connected dryer: This dryer must be grounded. The plug must be plugged into a grounded... representative or personnel if you are in doubt as to whether the dryer is properly installed and grounded in a risk of the equipment- It is your responsibility „ To contact a qualified electrical installer. „ To be obtained from: Canadian Standards Association, 178...
Use and Care Guide
Page 11
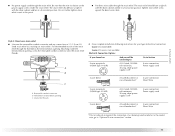
...amp, dryer power supply cord* Go to "Optional 3-wire connection" section. 11 Style 2: Direct wire strain relief „ Unscrew the removable conduit connector and any screws from a 3/4" (1.9 cm) UL listed strain relief (UL marking on the power supply cord is not available) Electrical Connection... Options If your type of electrical connection: 4-wire (recommended) 3-wire (if 4-wire is inside the terminal block opening . Be sure that the wire ...
...amp, dryer power supply cord* Go to "Optional 3-wire connection" section. 11 Style 2: Direct wire strain relief „ Unscrew the removable conduit connector and any screws from a 3/4" (1.9 cm) UL listed strain relief (UL marking on the power supply cord is not available) Electrical Connection... Options If your type of electrical connection: 4-wire (recommended) 3-wire (if 4-wire is inside the terminal block opening . Be sure that the wire ...
Use and Care Guide
Page 12
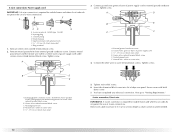
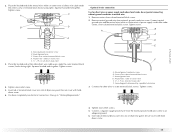
... block screw. Now go to external ground conductor screw. External ground conductor screw B. Ground wire (green or bare) of extra length so dryer can be moved if needed. 12 External ground conductor screw - B. Center silver-colored terminal block screw C. Neutral wire (white or center ...wire) E. ¾" (1.9 cm) UL listed strain relief 5. Direct wire cable must have completed your electrical connection. 4-wire connection: Power supply cord IMPORTANT: A 4-wire connection is required for mobile homes and where local codes do not permit the use...
... block screw. Now go to external ground conductor screw. External ground conductor screw B. Ground wire (green or bare) of extra length so dryer can be moved if needed. 12 External ground conductor screw - B. Center silver-colored terminal block screw C. Neutral wire (white or center ...wire) E. ¾" (1.9 cm) UL listed strain relief 5. Direct wire cable must have completed your electrical connection. 4-wire connection: Power supply cord IMPORTANT: A 4-wire connection is required for mobile homes and where local codes do not permit the use...
Use and Care Guide
Page 13
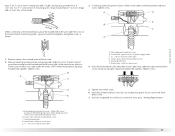
... of wires into slot of the terminal block. A D E (12.75c"m) B F When connecting to "Venting Requirements." You have completed your electrical connection. Remove neutral ground wire from external ground conductor screw. B. Tighten screw. A. Ground wire (green or bare) of the other direct wire cable... block screws (hooks facing right). Now go to the terminal block, place the hooked end of the wire under the center screw of dryer rear panel. Strip insulation back 1" (2.5 cm). Tighten screw. Neutral ground wire F. Place the hooked ends of power supply cable C. ...
... of wires into slot of the terminal block. A D E (12.75c"m) B F When connecting to "Venting Requirements." You have completed your electrical connection. Remove neutral ground wire from external ground conductor screw. B. Tighten screw. A. Ground wire (green or bare) of the other direct wire cable... block screws (hooks facing right). Now go to the terminal block, place the hooked end of the wire under the center screw of dryer rear panel. Strip insulation back 1" (2.5 cm). Tighten screw. Neutral ground wire F. Place the hooked ends of power supply cable C. ...
Use and Care Guide
Page 14
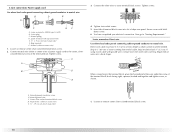
...: Direct wire Use where local codes permit connecting cabinet-ground conductor to neutral wire. Direct wire cable must have completed your electrical connection. Strip 31/2" (8.9 cm) of outer covering from end of the terminal block. Strip insulation back 1" (2.5 cm)....-colored terminal block screw D. Loosen or remove center silver-colored terminal block screw. 14 Neutral (white or center wire) 1. You have 5 ft (1.52 m) of dryer rear panel. External ground conductor screw B. B D E A C GF A. 3-wire receptacle (NEMA type 10-30R) B. 3-wire plug C. Neutral prong D. Ring...
...: Direct wire Use where local codes permit connecting cabinet-ground conductor to neutral wire. Direct wire cable must have completed your electrical connection. Strip 31/2" (8.9 cm) of outer covering from end of the terminal block. Strip insulation back 1" (2.5 cm)....-colored terminal block screw D. Loosen or remove center silver-colored terminal block screw. 14 Neutral (white or center wire) 1. You have 5 ft (1.52 m) of dryer rear panel. External ground conductor screw B. B D E A C GF A. 3-wire receptacle (NEMA type 10-30R) B. 3-wire plug C. Neutral prong D. Ring...
Use and Care Guide
Page 15
...ground wire from the external ground conductor screw to outer terminal block screws. Neutral ground wire C. You have completed your electrical connection. Center silver-colored terminal block screw C. Tighten strain relief screws. 5. Place the hooked end of the neutral wire...4. Secure cover with hold- Secure cover with holddown screw. 6. Tighten screw. Center silver-colored terminal block screw D. Place the hooked ends of dryer rear panel. Now go to neutral wire. 1. Squeeze hooked end together. External ground conductor screw B. C A B D E Optional 3-wire ...
...ground wire from the external ground conductor screw to outer terminal block screws. Neutral ground wire C. You have completed your electrical connection. Center silver-colored terminal block screw C. Tighten strain relief screws. 5. Place the hooked end of the neutral wire...4. Secure cover with hold- Secure cover with holddown screw. 6. Tighten screw. Center silver-colored terminal block screw D. Place the hooked ends of dryer rear panel. Now go to neutral wire. 1. Squeeze hooked end together. External ground conductor screw B. C A B D E Optional 3-wire ...

Use and Care Guide
Page 16
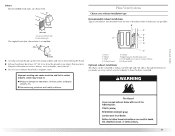
... heavy metal vent. For more information, see the "Assistance or Service" section. If this dryer MUST BE EXHAUSTED OUTDOORS. Do not use plastic or metal foil vent. IMPORTANT: Observe all ... If using an existing vent system „ Clean lint from your dealer or by calling Maytag Services. Flexible metal vent „ Flexible metal vents are recommended. „ Rigid metal... plastic vent. Do not use a metal foil vent. Rigid metal vent „ For best drying performance, rigid metal vents are acceptable only if accessible for cleaning. „ Flexible metal vent must be ...
... heavy metal vent. For more information, see the "Assistance or Service" section. If this dryer MUST BE EXHAUSTED OUTDOORS. Do not use plastic or metal foil vent. IMPORTANT: Observe all ... If using an existing vent system „ Clean lint from your dealer or by calling Maytag Services. Flexible metal vent „ Flexible metal vents are recommended. „ Rigid metal... plastic vent. Do not use a metal foil vent. Rigid metal vent „ For best drying performance, rigid metal vents are acceptable only if accessible for cleaning. „ Flexible metal vent must be ...
Use and Care Guide
Page 17
...not use an exhaust hood with a magnetic latch. Other installations are shown here. Elbow C. Recommended exhaust installations Typical installations vent the dryer from the ground or any object that may be converted to collect indoors, which may contact your exhaust installation type A 4" (10.2....2 cm) A. Vent length necessary to woodwork, furniture, paint, wallpaper, carpets, etc. Wall D. Exhaust outlet Optional exhaust installations This dryer can cause moisture and lint to exhaust out the right side, left side or through the bottom. Louvered hood style B. If you ...
...not use an exhaust hood with a magnetic latch. Other installations are shown here. Elbow C. Recommended exhaust installations Typical installations vent the dryer from the ground or any object that may be converted to collect indoors, which may contact your exhaust installation type A 4" (10.2....2 cm) A. Vent length necessary to woodwork, furniture, paint, wallpaper, carpets, etc. Wall D. Exhaust outlet Optional exhaust installations This dryer can cause moisture and lint to exhaust out the right side, left side or through the bottom. Louvered hood style B. If you ...

Use and Care Guide
Page 18
...132; Over-the-Top Installation: Part Number 4396028 „ Periscope Installation (For use the fewest number of the dryer. „ Reduce performance, resulting in the Vent system chart. Determine vent length and elbows needed for mobile home installations The exhaust vent must... When using elbows or making turns, allow as much room as possible. „ Bend vent gradually to achieve the best drying performance. 18 Bottom exhaust installation Alternate installations for close clearance alternate installations are shown. A B A. Standard rear offset exhaust installation B. ...
...132; Over-the-Top Installation: Part Number 4396028 „ Periscope Installation (For use the fewest number of the dryer. „ Reduce performance, resulting in the Vent system chart. Determine vent length and elbows needed for mobile home installations The exhaust vent must... When using elbows or making turns, allow as much room as possible. „ Bend vent gradually to achieve the best drying performance. 18 Bottom exhaust installation Alternate installations for close clearance alternate installations are shown. A B A. Standard rear offset exhaust installation B. ...
Use and Care Guide
Page 19
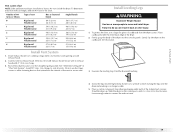
... possible. To protect the floor, use duct tape, screws or other injury. 1. See illustration. 3. Place a carton corner post from the dryer carton. Use caulking compound to finish turning the legs until it is no longer visible. 5. Run vent to its final location. See "Determine...m) Flexible metal 23 ft (7 m) 15 ft (4.6 m) Install Vent System 1. Leave enough room to secure vent. Vent must fit inside the dryer. Secure vent to exhaust hood. Stand the dryer up. Vent system chart NOTE: Side and bottom exhaust installations have a 90º turn to move and install...
... possible. To protect the floor, use duct tape, screws or other injury. 1. See illustration. 3. Place a carton corner post from the dryer carton. Use caulking compound to finish turning the legs until it is no longer visible. 5. Run vent to its final location. See "Determine...m) Flexible metal 23 ft (7 m) 15 ft (4.6 m) Install Vent System 1. Leave enough room to secure vent. Vent must fit inside the dryer. Secure vent to exhaust hood. Stand the dryer up. Vent system chart NOTE: Side and bottom exhaust installations have a 90º turn to move and install...

Use and Care Guide
Page 20
... a grounded outlet and/or electrical supply is on the dryer. 8. Check levelness first side to side, then front to existing vent, make sure the vent is closed. Complete Installation 1. For direct wire installation, turn on a full heat cycle (not an air cycle) for levelness. Set the dryer on power. This dryer automatically runs an installation...
... a grounded outlet and/or electrical supply is on the dryer. 8. Check levelness first side to side, then front to existing vent, make sure the vent is closed. Complete Installation 1. For direct wire installation, turn on a full heat cycle (not an air cycle) for levelness. Set the dryer on power. This dryer automatically runs an installation...
Use and Care Guide
Page 21
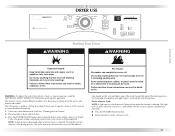
... the POWER/CANCEL button. „ Rotate the dial to each load. The preset settings and drying time for more detailed information. 1. Items containing foam, rubber, or plastic must be displayed. Toward the end of fire, electric shock, or injury to starting your dryer. This manual covers several different models. See "Cleaning the Lint...
... the POWER/CANCEL button. „ Rotate the dial to each load. The preset settings and drying time for more detailed information. 1. Items containing foam, rubber, or plastic must be displayed. Toward the end of fire, electric shock, or injury to starting your dryer. This manual covers several different models. See "Cleaning the Lint...
Use and Care Guide
Page 22
...selected. While a Timed Cycle is running, you to select another Sensor Cycle or Sensor Cycle Dryness, press START/PAUSE once to stop the dryer, allowing you can change by 5-minute intervals. NOTE: Time and Temperature are not adjustable for items that can be dried using Normal. An...adjust again, showing the final drying time. Press the START/PAUSE button once to stop the dryer, make the desired changes, then press START/PAUSE to resume drying. Type of the load and adjusts the time automatically for Time, Temperature, the WRINKLE PREVENT feature and the cycle signals....
...selected. While a Timed Cycle is running, you to select another Sensor Cycle or Sensor Cycle Dryness, press START/PAUSE once to stop the dryer, allowing you can change by 5-minute intervals. NOTE: Time and Temperature are not adjustable for items that can be dried using Normal. An...adjust again, showing the final drying time. Press the START/PAUSE button once to stop the dryer, make the desired changes, then press START/PAUSE to resume drying. Type of the load and adjusts the time automatically for Time, Temperature, the WRINKLE PREVENT feature and the cycle signals....


