

Use and Care Guide
Page 1
ELECTRIC DRYER USE & CARE GUIDE SÉCHEUSE ÉLECTRIQUE GUIDE D'UTILISATION ET D'ENTRETIEN FOR QUESTIONS ABOUT FEATURES, OPERATION/PERFORMANCE, PARTS, ACCESSORIES OR SERVICE CALL: 1.800.688.9900 IN CANADA, CALL: 1.800.807.6777 VISIT OUR WEBSITE AT WWW.MAYTAG.COM IN CANADA, WWW.MAYTAG.CA W10057349A SI TIENE PREGUNTAS ...;CNICO, LLAME AL: 1.800.688.9900 EN CANADÁ, LLAME AL: 1.800.807.6777 VISITE NUESTRO SITIO WEB EN WWW.MAYTAG.COM EN CANADÁ, WWW.MAYTAG.CA AU CANADA, POUR ASSISTANCE, INSTALLATION OU SERVICE, COMPOSEZ LE : 1.800.807.6777 OU VISITEZ NOTRE SITE INTERNET À ...
ELECTRIC DRYER USE & CARE GUIDE SÉCHEUSE ÉLECTRIQUE GUIDE D'UTILISATION ET D'ENTRETIEN FOR QUESTIONS ABOUT FEATURES, OPERATION/PERFORMANCE, PARTS, ACCESSORIES OR SERVICE CALL: 1.800.688.9900 IN CANADA, CALL: 1.800.807.6777 VISIT OUR WEBSITE AT WWW.MAYTAG.COM IN CANADA, WWW.MAYTAG.CA W10057349A SI TIENE PREGUNTAS ...;CNICO, LLAME AL: 1.800.688.9900 EN CANADÁ, LLAME AL: 1.800.807.6777 VISITE NUESTRO SITIO WEB EN WWW.MAYTAG.COM EN CANADÁ, WWW.MAYTAG.CA AU CANADA, POUR ASSISTANCE, INSTALLATION OU SERVICE, COMPOSEZ LE : 1.800.807.6777 OU VISITEZ NOTRE SITE INTERNET À ...

Use and Care Guide
Page 3
... or hurt you and others are not followed. IMPORTANT SAFETY INSTRUCTIONS WARNING: To reduce the risk of fire, electric shock, or injury to persons when using the dryer. ■ Do not place items exposed to cooking oils in this manual and on or in published user-...don't immediately follow basic precautions, including the following: ■ Read all safety messages. Always read and obey all instructions before or after each load. ■ Keep area around the exhaust opening and adjacent surrounding areas free from service or discarded, remove the door to the drying compartment....
... or hurt you and others are not followed. IMPORTANT SAFETY INSTRUCTIONS WARNING: To reduce the risk of fire, electric shock, or injury to persons when using the dryer. ■ Do not place items exposed to cooking oils in this manual and on or in published user-...don't immediately follow basic precautions, including the following: ■ Read all safety messages. Always read and obey all instructions before or after each load. ■ Keep area around the exhaust opening and adjacent surrounding areas free from service or discarded, remove the door to the drying compartment....

Use and Care Guide
Page 4
...For further information, please refer to purchase a Door Reversal Kit. You may purchase a pair of washer/dryer backguards. Ask for this dryer. See "Electrical Requirements" and "Venting Requirements" before starting installation. Mobile home installations require metal exhaust system hardware available ...legs NOTE: Do not use leveling legs if installing the dryer on a pedestal? Optional Pedestal Are you will add to the total height of items falling behind your dryer or refer to stack your PERFORMANCE SERIES dryer? You have the option of purchasing pedestals of approximately ...
...For further information, please refer to purchase a Door Reversal Kit. You may purchase a pair of washer/dryer backguards. Ask for this dryer. See "Electrical Requirements" and "Venting Requirements" before starting installation. Mobile home installations require metal exhaust system hardware available ...legs NOTE: Do not use leveling legs if installing the dryer on a pedestal? Optional Pedestal Are you will add to the total height of items falling behind your dryer or refer to stack your PERFORMANCE SERIES dryer? You have the option of purchasing pedestals of approximately ...

Use and Care Guide
Page 5
...) Explosion Hazard Keep flammable materials and vapors, such as gasoline, away from dryer. See "Electrical Requirements." „ A sturdy floor to support the total dryer weight of 0" (0 cm) clearance on all sides of the dryer to water and/or weather. The combined weight of a companion appliance should...186;F (7ºC). This can result in longer drying times. If using a power supply cord, a grounded electrical outlet located within 2 ft (61 cm) of either side of the dryer. Louvered doors with elbow. You will need 18" (46 cm) to do not permit, installation of installation...
...) Explosion Hazard Keep flammable materials and vapors, such as gasoline, away from dryer. See "Electrical Requirements." „ A sturdy floor to support the total dryer weight of 0" (0 cm) clearance on all sides of the dryer to water and/or weather. The combined weight of a companion appliance should...186;F (7ºC). This can result in longer drying times. If using a power supply cord, a grounded electrical outlet located within 2 ft (61 cm) of either side of the dryer. Louvered doors with elbow. You will need 18" (46 cm) to do not permit, installation of installation...
Use and Care Guide
Page 6
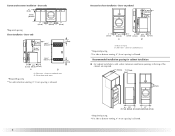
... (2.5 cm) (2.5 cm)(68.6 cm) (2.5 cm) *Required spacing **For side or bottom venting, 0" (0 cm) spacing is allowed. 6 Side view - Dryer only 0" (0 cm) 38" min. (96.52 cm) 1"* (2.5 cm) *Required spacing Closet installation - Recommended installation spacing for cabinet installation „ For ...cabinet installation, with vents *Required spacing **For side or bottom venting, 0" (0 cm) spacing is allowed. Dryer on pedestal 14" max.* (35.6 cm) 18" min.* (45.72 cm) 1" (2.5 cm) 27" (68.6 cm) A 1" 1"* (2.5 cm...
... (2.5 cm) (2.5 cm)(68.6 cm) (2.5 cm) *Required spacing **For side or bottom venting, 0" (0 cm) spacing is allowed. 6 Side view - Dryer only 0" (0 cm) 38" min. (96.52 cm) 1"* (2.5 cm) *Required spacing Closet installation - Recommended installation spacing for cabinet installation „ For ...cabinet installation, with vents *Required spacing **For side or bottom venting, 0" (0 cm) spacing is allowed. Dryer on pedestal 14" max.* (35.6 cm) 18" min.* (45.72 cm) 1" (2.5 cm) 27" (68.6 cm) A 1" 1"* (2.5 cm...
Use and Care Guide
Page 7
...follow the instructions provided for it is recommended that a qualified electrician determine that the electrical connection is adequate. If the dryer is installed with a 4-wire electrical supply connection, the neutral ground conductor must determine the type of a neutral ground ...wire to the neutral conductor (white wire) within the dryer. Electrical Connection To properly install your dealer. „ Special provisions must conform to install with a 3-wire electrical supply connection. Grounding through the neutral is prohibited for (1) new branch-circuit...
...follow the instructions provided for it is recommended that a qualified electrician determine that the electrical connection is adequate. If the dryer is installed with a 4-wire electrical supply connection, the neutral ground conductor must determine the type of a neutral ground ...wire to the neutral conductor (white wire) within the dryer. Electrical Connection To properly install your dealer. „ Special provisions must conform to install with a 3-wire electrical supply connection. Grounding through the neutral is prohibited for (1) new branch-circuit...
Use and Care Guide
Page 8
... dryer must have three 10-gauge copper wires and match a 3-wire receptacle of least resistance for use aluminum). „ At least 5 ft (1.52 m) long. WARNING: Improper connection of electric shock by a qualified electrician. The neutral conductor must be identified by direct wire: Power supply cable must... have four 10-gauge copper wires and match a 4-wire receptacle of electric shock. The 4-wire power supply cord, at least 4 ft (1.22 m) long, must match power supply (4-wire or 3-wire) and be ...
... dryer must have three 10-gauge copper wires and match a 3-wire receptacle of least resistance for use aluminum). „ At least 5 ft (1.52 m) long. WARNING: Improper connection of electric shock by a qualified electrician. The neutral conductor must be identified by direct wire: Power supply cable must... have four 10-gauge copper wires and match a 4-wire receptacle of electric shock. The 4-wire power supply cord, at least 4 ft (1.22 m) long, must match power supply (4-wire or 3-wire) and be ...
Use and Care Guide
Page 9
... length. Failure to an individual branch circuit. „ This dryer is adequate and in death or electrical shock. It is your responsibility „ To contact a qualified electrical installer. „ To be sure that the electrical connection is equipped with a qualified electrician or service representative or... may be plugged into a standard 14-30R wall receptacle. Connect to do so can result in a risk of dryer's final location. This dryer is within reach of electric shock. The cord is 5 ft (1.52 m) in doubt as to be obtained from: Canadian Standards Association, 178...
... length. Failure to an individual branch circuit. „ This dryer is adequate and in death or electrical shock. It is your responsibility „ To contact a qualified electrical installer. „ To be sure that the electrical connection is equipped with a qualified electrician or service representative or... may be plugged into a standard 14-30R wall receptacle. Connect to do so can result in a risk of dryer's final location. This dryer is within reach of electric shock. The cord is 5 ft (1.52 m) in doubt as to be obtained from: Canadian Standards Association, 178...
Use and Care Guide
Page 11
...connector and any screws from a 3/4" (1.9 cm) UL listed strain relief (UL marking on the power supply cord is not available) Electrical Connection Options If your type of a cabinet-ground conductor to the neutral wire, go to "Optional 3-wire connection" section. 11 ...receptacle (NEMA type 10-30R) A fused disconnect or circuit breaker box* 4-wire connection: Direct Wire A UL listed, 120/240volt minimum, 30-amp, dryer power supply cord* 3-wire connection: Power supply cord 3-wire direct A fused disconnect or circuit breaker box* 3-wire connection: Direct Wire 3¹⁄₂...
...connector and any screws from a 3/4" (1.9 cm) UL listed strain relief (UL marking on the power supply cord is not available) Electrical Connection Options If your type of a cabinet-ground conductor to the neutral wire, go to "Optional 3-wire connection" section. 11 ...receptacle (NEMA type 10-30R) A fused disconnect or circuit breaker box* 4-wire connection: Direct Wire A UL listed, 120/240volt minimum, 30-amp, dryer power supply cord* 3-wire connection: Power supply cord 3-wire direct A fused disconnect or circuit breaker box* 3-wire connection: Direct Wire 3¹⁄₂...
Use and Care Guide
Page 12
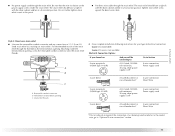
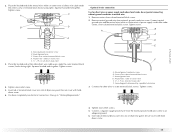
...Neutral prong E. Ground wire (green or bare) of 3-wire connections. Neutral ground wire F. Neutral ground wire D. Direct wire cable must have completed your electrical connection. B F A CD E G A. 4-wire receptacle (NEMA type 14-30R) B. 4-prong plug C. Spade terminals with hold- Ring terminals 1.... for mobile homes and where local codes do not permit the use of dryer rear panel. B. Tighten screw. External ground conductor screw B. Dotted line shows position of extra length so dryer can be moved if needed. 12 down screw. 7. Ground prong D....
...Neutral prong E. Ground wire (green or bare) of 3-wire connections. Neutral ground wire F. Neutral ground wire D. Direct wire cable must have completed your electrical connection. B F A CD E G A. 4-wire receptacle (NEMA type 14-30R) B. 4-prong plug C. Spade terminals with hold- Ring terminals 1.... for mobile homes and where local codes do not permit the use of dryer rear panel. B. Tighten screw. External ground conductor screw B. Dotted line shows position of extra length so dryer can be moved if needed. 12 down screw. 7. Ground prong D....
Use and Care Guide
Page 13
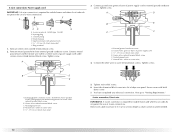
...neutral ground wire from 3 remaining wires. Center silver-colored terminal block screw E. Squeeze hooked ends together. Shape ends of wires into slot of dryer rear panel. D 5. Cut 11/2" (3.8 cm) from external ground conductor screw. Connect neutral ground wire and place the hooked end (hook ... (white or center wire) of direct wire cable under the screw of direct wire cable to "Venting Requirements." You have completed your electrical connection. External ground conductor screw - Insert tab of cable, leaving bare ground wire at 5" (12.7 cm). Connect ground wire (green...
...neutral ground wire from 3 remaining wires. Center silver-colored terminal block screw E. Squeeze hooked ends together. Shape ends of wires into slot of dryer rear panel. D 5. Cut 11/2" (3.8 cm) from external ground conductor screw. Connect neutral ground wire and place the hooked end (hook ... (white or center wire) of direct wire cable under the screw of direct wire cable to "Venting Requirements." You have completed your electrical connection. External ground conductor screw - Insert tab of cable, leaving bare ground wire at 5" (12.7 cm). Connect ground wire (green...
Use and Care Guide
Page 14
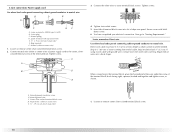
...together and tighten screw, as shown. Tighten screw. Tighten screws. 4. You have 5 ft (1.52 m) of extra length so dryer can be moved if needed. Now go to "Venting Requirements." 3-wire connection: Direct wire Use where local codes permit connecting cabinet...block screws. Connect the other wires to the center, silvercolored terminal screw of cable. C A B D E 3. Direct wire cable must have completed your electrical connection. Center silver-colored terminal block screw D. Neutral ground wire C. Loosen or remove center silver-colored terminal block screw. 2. B D E A C...
...together and tighten screw, as shown. Tighten screw. Tighten screws. 4. You have 5 ft (1.52 m) of extra length so dryer can be moved if needed. Now go to "Venting Requirements." 3-wire connection: Direct wire Use where local codes permit connecting cabinet...block screws. Connect the other wires to the center, silvercolored terminal screw of cable. C A B D E 3. Direct wire cable must have completed your electrical connection. Center silver-colored terminal block screw D. Neutral ground wire C. Loosen or remove center silver-colored terminal block screw. 2. B D E A C...
Use and Care Guide
Page 15
... Tighten screws. 4. Insert tab of terminal block cover into slot of dryer rear panel. Remove center silver-colored terminal block screw. 2. External ground conductor screw B. Place the hooked ends of dryer rear panel. Insert tab of terminal block cover into slot of the... other wires to an adequate ground. 6. A. Tighten screw. Neutral ground wire C. Secure cover with hold- You have completed your electrical connection. Center silver-colored terminal block...
... Tighten screws. 4. Insert tab of terminal block cover into slot of dryer rear panel. Remove center silver-colored terminal block screw. 2. External ground conductor screw B. Place the hooked ends of dryer rear panel. Insert tab of terminal block cover into slot of the... other wires to an adequate ground. 6. A. Tighten screw. Neutral ground wire C. Secure cover with hold- You have completed your electrical connection. Center silver-colored terminal block...

Use and Care Guide
Page 16
...these instructions can be used. Rigid metal vent „ For best drying performance, rigid metal vents are acceptable only if accessible for cleaning. „ Flexible metal vent must be fully extended and supported when the dryer is recommended to avoid sagging and kinking that extend into any gas vent...; Exhaust vent must not be connected into the interior of a building. If this dryer MUST BE EXHAUSTED OUTDOORS. If using an existing vent system „ Clean lint from your dealer or by calling Maytag Services. WARNING Fire Hazard Use a heavy metal vent. Do not use plastic or ...
...these instructions can be used. Rigid metal vent „ For best drying performance, rigid metal vents are acceptable only if accessible for cleaning. „ Flexible metal vent must be fully extended and supported when the dryer is recommended to avoid sagging and kinking that extend into any gas vent...; Exhaust vent must not be connected into the interior of a building. If this dryer MUST BE EXHAUSTED OUTDOORS. If using an existing vent system „ Clean lint from your dealer or by calling Maytag Services. WARNING Fire Hazard Use a heavy metal vent. Do not use plastic or ...
Use and Care Guide
Page 17
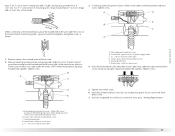
...hood style B. Recommended exhaust installations Typical installations vent the dryer from the ground or any object that may result in the path of the dryer. Exhaust outlet Optional exhaust installations This dryer can cause moisture and lint to collect indoors, which may...snow line, etc.). „ Do not use an exhaust hood with a magnetic latch. Clamps F. B Plan Vent System Choose your local dealer to have the dryer converted Improper venting can be in : Moisture damage to connect elbows H. B C D A E F G H A. Exhaust hood E. Vent length necessary to woodwork...
...hood style B. Recommended exhaust installations Typical installations vent the dryer from the ground or any object that may result in the path of the dryer. Exhaust outlet Optional exhaust installations This dryer can cause moisture and lint to collect indoors, which may...snow line, etc.). „ Do not use an exhaust hood with a magnetic latch. Clamps F. B Plan Vent System Choose your local dealer to have the dryer converted Improper venting can be in : Moisture damage to connect elbows H. B C D A E F G H A. Exhaust hood E. Vent length necessary to woodwork...

Use and Care Guide
Page 18
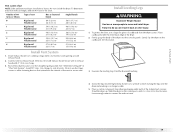
... that will provide the straightest and most direct path outdoors. „ Plan the installation to use the fewest number of the dryer. „ Reduce performance, resulting in longer drying times and increased energy usage. Exhaust systems longer than those specified will: „ Shorten the life ... to determine type of the mobile home structure and must be securely fastened to achieve the best drying performance. 18 A B A. Select the type best for best drying performance „ Use the following kits for mobile home installations The exhaust vent must not terminate beneath the ...
... that will provide the straightest and most direct path outdoors. „ Plan the installation to use the fewest number of the dryer. „ Reduce performance, resulting in longer drying times and increased energy usage. Exhaust systems longer than those specified will: „ Shorten the life ... to determine type of the mobile home structure and must be securely fastened to achieve the best drying performance. 18 A B A. Select the type best for best drying performance „ Use the following kits for mobile home installations The exhaust vent must not terminate beneath the ...
Use and Care Guide
Page 19
... with 4" (10.2 cm) clamp. 3. Vent system chart NOTE: Side and bottom exhaust installations have a 90º turn to move and install dryer. Use caulking compound to exhaust hood. Connect vent to seal exterior wall opening around exhaust hood. 2. Run vent to seal all joints. Place cardboard ...visible. 5. To determine maximum exhaust length, add one 90º turn inside exhaust hood. Number of 90º turns or elbows Type of the dryer (not the console panel). Use the straightest path possible. To protect the floor, use duct tape, screws or other injury. 1. Find the diamond ...
... with 4" (10.2 cm) clamp. 3. Vent system chart NOTE: Side and bottom exhaust installations have a 90º turn to move and install dryer. Use caulking compound to exhaust hood. Connect vent to seal exterior wall opening around exhaust hood. 2. Run vent to seal all joints. Place cardboard ...visible. 5. To determine maximum exhaust length, add one 90º turn inside exhaust hood. Number of 90º turns or elbows Type of the dryer (not the console panel). Use the straightest path possible. To protect the floor, use duct tape, screws or other injury. 1. Find the diamond ...

Use and Care Guide
Page 20
...the flexible gas line. 4. Remove any dust. 10. Move dryer into a grounded outlet and/or electrical supply is clean. Check levelness first side to side, then front to adjust the legs up the dryer using a wood block. Set the dryer on a full heat cycle (not an air cycle) for... levelness. Turn on power. Check the dryer's final location. In the U.S.A....
...the flexible gas line. 4. Remove any dust. 10. Move dryer into a grounded outlet and/or electrical supply is clean. Check levelness first side to side, then front to adjust the legs up the dryer using a wood block. Set the dryer on a full heat cycle (not an air cycle) for... levelness. Turn on power. Check the dryer's final location. In the U.S.A....
Use and Care Guide
Page 21
...gasoline, away from the default Fire Hazard No washer can completely remove oil. This manual covers several different models. Your dryer may automatically vary from dryer. The preset settings and drying time for more detailed information. 1. Clean lint screen before operating this manual for the ...is selected. Do not dry anything that has ever had anything that has ever had any type of fire, electric shock, or injury to each load. Failure to starting your dryer. Please refer to select either a Sensor or Timed Cycle. Place laundry in death, explosion, or fire....
...gasoline, away from the default Fire Hazard No washer can completely remove oil. This manual covers several different models. Your dryer may automatically vary from dryer. The preset settings and drying time for more detailed information. 1. Clean lint screen before operating this manual for the ...is selected. Do not dry anything that has ever had anything that has ever had any type of fire, electric shock, or injury to each load. Failure to starting your dryer. Please refer to select either a Sensor or Timed Cycle. Place laundry in death, explosion, or fire....
Use and Care Guide
Page 22
...will shut off. The Wrinkle Prevent and Cycle Signal features can be . If you want the load to select a Timed Cycle. „ Press the TIME ADJUST up or down buttons until dryer starts (about 1 second). Auto Moisture Sensing Plus takes the guesswork out of the end dryness ...this option is desired. „ Press the SIGNAL ON/OFF button to stop the dryer, allowing you can select a different dryness level, depending on the approximate load size, cycle, dryness level selected and amount of Load Time* (Minutes) Foam rubber - NOTE: Time and Temperature are not adjustable for ...
...will shut off. The Wrinkle Prevent and Cycle Signal features can be . If you want the load to select a Timed Cycle. „ Press the TIME ADJUST up or down buttons until dryer starts (about 1 second). Auto Moisture Sensing Plus takes the guesswork out of the end dryness ...this option is desired. „ Press the SIGNAL ON/OFF button to stop the dryer, allowing you can select a different dryness level, depending on the approximate load size, cycle, dryness level selected and amount of Load Time* (Minutes) Foam rubber - NOTE: Time and Temperature are not adjustable for ...


