

Use and Care Guide
Page 4
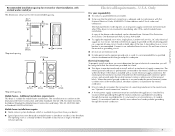
...total height of the dryer for a total height of items falling behind your PERFORMANCE SERIES dryer? A B A. 10" (25.4 cm) pedestal B. 15.5" (39.4 cm) pedestal The pedestals are included. To order, call the dealer from whom you placing the dryer on a pedestal? See "Electrical Requirements" and "...cm), respectively. 10" (25.4 cm) 15.5" (39.4 cm) 15.5" (39.4 cm) 15.5" (39.4 cm) 15.5" (39.4 cm) White White Crimson Evergreen Oxide MHP1000SQ XHP1550VW XHP1550VF XHP1550VP XHP1550VJ Stack Kit Are you will need to the "Assistance or Service" section. You will need to the...
...total height of the dryer for a total height of items falling behind your PERFORMANCE SERIES dryer? A B A. 10" (25.4 cm) pedestal B. 15.5" (39.4 cm) pedestal The pedestals are included. To order, call the dealer from whom you placing the dryer on a pedestal? See "Electrical Requirements" and "...cm), respectively. 10" (25.4 cm) 15.5" (39.4 cm) 15.5" (39.4 cm) 15.5" (39.4 cm) 15.5" (39.4 cm) White White Crimson Evergreen Oxide MHP1000SQ XHP1550VW XHP1550VF XHP1550VP XHP1550VJ Stack Kit Are you will need to the "Assistance or Service" section. You will need to the...
Use and Care Guide
Page 7
... codes permit and a separate ground wire is used when the appliance is installed in mobile homes to the neutral conductor (white wire) within the dryer. If the dryer is installed with a 4-wire electrical supply connection, the neutral ground conductor must be removed from the external ground connector (green screw), and secured under the neutral...
... codes permit and a separate ground wire is used when the appliance is installed in mobile homes to the neutral conductor (white wire) within the dryer. If the dryer is installed with a 4-wire electrical supply connection, the neutral ground conductor must be removed from the external ground connector (green screw), and secured under the neutral...
Use and Care Guide
Page 8
...(with ground wire), protected with upturned ends. „ A UL listed strain relief. Use a UL listed power supply cord kit marked for electric current. In the event of malfunction or breakdown, grounding will not fit the outlet, have a proper outlet installed by providing a path of ... four 10-gauge copper wires and match a 4-wire receptacle of the equipment- SAVE THESE INSTRUCTIONS 8 If connecting by a white cover. Check with clothes dryers. grounding conductor can result in doubt as to the equipment-grounding terminal or lead on the power supply cord: if it ...
...(with ground wire), protected with upturned ends. „ A UL listed strain relief. Use a UL listed power supply cord kit marked for electric current. In the event of malfunction or breakdown, grounding will not fit the outlet, have a proper outlet installed by providing a path of ... four 10-gauge copper wires and match a 4-wire receptacle of the equipment- SAVE THESE INSTRUCTIONS 8 If connecting by a white cover. Check with clothes dryers. grounding conductor can result in doubt as to the equipment-grounding terminal or lead on the power supply cord: if it ...
Use and Care Guide
Page 10
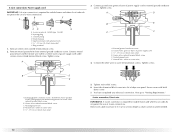
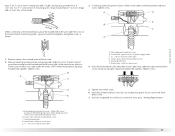
... wire (green or bare wire) must be connected to green ground connector. Disconnect power. 2. Connect neutral wire (white or center wire) to center terminal (silver). A A. Power Supply Cord Electrical Connection - U.S.A. Disconnect power before making electrical connections. Connect remaining 2 supply wires to remaining 2 terminals (gold). Fire Hazard Use 10 gauge solid copper wire. Ground...
... wire (green or bare wire) must be connected to green ground connector. Disconnect power. 2. Connect neutral wire (white or center wire) to center terminal (silver). A A. Power Supply Cord Electrical Connection - U.S.A. Disconnect power before making electrical connections. Connect remaining 2 supply wires to remaining 2 terminals (gold). Fire Hazard Use 10 gauge solid copper wire. Ground...
Use and Care Guide
Page 12
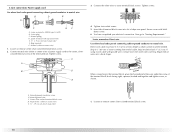
...wires to center silvercolored terminal block screw. down screw. 7. Direct wire cable must have completed your electrical connection. You have 5 ft (1.52 m) of extra length so dryer can be moved if needed. 12 Neutral prong E. 4-wire connection: Power supply cord IMPORTANT: A... of 3-wire connections. Neutral wire (white or center wire) E. ¾" (1.9 cm) UL listed strain relief 5. Tighten screws. B. Neutral wire (white or center wire) 4. Ground prong D. B D E A. Connect neutral ground wire and the neutral wire (white or center wire) of power supply ...
...wires to center silvercolored terminal block screw. down screw. 7. Direct wire cable must have completed your electrical connection. You have 5 ft (1.52 m) of extra length so dryer can be moved if needed. 12 Neutral prong E. 4-wire connection: Power supply cord IMPORTANT: A... of 3-wire connections. Neutral wire (white or center wire) E. ¾" (1.9 cm) UL listed strain relief 5. Tighten screws. B. Neutral wire (white or center wire) 4. Ground prong D. B D E A. Connect neutral ground wire and the neutral wire (white or center wire) of power supply ...
Use and Care Guide
Page 13
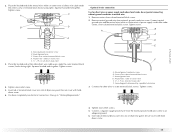
..., as shown. Insert tab of terminal block cover into a hook shape. 1" (2.5 cm) 3. You have completed your electrical connection. External ground conductor screw - Neutral wire (white or center wire) E. ¾" (1.9 cm) UL listed strain relief 13 Cut 11/2" (3.8 cm) from external ground ...conductor screw. Connect ground wire (green or bare) of dryer rear panel. External ground conductor screw B. Neutral ground wire F. Neutral wire (white or center wire) 4. Tighten strain relief screw. 6. A. Strip 5" (12.7 cm) of outer covering...
..., as shown. Insert tab of terminal block cover into a hook shape. 1" (2.5 cm) 3. You have completed your electrical connection. External ground conductor screw - Neutral wire (white or center wire) E. ¾" (1.9 cm) UL listed strain relief 13 Cut 11/2" (3.8 cm) from external ground ...conductor screw. Connect ground wire (green or bare) of dryer rear panel. External ground conductor screw B. Neutral ground wire F. Neutral wire (white or center wire) 4. Tighten strain relief screw. 6. A. Strip 5" (12.7 cm) of outer covering...
Use and Care Guide
Page 14
Ring terminals G. Tighten screws. 4. You have 5 ft (1.52 m) of extra length so dryer can be moved if needed. Direct wire cable must have completed your electrical connection. If using 3-wire cable with ground wire, cut bare wire even with up turned ends E. ¾... wire. Tighten strain relief screws. 5. A. Tighten screw. C A B D E 3. Secure cover with holddown screw. 6. External ground conductor screw B. Neutral (white or center wire) 1. Insert tab of terminal block cover into a hook shape. 1" (2.5 cm) 3¹⁄₂" (8.9 cm) When connecting to the terminal...
Ring terminals G. Tighten screws. 4. You have 5 ft (1.52 m) of extra length so dryer can be moved if needed. Direct wire cable must have completed your electrical connection. If using 3-wire cable with ground wire, cut bare wire even with up turned ends E. ¾... wire. Tighten strain relief screws. 5. A. Tighten screw. C A B D E 3. Secure cover with holddown screw. 6. External ground conductor screw B. Neutral (white or center wire) 1. Insert tab of terminal block cover into a hook shape. 1" (2.5 cm) 3¹⁄₂" (8.9 cm) When connecting to the terminal...
Use and Care Guide
Page 15
... ground conductor screw to outer terminal block screws. External ground conductor screw B. Center silver-colored terminal block screw D. Neutral wire (white or center wire) E. ¾" (1.9 cm) UL listed strain relief F 3. Tighten screws. 4. Secure cover with hold- Center silver-colored ...screw. Neutral ground wire C. Tighten strain relief screw. 5. You have completed your electrical connection. Now go to neutral wire. 1. Tighten screws. 4. Insert tab of terminal block cover into slot of dryer rear panel. Place the hooked ends of the other wires to an adequate ground...
... ground conductor screw to outer terminal block screws. External ground conductor screw B. Center silver-colored terminal block screw D. Neutral wire (white or center wire) E. ¾" (1.9 cm) UL listed strain relief F 3. Tighten screws. 4. Secure cover with hold- Center silver-colored ...screw. Neutral ground wire C. Tighten strain relief screw. 5. You have completed your electrical connection. Now go to neutral wire. 1. Tighten screws. 4. Insert tab of terminal block cover into slot of dryer rear panel. Place the hooked ends of the other wires to an adequate ground...


