Installation Instructions
Page 4
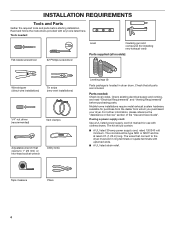
... Service" section of the "Use and Care Guide". Read and follow the instructions provided with clothes dryers. Parts needed : Flat-blade screwdriver #2 Phillips screwdriver Level Caulking gun and compound (for purchase from the dealer from whom you purchased your dryer. Tape measure Pliers 4 Tools needed : Check local codes. Mobile home installations require metal exhaust system hardware, available for installing new exhaust vent) Parts supplied (all models): Wire stripper (direct wire installations) Tin snips (new vent installations) 1/4" nut driver...
... Service" section of the "Use and Care Guide". Read and follow the instructions provided with clothes dryers. Parts needed : Flat-blade screwdriver #2 Phillips screwdriver Level Caulking gun and compound (for purchase from the dealer from whom you purchased your dryer. Tape measure Pliers 4 Tools needed : Check local codes. Mobile home installations require metal exhaust system hardware, available for installing new exhaust vent) Parts supplied (all models): Wire stripper (direct wire installations) Tin snips (new vent installations) 1/4" nut driver...
Installation Instructions
Page 5
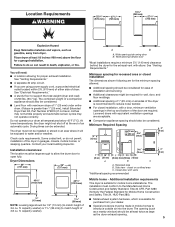
... installation requirements This dryer is greater than 1" [25 mm], install Extended Dryer Feet Kit, Part Number 279810.) If not level, clothes may not tumble properly and automatic sensor cycles may not operate correctly. The combined weight of a companion appliance should be large enough to allow the dryer door to match height of 1" (25 mm) under entire dryer. (If slope is suitable for the exhaust vent with elbow. capacity washer...
... installation requirements This dryer is greater than 1" [25 mm], install Extended Dryer Feet Kit, Part Number 279810.) If not level, clothes may not tumble properly and automatic sensor cycles may not operate correctly. The combined weight of a companion appliance should be large enough to allow the dryer door to match height of 1" (25 mm) under entire dryer. (If slope is suitable for the exhaust vent with elbow. capacity washer...
Installation Instructions
Page 6
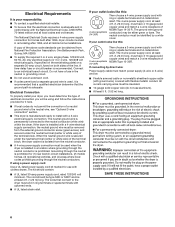
... wires that connect to install with a 3-wire electrical supply connection. If your outlet looks like this : 3-wire receptacle (10-30R) Then choose a 3-wire power supply cord with ring or spade terminals and UL listed strain relief. A time-delay fuse or circuit breaker is permanently connected to an individual branch circuit. The 3-wire power supply cord, at least 4 ft. (1.22 m) long, must have 4 10-gauge solid copper wires and match a 4-wire receptacle of NEMA Type 10-30R. Electrical Requirements...
... wires that connect to install with a 3-wire electrical supply connection. If your outlet looks like this : 3-wire receptacle (10-30R) Then choose a 3-wire power supply cord with ring or spade terminals and UL listed strain relief. A time-delay fuse or circuit breaker is permanently connected to an individual branch circuit. The 3-wire power supply cord, at least 4 ft. (1.22 m) long, must have 4 10-gauge solid copper wires and match a 4-wire receptacle of NEMA Type 10-30R. Electrical Requirements...

Installation Instructions
Page 9
... ground wire and neutral wire C B E Connect neutral ground wire (E) and neutral wire (white or center) (C) of dryer rear panel. Finally, reinsert tab of terminal block cover into slot of power supply cord under center terminal block screw (B). Ring terminals G. Ground prong D. Prepare to neutral wire. B D E A C GF A. 3-wire receptacle (NEMA type 10-30R) B. 3-wire plug C. Neutral (white or center wire) 3. Connect ground wire A CD E G A. 4-wire receptacle (NEMA type 14-30R) B. 4-prong plug C. Neutral prong E. Connect remaining wires A B E Remove center terminal block...
... ground wire and neutral wire C B E Connect neutral ground wire (E) and neutral wire (white or center) (C) of dryer rear panel. Finally, reinsert tab of terminal block cover into slot of power supply cord under center terminal block screw (B). Ring terminals G. Ground prong D. Prepare to neutral wire. B D E A C GF A. 3-wire receptacle (NEMA type 10-30R) B. 3-wire plug C. Neutral (white or center wire) 3. Connect ground wire A CD E G A. 4-wire receptacle (NEMA type 14-30R) B. 4-prong plug C. Neutral prong E. Connect remaining wires A B E Remove center terminal block...
Installation Instructions
Page 10
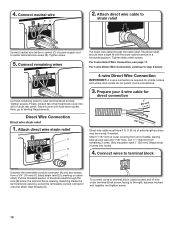
... connect wires to terminal block, place hooked end of dryer rear panel. Attach direct wire cable to strain relief Connect neutral wire (white or center) (C) of the strain relief through the strain relief. Tighten screws. Put the threaded section of power supply cord to the right, squeeze hooked end together and tighten screw. 10 Connect neutral wire BC 2. Now, go to step 3 below the terminal block opening , screw the removable conduit connector onto...
... connect wires to terminal block, place hooked end of dryer rear panel. Attach direct wire cable to strain relief Connect neutral wire (white or center) (C) of the strain relief through the strain relief. Tighten screws. Put the threaded section of power supply cord to the right, squeeze hooked end together and tighten screw. 10 Connect neutral wire BC 2. Now, go to step 3 below the terminal block opening , screw the removable conduit connector onto...

Installation Instructions
Page 11
.... 7. Connect wires to terminal block, place hooked end of extra length so dryer may be moved if needed. Secure cover with outer covering. Finally, reinsert tab of terminal block cover into hooks. 4. Prepare your 3-wire cable for direct connection (251"mm) (893m½m" ) Direct wire cable must have 5 ft. (1.52 m) of wire under outer terminal block screws (hooks facing right). To connect wires to terminal block A F Connect ground wire (green or bare) (F) of dryer rear panel. Prepare to neutral wire. 3. Remove center screw B Remove center terminal block screw...
.... 7. Connect wires to terminal block, place hooked end of extra length so dryer may be moved if needed. Secure cover with outer covering. Finally, reinsert tab of terminal block cover into hooks. 4. Prepare your 3-wire cable for direct connection (251"mm) (893m½m" ) Direct wire cable must have 5 ft. (1.52 m) of wire under outer terminal block screws (hooks facing right). To connect wires to terminal block A F Connect ground wire (green or bare) (F) of dryer rear panel. Prepare to neutral wire. 3. Remove center screw B Remove center terminal block screw...
Installation Instructions
Page 14
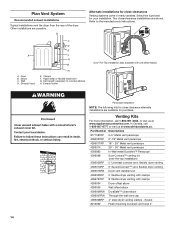
... dryer venting with clamps 4396727RP 8' flexible dryer venting with one offset elbow) Periscope installation NOTE: The following kits for close -clearance installations are shown. Wall D. Venting Kits For more information, call 1-800-807-6777 or visit us at www.whirlpoolparts.ca. A A. Plan Vent System Recommended exhaust installations Typical installations vent the dryer from the rear of the dryer. Other installations are available for purchase. Vent length necessary to the manufacturer's instructions...
... dryer venting with clamps 4396727RP 8' flexible dryer venting with one offset elbow) Periscope installation NOTE: The following kits for close -clearance installations are shown. Wall D. Venting Kits For more information, call 1-800-807-6777 or visit us at www.whirlpoolparts.ca. A A. Plan Vent System Recommended exhaust installations Typical installations vent the dryer from the rear of the dryer. Other installations are available for purchase. Vent length necessary to the manufacturer's instructions...

Installation Instructions
Page 15
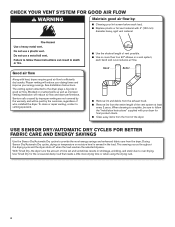
... must not terminate beneath the mobile home. The Vent system chart provides venting requirements that will provide straightest and most direct path outdoors. ■■ Plan installation to secure vent, because they can catch lint. 15 Vent System Chart Number of 90° turns or elbows Type of vent to use vent runs longer than those specified in longer drying times and increased energy usage. Use clamps to exhaust hood 1 Rigid...
... must not terminate beneath the mobile home. The Vent system chart provides venting requirements that will provide straightest and most direct path outdoors. ■■ Plan installation to secure vent, because they can catch lint. 15 Vent System Chart Number of 90° turns or elbows Type of vent to use vent runs longer than those specified in longer drying times and increased energy usage. Use clamps to exhaust hood 1 Rigid...
Installation Instructions
Page 16
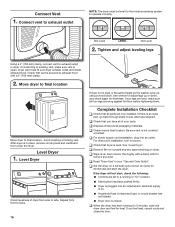
... parts are level, make sure vent is plugged into an outlet. Not Level LEVEL Not Level 2. After dryer is not level or the same height as the washer, prop up or down, and check again for heat. Use wrench to back. 16 If dryer is in a running for 5 minutes, open the dryer door and feel heat, cancel cycle and close the door. For direct wire installation, turn on . ■■ Household fuse...
... parts are level, make sure vent is plugged into an outlet. Not Level LEVEL Not Level 2. After dryer is not level or the same height as the washer, prop up or down, and check again for heat. Use wrench to back. 16 If dryer is in a running for 5 minutes, open the dryer door and feel heat, cancel cycle and close the door. For direct wire installation, turn on . ■■ Household fuse...
Owners Manual
Page 4
... a vent system; To clean or repair venting, contact a venting specialist. ■ Use the shortest length of who installed the dryer. During Sensor Dry/Automatic Dry cycles, drying air temperature or moisture level is complete, be paid by the customer, regardless of vent possible. ■ Use no more drying time or when using the drying rack. 4 See Installation Instructions. Service calls caused by improper venting are not covered by : ■ Cleaning your lint screen before each bend and curve reduces air flow. With Timed Dry, the dryer runs...
... a vent system; To clean or repair venting, contact a venting specialist. ■ Use the shortest length of who installed the dryer. During Sensor Dry/Automatic Dry cycles, drying air temperature or moisture level is complete, be paid by the customer, regardless of vent possible. ■ Use no more drying time or when using the drying rack. 4 See Installation Instructions. Service calls caused by improper venting are not covered by : ■ Cleaning your lint screen before each bend and curve reduces air flow. With Timed Dry, the dryer runs...
Owners Manual
Page 5
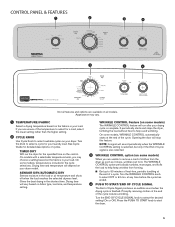
... fabric type, load size, and temperature setting. Promptly removing clothes at the end of cycles. See Cycle Guide for the specified time on your laundry load. Drying time will depend on the control. Opening the door will run the dryer for detailed descriptions of the cycle. TIMED DRY Will run after your load. On some models) The WRINKLE CONTROL feature will stop this feature. Press the PUSH TO START knob to select the desired setting (On or Off). CONTROL PANEL & FEATURES...
... fabric type, load size, and temperature setting. Promptly removing clothes at the end of cycles. See Cycle Guide for the specified time on your laundry load. Drying time will depend on the control. Opening the door will run the dryer for detailed descriptions of the cycle. TIMED DRY Will run after your load. On some models) The WRINKLE CONTROL feature will stop this feature. Press the PUSH TO START knob to select the desired setting (On or Off). CONTROL PANEL & FEATURES...
Owners Manual
Page 6
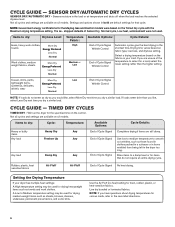
... your dryer has multiple heat settings: A High temperature setting may be used . Setting the Drying Temperature If your load. The as towels and work clothes, towels More Dry Energy Preferred Less Dry Normal Work clothes, medium weight fabrics, sheets More Dry Energy Preferred Less Dry Normal Temperature Fabric: High Medium or Low Available Options: Cycle Details: End of Cycle Signal Wrinkle Control End of Cycle Signal No heat drying. Not all models. CYCLE GUIDE - Drying time varies based on all cycles and settings are default settings for...
... your dryer has multiple heat settings: A High temperature setting may be used . Setting the Drying Temperature If your load. The as towels and work clothes, towels More Dry Energy Preferred Less Dry Normal Work clothes, medium weight fabrics, sheets More Dry Energy Preferred Less Dry Normal Temperature Fabric: High Medium or Low Available Options: Cycle Details: End of Cycle Signal Wrinkle Control End of Cycle Signal No heat drying. Not all models. CYCLE GUIDE - Drying time varies based on all cycles and settings are default settings for...
Owners Manual
Page 8
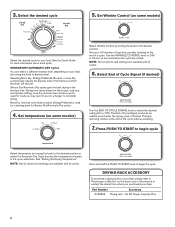
... time. Energy Preferred is finished. Part Number Accessory 3406839 Drying rack - Set Wrinkle Control (on fabric type, load size, and dryness setting. Sensor Dry/Automatic Dry cycles give the best drying in the cycle selections. NOTE: Not all options and settings are available with all cycles. Drying time varies based on some models) Select Wrinkle Control by turning the knob to complete drying. Less Dry removes less moisture and is used for a starting point for your dryer. Get up to 90 minutes of heat-free...
... time. Energy Preferred is finished. Part Number Accessory 3406839 Drying rack - Set Wrinkle Control (on fabric type, load size, and dryness setting. Sensor Dry/Automatic Dry cycles give the best drying in the cycle selections. NOTE: Not all options and settings are available with all cycles. Drying time varies based on some models) Select Wrinkle Control by turning the knob to complete drying. Less Dry removes less moisture and is used for a starting point for your dryer. Get up to 90 minutes of heat-free...
Owners Manual
Page 9
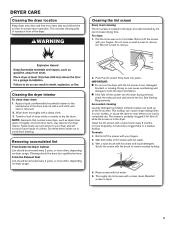
... the lint screen. IMPORTANT: n Do not run the dryer with hot water and liquid detergent. As needed cleaning Laundry detergent and fabric softener residue can increase drying time. The screen is hard to remove lint. To wash: 1. Scrub lint screen with your fingers. Rinse screen with a damp cloth. 3. A screen blocked by a qualified servicer. To clean: 1. Wet lint is probably clogged if lint falls off the screen with the brush to avoid drum staining. DRYER CARE Cleaning the dryer location Keep dryer...
... the lint screen. IMPORTANT: n Do not run the dryer with hot water and liquid detergent. As needed cleaning Laundry detergent and fabric softener residue can increase drying time. The screen is hard to remove lint. To wash: 1. Scrub lint screen with your fingers. Rinse screen with a damp cloth. 3. A screen blocked by a qualified servicer. To clean: 1. Wet lint is probably clogged if lint falls off the screen with the brush to avoid drum staining. DRYER CARE Cleaning the dryer location Keep dryer...
Owners Manual
Page 10
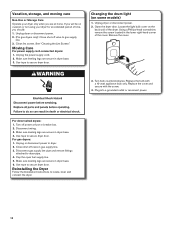
... the dryer. Changing the drum light (on the back wall of the cover. For direct-wired dryers: 1. For gas dryers: 1. Open the dryer door. Use tape to locate, level, and connect the dryer. 10 Turn off power at home. Clean lint screen. Unplug the power supply cord. 2. Disconnect wiring. 3. Replace the cover and secure with a 10-watt appliance bulb only. Disconnect gas supply line pipe and remove fittings attached to dryer. 2. Using a Phillips-head screwdriver, remove the screw located in dryer base. 6. Unplug or disconnect power to dryer...
... the dryer. Changing the drum light (on the back wall of the cover. For direct-wired dryers: 1. For gas dryers: 1. Open the dryer door. Use tape to locate, level, and connect the dryer. 10 Turn off power at home. Clean lint screen. Unplug the power supply cord. 2. Disconnect wiring. 3. Replace the cover and secure with a 10-watt appliance bulb only. Disconnect gas supply line pipe and remove fittings attached to dryer. 2. Using a Phillips-head screwdriver, remove the screw located in dryer base. 6. Unplug or disconnect power to dryer...
Owners Manual
Page 11
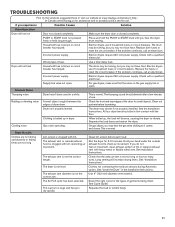
... exhaust vent diameter is blown or circuit breaker has tripped. Clean lint screen before laundering. See Installation Instructions. Clothes not contacting the moisture sensors during Automatic cycles. See Cycle Guide. Household fuse is not the correct size. Incorrect power supply. Check with lint, restricting air movement. For gas dryers, make sure that the exhaust vent is clogged with a qualified electrician. Gas valve operating. The exhaust vent or outside exhaust hood to check air movement. Run the dryer for small objects. See "Installation Instructions...
... exhaust vent diameter is blown or circuit breaker has tripped. Clean lint screen before laundering. See Installation Instructions. Clothes not contacting the moisture sensors during Automatic cycles. See Cycle Guide. Household fuse is not the correct size. Incorrect power supply. Check with lint, restricting air movement. For gas dryers, make sure that the exhaust vent is clogged with a qualified electrician. Gas valve operating. The exhaust vent or outside exhaust hood to check air movement. Run the dryer for small objects. See "Installation Instructions...

Owners Manual
Page 12
... cycle. Check that can stain your dryer is clogged with lint. The load may feel very warm. Use Timed Dry for most installations, the rear of the dryer requires 5" (127 mm). Clean lint screen before Cool Down may not be first time. Stains on load Lint screen is located. Load too hot Laundry items were removed from dryer. The front of the dryer requires a minimum of 1" (25 mm) of airspace, and, for very small loads. Change the Dry Level setting on load...
... cycle. Check that can stain your dryer is clogged with lint. The load may feel very warm. Use Timed Dry for most installations, the rear of the dryer requires 5" (127 mm). Clean lint screen before Cool Down may not be first time. Stains on load Lint screen is located. Load too hot Laundry items were removed from dryer. The front of the dryer requires a minimum of 1" (25 mm) of airspace, and, for very small loads. Change the Dry Level setting on load...
Owners Manual
Page 13
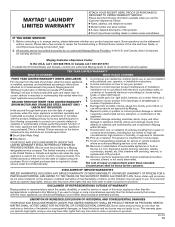
... of the product. 13. house wiring, fuses, or water inlet hoses). 4. Travel or transportation expenses for service in accordance with this major appliance is installed, operated, and maintained according to instructions attached to review the Troubleshooting or Problem Solver section of appliance doors. 6. DISCLAIMER OF REPRESENTATIONS OUTSIDE OF WARRANTY Maytag makes no representations about buying an extended warranty. MAYTAG® LAUNDRY LIMITED WARRANTY ATTACH YOUR RECEIPT HERE. Please...
... of the product. 13. house wiring, fuses, or water inlet hoses). 4. Travel or transportation expenses for service in accordance with this major appliance is installed, operated, and maintained according to instructions attached to review the Troubleshooting or Problem Solver section of appliance doors. 6. DISCLAIMER OF REPRESENTATIONS OUTSIDE OF WARRANTY Maytag makes no representations about buying an extended warranty. MAYTAG® LAUNDRY LIMITED WARRANTY ATTACH YOUR RECEIPT HERE. Please...
Quick Reference Sheet
Page 1
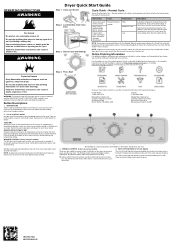
... installation instruction and maintenance information, winter storage, and transportation tips, please see the Owner's Manual included with the Maximum drying temperature setting. However, if you are unable to 90 minutes of heat-free, periodic tumbling at any of the cycle. SENSOR DRY/AUTOMATIC DRY Senses moisture in the load or air temperature and shuts off when the load reaches the selected dryness level. Drying time will depend on fabric type, load size, dryness setting, and temperature setting. Turn...
... installation instruction and maintenance information, winter storage, and transportation tips, please see the Owner's Manual included with the Maximum drying temperature setting. However, if you are unable to 90 minutes of heat-free, periodic tumbling at any of the cycle. SENSOR DRY/AUTOMATIC DRY Senses moisture in the load or air temperature and shuts off when the load reaches the selected dryness level. Drying time will depend on fabric type, load size, dryness setting, and temperature setting. Turn...
Specification Sheet
Page 1
... Door Open 90° Maximum Vent Length Venting Direction Ventless Reference Material Dimension Guide Install Guide Use & Care Guide Energy Guide Warranty Powder Coat Electric Side Swing Yes 12 Delicates Energy Preferred Heavy Duty Jeans Less Dry More Dry Timed Dry 20 Timed Dry 30 Timed Dry 40 Timed Dry 50 Timed Dry 60 Timed Dry 70 Wrinkle Control 42-5/16" x 36" x 28-3/8" 50-11/16" 64' Rear Only No *Visit maytag.com for warranty details. All rights reserved. D200104XXD. ft. capacity dryers have plenty of extra tumbling after the cycle...
... Door Open 90° Maximum Vent Length Venting Direction Ventless Reference Material Dimension Guide Install Guide Use & Care Guide Energy Guide Warranty Powder Coat Electric Side Swing Yes 12 Delicates Energy Preferred Heavy Duty Jeans Less Dry More Dry Timed Dry 20 Timed Dry 30 Timed Dry 40 Timed Dry 50 Timed Dry 60 Timed Dry 70 Wrinkle Control 42-5/16" x 36" x 28-3/8" 50-11/16" 64' Rear Only No *Visit maytag.com for warranty details. All rights reserved. D200104XXD. ft. capacity dryers have plenty of extra tumbling after the cycle...


