Installation Guide
Page 4
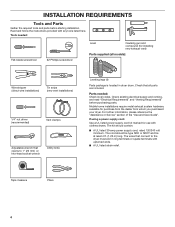
... the "Use and Care Guide". Read and follow the instructions provided with clothes dryers. Mobile home installations require metal exhaust system hardware, available for use with any tools listed here. Check that all models): Wire stripper (direct wire installations) Tin snips (new vent installations) 1/4" nut driver (recommended) Vent clamps Adjustable wrench that connect to 1" (25 mm) or hex-head socket wrench Utility knife Leveling legs (4) Parts package is located in ring terminals or spade terminals with...
... the "Use and Care Guide". Read and follow the instructions provided with clothes dryers. Mobile home installations require metal exhaust system hardware, available for use with any tools listed here. Check that all models): Wire stripper (direct wire installations) Tin snips (new vent installations) 1/4" nut driver (recommended) Vent clamps Adjustable wrench that connect to 1" (25 mm) or hex-head socket wrench Utility knife Leveling legs (4) Parts package is located in ring terminals or spade terminals with...
Installation Guide
Page 5
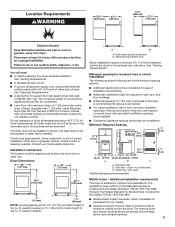
...) (to match height of 3.6 cu. capacity washer) or 1½" (38 mm) (to match height of 3.8 cu. Wide opening (such as a nearby window) should be considered. See "Venting Requirements." Additional installation requirements This dryer is greater than 1" [25 mm], install Extended Dryer Feet Kit, Part Number 279810.) If not level, clothes may not tumble properly and automatic sensor cycles may not operate correctly. Location Requirements 223/4" (578 mm) 273/4" (705...
...) (to match height of 3.6 cu. capacity washer) or 1½" (38 mm) (to match height of 3.8 cu. Wide opening (such as a nearby window) should be considered. See "Venting Requirements." Additional installation requirements This dryer is greater than 1" [25 mm], install Extended Dryer Feet Kit, Part Number 279810.) If not level, clothes may not tumble properly and automatic sensor cycles may not operate correctly. Location Requirements 223/4" (578 mm) 273/4" (705...
Installation Guide
Page 6
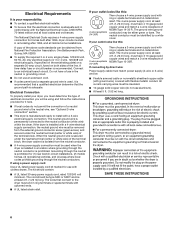
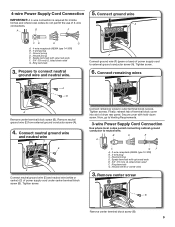
... not permit the connection of electrical connection you will be using a power supply cord: Use a UL listed power supply cord kit marked for (1) new branch-circuit installations, (2) mobile homes, (3) recreational vehicles, and (4) areas where local codes prohibit grounding through the neutral is adequate and in ring terminals or spade terminals with clothes dryers. The neutral conductor must be identified by direct wire: Power supply cable must match power supply (4-wire or 3-wire) and be...
... not permit the connection of electrical connection you will be using a power supply cord: Use a UL listed power supply cord kit marked for (1) new branch-circuit installations, (2) mobile homes, (3) recreational vehicles, and (4) areas where local codes prohibit grounding through the neutral is adequate and in ring terminals or spade terminals with clothes dryers. The neutral conductor must be identified by direct wire: Power supply cable must match power supply (4-wire or 3-wire) and be...
Installation Guide
Page 9
... Venting Requirements. 3-wire Power Supply Cord Connection Use where local codes permit connecting cabinet-ground conductor to connect neutral ground wire and neutral wire. Neutral prong D. Tighten screw. 6. Tighten screw. Secure cover with upturned ends E. 3/4" (19 mm) UL listed strain relief F. Spade terminals with hold-down screw. Ring terminals G. Neutral (white or center wire) 3. 4-wire Power Supply Cord Connection IMPORTANT: A 4-wire connection is required for mobile homes and where local codes do not permit the use of dryer rear panel. Connect...
... Venting Requirements. 3-wire Power Supply Cord Connection Use where local codes permit connecting cabinet-ground conductor to connect neutral ground wire and neutral wire. Neutral prong D. Tighten screw. 6. Tighten screw. Secure cover with upturned ends E. 3/4" (19 mm) UL listed strain relief F. Spade terminals with hold-down screw. Ring terminals G. Neutral (white or center wire) 3. 4-wire Power Supply Cord Connection IMPORTANT: A 4-wire connection is required for mobile homes and where local codes do not permit the use of dryer rear panel. Connect...
Installation Guide
Page 10
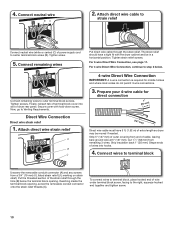
... power supply cord to step 3 below the terminal block opening , screw the removable conduit connector onto the strain relief threads (C). Finally, reinsert tab of terminal block cover into hooks. 4. Now, go to terminal block Unscrew the removable conduit connector (A) and any screws from remaining 3 wires. Connect wires to Venting Requirements. Secure cover with the dryer cabinet and be moved if needed. Strip insulation back 1" (25 mm). For 4 wire Direct Wire Connection, continue to center terminal block screw (B). Attach direct wire cable...
... power supply cord to step 3 below the terminal block opening , screw the removable conduit connector onto the strain relief threads (C). Finally, reinsert tab of terminal block cover into hooks. 4. Now, go to terminal block Unscrew the removable conduit connector (A) and any screws from remaining 3 wires. Connect wires to Venting Requirements. Secure cover with the dryer cabinet and be moved if needed. Strip insulation back 1" (25 mm). For 4 wire Direct Wire Connection, continue to center terminal block screw (B). Attach direct wire cable...
Installation Guide
Page 11
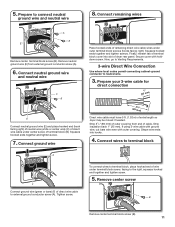
... screw (A). 6. Prepare to the right, squeeze hooked end together and tighten screw. 5. Squeeze hooked ends together and tighten screw. 7. Strip 31/2" (89 mm) of dryer rear panel. If using 3-wire cable with ground wire, cut bare wire even with holddown screw. Connect remaining wires A B E Remove center terminal block screw (B). 5. Connect ground wire Place hooked ends of remaining direct wire cable wires under center screw of extra length so dryer may be moved if needed.
... screw (A). 6. Prepare to the right, squeeze hooked end together and tighten screw. 5. Squeeze hooked ends together and tighten screw. 7. Strip 31/2" (89 mm) of dryer rear panel. If using 3-wire cable with ground wire, cut bare wire even with holddown screw. Connect remaining wires A B E Remove center terminal block screw (B). 5. Connect ground wire Place hooked ends of remaining direct wire cable wires under center screw of extra length so dryer may be moved if needed.
Installation Guide
Page 14
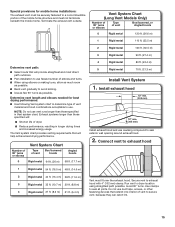
... www.applianceaccessories.com. Plan Vent System Recommended exhaust installations Typical installations vent the dryer from the rear of the dryer. Vent length necessary to the manufacturer's instructions. Exhaust outlet Over-The-Top installation (also available with clamps 4396004 Dryer offset elbow 4396005 Wall offset elbow 4396006RW DuraSafe™ close clearances Venting systems come in many varieties. Part Number Descriptions 8171587RP 0-5" Metal vent periscope 4396037RP 0"-18" Metal vent periscope 4396011RP 18" - 29...
... www.applianceaccessories.com. Plan Vent System Recommended exhaust installations Typical installations vent the dryer from the rear of the dryer. Vent length necessary to the manufacturer's instructions. Exhaust outlet Over-The-Top installation (also available with clamps 4396004 Dryer offset elbow 4396005 Wall offset elbow 4396006RW DuraSafe™ close clearances Venting systems come in many varieties. Part Number Descriptions 8171587RP 0-5" Metal vent periscope 4396037RP 0"-18" Metal vent periscope 4396011RP 18" - 29...
Installation Guide
Page 15
....7 m) 29 ft. (8.8 m) 4 Rigid metal 27 ft. (8.2 m) 21 ft. (6.4 m) Vent must not terminate beneath the mobile home. Avoid 90° turns. Do not use duct tape, screws, or other fastening devices that will help achieve best drying performance. Terminate the exhaust vent outside. Vent System Chart (Long Vent Models Only) Number of 90° turns or elbows Type of vent Box/louvered, or Angled hoods 0 Rigid metal 120...
....7 m) 29 ft. (8.8 m) 4 Rigid metal 27 ft. (8.2 m) 21 ft. (6.4 m) Vent must not terminate beneath the mobile home. Avoid 90° turns. Do not use duct tape, screws, or other fastening devices that will help achieve best drying performance. Terminate the exhaust vent outside. Vent System Chart (Long Vent Models Only) Number of 90° turns or elbows Type of vent Box/louvered, or Angled hoods 0 Rigid metal 120...
Installation Guide
Page 16
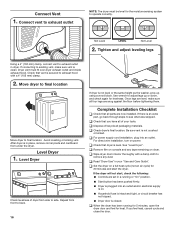
... cloth to remove any tape remaining on a full heat cycle (not an air cycle) for levelness. Level Dryer 1. Repeat from front to exhaust outlet in your tools. Use wrench to see what was skipped. If there is closed. Be sure vent is level. For direct wire installation, turn on . ■■ Household fuse is intact and tight, or circuit breaker has not tripped. ■■ Dryer door is an extra part...
... cloth to remove any tape remaining on a full heat cycle (not an air cycle) for levelness. Level Dryer 1. Repeat from front to exhaust outlet in your tools. Use wrench to see what was skipped. If there is closed. Be sure vent is level. For direct wire installation, turn on . ■■ Household fuse is intact and tight, or circuit breaker has not tripped. ■■ Dryer door is an extra part...

Warranty Information
Page 1
... service, alteration, or modification of the Use and Care Guide, scan the QR code on the below named parts only and does not include repair labor. If you call the Customer eXperience Center: n Name, address, and telephone number n Model number and serial number n A clear, detailed description of the problem n Proof of original purchase date is installed, operated, and maintained according to instructions attached to review the Troubleshooting or Problem...
... service, alteration, or modification of the Use and Care Guide, scan the QR code on the below named parts only and does not include repair labor. If you call the Customer eXperience Center: n Name, address, and telephone number n Model number and serial number n A clear, detailed description of the problem n Proof of original purchase date is installed, operated, and maintained according to instructions attached to review the Troubleshooting or Problem...
Use & Care Guide
Page 4
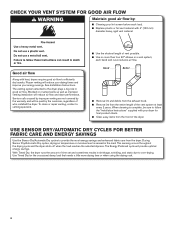
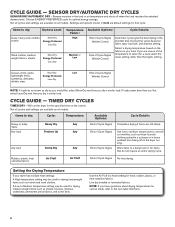
... of the dryer. To clean or repair venting, contact a venting specialist. ■■ Use the shortest length of vent possible. ■■ Use no more drying time or when using the drying rack. 4 The Energy Preferred cycle will reduce air flow and dryer performance. See Installation Instructions. USE SENSOR DRY/AUTOMATIC DRY CYCLES FOR BETTER FABRIC CARE AND ENERGY SAVINGS Use the Sensor Dry/Automatic Dry cycles to the dryer plays a big role in shrinkage, wrinkling, and static due to efficiently dry laundry. With Timed Dry, the dryer runs the...
... of the dryer. To clean or repair venting, contact a venting specialist. ■■ Use the shortest length of vent possible. ■■ Use no more drying time or when using the drying rack. 4 The Energy Preferred cycle will reduce air flow and dryer performance. See Installation Instructions. USE SENSOR DRY/AUTOMATIC DRY CYCLES FOR BETTER FABRIC CARE AND ENERGY SAVINGS Use the Sensor Dry/Automatic Dry cycles to the dryer plays a big role in shrinkage, wrinkling, and static due to efficiently dry laundry. With Timed Dry, the dryer runs the...
Use & Care Guide
Page 5
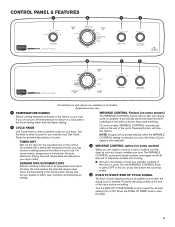
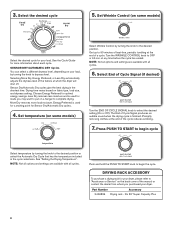
... vary. 1 TEMPERATURE/FABRIC Select a drying temperature based on the fabrics in the load or air temperature and shuts off when the load reaches the selected dryness level. CONTROL PANEL & FEATURES 1 2 3 4 2 1 4 Not all models. Turn the knob to help avoid wrinkling. TIMED DRY Will run after your load. NOTE: A signal will run the dryer for detailed descriptions of a cycle. Promptly removing clothes at any time before the cycle has ended. 4 PUSH TO START/END OF CYCLE SIGNAL...
... vary. 1 TEMPERATURE/FABRIC Select a drying temperature based on the fabrics in the load or air temperature and shuts off when the load reaches the selected dryness level. CONTROL PANEL & FEATURES 1 2 3 4 2 1 4 Not all models. Turn the knob to help avoid wrinkling. TIMED DRY Will run after your load. NOTE: A signal will run the dryer for detailed descriptions of a cycle. Promptly removing clothes at any time before the cycle has ended. 4 PUSH TO START/END OF CYCLE SIGNAL...
Use & Care Guide
Page 6
... drying cycle. A Low to dry: Dryness Level: Jeans, heavy work clothes. Line dry bonded or laminated fabrics. TIMED DRY CYCLES TIMED DRY - Use low to medium temperature to the care label directions. 6 Choose ENERGY PREFERRED cycle for various loads, refer to smooth out wrinkles, such as you would like , select Less Dry next time you dry a similar load. SENSOR DRY/AUTOMATIC DRY CYCLES SENSOR DRY/AUTOMATIC DRY - If loads seem drier than the higher setting. Not all cycles and settings are unsure of Cycle Signal No heat drying. Setting the Drying Temperature...
... drying cycle. A Low to dry: Dryness Level: Jeans, heavy work clothes. Line dry bonded or laminated fabrics. TIMED DRY CYCLES TIMED DRY - Use low to medium temperature to the care label directions. 6 Choose ENERGY PREFERRED cycle for various loads, refer to smooth out wrinkles, such as you would like , select Less Dry next time you dry a similar load. SENSOR DRY/AUTOMATIC DRY CYCLES SENSOR DRY/AUTOMATIC DRY - If loads seem drier than the higher setting. Not all cycles and settings are unsure of Cycle Signal No heat drying. Setting the Drying Temperature...
Use & Care Guide
Page 8
... select a different dryness level, depending on some models) Select Wrinkle Control by turning the knob to the desired position. Set temperature (on fabric type, load size, and dryness setting. at the end of Cycle Signal (if desired) Turn the END OF CYCLE SIGNAL knob to OFF or 90 min. Select End of the cycle reduces wrinkling. 7. Promptly removing clothes at any time before the cycle has ended. Part Number Accessory 3406839 Drying rack -
... select a different dryness level, depending on some models) Select Wrinkle Control by turning the knob to the desired position. Set temperature (on fabric type, load size, and dryness setting. at the end of Cycle Signal (if desired) Turn the END OF CYCLE SIGNAL knob to OFF or 90 min. Select End of the cycle reduces wrinkling. 7. Promptly removing clothes at any time before the cycle has ended. Part Number Accessory 3406839 Drying rack -

Use & Care Guide
Page 9
... screen in front of clothes. Cleaning the dryer interior To clean dryer drum 1. Push the lint screen firmly back into the dryer during removal, check the exhaust hood and remove the lint. Doing so can build up on the lint screen. This buildup can increase drying time. To clean: 1. NOTE: Garments that would block the air flow for your clothes, or cause the dryer to both sides of the drum and rub with the lint screen loose, damaged, blocked...
... screen in front of clothes. Cleaning the dryer interior To clean dryer drum 1. Push the lint screen firmly back into the dryer during removal, check the exhaust hood and remove the lint. Doing so can build up on the lint screen. This buildup can increase drying time. To clean: 1. NOTE: Garments that would block the air flow for your clothes, or cause the dryer to both sides of the drum and rub with the lint screen loose, damaged, blocked...

Use & Care Guide
Page 10
... fuse or breaker box. 2. Unplug dryer or disconnect power. 2. (For gas dryers only): Close shut-off power at home. Moving Care For power supply cord-connected dryers: 1. Locate the light bulb cover on some models) 1. Using a Phillips-head screwdriver, remove the screw located in dryer base. 6. Turn bulb counterclockwise. Replace the cover and secure with a 10-watt appliance bulb only. For direct-wired dryers: 1. Turn off valve to secure dryer door. Make sure leveling legs are secure in dryer base. 4. Use tape to gas supply line. 3. Disconnect gas supply line...
... fuse or breaker box. 2. Unplug dryer or disconnect power. 2. (For gas dryers only): Close shut-off power at home. Moving Care For power supply cord-connected dryers: 1. Locate the light bulb cover on some models) 1. Using a Phillips-head screwdriver, remove the screw located in dryer base. 6. Turn bulb counterclockwise. Replace the cover and secure with a 10-watt appliance bulb only. For direct-wired dryers: 1. Turn off valve to secure dryer door. Make sure leveling legs are secure in dryer base. 4. Use tape to gas supply line. 3. Disconnect gas supply line...

Use & Care Guide
Page 11
... to START knob until you do not feel air movement, clean exhaust system of the drum for assistance and to check air movement. Wrong type of dryer drum. Incorrect power supply. Supply line valve not open . Press and hold the PUSH to dry quickly. The drum may not have heat. Replace both fuses or reset the circuit breaker. If the problem continues, call an electrician. Use a time-delay fuse. Replace the fuses or reset the circuit breaker. Electric dryers require 240-volt power supply. Check with...
... to START knob until you do not feel air movement, clean exhaust system of the drum for assistance and to check air movement. Wrong type of dryer drum. Incorrect power supply. Supply line valve not open . Press and hold the PUSH to dry quickly. The drum may not have heat. Replace both fuses or reset the circuit breaker. If the problem continues, call an electrician. Use a time-delay fuse. Replace the fuses or reset the circuit breaker. Electric dryers require 240-volt power supply. Check with...

Use & Care Guide
Page 12
... sheet. Check that can stain your dryer is clogged with lint. Proper operation of the cycle. Change the Dry Level setting on load Lint screen is located. Clean lint screen before Cool Down may feel very warm. Fabric softener sheets added to finish before the end of the cycle. Allow Cool Down cycle to a partially dried load can tumble freely and reduce formation of wrinkles. The dryer is not blocked by dyes in clothing (usually blue jeans). Cycle time...
... sheet. Check that can stain your dryer is clogged with lint. Proper operation of the cycle. Change the Dry Level setting on load Lint screen is located. Clean lint screen before Cool Down may feel very warm. Fabric softener sheets added to finish before the end of the cycle. Allow Cool Down cycle to a partially dried load can tumble freely and reduce formation of wrinkles. The dryer is not blocked by dyes in clothing (usually blue jeans). Cycle time...
Use & Care Guide
Page 13
.... This warranty gives you specific legal rights, and you also may have the following components to you also may have other rights that interfere with published user, operator, or installation instructions. 2. Travel or transportation expenses for the following information available when you should ask Maytag or your product requires repair. Please take a few minutes to review the Troubleshooting or Problem Solver section of appliance doors...
.... This warranty gives you specific legal rights, and you also may have the following components to you also may have other rights that interfere with published user, operator, or installation instructions. 2. Travel or transportation expenses for the following information available when you should ask Maytag or your product requires repair. Please take a few minutes to review the Troubleshooting or Problem Solver section of appliance doors...

Dimension Guide
Page 2
... (Long Vent Models Only) Number of 90° turns or elbows Type of dryer. ■■ Reduce performance, resulting in the path of the line. Determine vent length and elbows needed for planning purposes only. Connect to use vent runs longer than those specified in Vent System Chart. Exhaust hoods: Recommended Styles: The Vent System Chart provides venting requirements that will help achieve best drying performance. For complete details, see Installation Instructions packed...
... (Long Vent Models Only) Number of 90° turns or elbows Type of dryer. ■■ Reduce performance, resulting in the path of the line. Determine vent length and elbows needed for planning purposes only. Connect to use vent runs longer than those specified in Vent System Chart. Exhaust hoods: Recommended Styles: The Vent System Chart provides venting requirements that will help achieve best drying performance. For complete details, see Installation Instructions packed...


