Installation Guide
Page 4
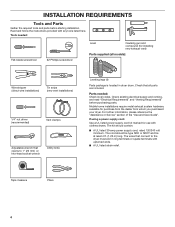
...rated 120/240 volt minimum. The wires that all models): Wire stripper (direct wire installations) Tin snips (new vent installations) 1/4" nut driver (recommended) Vent clamps Adjustable wrench that opens to the dryer must end in dryer drum. INSTALLATION REQUIREMENTS Tools and Parts Gather the... whom you purchased your dryer. Parts needed : Flat-blade screwdriver #2 Phillips screwdriver Level Caulking gun and compound (for installing new exhaust vent) Parts supplied (all parts are included. Tools needed : Check local codes. The kit should be type SRD or SRDT and be ...
...rated 120/240 volt minimum. The wires that all models): Wire stripper (direct wire installations) Tin snips (new vent installations) 1/4" nut driver (recommended) Vent clamps Adjustable wrench that opens to the dryer must end in dryer drum. INSTALLATION REQUIREMENTS Tools and Parts Gather the... whom you purchased your dryer. Parts needed : Flat-blade screwdriver #2 Phillips screwdriver Level Caulking gun and compound (for installing new exhaust vent) Parts supplied (all parts are included. Tools needed : Check local codes. The kit should be type SRD or SRDT and be ...
Installation Guide
Page 5
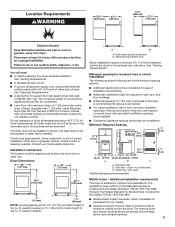
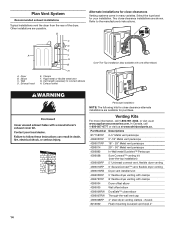
... 1" (25 mm) on all sides of 1" (25 mm) under entire dryer. (If slope is suitable for the exhaust vent with vents *Additional spacing recommended 3"* (76 mm) Mobile home - Check code requirements. Louvered doors with maximum slope of the dryer is available... Some codes limit, or do not permit, installation of an automatic cycle. The combined weight of a companion appliance should also be considered. See "Venting Requirements." ■■ A separate 30 amp circuit. ■■ If you are acceptable. ■■ Companion appliance spacing should also be ...
... 1" (25 mm) on all sides of 1" (25 mm) under entire dryer. (If slope is suitable for the exhaust vent with vents *Additional spacing recommended 3"* (76 mm) Mobile home - Check code requirements. Louvered doors with maximum slope of the dryer is available... Some codes limit, or do not permit, installation of an automatic cycle. The combined weight of a companion appliance should also be considered. See "Venting Requirements." ■■ A separate 30 amp circuit. ■■ If you are acceptable. ■■ Companion appliance spacing should also be ...
Installation Guide
Page 7
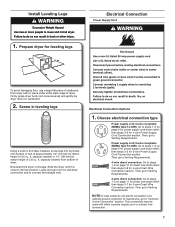
...a direct wire connection. 7 capacity washer) from dryer carton; Now stand the dryer on cardboard. 2. Electrical Connection Options 1. Then go to Venting Requirements. Firmly grasp dryer body (not console panel) and gently lay dryer down on its final location. Leave enough room for 3-wire Direct ... legs To avoid damaging floor, use a large flat piece of cardboard from bottom of a cabinet-ground conductor to neutral wire, go to Venting Requirements. 4-wire direct connection: Go to steps 1-2 on page 10 for direct wire strain relief: then steps 3-8 for 3-wire Power Supply...
...a direct wire connection. 7 capacity washer) from dryer carton; Now stand the dryer on cardboard. 2. Electrical Connection Options 1. Then go to Venting Requirements. Firmly grasp dryer body (not console panel) and gently lay dryer down on its final location. Leave enough room for 3-wire Direct ... legs To avoid damaging floor, use a large flat piece of cardboard from bottom of a cabinet-ground conductor to neutral wire, go to Venting Requirements. 4-wire direct connection: Go to steps 1-2 on page 10 for direct wire strain relief: then steps 3-8 for 3-wire Power Supply...
Installation Guide
Page 9
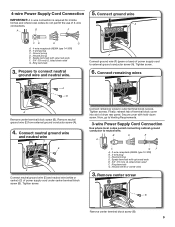
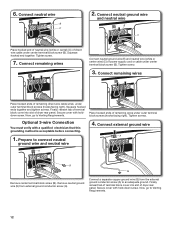
A B F 5. Connect ground wire A CD E G A. 4-wire receptacle (NEMA type 14-30R) B. 4-prong plug C. Ring terminals 3. Tighten screws. Now, go to Venting Requirements. 3-wire Power Supply Cord Connection Use where local codes permit connecting cabinet-ground conductor to connect neutral ground wire and neutral wire. B D E A C GF A. 3-wire ...
A B F 5. Connect ground wire A CD E G A. 4-wire receptacle (NEMA type 14-30R) B. 4-prong plug C. Ring terminals 3. Tighten screws. Now, go to Venting Requirements. 3-wire Power Supply Cord Connection Use where local codes permit connecting cabinet-ground conductor to connect neutral ground wire and neutral wire. B D E A C GF A. 3-wire ...
Installation Guide
Page 10
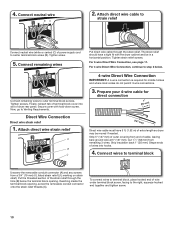
... strain relief threads (C). Reaching inside the terminal block opening . Tighten screws. Shape ends of wires into slot of wire under terminal block screw, facing to Venting Requirements. Connect remaining wires to center terminal block screw (B). To connect wires to terminal block, place hooked end of dryer rear panel. For 4 wire Direct...
... strain relief threads (C). Reaching inside the terminal block opening . Tighten screws. Shape ends of wires into slot of wire under terminal block screw, facing to Venting Requirements. Connect remaining wires to center terminal block screw (B). To connect wires to terminal block, place hooked end of dryer rear panel. For 4 wire Direct...
Installation Guide
Page 11
... terminal block, place hooked end of extra length so dryer may be moved if needed. Squeeze hooked ends together and tighten screw. 7. Now, go to Venting Requirements. 3-wire Direct Wire Connection Use where local codes permit connecting cabinet-ground conductor to the right, squeeze hooked end together and tighten screw. 5. Strip...
... terminal block, place hooked end of extra length so dryer may be moved if needed. Squeeze hooked ends together and tighten screw. 7. Now, go to Venting Requirements. 3-wire Direct Wire Connection Use where local codes permit connecting cabinet-ground conductor to the right, squeeze hooked end together and tighten screw. 5. Strip...
Installation Guide
Page 12
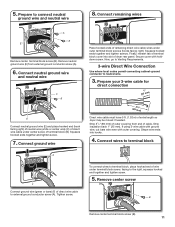
... (white or center wire) (C) of dryer rear panel. Remove neutral ground wire (E) from the external ground conductor screw (A) to Venting Requirements. 12 Now, go to connect neutral ground wire and neutral wire 4. Secure cover with holddown screw. Squeeze hooked ends together ...wire B C 2. Tighten screw. 3. Place hooked ends of direct wire cable under outer terminal block screws (hooks facing right). Prepare to Venting Requirements. Tighten screw. 7. Now, go to an adequate ground. Connect neutral ground wire and neutral wire B C Place hooked end of ...
... (white or center wire) (C) of dryer rear panel. Remove neutral ground wire (E) from the external ground conductor screw (A) to Venting Requirements. 12 Now, go to connect neutral ground wire and neutral wire 4. Secure cover with holddown screw. Squeeze hooked ends together ...wire B C 2. Tighten screw. 3. Place hooked ends of direct wire cable under outer terminal block screws (hooks facing right). Prepare to Venting Requirements. Tighten screw. 7. Now, go to an adequate ground. Connect neutral ground wire and neutral wire B C Place hooked end of ...
Installation Guide
Page 13
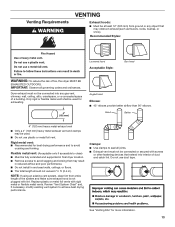
...; elbows provide better airflow than 90° elbows. Do not use plastic or metal foil vent. Good Better 4" (102 mm) heavy metal exhaust vent ■■ Only a 4" (102 mm) heavy metal exhaust vent and clamps may be fully extended and supported in final dryer location. ■■ Remove ... Styles: Louvered hood Acceptable Style: Box hood WARNING: To reduce the risk of fire, this dryer MUST BE EXHAUSTED OUTDOORS. Venting Requirements VENTING Exhaust hoods: ■■ Must be connected into interior of duct and catch lint. Only rigid or flexible metal...
...; elbows provide better airflow than 90° elbows. Do not use plastic or metal foil vent. Good Better 4" (102 mm) heavy metal exhaust vent ■■ Only a 4" (102 mm) heavy metal exhaust vent and clamps may be fully extended and supported in final dryer location. ■■ Remove ... Styles: Louvered hood Acceptable Style: Box hood WARNING: To reduce the risk of fire, this dryer MUST BE EXHAUSTED OUTDOORS. Venting Requirements VENTING Exhaust hoods: ■■ Must be connected into interior of duct and catch lint. Only rigid or flexible metal...
Installation Guide
Page 14
... 4392892 In-Wall metal DuraVent™ Periscope 4396028 Sure Connect™ venting kit (over-the-top installation) 4396009RP 5' Universal connect vent, flexible dryer venting 4396010RP 6' SecureConnect™ vent, flexible dryer venting 4396013RB Dryer vent installer's kit 4396033RP 5' flexible dryer venting with clamps 4396727RP 8' flexible dryer venting with one offset elbow) Periscope installation NOTE: The following kits for close...
... 4392892 In-Wall metal DuraVent™ Periscope 4396028 Sure Connect™ venting kit (over-the-top installation) 4396009RP 5' Universal connect vent, flexible dryer venting 4396010RP 6' SecureConnect™ vent, flexible dryer venting 4396013RB Dryer vent installer's kit 4396033RP 5' flexible dryer venting with clamps 4396727RP 8' flexible dryer venting with one offset elbow) Periscope installation NOTE: The following kits for close...
Installation Guide
Page 15
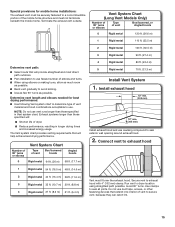
... 120 ft. (36.6 m) 1 Rigid metal 110 ft. (33.5 m) 2 Rigid metal 100 ft. (30.5 m) 3 Rigid metal 90 ft. (27.4 m) Determine vent path: ■■ Select route that will provide straightest and most direct path outdoors. ■■ Plan installation to use caulking compound to seal exterior... m) 2 Rigid metal 44 ft. (13.4 m) 38 ft. (11.6 m) 3 Rigid metal 35 ft. (10.7 m) 29 ft. (8.8 m) 4 Rigid metal 27 ft. (8.2 m) 21 ft. (6.4 m) Vent must fit over the exhaust hood. Install exhaust hood 12" min. (305 mm) 12" min. (305 mm) Install exhaust hood and use fewest number of...
... 120 ft. (36.6 m) 1 Rigid metal 110 ft. (33.5 m) 2 Rigid metal 100 ft. (30.5 m) 3 Rigid metal 90 ft. (27.4 m) Determine vent path: ■■ Select route that will provide straightest and most direct path outdoors. ■■ Plan installation to use caulking compound to seal exterior... m) 2 Rigid metal 44 ft. (13.4 m) 38 ft. (11.6 m) 3 Rigid metal 35 ft. (10.7 m) 29 ft. (8.8 m) 4 Rigid metal 27 ft. (8.2 m) 21 ft. (6.4 m) Vent must fit over the exhaust hood. Install exhaust hood 12" min. (305 mm) 12" min. (305 mm) Install exhaust hood and use fewest number of...
Installation Guide
Page 16
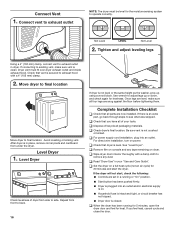
...wrench to see what was skipped. Once legs are snug against the floor before tightening them. q Check that vent is level. q Set the dryer on a full heat cycle (not an air cycle) for levelness. If... you have all four legs are level, make sure vent is an extra part, go back through steps to adjust legs up using a wood block. q Check dryer's... a damp cloth to operate correctly. Move dryer to final location Move dryer to side. Be sure vent is not level or the same height as the washer, prop up or down, and check again ...
...wrench to see what was skipped. Once legs are snug against the floor before tightening them. q Check that vent is level. q Set the dryer on a full heat cycle (not an air cycle) for levelness. If... you have all four legs are level, make sure vent is an extra part, go back through steps to adjust legs up using a wood block. q Check dryer's... a damp cloth to operate correctly. Move dryer to final location Move dryer to side. Be sure vent is not level or the same height as the washer, prop up or down, and check again ...
Use & Care Guide
Page 4
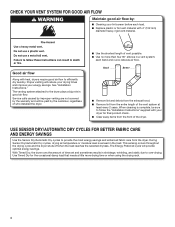
...to the dryer plays a big role in shrinkage, wrinkling, and static due to over-drying. each load. ■■ Replace plastic or foil vent material with your dryer for the occasional damp load that needs a little more than four 90° elbows in the load. During Sensor Dry/... selected dryness. Good Better ■■ Remove lint and debris from the exhaust hood. ■■ Remove lint from the front of the vent system at least every 2 years. See "Installation Instructions." USE SENSOR DRY/AUTOMATIC DRY CYCLES FOR BETTER FABRIC CARE AND ENERGY SAVINGS Use the Sensor...
...to the dryer plays a big role in shrinkage, wrinkling, and static due to over-drying. each load. ■■ Replace plastic or foil vent material with your dryer for the occasional damp load that needs a little more than four 90° elbows in the load. During Sensor Dry/... selected dryness. Good Better ■■ Remove lint and debris from the exhaust hood. ■■ Remove lint from the front of the vent system at least every 2 years. See "Installation Instructions." USE SENSOR DRY/AUTOMATIC DRY CYCLES FOR BETTER FABRIC CARE AND ENERGY SAVINGS Use the Sensor...
Use & Care Guide
Page 9
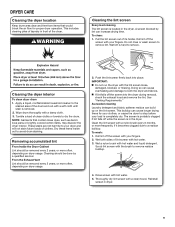
... accumulated lint From Inside the Dryer Cabinet Lint should be removed every 2 years, or more often, depending on dryer usage. 2. From the Exhaust Vent Lint should be removed every 2 years, or more often, depending on the lint screen. Thoroughly dry lint screen with your dryer and will not stain...removal, check the exhaust hood and remove the lint. IMPORTANT: n Do not run the dryer with your load is located in dryer. 9 See "Venting Requirements." This buildup can cause overheating and damage to your fingers. The screen is in front of the drum and rub with hot water. 5. ...
... accumulated lint From Inside the Dryer Cabinet Lint should be removed every 2 years, or more often, depending on dryer usage. 2. From the Exhaust Vent Lint should be removed every 2 years, or more often, depending on the lint screen. Thoroughly dry lint screen with your dryer and will not stain...removal, check the exhaust hood and remove the lint. IMPORTANT: n Do not run the dryer with your load is located in dryer. 9 See "Venting Requirements." This buildup can cause overheating and damage to your fingers. The screen is in front of the drum and rub with hot water. 5. ...
Use & Care Guide
Page 11
...If you hear the dryer drum moving. PUSH to vibrate. Incorrect power supply. Clicking noise Gas valve operating. The exhaust vent or outside exhaust hood to START knob until you experience Possible Causes Solution Dryer Operation Dryer will not heat Household fuse is...avoid a service call. TROUBLESHOOTING First try the solutions suggested here or visit our website at www.maytag.com/product_help In Canada www.maytag.ca for 5-10 minutes. The exhaust vent is normal. Supply line valve not open . Electric dryers use 2 household fuses or circuit breakers...
...If you hear the dryer drum moving. PUSH to vibrate. Incorrect power supply. Clicking noise Gas valve operating. The exhaust vent or outside exhaust hood to START knob until you experience Possible Causes Solution Dryer Operation Dryer will not heat Household fuse is...avoid a service call. TROUBLESHOOTING First try the solutions suggested here or visit our website at www.maytag.com/product_help In Canada www.maytag.ca for 5-10 minutes. The exhaust vent is normal. Supply line valve not open . Electric dryers use 2 household fuses or circuit breakers...


