Installation Guide
Page 4
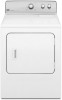
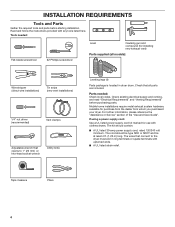
.... (1.22 m) long. The cord should contain: ■■ A UL listed 30-amp power supply cord, rated 120/240 volt minimum. The wires that opens to the dryer must end in dryer drum. Tape measure Pliers 4 Parts needed : Flat-blade screwdriver #2 Phillips screwdriver Level Caulking gun and compound (for installing new exhaust vent) Parts supplied (all parts are included. Check that all models): Wire stripper (direct wire installations) Tin snips (new vent installations) 1/4" nut driver (recommended) Vent clamps Adjustable...
.... (1.22 m) long. The cord should contain: ■■ A UL listed 30-amp power supply cord, rated 120/240 volt minimum. The wires that opens to the dryer must end in dryer drum. Tape measure Pliers 4 Parts needed : Flat-blade screwdriver #2 Phillips screwdriver Level Caulking gun and compound (for installing new exhaust vent) Parts supplied (all parts are included. Check that all models): Wire stripper (direct wire installations) Tin snips (new vent installations) 1/4" nut driver (recommended) Vent clamps Adjustable...
Installation Guide
Page 5
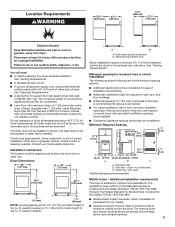
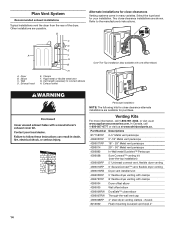
...], install Extended Dryer Feet Kit, Part Number 279810.) If not level, clothes may not tumble properly and automatic sensor cycles may not operate correctly. Additional installation requirements This dryer is recommended to water and/or weather. Location Requirements 223/4" (578 mm) 273/4" (705 mm) 133/4" (349 mm) 273/4" (705 mm) You will be exposed to reduce noise transfer. ■■ For closet installation, with a door, minimum ventilation openings in...
...], install Extended Dryer Feet Kit, Part Number 279810.) If not level, clothes may not tumble properly and automatic sensor cycles may not operate correctly. Additional installation requirements This dryer is recommended to water and/or weather. Location Requirements 223/4" (578 mm) 273/4" (705 mm) 133/4" (349 mm) 273/4" (705 mm) You will be exposed to reduce noise transfer. ■■ For closet installation, with a door, minimum ventilation openings in...
Installation Guide
Page 6
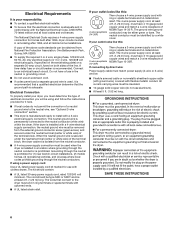
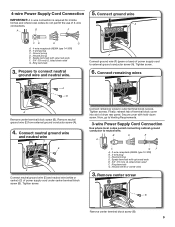
... is prohibited for use aluminum). ■■ At least 5 ft. (1.52 m) long. 6 If using and follow the instructions provided for homes built after 1996, and all local codes and ordinances. A time-delay fuse or circuit breaker is permanently connected to an individual branch circuit. All current-carrying wires must be identified by direct wire: Power supply cable must end in conformance with clothes dryers. The neutral ground...
... is prohibited for use aluminum). ■■ At least 5 ft. (1.52 m) long. 6 If using and follow the instructions provided for homes built after 1996, and all local codes and ordinances. A time-delay fuse or circuit breaker is permanently connected to an individual branch circuit. All current-carrying wires must be identified by direct wire: Power supply cable must end in conformance with clothes dryers. The neutral ground...
Installation Guide
Page 9
...of dryer rear panel. Tighten screws. Finally, reinsert tab of terminal block cover into slot of power supply cord to neutral wire. Ring terminals G. Neutral (white or center wire) 3. Remove center screw B Remove center terminal block screw (B). 9 A B F 5. Ring terminals 3. Connect remaining wires A B E Remove center terminal block screw (B). Tighten screw. Neutral prong D. Prepare to outer terminal block screws. Connect remaining wires to connect neutral ground wire and neutral wire. B D E A C GF A. 3-wire receptacle (NEMA type 10-30R) B. 3-wire plug C. Spade...
...of dryer rear panel. Tighten screws. Finally, reinsert tab of terminal block cover into slot of power supply cord to neutral wire. Ring terminals G. Neutral (white or center wire) 3. Remove center screw B Remove center terminal block screw (B). 9 A B F 5. Ring terminals 3. Connect remaining wires A B E Remove center terminal block screw (B). Tighten screw. Neutral prong D. Prepare to outer terminal block screws. Connect remaining wires to connect neutral ground wire and neutral wire. B D E A C GF A. 3-wire receptacle (NEMA type 10-30R) B. 3-wire plug C. Spade...
Installation Guide
Page 10
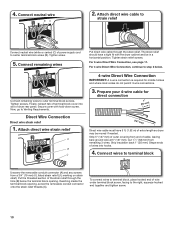
... moved if needed. Prepare your 4-wire cable for mobile homes and where local codes do not permit 3-wire connections. 3. Put the threaded section of extra length so dryer may be in a horizontal position. Connect neutral wire BC 2. Attach direct wire cable to strain relief Connect neutral wire (white or center) (C) of wire under terminal block screw, facing to step 3 below the terminal block opening , screw the removable conduit connector onto the...
... moved if needed. Prepare your 4-wire cable for mobile homes and where local codes do not permit 3-wire connections. 3. Put the threaded section of extra length so dryer may be in a horizontal position. Connect neutral wire BC 2. Attach direct wire cable to strain relief Connect neutral wire (white or center) (C) of wire under terminal block screw, facing to step 3 below the terminal block opening , screw the removable conduit connector onto the...
Installation Guide
Page 11
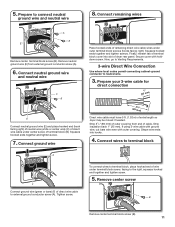
... Venting Requirements. 3-wire Direct Wire Connection Use where local codes permit connecting cabinet-ground conductor to connect neutral ground wire and neutral wire 8. Squeeze hooked ends together and tighten screw. 7. Finally, reinsert tab of terminal block cover into hooks. 4. Connect wires to terminal block, place hooked end of remaining direct wire cable wires under outer terminal block screws (hooks facing right). To connect wires to terminal block A F Connect ground wire (green or bare) (F) of dryer rear panel. If using 3-wire cable with ground wire, cut bare wire...
... Venting Requirements. 3-wire Direct Wire Connection Use where local codes permit connecting cabinet-ground conductor to connect neutral ground wire and neutral wire 8. Squeeze hooked ends together and tighten screw. 7. Finally, reinsert tab of terminal block cover into hooks. 4. Connect wires to terminal block, place hooked end of remaining direct wire cable wires under outer terminal block screws (hooks facing right). To connect wires to terminal block A F Connect ground wire (green or bare) (F) of dryer rear panel. If using 3-wire cable with ground wire, cut bare wire...
Installation Guide
Page 12
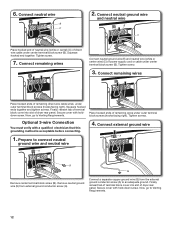
... Venting Requirements. Finally, reinsert tab of terminal block cover into slot of remaining wires under center terminal block screw (B). Place hooked ends of dryer rear panel. Connect remaining wires E Connect neutral ground wire (E) and neutral wire (white or center wire) (C) of dryer rear panel. Squeeze hooked ends together and tighten screws. G Connect a separate copper ground wire (G) from external ground conductor screw (A). Finally, reinsert tab of terminal block cover into slot of power supply cord or cable under outer terminal block screws (hooks...
... Venting Requirements. Finally, reinsert tab of terminal block cover into slot of remaining wires under center terminal block screw (B). Place hooked ends of dryer rear panel. Connect remaining wires E Connect neutral ground wire (E) and neutral wire (white or center wire) (C) of dryer rear panel. Squeeze hooked ends together and tighten screws. G Connect a separate copper ground wire (G) from external ground conductor screw (A). Finally, reinsert tab of terminal block cover into slot of power supply cord or cable under outer terminal block screws (hooks...
Installation Guide
Page 14
...metal vent G. Dryer B. Vent length necessary to the manufacturer's instructions. Part Number Descriptions 8171587RP 0-5" Metal vent periscope 4396037RP 0"-18" Metal vent periscope 4396011RP 18" - 29" Metal vent periscope 4396014 29" - 50" Metal vent periscope 4392892 In-Wall metal DuraVent™ Periscope 4396028 Sure Connect™ venting kit (over-the-top installation) 4396009RP 5' Universal connect vent, flexible dryer venting 4396010RP 6' SecureConnect™ vent, flexible dryer venting 4396013RB Dryer vent installer's kit 4396033RP 5' flexible dryer venting with...
...metal vent G. Dryer B. Vent length necessary to the manufacturer's instructions. Part Number Descriptions 8171587RP 0-5" Metal vent periscope 4396037RP 0"-18" Metal vent periscope 4396011RP 18" - 29" Metal vent periscope 4396014 29" - 50" Metal vent periscope 4392892 In-Wall metal DuraVent™ Periscope 4396028 Sure Connect™ venting kit (over-the-top installation) 4396009RP 5' Universal connect vent, flexible dryer venting 4396010RP 6' SecureConnect™ vent, flexible dryer venting 4396013RB Dryer vent installer's kit 4396033RP 5' flexible dryer venting with...
Installation Guide
Page 15
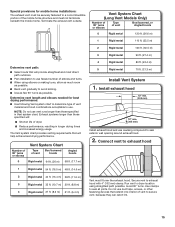
...; turns as possible. Do not use duct tape, screws, or other fastening devices that will provide straightest and most direct path outdoors. ■■ Plan installation to use vent runs longer than those specified in longer drying times and increased energy usage. Exhaust systems longer than those specified will: ■■ Shorten life of dryer. ■■ Reduce performance, resulting in Vent system chart. Install exhaust...
...; turns as possible. Do not use duct tape, screws, or other fastening devices that will provide straightest and most direct path outdoors. ■■ Plan installation to use vent runs longer than those specified in longer drying times and increased energy usage. Exhaust systems longer than those specified will: ■■ Shorten life of dryer. ■■ Reduce performance, resulting in Vent system chart. Install exhaust...
Installation Guide
Page 16
... there is level. For direct wire installation, turn on a full heat cycle (not an air cycle) for 5 minutes, open the dryer door and feel heat, cancel cycle and close the door. See "Level Dryer". q Read "Dryer Use" in a running for 20 minutes and start , check the following: ■■ Controls are level, make sure vent is not crushed or kinked. Use wrench to back. 16 If dryer is plugged into an outlet. Dryer vent must be level for...
... there is level. For direct wire installation, turn on a full heat cycle (not an air cycle) for 5 minutes, open the dryer door and feel heat, cancel cycle and close the door. See "Level Dryer". q Read "Dryer Use" in a running for 20 minutes and start , check the following: ■■ Controls are level, make sure vent is not crushed or kinked. Use wrench to back. 16 If dryer is plugged into an outlet. Dryer vent must be level for...
Use & Care Guide
Page 4
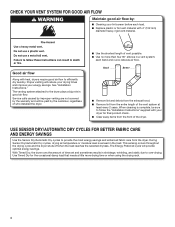
... of time set and sometimes results in good air flow. USE SENSOR DRY/AUTOMATIC DRY CYCLES FOR BETTER FABRIC CARE AND ENERGY SAVINGS Use the Sensor Dry/Automatic Dry cycles to over-drying. Service calls caused by improper venting are not covered by the warranty and will provide optimal energy savings. When cleaning is sensed in a vent system; each load. ■■ Replace plastic or foil vent material with heat, dryers require good air flow to follow the "Installation Instructions" supplied with your dryer for...
... of time set and sometimes results in good air flow. USE SENSOR DRY/AUTOMATIC DRY CYCLES FOR BETTER FABRIC CARE AND ENERGY SAVINGS Use the Sensor Dry/Automatic Dry cycles to over-drying. Service calls caused by improper venting are not covered by the warranty and will provide optimal energy savings. When cleaning is sensed in a vent system; each load. ■■ Replace plastic or foil vent material with heat, dryers require good air flow to follow the "Installation Instructions" supplied with your dryer for...

Use & Care Guide
Page 5
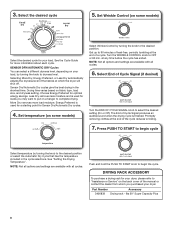
... drying cycle is complete. The WRINKLE CONTROL option periodically tumbles, rearranges, and fluffs the load to help avoid wrinkling. Turn the END OF CYCLE SIGNAL knob to select OFF or 90 min. TIMED DRY Will run after your dryer model. Opening the door will vary based on all features and options are available on fabric type, load size, and temperature setting. CONTROL PANEL & FEATURES 1 2 3 4 2 1 4 Not all models. Appearance may choose a setting based on your drying cycle...
... drying cycle is complete. The WRINKLE CONTROL option periodically tumbles, rearranges, and fluffs the load to help avoid wrinkling. Turn the END OF CYCLE SIGNAL knob to select OFF or 90 min. TIMED DRY Will run after your dryer model. Opening the door will vary based on all features and options are available on fabric type, load size, and temperature setting. CONTROL PANEL & FEATURES 1 2 3 4 2 1 4 Not all models. Appearance may choose a setting based on your drying cycle...
Use & Care Guide
Page 6
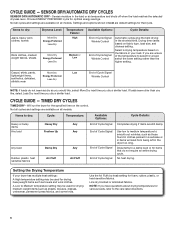
... of Cycle Signal Wrinkle Control End of Cycle Signal Cycle Details: Completes drying if items are available on all models. Drying time varies based on the control. SENSOR DRY/AUTOMATIC DRY CYCLES SENSOR DRY/AUTOMATIC DRY - Select a drying temperature based on all models. Use the Air Fluff (no heat) setting for optimal energy savings. NOTE: If you dry a similar load. Senses moisture in the dryer too long. Items to the care label directions. 6 Casual, shirts, pants, More Dry Low lightweight items, Energy Preferred...
... of Cycle Signal Wrinkle Control End of Cycle Signal Cycle Details: Completes drying if items are available on all models. Drying time varies based on the control. SENSOR DRY/AUTOMATIC DRY CYCLES SENSOR DRY/AUTOMATIC DRY - Select a drying temperature based on all models. Use the Air Fluff (no heat) setting for optimal energy savings. NOTE: If you dry a similar load. Senses moisture in the dryer too long. Items to the care label directions. 6 Casual, shirts, pants, More Dry Low lightweight items, Energy Preferred...
Use & Care Guide
Page 8
... energy savings. Part Number Accessory 3406839 Drying rack - Sensor Dry/Automatic Dry cycles give the best drying in the cycle selections. Choose Energy Preferred for your load. Turn the WRINKLE CONTROL knob to the desired position. SENSOR DRY/AUTOMATIC DRY Cycles You can select a different dryness level, depending on a hanger to dryness level. Drying time varies based on some models) Select Wrinkle Control by turning the knob to complete drying. Energy Preferred is used for more load moisture. Set Wrinkle Control (on fabric type, load size...
... energy savings. Part Number Accessory 3406839 Drying rack - Sensor Dry/Automatic Dry cycles give the best drying in the cycle selections. Choose Energy Preferred for your load. Turn the WRINKLE CONTROL knob to the desired position. SENSOR DRY/AUTOMATIC DRY Cycles You can select a different dryness level, depending on a hanger to dryness level. Drying time varies based on some models) Select Wrinkle Control by turning the knob to complete drying. Energy Preferred is used for more load moisture. Set Wrinkle Control (on fabric type, load size...
Use & Care Guide
Page 9
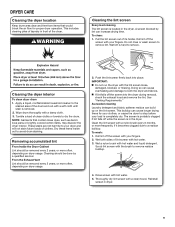
... drying time. This includes clearing piles of laundry in dryer. 9 Rinse screen with hot water. 3. Wet a nylon brush with your dryer and will not stain future loads of the drum and rub with the brush to remove lint. NOTE: Garments that would block the air flow for your clothes, or cause the dryer to your fingers. Roll lint off the screen into place. DRYER CARE Cleaning the dryer location Keep dryer area clear and free...
... drying time. This includes clearing piles of laundry in dryer. 9 Rinse screen with hot water. 3. Wet a nylon brush with your dryer and will not stain future loads of the drum and rub with the brush to remove lint. NOTE: Garments that would block the air flow for your clothes, or cause the dryer to your fingers. Roll lint off the screen into place. DRYER CARE Cleaning the dryer location Keep dryer area clear and free...

Use & Care Guide
Page 10
... an extended period of time, you are at fuse or breaker box. 2. Use tape to locate, level, and connect the dryer. Close shut-off valve to secure dryer door. Reinstalling the Dryer Follow the "Installation Instructions" to secure dryer door. Open the dryer door. Remove the cover. 3. Turn off power at home. If you will be on some models) 1. Use tape to gas supply line. 3. Changing the drum light (on vacation or not using your dryer only when you should: 1. See "Cleaning the Lint Screen."
... an extended period of time, you are at fuse or breaker box. 2. Use tape to locate, level, and connect the dryer. Close shut-off valve to secure dryer door. Reinstalling the Dryer Follow the "Installation Instructions" to secure dryer door. Open the dryer door. Remove the cover. 3. Turn off power at home. If you will be on some models) 1. Use tape to gas supply line. 3. Changing the drum light (on vacation or not using your dryer only when you should: 1. See "Cleaning the Lint Screen."
Use & Care Guide
Page 11
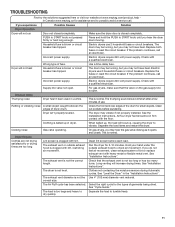
... fuses or reset the circuit breaker. If the problem continues, call an electrician. Electric dryers require 240-volt power supply. Unusual Noise Thumping noise Dryer hasn't been used in the "Installation Instructions". Clean out pockets before each load. On gas dryers, you may be in dryer. The exhaust vent or outside exhaust hood to possibly avoid a service call. The exhaust vent is not level. The dryer is not the correct length. Clothes not contacting the moisture sensors during Automatic cycles. correct size...
... fuses or reset the circuit breaker. If the problem continues, call an electrician. Electric dryers require 240-volt power supply. Unusual Noise Thumping noise Dryer hasn't been used in the "Installation Instructions". Clean out pockets before each load. On gas dryers, you may be in dryer. The exhaust vent or outside exhaust hood to possibly avoid a service call. The exhaust vent is not level. The dryer is not the correct length. Clothes not contacting the moisture sensors during Automatic cycles. correct size...

Use & Care Guide
Page 12
... operation of the dryer requires 5" (127 mm). See "Installation Instructions". Clean lint screen before Cool Down may feel very warm. to possibly avoid a service call. TROUBLESHOOTING First try the solutions suggested here or visit our website at www.maytag.com/product_help In Canada www.maytag.ca for assistance and to avoid wrinkling. Change the Dry Level setting on load Improper use an automatic drying cycle. Dryer tightly packed. Stains on load Lint screen is not blocked...
... operation of the dryer requires 5" (127 mm). See "Installation Instructions". Clean lint screen before Cool Down may feel very warm. to possibly avoid a service call. TROUBLESHOOTING First try the solutions suggested here or visit our website at www.maytag.com/product_help In Canada www.maytag.ca for assistance and to avoid wrinkling. Change the Dry Level setting on load Improper use an automatic drying cycle. Dryer tightly packed. Stains on load Lint screen is not blocked...

Use & Care Guide
Page 13
... is reported to Maytag within 30 days from warranty coverage. 4. Replacement parts or repair labor on the product. You can be provided by the customer. Service calls to know your major appliance to resolve the problem after checking "Troubleshooting," additional help you obtain assistance or service if you also may have other rights that comes with electrical or plumbing codes, or use of products not...
... is reported to Maytag within 30 days from warranty coverage. 4. Replacement parts or repair labor on the product. You can be provided by the customer. Service calls to know your major appliance to resolve the problem after checking "Troubleshooting," additional help you obtain assistance or service if you also may have other rights that comes with electrical or plumbing codes, or use of products not...
Warranty Information
Page 1
... use of God, improper installation, installation not in accordance with original model/serial numbers that vary from defects in -warranty service. This warranty gives you specific legal rights, and you on the duration of implied warranties of merchantability or fitness, so this book and your retailer about the quality, durability, or need repair service, first see the "Troubleshooting" section of purchase or installation date for factory specified replacement parts...
... use of God, improper installation, installation not in accordance with original model/serial numbers that vary from defects in -warranty service. This warranty gives you specific legal rights, and you on the duration of implied warranties of merchantability or fitness, so this book and your retailer about the quality, durability, or need repair service, first see the "Troubleshooting" section of purchase or installation date for factory specified replacement parts...


