
Owners Manual
Page 8
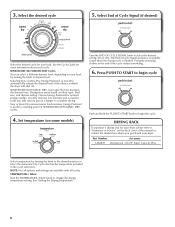
... for a starting point for your load. Very or More Dry removes more information about each cycle. Promptly removing clothes at which the dryer will shut off. DRYING RACK To purchase a drying rack for SENSOR DRY/AUTOMATIC DRY cycles. 4. TEMPERATURE / Fabric Turn the TEMPERATURE ...the knob to complete drying. See "Setting the Drying Temperature". 8 Select the desired cycle 5. 3. Part Number Accessory 3406839 Drying rack - Drying time varies based on your dryer. Choose Energy Preferred for more load moisture. Less Dry removes less moisture and is finished. SENSOR DRY...
... for a starting point for your load. Very or More Dry removes more information about each cycle. Promptly removing clothes at which the dryer will shut off. DRYING RACK To purchase a drying rack for SENSOR DRY/AUTOMATIC DRY cycles. 4. TEMPERATURE / Fabric Turn the TEMPERATURE ...the knob to complete drying. See "Setting the Drying Temperature". 8 Select the desired cycle 5. 3. Part Number Accessory 3406839 Drying rack - Drying time varies based on your dryer. Choose Energy Preferred for more load moisture. Less Dry removes less moisture and is finished. SENSOR DRY...

Installation Instructions
Page 2
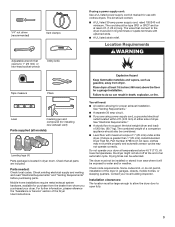
This is , tell you how to potential hazards that can happen if the instructions are very important. INSTALLATION REQUIREMENTS Tools and Parts Gather the required tools and parts before starting installation. Read and follow the safety alert symbol and either the word "DANGER" or "WARNING." This symbol alerts you to ... safety messages in this manual and on your appliance. WARNING You can be killed or seriously injured if you don't follow instructions. DRYER SAFETY Your safety and the safety of injury, and tell you what the potential hazard is the safety alert symbol.
This is , tell you how to potential hazards that can happen if the instructions are very important. INSTALLATION REQUIREMENTS Tools and Parts Gather the required tools and parts before starting installation. Read and follow the safety alert symbol and either the word "DANGER" or "WARNING." This symbol alerts you to ... safety messages in this manual and on your appliance. WARNING You can be killed or seriously injured if you don't follow instructions. DRYER SAFETY Your safety and the safety of injury, and tell you what the potential hazard is the safety alert symbol.
Installation Instructions
Page 3
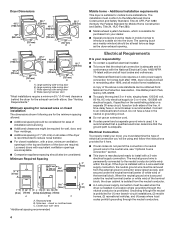
... power supply cord kit marked for installing new exhaust vent) Parts supplied (all parts are using power supply cord, a grounded electrical outlet located within 2 ft. (610 mm) of either side of the Dryer User Instructions. Location Requirements Tape measure Pliers Level Caulking gun ... and "Venting Requirements" before purchasing parts. For further information, please reference the "Assistance or Service" section of dryer. Do not operate your dryer at least 4 ft. (1.22 m) long. The dryer must not be exposed to support the total weight (dryer and load) of an automatic cycle...
... power supply cord kit marked for installing new exhaust vent) Parts supplied (all parts are using power supply cord, a grounded electrical outlet located within 2 ft. (610 mm) of either side of the Dryer User Instructions. Location Requirements Tape measure Pliers Level Caulking gun ... and "Venting Requirements" before purchasing parts. For further information, please reference the "Assistance or Service" section of dryer. Do not operate your dryer at least 4 ft. (1.22 m) long. The dryer must not be exposed to support the total weight (dryer and load) of an automatic cycle...
Installation Instructions
Page 4
... (formerly the Federal Standard for Mobile Home Construction and Safety, Title 24, HUD Part 280). ■■ Metal exhaust system hardware, which is recommended to the neutral conductor (white wire) within the dryer. Large opening . Minimum Required Spacing 18"* (457 mm) 14" max.* (356 mm) ...do not permit the connection of installation and servicing. ■■ Additional clearances might be made in remodeling after 1996, dryer circuits involved in mobile homes to install with the National Electrical Code, ANSI/NFPA 70-latest edition and all mobile home installations...
... (formerly the Federal Standard for Mobile Home Construction and Safety, Title 24, HUD Part 280). ■■ Metal exhaust system hardware, which is recommended to the neutral conductor (white wire) within the dryer. Large opening . Minimum Required Spacing 18"* (457 mm) 14" max.* (356 mm) ...do not permit the connection of installation and servicing. ■■ Additional clearances might be made in remodeling after 1996, dryer circuits involved in mobile homes to install with the National Electrical Code, ANSI/NFPA 70-latest edition and all mobile home installations...

Installation Instructions
Page 13
Wall D. Exhaust hood C D E F G B H E. Clamps F. Refer to connect elbows H. Dryer B. In Canada, call 1-800-901-2042, or visit us at www.applianceaccessories.com. Two close clearance alternate installations are available for purchase. A A. Elbow C. Vent length necessary to the manufacturer's instructions. Part Number Descriptions 8171587RP 0-5" Metal vent periscope 4396037RP 0"-18" Metal vent periscope 4396011RP 18...
Wall D. Exhaust hood C D E F G B H E. Clamps F. Refer to connect elbows H. Dryer B. In Canada, call 1-800-901-2042, or visit us at www.applianceaccessories.com. Two close clearance alternate installations are available for purchase. A A. Elbow C. Vent length necessary to the manufacturer's instructions. Part Number Descriptions 8171587RP 0-5" Metal vent periscope 4396037RP 0"-18" Metal vent periscope 4396011RP 18...

Installation Instructions
Page 15
... mm) clamp, connect vent to operate correctly. Avoid crushing or kinking vent. q Check dryer's final location. q Read "Dryer Use" in dryer. Dupont De Nemours and Company. 15 Check that all packaging materials. Level Dryer 1. Level Dryer Check levelness of /recycle all parts are snug against the ground before tightening them. Repeat from side to back. q For...
... mm) clamp, connect vent to operate correctly. Avoid crushing or kinking vent. q Check dryer's final location. q Read "Dryer Use" in dryer. Dupont De Nemours and Company. 15 Check that all packaging materials. Level Dryer 1. Level Dryer Check levelness of /recycle all parts are snug against the ground before tightening them. Repeat from side to back. q For...
Installation Instructions
Page 16
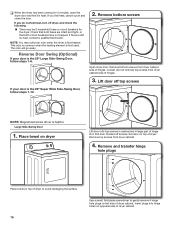
... that both fuses are in cabinet are intact and tight, or that both circuit breakers have not tripped. Remove bottom screws Open dryer door. Place towel on opposite side of hinges. 3. Pull door forward off top screws If your door is first heated. If there ...into hinge holes on dryer Lift door until top screws in large part of dryer cabinet. If you do not remove) top screws from dryer cabinet side of dryer cabinet. Remove bottom screws from dryer cabinet. 4. q When the dryer has been running for 5 minutes, open the dryer door and feel for the dryer. If you feel heat...
... that both fuses are in cabinet are intact and tight, or that both circuit breakers have not tripped. Remove bottom screws Open dryer door. Place towel on opposite side of hinges. 3. Pull door forward off top screws If your door is first heated. If there ...into hinge holes on dryer Lift door until top screws in large part of dryer cabinet. If you do not remove) top screws from dryer cabinet side of dryer cabinet. Remove bottom screws from dryer cabinet. 4. q When the dryer has been running for 5 minutes, open the dryer door and feel for the dryer. If you feel heat...

Installation Instructions
Page 17
... 2. Insert and tighten top screws in hinge holes on top of hinge slot. Place towel on dryer Lift door until top screws in dryer cabinet are in large part of dryer. Insert screws in hinges. 6. Loosen (do not remove) top screws from hinges Remove screws attaching hinges to avoid damaging the surface. 17 Place...
... 2. Insert and tighten top screws in hinge holes on top of hinge slot. Place towel on dryer Lift door until top screws in dryer cabinet are in large part of dryer. Insert screws in hinges. 6. Loosen (do not remove) top screws from hinges Remove screws attaching hinges to avoid damaging the surface. 17 Place...


