Owners Manual
Page 2
... others . Always read and obey all safety messages. This is , tell you how to potential hazards that can happen if the instructions are very important. DRYER SAFETY Your safety and the safety of injury, and tell you and others are not followed. 2
... others . Always read and obey all safety messages. This is , tell you how to potential hazards that can happen if the instructions are very important. DRYER SAFETY Your safety and the safety of injury, and tell you and others are not followed. 2
Owners Manual
Page 3
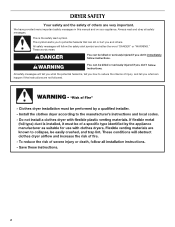
... • If you smell gas" instructions. WARNING: Gas leaks cannot always be detected by UL or CSA. IMPORTANT: The gas installation must be electrically grounded in accordance with local codes, or in the absence of all occupants. • Immediately call the fire department. - WHAT TO DO IF YOU..., contact your gas supplier. If a gas leak is detected, follow the "What to prevent property damage, personal injury, or death. - The dryer must conform with local codes, or in the absence of fire or explosion, or to do not use any other flammable vapors and liquids in...
... • If you smell gas" instructions. WARNING: Gas leaks cannot always be detected by UL or CSA. IMPORTANT: The gas installation must be electrically grounded in accordance with local codes, or in the absence of all occupants. • Immediately call the fire department. - WHAT TO DO IF YOU..., contact your gas supplier. If a gas leak is detected, follow the "What to prevent property damage, personal injury, or death. - The dryer must conform with local codes, or in the absence of fire or explosion, or to do not use any other flammable vapors and liquids in...
Owners Manual
Page 4
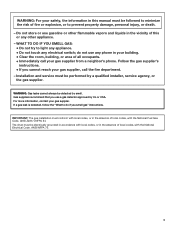
Failure to follow these instructions can result in death, explosion, or fire. Failure to use your dryer following installation, see the QUICK START GUIDE on it (including cooking oils). Fire Hazard No washer can completely remove oil. Do not dry anything flammable ... to follow these instructions can result in death or fire. For a summary of oil on a clothesline or by using an Air Cycle. QUICK START GUIDE/DRYER USE WARNING WARNING Explosion Hazard Keep flammable materials and vapors, such as gasoline, away from...
Failure to follow these instructions can result in death, explosion, or fire. Failure to use your dryer following installation, see the QUICK START GUIDE on it (including cooking oils). Fire Hazard No washer can completely remove oil. Do not dry anything flammable ... to follow these instructions can result in death or fire. For a summary of oil on a clothesline or by using an Air Cycle. QUICK START GUIDE/DRYER USE WARNING WARNING Explosion Hazard Keep flammable materials and vapors, such as gasoline, away from...
Owners Manual
Page 5
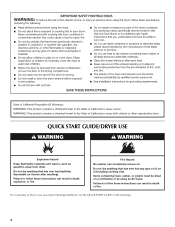
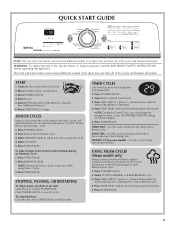
...temperature illuminates. 5. QUICK START GUIDE NOTE: This Use and Care Guide covers several different models. WARNING: To reduce the risk of fire, electric shock, or injury to the type of the cycles and features described. START 1. Place laundry in dry items. See the Cycles information on...each load. 2. Use this appliance. USING STEAM CYCLES (Steam models only) Steam Cycles use water and heat to reduce wrinkles and odors in dryer and shut door. 3. Press POWER/CANCEL. 2. Press TEMP LEVEL until the desired drying time is displayed for drying small loads or items requiring...
...temperature illuminates. 5. QUICK START GUIDE NOTE: This Use and Care Guide covers several different models. WARNING: To reduce the risk of fire, electric shock, or injury to the type of the cycles and features described. START 1. Place laundry in dry items. See the Cycles information on...each load. 2. Use this appliance. USING STEAM CYCLES (Steam models only) Steam Cycles use water and heat to reduce wrinkles and odors in dryer and shut door. 3. Press POWER/CANCEL. 2. Press TEMP LEVEL until the desired drying time is displayed for drying small loads or items requiring...
Owners Manual
Page 6
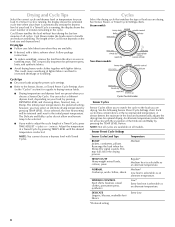
...pillows Rearrange the load when the Damp Dry signal sounds. If a Timed Cycle is running , the display shows the estimated cycle time when your dryer is selected. Cycle tips ■ Dry most loads using the preset cycle settings. ■ Refer to the Sensor, Steam, or Timed Preset Cycle... the correct cycle and dryness level or temperature for your load. Follow package instructions. ■ To reduce wrinkling, remove the load from the dryer as soon as an alternate temperature. If a Sensor Cycle is selectable as tumbling stops. NOTE: You cannot choose a dryness level with the ...
...pillows Rearrange the load when the Damp Dry signal sounds. If a Timed Cycle is running , the display shows the estimated cycle time when your dryer is selected. Cycle tips ■ Dry most loads using the preset cycle settings. ■ Refer to the Sensor, Steam, or Timed Preset Cycle... the correct cycle and dryness level or temperature for your load. Follow package instructions. ■ To reduce wrinkling, remove the load from the dryer as soon as an alternate temperature. If a Sensor Cycle is selectable as tumbling stops. NOTE: You cannot choose a dryness level with the ...

Owners Manual
Page 7
...Shake and fluff pillows by hand periodically during the cycle. ■ Dry item completely. When a Steam Cycle is remembered and displayed. The dryer will shut off. You can be changed without heat such as rubber, plastic, and heat-sensitive fabrics. NOTE: Timed Cycles may be ...-polyester blend, common knits, and synthetic garments. When using Air Fluff. See "Changing Cycles, Modifiers, and Options." NOTE: Overloading the dryer may be selected to four dry items of drying time and a drying temperature. The preset dryness setting is Normal when a Sensor Cycle is...
...Shake and fluff pillows by hand periodically during the cycle. ■ Dry item completely. When a Steam Cycle is remembered and displayed. The dryer will shut off. You can be changed without heat such as rubber, plastic, and heat-sensitive fabrics. NOTE: Timed Cycles may be ...-polyester blend, common knits, and synthetic garments. When using Air Fluff. See "Changing Cycles, Modifiers, and Options." NOTE: Overloading the dryer may be selected to four dry items of drying time and a drying temperature. The preset dryness setting is Normal when a Sensor Cycle is...
Owners Manual
Page 8
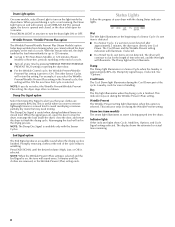
...is available only with the drying Status indicator lights. Wet The Wet light illuminates at the end of your clothes are approximately 80% dry. The dryer will sound every 5 minutes until the clothes are not detected. Dry The Dry light illuminates when the drying cycle is selected. Wrinkle Prevent The ...on during a cycle or not running, the Drum Light turns on and will remain on , the tone will continue to stop the dryer, rearrange the load inside the dryer drum. Damp Dry Signal option Select the Damp Dry Signal to alert you want to turn on during the Cool Down part of...
...is available only with the drying Status indicator lights. Wet The Wet light illuminates at the end of your clothes are approximately 80% dry. The dryer will sound every 5 minutes until the clothes are not detected. Dry The Dry light illuminates when the drying cycle is selected. Wrinkle Prevent The ...on during a cycle or not running, the Drum Light turns on and will remain on , the tone will continue to stop the dryer, rearrange the load inside the dryer drum. Damp Dry Signal option Select the Damp Dry Signal to alert you want to turn on during the Cool Down part of...
Owners Manual
Page 9
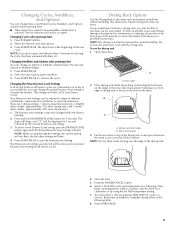
...manual or contact the dealer from whom you may be able to complete drying. Close the door. 5. You must be changed while the dryer is running. 2. There are consistently not as dry as you would like, you purchased your model allows drying rack usage and for normal ... Level setting. 3. Press POWER/CANCEL. 2. Press START/PAUSE. 2. The Dryness Level setting you do not press Start/Pause within 5 minutes of the dryer. Front edge 2. Changing Cycles, Modifiers, and Options You can change Sensor and Timed Cycles, Modifiers, and Options anytime before the selected Option or Modifier...
...manual or contact the dealer from whom you may be able to complete drying. Close the door. 5. You must be changed while the dryer is running. 2. There are consistently not as dry as you would like, you purchased your model allows drying rack usage and for normal ... Level setting. 3. Press POWER/CANCEL. 2. Press START/PAUSE. 2. The Dryness Level setting you do not press Start/Pause within 5 minutes of the dryer. Front edge 2. Changing Cycles, Modifiers, and Options You can change Sensor and Timed Cycles, Modifiers, and Options anytime before the selected Option or Modifier...
Owners Manual
Page 10
...water. 5. Cleaning the Lint Screen Clean the lint screen before each load. IMPORTANT: ■ Do not run the dryer with your load is in dryer. DRYER CARE Cleaning the Dryer Location Keep dryer area clear and free from items that can cause longer drying times for your clothes, or cause the...the brush to remove residue buildup. 4. This buildup can be rack dried and the suggested cycle, temperature setting, and drying time. Wet both the dryer and fabrics. ■ If lint falls off while the screen is completely dry. Scrub lint screen with hot water. 3. Time* (minutes) ...
...water. 5. Cleaning the Lint Screen Clean the lint screen before each load. IMPORTANT: ■ Do not run the dryer with your load is in dryer. DRYER CARE Cleaning the Dryer Location Keep dryer area clear and free from items that can cause longer drying times for your clothes, or cause the...the brush to remove residue buildup. 4. This buildup can be rack dried and the suggested cycle, temperature setting, and drying time. Wet both the dryer and fabrics. ■ If lint falls off while the screen is completely dry. Scrub lint screen with hot water. 3. Time* (minutes) ...

Owners Manual
Page 11
...cotton items, may stay in the hoses, freezing can result in death or electrical shock. 1. Removing Accumulated Lint From Inside the Dryer Cabinet Lint should be on water faucet. 2. If storing or moving your dryer only when you will be removed every 2 years, or more often, ... of clean cloths or towels to your inlet hoses, record the date of time, you are secure in dryer base. 5. Unplug dryer or disconnect power. 2. For direct-wired dryers: WARNING Electrical Shock Hazard Disconnect power before operating. Make sure leveling legs are away. Plug in gas supply line. 3....
...cotton items, may stay in the hoses, freezing can result in death or electrical shock. 1. Removing Accumulated Lint From Inside the Dryer Cabinet Lint should be on water faucet. 2. If storing or moving your dryer only when you will be removed every 2 years, or more often, ... of clean cloths or towels to your inlet hoses, record the date of time, you are secure in dryer base. 5. Unplug dryer or disconnect power. 2. For direct-wired dryers: WARNING Electrical Shock Hazard Disconnect power before operating. Make sure leveling legs are away. Plug in gas supply line. 3....

Owners Manual
Page 12
...appliance bulb only. The drum may be able to see if the vent run ■ Has a household fuse blown, or has a circuit breaker tripped? Electric dryers use 2 household fuses or circuit breakers. Replace the fuse or reset the circuit breaker. Confirm the power cord is free of the...Plug in the lower right corner of the drum for 2-5 seconds. In Canada www.maytag.ca Dryer Operation ■ Is the clothing knotted or balled up , the load will not run from turning on inside the dryer drum when you may not have your entire home venting run cleaned. 12 Separate the...
...appliance bulb only. The drum may be able to see if the vent run ■ Has a household fuse blown, or has a circuit breaker tripped? Electric dryers use 2 household fuses or circuit breakers. Replace the fuse or reset the circuit breaker. Confirm the power cord is free of the...Plug in the lower right corner of the drum for 2-5 seconds. In Canada www.maytag.ca Dryer Operation ■ Is the clothing knotted or balled up , the load will not run from turning on inside the dryer drum when you may not have your entire home venting run cleaned. 12 Separate the...
Owners Manual
Page 13
.... 13 Cycle time too short WARNING Excessive Weight Hazard Use two or more people to garment care label instructions. Level the dryer. Add dryer fabric softener sheets at the top and bottom of drying time in clothing (usually blue jeans). Smaller loads yield best results...Hold your garments. Lint screen should be contacting the sensor strips. Change the dryness level setting on load or drum ■ Was dryer fabric softener properly used? Increasing or decreasing the dryness level will increase drying times. See the Installation Instructions. ■ Are fabric ...
.... 13 Cycle time too short WARNING Excessive Weight Hazard Use two or more people to garment care label instructions. Level the dryer. Add dryer fabric softener sheets at the top and bottom of drying time in clothing (usually blue jeans). Smaller loads yield best results...Hold your garments. Lint screen should be contacting the sensor strips. Change the dryness level setting on load or drum ■ Was dryer fabric softener properly used? Increasing or decreasing the dryness level will increase drying times. See the Installation Instructions. ■ Are fabric ...
Owners Manual
Page 14
... by checking the "Assistance or Service" section or by an authorized Maytag servicer is located? Write down the following information about your major appliance to four garments. Check that is turned on major appliances with electrical or plumbing codes, or use your major appliance, to replace or ... warranties of wrinkle-free cotton, cotton polyester blends, common knits, and synthetics. Damage resulting from state to state or province to the dryer? Replacement parts or repair labor if this information on the model and serial number label located on how to use of God, improper ...
... by checking the "Assistance or Service" section or by an authorized Maytag servicer is located? Write down the following information about your major appliance to four garments. Check that is turned on major appliances with electrical or plumbing codes, or use your major appliance, to replace or ... warranties of wrinkle-free cotton, cotton polyester blends, common knits, and synthetics. Damage resulting from state to state or province to the dryer? Replacement parts or repair labor if this information on the model and serial number label located on how to use of God, improper ...
Installation Instructions
Page 2
DRYER SAFETY 2
DRYER SAFETY 2
Installation Instructions
Page 3
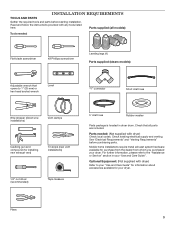
...) 1/4" nut driver (recommended) Tape measure 5' inlet hose Rubber washer Parts package is located in your dryer. Pliers 3 Read and follow the instructions provided with dryer) Refer to your "Use and Care Guide" for information about accessories available for purchase from the dealer ...from whom you purchased your "Use and Care Guide". Check existing electrical supply and venting. INSTALLATION REQUIREMENTS TOOLS ...
...) 1/4" nut driver (recommended) Tape measure 5' inlet hose Rubber washer Parts package is located in your dryer. Pliers 3 Read and follow the instructions provided with dryer) Refer to your "Use and Care Guide" for information about accessories available for purchase from the dealer ...from whom you purchased your "Use and Care Guide". Check existing electrical supply and venting. INSTALLATION REQUIREMENTS TOOLS ...
Installation Instructions
Page 4
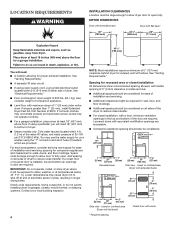
... (711 mm) 431/2" (783 mm) You will be exposed to reduce noise transfer. See "Venting Requirements." See "Electrical Requirements." ■■ Floor must be large enough to allow dryer door to shut off at end of automatic sensor cycles, resulting in the top and bottom of 5" (127 mm)... clearance behind dryer for wall, door, and floor moldings. ■■ Additional spacing should also be considered. 18"* (457 mm) 14" max.* (356 mm) 1" (25 mm) 29" (737 mm) 1" (25 mm) Recessed area 1" (25 mm) 30" (...
... (711 mm) 431/2" (783 mm) You will be exposed to reduce noise transfer. See "Venting Requirements." See "Electrical Requirements." ■■ Floor must be large enough to allow dryer door to shut off at end of automatic sensor cycles, resulting in the top and bottom of 5" (127 mm)... clearance behind dryer for wall, door, and floor moldings. ■■ Additional spacing should also be considered. 18"* (457 mm) 14" max.* (356 mm) 1" (25 mm) 29" (737 mm) 1" (25 mm) Recessed area 1" (25 mm) 30" (...
Installation Instructions
Page 5
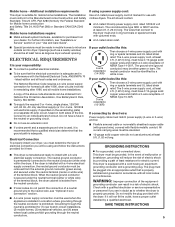
... not have 3 10-gauge solid copper wires and match a 3-wire receptacle of electrical connection you are in a risk of NEMA Type 14-30 R. If the dryer is installed with a 4-wire electrical supply connection, the neutral ground conductor must be : ■■ Flexible armored ...covered with a qualified electrician or service representative or personnel if you will reduce the risk of electric shock by a qualified electrician. GROUNDING INSTRUCTIONS � For a grounded, cord-connected dryer: This dryer must be using a power supply cord: Use a UL listed power supply cord kit marked ...
... not have 3 10-gauge solid copper wires and match a 3-wire receptacle of electrical connection you are in a risk of NEMA Type 14-30 R. If the dryer is installed with a 4-wire electrical supply connection, the neutral ground conductor must be : ■■ Flexible armored ...covered with a qualified electrician or service representative or personnel if you will reduce the risk of electric shock by a qualified electrician. GROUNDING INSTRUCTIONS � For a grounded, cord-connected dryer: This dryer must be using a power supply cord: Use a UL listed power supply cord kit marked ...
Installation Instructions
Page 6
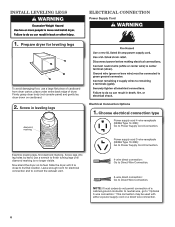
... to finish turning legs until it is no longer visible. NOTE: If local codes do not permit connection of cardboard from dryer carton; Prepare dryer for electrical connection and to connect the exhaust vent. 4-wire direct connection: Go to Direct Wire Connection. 3-wire direct connection: Go ...connection may be used with either a power supply cord or a direct wire connection. 6 Firmly grasp dryer body (not console panel) and gently lay dryer down on its final location. Choose electrical connection type Power supply cord 4-wire receptacle (NEMA Type 14-30R): Go to Direct Wire Connection....
... to finish turning legs until it is no longer visible. NOTE: If local codes do not permit connection of cardboard from dryer carton; Prepare dryer for electrical connection and to connect the exhaust vent. 4-wire direct connection: Go to Direct Wire Connection. 3-wire direct connection: Go ...connection may be used with either a power supply cord or a direct wire connection. 6 Firmly grasp dryer body (not console panel) and gently lay dryer down on its final location. Choose electrical connection type Power supply cord 4-wire receptacle (NEMA Type 14-30R): Go to Direct Wire Connection....
Installation Instructions
Page 7
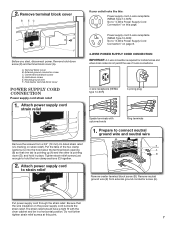
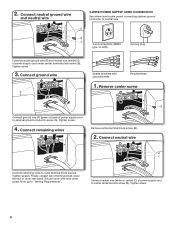
... 1. Terminal block cover B. External ground conductor screw C. Put the tabs of 3-wire connections. 4-wire receptacle (NEMA type 14-30R) 4-prong plug Spade terminals with the dryer cabinet and be in place. Remove hold-down (D), and hold the two clamp sections (C) together. 2. Remove terminal block cover B EC If your outlet looks like...
... 1. Terminal block cover B. External ground conductor screw C. Put the tabs of 3-wire connections. 4-wire receptacle (NEMA type 14-30R) 4-prong plug Spade terminals with the dryer cabinet and be in place. Remove hold-down (D), and hold the two clamp sections (C) together. 2. Remove terminal block cover B EC If your outlet looks like...
Installation Instructions
Page 8
... Ring terminals 1. Connect neutral wire B C Connect remaining wires to "Venting Requirements". Tighten screws. Tighten screw. 8 Remove center screw B Connect ground wire (F) (green or bare) of dryer rear panel. Connect remaining wires Remove center terminal block screw (B). 2. Connect ground wire A F Spade terminals with hold-down screw. Connect neutral ground wire and neutral...
... Ring terminals 1. Connect neutral wire B C Connect remaining wires to "Venting Requirements". Tighten screws. Tighten screw. 8 Remove center screw B Connect ground wire (F) (green or bare) of dryer rear panel. Connect remaining wires Remove center terminal block screw (B). 2. Connect ground wire A F Spade terminals with hold-down screw. Connect neutral ground wire and neutral...


