

Use and Care Guide
Page 3
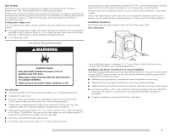
... not install a clothes dryer with flexible plastic venting materials, if flexible metal {foil type) duct is installed, it must be easily crushed, and trap lint, These conditions will obstruct clothes dryer airflow and increase the risk of fire, - This is , tell you how to reduce the chance of injury, and tell you what can be of a specific type identified by a qualified installer, - Save these instructions, instructions...
... not install a clothes dryer with flexible plastic venting materials, if flexible metal {foil type) duct is installed, it must be easily crushed, and trap lint, These conditions will obstruct clothes dryer airflow and increase the risk of fire, - This is , tell you how to reduce the chance of injury, and tell you what can be of a specific type identified by a qualified installer, - Save these instructions, instructions...

Use and Care Guide
Page 4
...-like materials. • Clean lint screen before starting installation. Levering legs (4) B. Rubber washer connector Short inlet hose D. SAVE THESE INSTRUCTIONS Gather the required tools and parts before or after each load. • Keep area around the exhaust opening and adjacent surrounding areas free from service or discarded, remove the door to 1" (25 mm) or hex-head socket wrench (for adjusting dryer feet) • Wire stripper (direct wire installations) • Vent clamps • Caulking gun...
...-like materials. • Clean lint screen before starting installation. Levering legs (4) B. Rubber washer connector Short inlet hose D. SAVE THESE INSTRUCTIONS Gather the required tools and parts before or after each load. • Keep area around the exhaust opening and adjacent surrounding areas free from service or discarded, remove the door to 1" (25 mm) or hex-head socket wrench (for adjusting dryer feet) • Wire stripper (direct wire installations) • Vent clamps • Caulking gun...
Use and Care Guide
Page 5
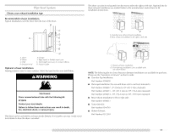
... installation. minimum ventilation openings in an area where it will need • A location that connect to water and/or weather. Check existing electrical supply and venting and see "Electrical Requirements" and "Venting Requirements" before purchasing parts. The dryer must be considered. Check code requirements. The combined weight of a companion appliance should also be large enough to allow the dryer door to reduce noise transfer. • For closet installation, with a doo_; The kit should...
... installation. minimum ventilation openings in an area where it will need • A location that connect to water and/or weather. Check existing electrical supply and venting and see "Electrical Requirements" and "Venting Requirements" before purchasing parts. The dryer must be considered. Check code requirements. The combined weight of a companion appliance should also be large enough to allow the dryer door to reduce noise transfer. • For closet installation, with a doo_; The kit should...

Use and Care Guide
Page 6
.... • Special provisions must determine the type of electrical connection you will be using a power supply cord: Use a UI. tJall 14" ma__ I _ I )o not use with the National Electrical Code, ANSI/NFPA 70-latest edition and all mobile home installations. Recessed area B. Closet door with vents area *Required spacing [Z6mm) + ° It is your dryer; The National Electric Code requires a 4-wire power supply connection for (1) new branch-circuit installations, (2) mobile homes, (3) recreational vehicles, and...
.... • Special provisions must determine the type of electrical connection you will be using a power supply cord: Use a UI. tJall 14" ma__ I _ I )o not use with the National Electrical Code, ANSI/NFPA 70-latest edition and all mobile home installations. Recessed area B. Closet door with vents area *Required spacing [Z6mm) + ° It is your dryer; The National Electric Code requires a 4-wire power supply connection for (1) new branch-circuit installations, (2) mobile homes, (3) recreational vehicles, and...

Use and Care Guide
Page 8
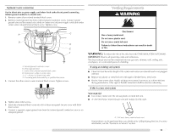
... outlet, have a proper outlet installed by providing a path of the line. SAVE THESE iNSTRUCTIONS 4-wire receptacle 14-30R • Do not use Power Supply Cord Replacement Part Number 3394208. It is recommended that the electrical connection is properly grounded. Electrical Shock Hazard Plug into a standard 14-30R wail receptacle. If you are using a replacement power supply cord, it will reduce the risk of dryer's final location. Do not modify the plug provided with a cord...
... outlet, have a proper outlet installed by providing a path of the line. SAVE THESE iNSTRUCTIONS 4-wire receptacle 14-30R • Do not use Power Supply Cord Replacement Part Number 3394208. It is recommended that the electrical connection is properly grounded. Electrical Shock Hazard Plug into a standard 14-30R wail receptacle. If you are using a replacement power supply cord, it will reduce the risk of dryer's final location. Do not modify the plug provided with a cord...

Use and Care Guide
Page 11
... listed strain relief C. A A_ B CD E G A. 4-wire receptacle (NEMA type 14-30R) B. 4-prong plug C. Spade terminals with hold- Cround wire (green or bare) of dryer rear panel. fxtema/ ground conductor screw - Now go to outer terminal block screws. II A. Insert tab of terminal block cover into slot of power supply cord D. Secure cover with upturned ends I ] Neutral wire (white or center wire) 4. Connect neutral ground wire and the neutral wire (white or center wire) of 3-wire connections...
... listed strain relief C. A A_ B CD E G A. 4-wire receptacle (NEMA type 14-30R) B. 4-prong plug C. Spade terminals with hold- Cround wire (green or bare) of dryer rear panel. fxtema/ ground conductor screw - Now go to outer terminal block screws. II A. Insert tab of terminal block cover into slot of power supply cord D. Secure cover with upturned ends I ] Neutral wire (white or center wire) 4. Connect neutral ground wire and the neutral wire (white or center wire) of 3-wire connections...

Use and Care Guide
Page 12
... position of extra length so dryer can be moved if needed. Neutral wire (white or center wire) E. Neutral ground wire B. Direct wire cable must have 5 ft (1.52 m) of Nf_UTRAL ground wire before being moved to the terminal block, place the hooked end of the wire under the center screw of outer covering from 3 remaining wires. Strip 5" (127 mm) of the terminal [)lock. Remove neutral ground wire from external ground...
... position of extra length so dryer can be moved if needed. Neutral wire (white or center wire) E. Neutral ground wire B. Direct wire cable must have 5 ft (1.52 m) of Nf_UTRAL ground wire before being moved to the terminal block, place the hooked end of the wire under the center screw of outer covering from 3 remaining wires. Strip 5" (127 mm) of the terminal [)lock. Remove neutral ground wire from external ground...
Use and Care Guide
Page 15
... Maytag Services. Tighten strain relief screws. 5. Optional 3-wire connection Use for exhausting. Remove neutral ground wire from the entire length of the system and make sure exhaust hood is not plugged with lint. • Replace any gas vent, chimney, wall, ceiling, attic, crawlspace, or a concealed space of fire, this is a new vent system Vent material • Use a heavy metal vent. Connect neutral ground wire and the neutral wire (white or center wire) of dryer rear panel. E 3, Connect...
... Maytag Services. Tighten strain relief screws. 5. Optional 3-wire connection Use for exhausting. Remove neutral ground wire from the entire length of the system and make sure exhaust hood is not plugged with lint. • Replace any gas vent, chimney, wall, ceiling, attic, crawlspace, or a concealed space of fire, this is a new vent system Vent material • Use a heavy metal vent. Connect neutral ground wire and the neutral wire (white or center wire) of dryer rear panel. E 3, Connect...
Use and Care Guide
Page 17
... to have the dryer converted. Optional kits for kit installation instructions. -i- _¸ ] B A. Vent length necessary to the manufacturer's instructions for these instructions can result in many varieties. Dryer B. Elbow C. Refer to connect elbows H. Failure to follow these exhaust installations are available for purchase. • Periscope Installation (For use with the following kits for your installation. Choose your exhaust installation type Recommended exhaust installations Typical installations vent the dryer from the rear to either the right or left side...
... to have the dryer converted. Optional kits for kit installation instructions. -i- _¸ ] B A. Vent length necessary to the manufacturer's instructions for these instructions can result in many varieties. Dryer B. Elbow C. Refer to connect elbows H. Failure to follow these exhaust installations are available for purchase. • Periscope Installation (For use with the following kits for your installation. Choose your exhaust installation type Recommended exhaust installations Typical installations vent the dryer from the rear to either the right or left side...

Use and Care Guide
Page 18
... maximum exhaust length, add one elbow. Install exhaust hood. Secure vent to move and install dryer. Excessive Weight Hazard Use two or more people to exhaust hood with 4" (102 mm) clamp. 3. To protect the floor, use duct tape, screws, or other injury. 1. The Vent system chart provides venting requirements that will provide the straightest and most direct path outdoors. • Plan the installation to use the fewest number...
... maximum exhaust length, add one elbow. Install exhaust hood. Secure vent to move and install dryer. Excessive Weight Hazard Use two or more people to exhaust hood with 4" (102 mm) clamp. 3. To protect the floor, use duct tape, screws, or other injury. 1. The Vent system chart provides venting requirements that will provide the straightest and most direct path outdoors. • Plan the installation to use the fewest number...

Use and Care Guide
Page 20
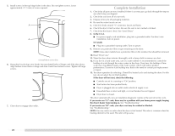
... inside of the 2 hinges in Step 4. 20 Place a towel or soft cloth on the door. t:3. Remove the door assembly 1. Remove the bottom screw from each of the door facing up. If the dryer is not level, prop up or down and check again for levelness. Remove remaining 2 loose screws from a right-side opening . location of plastic plugs shown You can change your door swing from dryer front panel. 5.
... inside of the 2 hinges in Step 4. 20 Place a towel or soft cloth on the door. t:3. Remove the door assembly 1. Remove the bottom screw from each of the door facing up. If the dryer is not level, prop up or down and check again for levelness. Remove remaining 2 loose screws from a right-side opening . location of plastic plugs shown You can change your door swing from dryer front panel. 5.
Use and Care Guide
Page 22
... certain part replacement or repair. 13. In the U.S.A. • For power supply cord installation, installation, turn on power. 9. For direct wire • Plug into a grounded outlet. Turn on power. Read "Dryer Use." 11. If the dryer will go back through the water system in a running or "On" position. • Start button has been pushed firmly. • Dryer is closed. This dryer automatically runs an installation diagnostic routine at the start , check the following: • Controls are set in the dryer. See "Troubleshooting...
... certain part replacement or repair. 13. In the U.S.A. • For power supply cord installation, installation, turn on power. 9. For direct wire • Plug into a grounded outlet. Turn on power. Read "Dryer Use." 11. If the dryer will go back through the water system in a running or "On" position. • Start button has been pushed firmly. • Dryer is closed. This dryer automatically runs an installation diagnostic routine at the start , check the following: • Controls are set in the dryer. See "Troubleshooting...

Use and Care Guide
Page 23
... the load. Your dryer may automatically vary from dryer. The preset settings for more detailed information. 1. Do not dry anything flammable on the size and fabric type of fire, electric shock, or injury to select cycle, or open the dryer door and the display will adjust again, showing the final drying time. Clean lint screen before operating this manual for Sensor; If the dryer is not started within 5 minutes, the dryer will turn the...
... the load. Your dryer may automatically vary from dryer. The preset settings for more detailed information. 1. Do not dry anything flammable on the size and fabric type of fire, electric shock, or injury to select cycle, or open the dryer door and the display will adjust again, showing the final drying time. Clean lint screen before operating this manual for Sensor; If the dryer is not started within 5 minutes, the dryer will turn the...
Use and Care Guide
Page 24
... dryer Close the door. to dry the load on the load size and dryness [eve[. If the cycle is dosed. 24 • If you do not offer an alternate temperature. Drying tips • Follow care [abe[ directions when they are dry. To use a Sensor Cycle • Press POWER/CANCEl ..... The length of all cycles. To use a Timed Cycle Turn knob to cancel a cycle. Press POWER/CANCEl. Coo[ Down tumbles the load without heat during a Sensor Cycle: • Press START...
... dryer Close the door. to dry the load on the load size and dryness [eve[. If the cycle is dosed. 24 • If you do not offer an alternate temperature. Drying tips • Follow care [abe[ directions when they are dry. To use a Sensor Cycle • Press POWER/CANCEl ..... The length of all cycles. To use a Timed Cycle Turn knob to cancel a cycle. Press POWER/CANCEl. Coo[ Down tumbles the load without heat during a Sensor Cycle: • Press START...
Use and Care Guide
Page 30
... Disconnect power before operating. Replace screen in dryer or reconnect power. Wipe drum thoroughly with hot water and liquid detergent remove residue buildup. 4. Turn off screen with the brush to the dryer. To winterize dryer 1. Unplug dryer or disconnect power. 2. Reconnect water inlet hose to secure dryer door. For direct-wired dryers: Replace inlet hoses and hose screen after 5 years of use dryer again 1. When replacing your inlet hoses, record the date of replacement Install and store your dryer and will not freeze. As needed cleaning...
... Disconnect power before operating. Replace screen in dryer or reconnect power. Wipe drum thoroughly with hot water and liquid detergent remove residue buildup. 4. Turn off screen with the brush to the dryer. To winterize dryer 1. Unplug dryer or disconnect power. 2. Reconnect water inlet hose to secure dryer door. For direct-wired dryers: Replace inlet hoses and hose screen after 5 years of use dryer again 1. When replacing your inlet hoses, record the date of replacement Install and store your dryer and will not freeze. As needed cleaning...
Use and Care Guide
Page 31
... dryer light automatically turns on the length of the power outage, you open the door. In U.S.A. The dryer may require pressing and holding the Start/Pause button for small objects. Use masking tape to resume the cycle by a power failure? bulb only. www.maytag.com/help - There may be 2 household fuses or circuit breakers for service. Check intact and tight, or that both circuit breakers have heat. Replace the circuit breaker. Electric dryers require 240-volt power supply. Check with the screw. 4. Use a time...
... dryer light automatically turns on the length of the power outage, you open the door. In U.S.A. The dryer may require pressing and holding the Start/Pause button for small objects. Use masking tape to resume the cycle by a power failure? bulb only. www.maytag.com/help - There may be 2 household fuses or circuit breakers for service. Check intact and tight, or that both circuit breakers have heat. Replace the circuit breaker. Electric dryers require 240-volt power supply. Check with the screw. 4. Use a time...

Use and Care Guide
Page 32
... see if the vent run length and number of the door. Check to see if a household fuse has blown or circuit breaker has tripped. Refer to tumble freely. Clothes are not drying satisfactorily, drying times are using. Do not use a metal foil vent. Failure to follow these instructions can result in a room with lint? If you are too long, or load is crushed or kinked. The rear of the dryer requires 5" (127 mm...
... see if the vent run length and number of the door. Check to see if a household fuse has blown or circuit breaker has tripped. Refer to tumble freely. Clothes are not drying satisfactorily, drying times are using. Do not use a metal foil vent. Failure to follow these instructions can result in a room with lint? If you are too long, or load is crushed or kinked. The rear of the dryer requires 5" (127 mm...

Use and Care Guide
Page 33
... time? Dry clean only garments are wrinkled • Was the load removed from loads consisting of wrinkle-free cotton, cotton polyester blends, common knits, and synthetics. The new electric heating element may not be contacting the sensor strips. I_oad cycle and odors knits, and Is water connected to move and install dryer. The load may have an odor. Dry smaller loads that the water supply is turned on load or drum Was dryer fabric softener properly used...
... time? Dry clean only garments are wrinkled • Was the load removed from loads consisting of wrinkle-free cotton, cotton polyester blends, common knits, and synthetics. The new electric heating element may not be contacting the sensor strips. I_oad cycle and odors knits, and Is water connected to move and install dryer. The load may have an odor. Dry smaller loads that the water supply is turned on load or drum Was dryer fabric softener properly used...
Use and Care Guide
Page 34
... Drying rack Steam hose kit g4 Whencallingp,leaskenowthepurchasdeateandthecompletmeodea[ndserianl umbeorf yourappliancTeh. or visit • Use and maintenance procedures. • Accessory and repair parts sales. • Referrals to Whirlpool Canada I .I_C ATTN: CAIR _kC_ enter RO. For more high-quality items or to order replacement parts, we recommend that you need replacement parts If you use only factory specified parts. PT6001 .... 8212614 31682 1903WH 49572 4 ft (1.2 m) gas line dryer connector installation kit 4 ft (1.2 m) dryer cord, 3-wire...
... Drying rack Steam hose kit g4 Whencallingp,leaskenowthepurchasdeateandthecompletmeodea[ndserianl umbeorf yourappliancTeh. or visit • Use and maintenance procedures. • Accessory and repair parts sales. • Referrals to Whirlpool Canada I .I_C ATTN: CAIR _kC_ enter RO. For more high-quality items or to order replacement parts, we recommend that you need replacement parts If you use only factory specified parts. PT6001 .... 8212614 31682 1903WH 49572 4 ft (1.2 m) gas line dryer connector installation kit 4 ft (1.2 m) dryer cord, 3-wire...

Use and Care Guide
Page 35
... of the Use & Care Guide. ITEMS EXCLUDED FROM WARRANTY This limited warranty does not cover: 1. and is required to repair or replace appliance light bulbs, air filters or water filters. Repairs to better help by checking the "Assistance or Service" 9/07 Keep this book and your sales slip together for product service if your major appliance. In the U.S.A., call 1-800-807-6777. Dealer name Address Phone number Model number Serial number Purchase date This...
... of the Use & Care Guide. ITEMS EXCLUDED FROM WARRANTY This limited warranty does not cover: 1. and is required to repair or replace appliance light bulbs, air filters or water filters. Repairs to better help by checking the "Assistance or Service" 9/07 Keep this book and your sales slip together for product service if your major appliance. In the U.S.A., call 1-800-807-6777. Dealer name Address Phone number Model number Serial number Purchase date This...


