
Installation Guide
Page 3
Pliers 3 Read and follow the instructions provided with dryer) Check local codes. Check existing electrical supply and venting. Check that all models): Tools needed : (Not supplied with any tools listed here. Parts supplied (all parts are included. See ... Requirements" and "Venting Requirements" before starting installation. Parts needed : Flat-blade screwdriver #2 Phillips screwdriver Leveling legs (4) Parts supplied (steam models): Adjustable wrench that opens to 1" (25 mm) or hex-head socket wrench Level "Y" connector Short inlet hose Wire stripper (direct wire...
Pliers 3 Read and follow the instructions provided with dryer) Check local codes. Check existing electrical supply and venting. Check that all models): Tools needed : (Not supplied with any tools listed here. Parts supplied (all parts are included. See ... Requirements" and "Venting Requirements" before starting installation. Parts needed : Flat-blade screwdriver #2 Phillips screwdriver Leveling legs (4) Parts supplied (steam models): Adjustable wrench that opens to 1" (25 mm) or hex-head socket wrench Level "Y" connector Short inlet hose Wire stripper (direct wire...

Installation Guide
Page 4
... spacing on all sides of installation and servicing; Lower temperatures may not operate correctly. ■■ For a garage installation, place dryer at least 18" (457 mm) above floor. ■■ Steam models only: Cold water faucets located within 2 ft. (610 mm) of either side of 20-100 psi (137.9-689.6 kPa). Contact...
... spacing on all sides of installation and servicing; Lower temperatures may not operate correctly. ■■ For a garage installation, place dryer at least 18" (457 mm) above floor. ■■ Steam models only: Cold water faucets located within 2 ft. (610 mm) of either side of 20-100 psi (137.9-689.6 kPa). Contact...

Installation Guide
Page 13
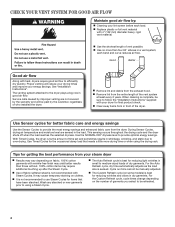
... ■■ Must be connected or secured with screws or other fastening devices that may obstruct exhaust (such as flowers, rocks, bushes, or snow). Dryer B. Rigid metal or flexible metal vent G. Part Number 8212503 13 B C D A E F G B H A. Elbow C. all joints. ■&#... connect elbows H. Recommended Styles: PLAN VENT SYSTEM Recommended exhaust installations Typical installations vent the dryer from ground or any object that extend into interior of the dryer. Exhaust outlet Optional exhaust installations: Good Better Clamps: ■■ Use clamps to ...
... ■■ Must be connected or secured with screws or other fastening devices that may obstruct exhaust (such as flowers, rocks, bushes, or snow). Dryer B. Rigid metal or flexible metal vent G. Part Number 8212503 13 B C D A E F G B H A. Elbow C. all joints. ■&#... connect elbows H. Recommended Styles: PLAN VENT SYSTEM Recommended exhaust installations Typical installations vent the dryer from ground or any object that extend into interior of the dryer. Exhaust outlet Optional exhaust installations: Good Better Clamps: ■■ Use clamps to ...

Installation Guide
Page 15
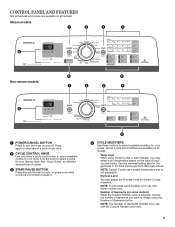
...hood 12" min. (305 mm) CONNECT INLET HOSES For non-steam models, skip to seal exterior wall opening around exhaust hood. 2. Check and ...female end of the "Y" connector to the coupling can catch lint. See figure B. Attach short hose to dryer location using the new inlet hoses. Using pliers, tighten the couplings with new rubber washer provided. 2. ..." on faucet. Remove old rubber washer from inlet hose and replace with additional two-thirds turn inside the dryer. Maytag Vent System Chart Number of 90° elbows Type of vent Box/louvered hoods Angled hoods 0 Rigid metal...
...hood 12" min. (305 mm) CONNECT INLET HOSES For non-steam models, skip to seal exterior wall opening around exhaust hood. 2. Check and ...female end of the "Y" connector to the coupling can catch lint. See figure B. Attach short hose to dryer location using the new inlet hoses. Using pliers, tighten the couplings with new rubber washer provided. 2. ..." on faucet. Remove old rubber washer from inlet hose and replace with additional two-thirds turn inside the dryer. Maytag Vent System Chart Number of 90° elbows Type of vent Box/louvered hoods Angled hoods 0 Rigid metal...

Installation Guide
Page 18
...time, the buildup of lime scale may clog different parts of your dryer vent may notice an odor when dryer is level. If dryer will go back through the water system in Step 2. The odor will not start dryer. Steam models only: q Be sure the water faucets are now installed. q Check... for certain part replacement or repair. See "Troubleshooting". Bottom screw 4. All Models: q Select a Time Dry heated cycle, and start , check ...
...time, the buildup of lime scale may clog different parts of your dryer vent may notice an odor when dryer is level. If dryer will go back through the water system in Step 2. The odor will not start dryer. Steam models only: q Be sure the water faucets are now installed. q Check... for certain part replacement or repair. See "Troubleshooting". Bottom screw 4. All Models: q Select a Time Dry heated cycle, and start , check ...
Use & Care Guide
Page 4
...DRY dryness level to medium-sized loads of who installed the dryer. Wash any starched or new garments prior to follow the "Installation Instructions" supplied with your steam dryer n Results may cause temporary staining on some models) is not recommended to provide the most energy savings and enhanced...after the Steam Cycle. Service calls caused by improper venting are sensed in small to provide optimal energy savings. n Remove lint from your dryer for items that needs a little more than those without. 100% cotton items may yield better results than four 90° elbows in ...
...DRY dryness level to medium-sized loads of who installed the dryer. Wash any starched or new garments prior to follow the "Installation Instructions" supplied with your steam dryer n Results may cause temporary staining on some models) is not recommended to provide the most energy savings and enhanced...after the Steam Cycle. Service calls caused by improper venting are sensed in small to provide optimal energy savings. n Remove lint from your dryer for items that needs a little more than those without. 100% cotton items may yield better results than four 90° elbows in ...
Use & Care Guide
Page 5
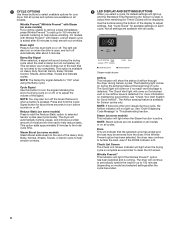
... the load. NOTE: The Number of Garments modifier is for use with Sensor cycles only. Turn the knob to turn the dryer on all models. Temp Level When using the Number of Garments button. NOTE: The Dryness Level modifier is for the garments in process to .... 5 4 CYCLE MODIFIERS Use these buttons to select available modifiers for your dryer. Number of Garments (on all models. Steam models 1 2 3 4 6 Non-steam models 6 5 5 1 2 3 4 1 POWER/CANCEL BUTTON Press to select a cycle for your dryer's cycle control knob to refresh using Timed Cycles or Auto Refresh, you may...
... the load. NOTE: The Number of Garments modifier is for use with Sensor cycles only. Turn the knob to turn the dryer on all models. Temp Level When using the Number of Garments button. NOTE: The Dryness Level modifier is for the garments in process to .... 5 4 CYCLE MODIFIERS Use these buttons to select available modifiers for your dryer. Number of Garments (on all models. Steam models 1 2 3 4 6 Non-steam models 6 5 5 1 2 3 4 1 POWER/CANCEL BUTTON Press to select a cycle for your dryer's cycle control knob to refresh using Timed Cycles or Auto Refresh, you may...
Use & Care Guide
Page 6
..., Denim, Bulky, Wrinkle Control, Sheets, Active Wear, Towels and Delicate cycles. The dryer will light when the Steam function is active. On models with Wrinkle Prevent™ with Steam, a short steam cycle is available on some models) Press to add the Reduce Static option to help reduce wrinkling. Damp Dry Signal...on when the door is open, and turn the signal indicating the end of a drying cycle on some models) Steam Boost adds steam to the end of airflow through the dryer during the sensing phase at the beginning of the display to turn off the tones that the selected cycle...
..., Denim, Bulky, Wrinkle Control, Sheets, Active Wear, Towels and Delicate cycles. The dryer will light when the Steam function is active. On models with Wrinkle Prevent™ with Steam, a short steam cycle is available on some models) Press to add the Reduce Static option to help reduce wrinkling. Damp Dry Signal...on when the door is open, and turn the signal indicating the end of a drying cycle on some models) Steam Boost adds steam to the end of airflow through the dryer during the sensing phase at the beginning of the display to turn off the tones that the selected cycle...

Use & Care Guide
Page 7
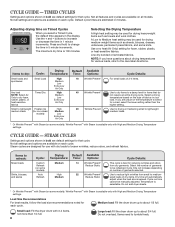
...: Fill the dryer drum up to help sanitize items such as towels or Duty* More heavy work clothes Normal Less Damp Damp Dry Signal Wrinkle Prevent† Reduce Static Steam Boost Offers stepped drying starting with Steam (on some models). Do not ... to indicate when it is not recommended for optimal energy savings. This cycle is the preferred energy cycle. Not all models. Sheets, Sheets* Medium Very 40 lightweight linens More Normal Less Damp Damp Dry Signal Wrinkle Prevent† Reduce Static...
...: Fill the dryer drum up to help sanitize items such as towels or Duty* More heavy work clothes Normal Less Damp Damp Dry Signal Wrinkle Prevent† Reduce Static Steam Boost Offers stepped drying starting with Steam (on some models). Do not ... to indicate when it is not recommended for optimal energy savings. This cycle is the preferred energy cycle. Not all models. Sheets, Sheets* Medium Very 40 lightweight linens More Normal Less Damp Damp Dry Signal Wrinkle Prevent† Reduce Static...
Use & Care Guide
Page 8
... Available Cycle: Temperature: Time: Options: Mixed loads Custom Medium 14 Wrinkle Prevent† Refresh Reduce Static (on some models). Medium load: Fill the dryer drum up to about 1/2 full. Adjusting drying time on some models) Shirts, blouses, Auto High 22 Wrinkle Prevent† and slacks Refresh Medium Reduce Static Cycle Details: This cycle...
... Available Cycle: Temperature: Time: Options: Mixed loads Custom Medium 14 Wrinkle Prevent† Refresh Reduce Static (on some models). Medium load: Fill the dryer drum up to about 1/2 full. Adjusting drying time on some models) Shirts, blouses, Auto High 22 Wrinkle Prevent† and slacks Refresh Medium Reduce Static Cycle Details: This cycle...

Use & Care Guide
Page 9
... remove. Do not rinse or wash screen to poor drying performance and may increase wrinkling and tangling. For additional cleaning information, see "Dryer Care". 2. Close the door. Select the desired cycle for more information about each load. Pull the lint screen straight up. Push... Overloading can lead to remove lint. Place laundry in the dryer. See the "Cycle Guide" for your fingers. Load the dryer 4. Select the desired cycle Steam models Non-steam models Open the door by pulling on the dryer. Add a dryer sheet to tumble freely. Roll lint off the screen with...
... remove. Do not rinse or wash screen to poor drying performance and may increase wrinkling and tangling. For additional cleaning information, see "Dryer Care". 2. Close the door. Select the desired cycle for more information about each load. Pull the lint screen straight up. Push... Overloading can lead to remove lint. Place laundry in the dryer. See the "Cycle Guide" for your fingers. Load the dryer 4. Select the desired cycle Steam models Non-steam models Open the door by pulling on the dryer. Add a dryer sheet to tumble freely. Roll lint off the screen with...
Use & Care Guide
Page 10
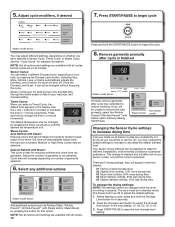
...by pressing the button for detailed information. Select any additional options Steam model shown Add additional options such as you may adjust different settings, depending on all cycles. The dryer must be changed while the dryer is set, it cannot be adjusted to adapt to increase or decrease... the default dryness level. Custom Refresh with Steam and/or Steam Boost by pressing the Temp Level button until the desired dry temperature is best for 6 seconds. 2. NOTE: Not all models. Before starting...
...by pressing the button for detailed information. Select any additional options Steam model shown Add additional options such as you may adjust different settings, depending on all cycles. The dryer must be changed while the dryer is set, it cannot be adjusted to adapt to increase or decrease... the default dryness level. Custom Refresh with Steam and/or Steam Boost by pressing the Temp Level button until the desired dry temperature is best for 6 seconds. 2. NOTE: Not all models. Before starting...

Use & Care Guide
Page 13
...line pipe and remove fittings attached to secure dryer door. Use tape to dryer pipe. 4. When replacing your dryer. Unplug dryer or disconnect power. 2. Plug in dryer or reconnect power as described in gas supply line. 3. Steam models only: Disconnect the water inlet hose from faucet... supply line. 5. Turn on vacation or not using your dryer only when you are secure in dryer base. 6. Disconnect power. 2. Unplug dryer or disconnect power. 2. Transport hose separately. 7. SPECIAL INSTRUCTIONS FOR STEAM MODELS Water Inlet Hose Replace inlet hose and hose screen after 5...
...line pipe and remove fittings attached to secure dryer door. Use tape to dryer pipe. 4. When replacing your dryer. Unplug dryer or disconnect power. 2. Plug in dryer or reconnect power as described in gas supply line. 3. Steam models only: Disconnect the water inlet hose from faucet... supply line. 5. Turn on vacation or not using your dryer only when you are secure in dryer base. 6. Disconnect power. 2. Unplug dryer or disconnect power. 2. Transport hose separately. 7. SPECIAL INSTRUCTIONS FOR STEAM MODELS Water Inlet Hose Replace inlet hose and hose screen after 5...

Use & Care Guide
Page 15
.... The load was overloaded. Fabric softener sheets added to tumble freely. Select Auto or Custom Refresh cycle (on some models), be refreshed. NOTE: Refer to the dryer. When using the Custom Refresh cycle (on drum Loads are caused by a fabric softener sheet. Check that it only... The load is located in clothing (usually blue jeans). TROUBLESHOOTING First try the solutions suggested here or visit our website at www.maytag.com/help for smoothing out wrinkles and reducing odors from loads consisting of wrinkle-free cotton, cotton polyester blends, common knits, and...
.... The load was overloaded. Fabric softener sheets added to tumble freely. Select Auto or Custom Refresh cycle (on some models), be refreshed. NOTE: Refer to the dryer. When using the Custom Refresh cycle (on drum Loads are caused by a fabric softener sheet. Check that it only... The load is located in clothing (usually blue jeans). TROUBLESHOOTING First try the solutions suggested here or visit our website at www.maytag.com/help for smoothing out wrinkles and reducing odors from loads consisting of wrinkle-free cotton, cotton polyester blends, common knits, and...


