
Owners Manual
Page 4
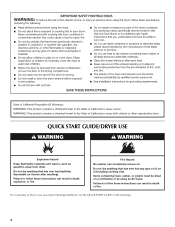
..., or fire. Failure to follow these instructions can completely remove oil. Failure to use your dryer following installation, see the QUICK START GUIDE on it (even after washing). Fire Hazard No washer can result in death or fire. Items containing foam, rubber, or plastic must be dried... on it (including cooking oils). Do not dry anything flammable on a clothesline or by using an Air Cycle. QUICK START GUIDE/DRYER USE WARNING WARNING Explosion Hazard...
..., or fire. Failure to follow these instructions can completely remove oil. Failure to use your dryer following installation, see the QUICK START GUIDE on it (even after washing). Fire Hazard No washer can result in death or fire. Items containing foam, rubber, or plastic must be dried... on it (including cooking oils). Do not dry anything flammable on a clothesline or by using an Air Cycle. QUICK START GUIDE/DRYER USE WARNING WARNING Explosion Hazard...
Installation Instructions
Page 3
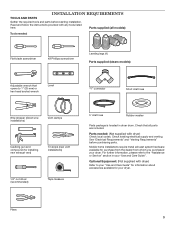
...1/4" nut driver (recommended) Tape measure 5' inlet hose Rubber washer Parts package is located in your dryer. Parts supplied (all models): Tools needed : (Not supplied with dryer) Check local codes. Check existing electrical supply and venting. Pliers 3 INSTALLATION REQUIREMENTS TOOLS AND PARTS...you purchased your "Use and Care Guide". Read and follow the instructions provided with dryer) Refer to the "Assistance or Service" section in dryer drum. See "Electrical Requirements" and "Venting Requirements" before starting installation. Optional Equipment: (Not supplied with...
...1/4" nut driver (recommended) Tape measure 5' inlet hose Rubber washer Parts package is located in your dryer. Parts supplied (all models): Tools needed : (Not supplied with dryer) Check local codes. Check existing electrical supply and venting. Pliers 3 INSTALLATION REQUIREMENTS TOOLS AND PARTS...you purchased your "Use and Care Guide". Read and follow the instructions provided with dryer) Refer to the "Assistance or Service" section in dryer drum. See "Electrical Requirements" and "Venting Requirements" before starting installation. Optional Equipment: (Not supplied with...
Installation Instructions
Page 4
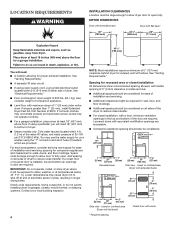
... installation and servicing. ■■ Additional clearances might be required for proper exhaust installation. Contact your washer using the "Y" connector and short hose (if needed) which are provided. See "Venting Requirements." &#...Dryer with equivalent ventilitation openings are required. spacing for companion appliances and clearances for ease of automatic sensor cycles, resulting in garages, closets, mobile homes, or sleeping quarters. See "Electrical Requirements." ■■ Floor must be considered. 18"* (457 mm) 14" max.* (356 mm) 1" (25 mm) 29...
... installation and servicing. ■■ Additional clearances might be required for proper exhaust installation. Contact your washer using the "Y" connector and short hose (if needed) which are provided. See "Venting Requirements." &#...Dryer with equivalent ventilitation openings are required. spacing for companion appliances and clearances for ease of automatic sensor cycles, resulting in garages, closets, mobile homes, or sleeping quarters. See "Electrical Requirements." ■■ Floor must be considered. 18"* (457 mm) 14" max.* (356 mm) 1" (25 mm) 29...

Installation Instructions
Page 14
...to the cold water faucet using straightest path possible. Check and see if rubber washer is in the "Y" connector. CONNECT INLET HOSES For non-steam models, skip to...vent path: ■■ Select route that will : ■■ Shorten life of dryer. ■■ Reduce performance, resulting in longer drying times and increased energy usage. Vent ...48 ft. (14.6 m) 2 Rigid metal 44 ft. (13.4 m) 38 ft. (11.6 m) 3 Rigid metal 35 ft. (10.7 m) 29 ft. (8.8 m) 4 Rigid metal 27 ft. (8.2 m) 21 ft. (6.4 m) NOTE: Bottom exhaust installations have a 90° turn to avoid kinking...
...to the cold water faucet using straightest path possible. Check and see if rubber washer is in the "Y" connector. CONNECT INLET HOSES For non-steam models, skip to...vent path: ■■ Select route that will : ■■ Shorten life of dryer. ■■ Reduce performance, resulting in longer drying times and increased energy usage. Vent ...48 ft. (14.6 m) 2 Rigid metal 44 ft. (13.4 m) 38 ft. (11.6 m) 3 Rigid metal 35 ft. (10.7 m) 29 ft. (8.8 m) 4 Rigid metal 27 ft. (8.2 m) 21 ft. (6.4 m) NOTE: Bottom exhaust installations have a 90° turn to avoid kinking...

Installation Instructions
Page 15
Attach long hose to cold water faucet. Attach short hose to dryer fill valve and tighten coupling Fig. Check for leaks around "Y" connector, faucets, and hoses. 15 Attach washer cold inlet hose to other end of long hose to fill valve at bottom of the long hose has a wire mesh ... Damage to the cold water faucet, the short hose must be used. Attach long hose to the "Y" connector. Check for leaks One end of dryer back panel. Screw on coupling by hand until it is seated on cold water faucet Using pliers, tighten the couplings with additional two-thirds turn...
Attach long hose to cold water faucet. Attach short hose to dryer fill valve and tighten coupling Fig. Check for leaks around "Y" connector, faucets, and hoses. 15 Attach washer cold inlet hose to other end of long hose to fill valve at bottom of the long hose has a wire mesh ... Damage to the cold water faucet, the short hose must be used. Attach long hose to the "Y" connector. Check for leaks One end of dryer back panel. Screw on coupling by hand until it is seated on cold water faucet Using pliers, tighten the couplings with additional two-thirds turn...


