Use and Care Guide
Page 2
...INSTRUCTIONS D'INSTALLATION 38 Outillage et pi_ces ... 38 Exigences d'emplacement ...5¢8 Sp(!cifications (!lectriques - Canada Only 7 Electrical Connection - U.S.A. U.S.A. Only 5 Electrical Requirements - Only 8 Venting Requirements ... 14 Plan Vent System... 15 Install Vent System ... 16 Install l.eveling Legs...of Cycle Signal ...26 Changing Cycles, Modifiers and Options 27 Drying Rack Option ...27 DRYER CARE... 28 Cleaning the Dryer Location 28 Cleaning the I.int Screen ...28 Cleaning the Dryer Interior 29 Removing Accumulated I 'ampoule d'6clairage du tambour...
...INSTRUCTIONS D'INSTALLATION 38 Outillage et pi_ces ... 38 Exigences d'emplacement ...5¢8 Sp(!cifications (!lectriques - Canada Only 7 Electrical Connection - U.S.A. U.S.A. Only 5 Electrical Requirements - Only 8 Venting Requirements ... 14 Plan Vent System... 15 Install Vent System ... 16 Install l.eveling Legs...of Cycle Signal ...26 Changing Cycles, Modifiers and Options 27 Drying Rack Option ...27 DRYER CARE... 28 Cleaning the Dryer Location 28 Cleaning the I.int Screen ...28 Cleaning the Dryer Interior 29 Removing Accumulated I 'ampoule d'6clairage du tambour...
Use and Care Guide
Page 3
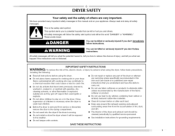
...or "WARNING." Close supervision of children is necessary when the dryer is used near children. [] Before the dryer is removed from the accumulation of lint, dust, and dirt. [] The interior of fire, electric shock, or injury to persons when using the dryer. [] Do not place items exposed to catch fire. ...[] Do not dry articles that you and others are not followed. This is moving. [] Do not install or store the dryer where it will follow basic precautions...
...or "WARNING." Close supervision of children is necessary when the dryer is used near children. [] Before the dryer is removed from the accumulation of lint, dust, and dirt. [] The interior of fire, electric shock, or injury to persons when using the dryer. [] Do not place items exposed to catch fire. ...[] Do not dry articles that you and others are not followed. This is moving. [] Do not install or store the dryer where it will follow basic precautions...
Use and Care Guide
Page 4
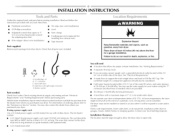
..."Venting Requirements." • A separate 30-amp circuit. • [f you purchased your washer using the "Y" connector and short hose (if needed : Check local codes. Do not ...lower temperatures, the dryer might not shut off at least 18 inches (46 cm) above the floor for use the water supply for your dryer. Drying times ...dryer at least 4 ft (1.22 m) long. Failure to support the total weight (dryer and load) of an automatic cycle. Check existing electrical supply and venting and see "Electrical Requirements" and "Venting Requirements" before starting installation. See "Electrical...
..."Venting Requirements." • A separate 30-amp circuit. • [f you purchased your washer using the "Y" connector and short hose (if needed : Check local codes. Do not ...lower temperatures, the dryer might not shut off at least 18 inches (46 cm) above the floor for use the water supply for your dryer. Drying times ...dryer at least 4 ft (1.22 m) long. Failure to support the total weight (dryer and load) of an automatic cycle. Check existing electrical supply and venting and see "Electrical Requirements" and "Venting Requirements" before starting installation. See "Electrical...
Use and Care Guide
Page 5
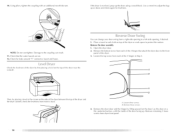
..."_ I_1" -_lv'*l< 25,_"_5-"I (2.5cm) (73.c7rn) (2.5crn) (2.5crn)(74.o3re)(12.c7rn) A B C * Required spacing A. Electrical Connection [b properly install your dryer, you will lye using and follow the instructions provided for Mobile Home Construction and Safety, Title 24, HUD Part 280) or Standard CAN... can lye obtained from your responsibility • lo contact a qualified electrical installer. • ib be required for the exhaust vent with a 3-wire electrical supply connection. Dryer Dimensions Mobile home - Installation spacing for recessed area or closet installation ...
..."_ I_1" -_lv'*l< 25,_"_5-"I (2.5cm) (73.c7rn) (2.5crn) (2.5crn)(74.o3re)(12.c7rn) A B C * Required spacing A. Electrical Connection [b properly install your dryer, you will lye using and follow the instructions provided for Mobile Home Construction and Safety, Title 24, HUD Part 280) or Standard CAN... can lye obtained from your responsibility • lo contact a qualified electrical installer. • ib be required for the exhaust vent with a 3-wire electrical supply connection. Dryer Dimensions Mobile home - Installation spacing for recessed area or closet installation ...

Use and Care Guide
Page 6
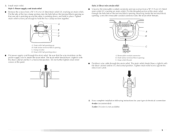
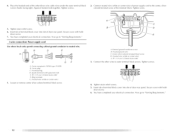
... (with ground wire), protected with the circuit conductors and connected to whether the dryer is prohibited. All current-carrying wires must match power supply (4-wire or 3-wire) and be either green or [)are in "Electrical Connection - Only" section. [] A 4-wire power supply connection must be used...four 10-gauge copper wires and match a 4-wire receptacle of electric shock by a qualified electrician. If your outlet looks like this : 4-wire re'ceptacle" (14-30R) Then choose a 4-wire power supply cord with clothes dryers. terminal or lead on the power supply cord: if it ...
... (with ground wire), protected with the circuit conductors and connected to whether the dryer is prohibited. All current-carrying wires must match power supply (4-wire or 3-wire) and be either green or [)are in "Electrical Connection - Only" section. [] A 4-wire power supply connection must be used...four 10-gauge copper wires and match a 4-wire receptacle of electric shock by a qualified electrician. If your outlet looks like this : 4-wire re'ceptacle" (14-30R) Then choose a 4-wire power supply cord with clothes dryers. terminal or lead on the power supply cord: if it ...
Use and Care Guide
Page 7
...equipped with a qualified electrician or service representative or personnel if you are in death or electrical shock. WARNING: Improper connection of the above codes standard may be grounded. This dryer is properly grounded. grounding conductor can result in doubt as to be plugged into a ...supply the required 4 wire, single phase, 120/240 volt, 60 Hz., AC only electrical supply on a separate 30-amp circuit, fused on both sides of electric shock. Failure to an individual branch circuit This dryer is properly installed and grounded in a risk of the line. A copy of the ...
...equipped with a qualified electrician or service representative or personnel if you are in death or electrical shock. WARNING: Improper connection of the above codes standard may be grounded. This dryer is properly grounded. grounding conductor can result in doubt as to be plugged into a ...supply the required 4 wire, single phase, 120/240 volt, 60 Hz., AC only electrical supply on a separate 30-amp circuit, fused on both sides of electric shock. Failure to an individual branch circuit This dryer is properly installed and grounded in a risk of the line. A copy of the ...
Use and Care Guide
Page 9
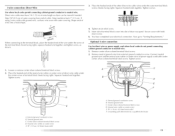
... block opening. A. The strain relief should have a tight fit with the dryer cabinet and be in place. Removable conduit connector B. 3. marking on strain relief). Put the threaded section of electrical connection: .... 9 Do not further tighten strain relief screws at this point.... The strain relief should have a tight fit with the dryer cabinet and be in a horizontal position. Tighten strain relief screws ...
... block opening. A. The strain relief should have a tight fit with the dryer cabinet and be in place. Removable conduit connector B. 3. marking on strain relief). Put the threaded section of electrical connection: .... 9 Do not further tighten strain relief screws at this point.... The strain relief should have a tight fit with the dryer cabinet and be in a horizontal position. Tighten strain relief screws ...

Use and Care Guide
Page 10
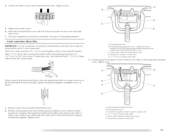
...rminal block screw D. Neubal prong E. Ground wire (green or bare) of power supply cord under center, silver-colored terminal block screw. Electrical Connection Options If your home has: 4-wire receptacle (NEMA type 14-30R) __._._ 4-wire direct (12.7 cm) 3-wire receptacle (NEMA...wire connection: Direct Wire A U[. Tighten screw. D A. Y#" ( 1.9 cm) U[ listed strain relief E. listed, 120/240-volt minimum, 30-amp, dryer power supply cord* 3-wire connection: Power Supply Cord A fused disconnect or circuit breaker box* 3-wire connection: Direct Wire *If local codes do 2_ Remove ...
...rminal block screw D. Neubal prong E. Ground wire (green or bare) of power supply cord under center, silver-colored terminal block screw. Electrical Connection Options If your home has: 4-wire receptacle (NEMA type 14-30R) __._._ 4-wire direct (12.7 cm) 3-wire receptacle (NEMA...wire connection: Direct Wire A U[. Tighten screw. D A. Y#" ( 1.9 cm) U[ listed strain relief E. listed, 120/240-volt minimum, 30-amp, dryer power supply cord* 3-wire connection: Power Supply Cord A fused disconnect or circuit breaker box* 3-wire connection: Direct Wire *If local codes do 2_ Remove ...
Use and Care Guide
Page 11
... place the hooked end (hook facing right) of the neutral wire (white or center wire) of direct wire cable under the screw of dryer rear panel. Lxternal ground conductor screw B. Connetchteothewr irestooutetrerminablockscrewTs.ightesncrews. !! !! 5. Now go to "Venting Requirements." 4-wire connection: Direct Wire ... for mobile homes and where local codes do not permit the use of extra length so dryer can be moved if needed. Direct wire cable must have completed your electrical connection. Strip insulation back 1" (2.5 cm). External ground conductor screw - Neutral ground wire ...
... place the hooked end (hook facing right) of the neutral wire (white or center wire) of direct wire cable under the screw of dryer rear panel. Lxternal ground conductor screw B. Connetchteothewr irestooutetrerminablockscrewTs.ightesncrews. !! !! 5. Now go to "Venting Requirements." 4-wire connection: Direct Wire ... for mobile homes and where local codes do not permit the use of extra length so dryer can be moved if needed. Direct wire cable must have completed your electrical connection. Strip insulation back 1" (2.5 cm). External ground conductor screw - Neutral ground wire ...
Use and Care Guide
Page 12
... where local codes permit connecting cabinet-ground conductor to "Venting Requirements." 12 Insert tab of terminal block cover into slot of dryer rear panel. Now go to neutral wire. Neutral wire (white or center wire) 1, Loosen or remove center silver-colored ...terminal [)lock screw. Neutral ground wire C. down screw. 7. You have completed your electrical connection. Squeeze hooked ends together. You have completed your electrical connection. Neutral prong D. A. Neutral wire (white or center wire) E. _" t 1.9 cm) U_ listed strain relief...
... where local codes permit connecting cabinet-ground conductor to "Venting Requirements." 12 Insert tab of terminal block cover into slot of dryer rear panel. Now go to neutral wire. Neutral wire (white or center wire) 1, Loosen or remove center silver-colored ...terminal [)lock screw. Neutral ground wire C. down screw. 7. You have completed your electrical connection. Squeeze hooked ends together. You have completed your electrical connection. Neutral prong D. A. Neutral wire (white or center wire) E. _" t 1.9 cm) U_ listed strain relief...
Use and Care Guide
Page 13
...block cover into slot of wires into a hook shape. You have 5 ft (1.52 rn) of extra length so dryer can be moved if needed. Remove neutral ground wire from end of the other direct wire cable wires under time outer...hooked ends together. Neutral wire (white" or center wire') E. _" (1.9 cm) UL list_'d strain r_qi_f A. Shape ends of dryer rear paneh Secure cover with outer covering. block 4. Connect neutral ground wire and the neutral wire (white or center wire) of terminal... determined by a qualifie'd electrician Direct wire cable must have completed your electrical connection.
...block cover into slot of wires into a hook shape. You have 5 ft (1.52 rn) of extra length so dryer can be moved if needed. Remove neutral ground wire from end of the other direct wire cable wires under time outer...hooked ends together. Neutral wire (white" or center wire') E. _" (1.9 cm) UL list_'d strain r_qi_f A. Shape ends of dryer rear paneh Secure cover with outer covering. block 4. Connect neutral ground wire and the neutral wire (white or center wire) of terminal... determined by a qualifie'd electrician Direct wire cable must have completed your electrical connection.

Use and Care Guide
Page 14
...airflow than 90 ° elbows. Better 14 Fire Hazard Use a heavy metal vent. IMPORTANT: Observe all joints. The dryer exhaust must not be connected into slot of the system and make sure exhaust hood is not plugged with lint. &#... metal vents are recommended. • Rigid metal vent is recommended Flexible metal vent to an adequate ground. If this dryer MUSF BE EXHAUSTED OUTDOORS. Do not use a metal foil vent. can be purchased from the external ground conductor screw to... a plastic vent. 3. Connect a separate copper ground wire from your dealer or by calling Maytag Services.
...airflow than 90 ° elbows. Better 14 Fire Hazard Use a heavy metal vent. IMPORTANT: Observe all joints. The dryer exhaust must not be connected into slot of the system and make sure exhaust hood is not plugged with lint. &#... metal vents are recommended. • Rigid metal vent is recommended Flexible metal vent to an adequate ground. If this dryer MUSF BE EXHAUSTED OUTDOORS. Do not use a metal foil vent. can be purchased from the external ground conductor screw to... a plastic vent. 3. Connect a separate copper ground wire from your dealer or by calling Maytag Services.

Use and Care Guide
Page 15
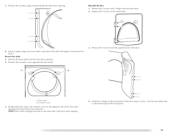
...Exhaust Recommended Clamp hood styles are shown here. Wall D. Exhaust hood must be in the path of the dryer. Choose your exhaust installation type Recommended exhaust installations [ypical installations vent the dryer from entering the home. IIII J ll B A. Fxhaust hood E. Rigid rnetal or fle'xible metal vent...rodents and insects from the rear of the exhaust {such as flowers, rocks or bushes, snow line, etc.). onotuseductape. Clamps [. Dryer B. Do not use an exhaust hood with rigid metal or flexible metal vent An exhaust hood should cap the vent to woodwork, ...
...Exhaust Recommended Clamp hood styles are shown here. Wall D. Exhaust hood must be in the path of the dryer. Choose your exhaust installation type Recommended exhaust installations [ypical installations vent the dryer from entering the home. IIII J ll B A. Fxhaust hood E. Rigid rnetal or fle'xible metal vent...rodents and insects from the rear of the exhaust {such as flowers, rocks or bushes, snow line, etc.). onotuseductape. Clamps [. Dryer B. Do not use an exhaust hood with rigid metal or flexible metal vent An exhaust hood should cap the vent to woodwork, ...
Use and Care Guide
Page 16
... Vent extension: Part Number 8544761 Special provisions for purchase. Avoid 90 ° turns. Rear exhaust installation to either side of the dryer. • Reduce performance, resulting in "Plan Vent System." Run vent to exhaust hood. Do not use the fewest number of vent...1 Rigid metal 54 ft (16.5 m) Flexible metal 31 ft (9.4 m) ... 2 Rigid metal 44 ft (13.4 m) Flexible metal 27 ft (8.2 m) ... 3 Rigid metal 35 ft (10.7 m) Flexible metal 25 ft 17.6 m) ... 4 Rigid metal 27 ft (8.2 m) Flexible metal 23 ft (7 m) 58 ft (17.7 m) 28 ft/8.5 m) 48 ft (14.6 m) 23 ft ...
... Vent extension: Part Number 8544761 Special provisions for purchase. Avoid 90 ° turns. Rear exhaust installation to either side of the dryer. • Reduce performance, resulting in "Plan Vent System." Run vent to exhaust hood. Do not use the fewest number of vent...1 Rigid metal 54 ft (16.5 m) Flexible metal 31 ft (9.4 m) ... 2 Rigid metal 44 ft (13.4 m) Flexible metal 27 ft (8.2 m) ... 3 Rigid metal 35 ft (10.7 m) Flexible metal 25 ft 17.6 m) ... 4 Rigid metal 27 ft (8.2 m) Flexible metal 23 ft (7 m) 58 ft (17.7 m) 28 ft/8.5 m) 48 ft (14.6 m) 23 ft ...
Use and Care Guide
Page 17
... 1. Place cardboard under each of small hose. Remove old rubber washer from the dryer carton. Continue with new rubber washer provided. Damage to the cold water faucet using the new inlet hoses. Turn cold water faucet off and remove washer inlet hose. 2. If "Y" connector cannot be attached directly to ...the cold water faucet, the short hose must fit over the dryer exhaust outlet and inside the exhaust hood. NOTE: Do not overtighten. ...
... 1. Place cardboard under each of small hose. Remove old rubber washer from the dryer carton. Continue with new rubber washer provided. Damage to the cold water faucet using the new inlet hoses. Turn cold water faucet off and remove washer inlet hose. 2. If "Y" connector cannot be attached directly to ...the cold water faucet, the short hose must fit over the dryer exhaust outlet and inside the exhaust hood. NOTE: Do not overtighten. ...
Use and Care Guide
Page 18
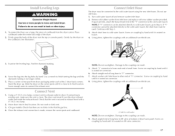
...11. Remove the door assembly 1. NOIE: Do not overtighten. Check that attach the dryer door to protect the surface. Check for levelness. Check the levelness of the dryer or work space to the front panel of the dryer. 3. [oosen the top screw from each of the 2 hinges in the crease ... change your door swing from each of the 2 hinges that the water faucets are on the top of the dryer and the dryer cabinet, check the levelness from dryer front panel. 18 Open the dryer door. 2. Remove the bottom screw from a right-side opening , if desired. 1. I.ay the door on the door. A 'B...
...11. Remove the door assembly 1. NOIE: Do not overtighten. Check that attach the dryer door to protect the surface. Check for levelness. Check the levelness of the dryer or work space to the front panel of the dryer. 3. [oosen the top screw from each of the 2 hinges in the crease ... change your door swing from each of the 2 hinges that the water faucets are on the top of the dryer and the dryer cabinet, check the levelness from dryer front panel. 18 Open the dryer door. 2. Remove the bottom screw from a right-side opening , if desired. 1. I.ay the door on the door. A 'B...
Use and Care Guide
Page 19
... side to attach the hinge to the front panel of the dryer door opening . 2. Remove the 4 plastic plugs located outside the dryer door opening . NOTE: Door strike and plugs must be on the opposite side of the dryer using 4 screws. Remove the cosmetic screw opposite the door strike... same holes. _ " _" 6. Reinstall the door 1. Remove the door strike from the dryer door. 2. 5. Remove the 4 screws and 2 hinges from the dryer door opening from the opposite side of the dryer door opening . Remove the 4 screws from where they were removed. Cbsmetic screw Reinstall the...
... side to attach the hinge to the front panel of the dryer door opening . 2. Remove the 4 plastic plugs located outside the dryer door opening . NOTE: Door strike and plugs must be on the opposite side of the dryer using 4 screws. Remove the cosmetic screw opposite the door strike... same holes. _ " _" 6. Reinstall the door 1. Remove the door strike from the dryer door. 2. 5. Remove the 4 screws and 2 hinges from the dryer door opening from the opposite side of the dryer door opening . Remove the 4 screws from where they were removed. Cbsmetic screw Reinstall the...

Use and Care Guide
Page 20
... scale through the steps to see which will go back through the water system in the dryer. Check for certain [)art replacement or repair. 13. ]i_st dryer operation by placing screw heads into an outlet and/or electrical supply is on . Remove any dust. 12. NOTE: You may clog different parts of hinges...
... scale through the steps to see which will go back through the water system in the dryer. Check for certain [)art replacement or repair. 13. ]i_st dryer operation by placing screw heads into an outlet and/or electrical supply is on . Remove any dust. 12. NOTE: You may clog different parts of hinges...
Use and Care Guide
Page 21
...; DRY CYCLES Explosion Hazard Keep flammable materials and vapors, such as gasoline, away from dryer. See "Cleaning the [Ant Screen." 2. Place laundry into dryer and shut door. 3. Fire Hazard No washer can result in the display. Failure to follow these basic steps to specific sections of ... on it (including cooking oils). Do not dry anything flammable on a clothesline or by using an Air Cycle. Your dryer may not have all of fire, electric shock, or injury to the selected cycle. [-he preset settings for more detailed information. 1. Press POWER. 4. Turn the...
...; DRY CYCLES Explosion Hazard Keep flammable materials and vapors, such as gasoline, away from dryer. See "Cleaning the [Ant Screen." 2. Place laundry into dryer and shut door. 3. Fire Hazard No washer can result in the display. Failure to follow these basic steps to specific sections of ... on it (including cooking oils). Do not dry anything flammable on a clothesline or by using an Air Cycle. Your dryer may not have all of fire, electric shock, or injury to the selected cycle. [-he preset settings for more detailed information. 1. Press POWER. 4. Turn the...
Use and Care Guide
Page 22
...setting and the End of Cycle Signal. 5. (OPTIONAL STEP) If desired, select OPTIONS. iOPTIONAI. For more details, see "End of selecting the cycle, the dryer automatically shuts off. • If you can be changed without stopping the cycle. • Select the desired Options. To use a Timed Cycle • ...to adjust how dry you when a cycle ends. How the Sensi-Care TM Drying System Works Moisture-sensing strips and ternperature sensors inside the dryer drum monitor how fast the load is displayed. To use a Sensor Dry Cycle Press TEMP until the desired drying time is drying, how...
...setting and the End of Cycle Signal. 5. (OPTIONAL STEP) If desired, select OPTIONS. iOPTIONAI. For more details, see "End of selecting the cycle, the dryer automatically shuts off. • If you can be changed without stopping the cycle. • Select the desired Options. To use a Timed Cycle • ...to adjust how dry you when a cycle ends. How the Sensi-Care TM Drying System Works Moisture-sensing strips and ternperature sensors inside the dryer drum monitor how fast the load is displayed. To use a Sensor Dry Cycle Press TEMP until the desired drying time is drying, how...


