
User Guide
Page 1
... being left in load No heat W10089171 Thoroughly dries denims. Thoroughly dries extra-heavy items. Gently dries delicate items. Periodically starts and stops dryer, tumbling the load to a damp level or items that do not require an entire drying cycle. High Dries items to avoid wrinkling. ... reaches the selected dryness. Any Evenly dries large or heavy loads. Any Low or Medium heat depending on fabrics in the dryer too long. ® DRYER CYCLE DESCRIPTIONS This information covers several different models. No-heat drying. Helps to handle. Any Medium or High High Low or...
... being left in load No heat W10089171 Thoroughly dries denims. Thoroughly dries extra-heavy items. Gently dries delicate items. Periodically starts and stops dryer, tumbling the load to a damp level or items that do not require an entire drying cycle. High Dries items to avoid wrinkling. ... reaches the selected dryness. Any Evenly dries large or heavy loads. Any Low or Medium heat depending on fabrics in the dryer too long. ® DRYER CYCLE DESCRIPTIONS This information covers several different models. No-heat drying. Helps to handle. Any Medium or High High Low or...

User Guide
Page 2
...reaches the selected dryness. The Cycle Control knob does not move until the load is also selected. The control senses the moisture level in your dryer has multiple heat settings: • A high heat setting may be used for example, pillows, stuffed toys). NOTE: A signal will periodically... load without heat for : • Heavyweight or bulky items that require a longer drying time. • Lightweight items that you purchased your dryer. You may select a drying temperature based on the front page of Cycle signal is almost dry. IntelliDry ®SENSOR DRY System SENSOR DRY ...
...reaches the selected dryness. The Cycle Control knob does not move until the load is also selected. The control senses the moisture level in your dryer has multiple heat settings: • A high heat setting may be used for example, pillows, stuffed toys). NOTE: A signal will periodically... load without heat for : • Heavyweight or bulky items that require a longer drying time. • Lightweight items that you purchased your dryer. You may select a drying temperature based on the front page of Cycle signal is almost dry. IntelliDry ®SENSOR DRY System SENSOR DRY ...

Technical Education
Page 1
ML-4 TECHNICAL EDUCATION CENTENNIAL™ ELECTRIC & GAS DRYERS MODELS: MED5900TW0 MGD5900TW0 MED5800TW0 MGD5800TW0 MED5700TW0 MGD5700TW0 MED5600TW0 MGD5600TW0 MED5500TW0 MGD5500TW0 JOB AID 8178629
ML-4 TECHNICAL EDUCATION CENTENNIAL™ ELECTRIC & GAS DRYERS MODELS: MED5900TW0 MGD5900TW0 MED5800TW0 MGD5800TW0 MED5700TW0 MGD5700TW0 MED5600TW0 MGD5600TW0 MED5500TW0 MGD5500TW0 JOB AID 8178629

Technical Education
Page 2
...made on our products by anyone other than authorized In-Home Service Professionals. GOALS AND OBJECTIVES The goal of the Centennial™ Electric & Gas Dryers. The Wiring Diagrams and Strip Circuits used in this Job Aid are to: • Understand and follow proper safety precautions....serviced, refer to the "Use and Care Guide," or "Tech Sheet" provided with the product when servicing the dryer. FORWARD This Maytag Job Aid, "Centennial™ Electric & Gas Dryers" (Part No.8178629), provides the InHome Service Professional with information on the installation, operation, and service of ...
...made on our products by anyone other than authorized In-Home Service Professionals. GOALS AND OBJECTIVES The goal of the Centennial™ Electric & Gas Dryers. The Wiring Diagrams and Strip Circuits used in this Job Aid are to: • Understand and follow proper safety precautions....serviced, refer to the "Use and Care Guide," or "Tech Sheet" provided with the product when servicing the dryer. FORWARD This Maytag Job Aid, "Centennial™ Electric & Gas Dryers" (Part No.8178629), provides the InHome Service Professional with information on the installation, operation, and service of ...
Technical Education
Page 3
... 1-2 Model & Serial Number Label & Tech Sheet Locations 1-3 Specifications 1-4 INSTALLATION INFORMATION 2-1 Installation Instructions 2-1 PRODUCT OPERATION 3-1 Dryer Use 3-1 Dryer Care 3-4 Troubleshooting 3-6 COMPONENT ACCESS 4-1 Component Locations 4-1 Removing The Control Panel Components 4-2 Removing The Door Switch And Cabinet Front...TCO) (Gas Models Only 4-13 Removing The Thermal Cutoff (TCO), Heater, And Inlet Thermistor/ High-Limit Thermostat (Electric Models Only 4-14 Removing The Flame Sensor And Gas Burner Assembly (Gas Models Only 4-16 Removing The Moisture Sensor And...
... 1-2 Model & Serial Number Label & Tech Sheet Locations 1-3 Specifications 1-4 INSTALLATION INFORMATION 2-1 Installation Instructions 2-1 PRODUCT OPERATION 3-1 Dryer Use 3-1 Dryer Care 3-4 Troubleshooting 3-6 COMPONENT ACCESS 4-1 Component Locations 4-1 Removing The Control Panel Components 4-2 Removing The Door Switch And Cabinet Front...TCO) (Gas Models Only 4-13 Removing The Thermal Cutoff (TCO), Heater, And Inlet Thermistor/ High-Limit Thermostat (Electric Models Only 4-14 Removing The Flame Sensor And Gas Burner Assembly (Gas Models Only 4-16 Removing The Moisture Sensor And...
Technical Education
Page 4
Page DIAGNOSTICS & TROUBLESHOOTING 6-1 Diagnostics 6-1 Diagnostic Guide 6-1 Less Dry Test 6-1 Diagnostic Test 6-1 Component Tests 6-3 Troubleshooting 6-9 Troubleshooting Guide 6-9 Troubleshooting 6-10 WIRING DIAGRAMS & STRIP CIRCUITS 7-1 Electric Dryers 7-1 Wiring Diagram 7-1 Strip Circuits 7-3 Gas Dryers 7-4 Wiring Diagram 7-4 Strip Circuits 7-6 - iv -
Page DIAGNOSTICS & TROUBLESHOOTING 6-1 Diagnostics 6-1 Diagnostic Guide 6-1 Less Dry Test 6-1 Diagnostic Test 6-1 Component Tests 6-3 Troubleshooting 6-9 Troubleshooting Guide 6-9 Troubleshooting 6-10 WIRING DIAGRAMS & STRIP CIRCUITS 7-1 Electric Dryers 7-1 Wiring Diagram 7-1 Strip Circuits 7-3 Gas Dryers 7-4 Wiring Diagram 7-4 Strip Circuits 7-6 - iv -
Technical Education
Page 5
... messages. All safety messages will follow instructions. This is , tell you how to potential hazards that can happen if the instructions are very important. GENERAL DRYER SAFETY Your safety and the safety of injury, and tell you and others are not followed. 1-1
... messages. All safety messages will follow instructions. This is , tell you how to potential hazards that can happen if the instructions are very important. GENERAL DRYER SAFETY Your safety and the safety of injury, and tell you and others are not followed. 1-1
Technical Education
Page 6
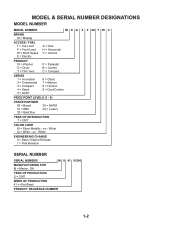
... = 41st Week PRODUCT SEQUENCE NUMBER 1-2 on - White Q = White - on - MODEL & SERIAL NUMBER DESIGNATIONS MODEL NUMBER MODEL NUMBER M E D 5 9 00 T W 0 BRAND M = Maytag ACCESS / FUEL T = Top Load F = Front Load W = Work Space E = Electric G = Gas H = Horizontal V = Vertical PRODUCT W = Washer D = Dryer T = Thin Twin P = Pedestal B = Combo C = Compact SERIES 1 = Innovation 2 = Commercial 3 = Compact 4 = Stack 5 = LEAP 6 = Oasis 7 = Merloni 8 = Horizon 9 = Duet/Combo PRICE POINT...
... = 41st Week PRODUCT SEQUENCE NUMBER 1-2 on - White Q = White - on - MODEL & SERIAL NUMBER DESIGNATIONS MODEL NUMBER MODEL NUMBER M E D 5 9 00 T W 0 BRAND M = Maytag ACCESS / FUEL T = Top Load F = Front Load W = Work Space E = Electric G = Gas H = Horizontal V = Vertical PRODUCT W = Washer D = Dryer T = Thin Twin P = Pedestal B = Combo C = Compact SERIES 1 = Innovation 2 = Commercial 3 = Compact 4 = Stack 5 = LEAP 6 = Oasis 7 = Merloni 8 = Horizon 9 = Duet/Combo PRICE POINT...

Technical Education
Page 8
SPECIFICATIONS Model Capacity (cu. ft.) GentIeBreeze™ Drying System Wrinkle Prevent Smooth BaIance™ Suspension DuraCushion™ Dryer Drum Interior Light Spill Guard Reversible Swing Door Commercial-Grade SteelReinforced Baseframe 360° Front & Rear Heat Seal High Torque Motor (1/3-HP) Front Serviceable 64-...
SPECIFICATIONS Model Capacity (cu. ft.) GentIeBreeze™ Drying System Wrinkle Prevent Smooth BaIance™ Suspension DuraCushion™ Dryer Drum Interior Light Spill Guard Reversible Swing Door Commercial-Grade SteelReinforced Baseframe 360° Front & Rear Heat Seal High Torque Motor (1/3-HP) Front Serviceable 64-...

Technical Education
Page 9
... vent) • Pliers • Tape measure Parts supplied: Remove parts package from whom you purchased your dryer. Check that opens to the "Assistance or Service" section of the "Use & Care Guide." • Mobile Home Installation Kit. Electric Models • Flat-blade screwdriver • #2 Phillips screwdriver • Adjustable wrench that all parts were...
... vent) • Pliers • Tape measure Parts supplied: Remove parts package from whom you purchased your dryer. Check that opens to the "Assistance or Service" section of the "Use & Care Guide." • Mobile Home Installation Kit. Electric Models • Flat-blade screwdriver • #2 Phillips screwdriver • Adjustable wrench that all parts were...

Technical Education
Page 10
... appliance should also be considered. 2-2 INSTALLATION CLEARANCES The location must not be large enough to allow the dryer door to do not permit, installation of 1˝ (2.5 cm) under entire dryer. Failure to open fully. See "Electrical Requirements," pages 2-4, 2-6, or 2-14. • A sturdy floor to reduce noise transfer. • For closet installation, with a maximum...
... appliance should also be considered. 2-2 INSTALLATION CLEARANCES The location must not be large enough to allow the dryer door to do not permit, installation of 1˝ (2.5 cm) under entire dryer. Failure to open fully. See "Electrical Requirements," pages 2-4, 2-6, or 2-14. • A sturdy floor to reduce noise transfer. • For closet installation, with a maximum...
Technical Education
Page 11
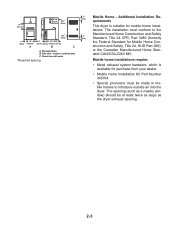
...CSA-Z240 MH. The opening . 2-3 Closet door with vents *Required spacing 3"* (7.6 cm) Mobile Home - The installation must be at least twice as large as the dryer exhaust opening (such as a nearby window) should be made in .2* (155 cm2) 1 " 29" 1" 1"* 27¾" 5"* (2.5 cm) (73.66 cm...CFR, Part 3280 (formerly the Federal Standard for mobile home installations. Side view - Recessed area B. Additional Installation Requirements This dryer is available for purchase from your dealer. • Mobile home Installation Kit Part Number 346764. • Special provisions must ...
...CSA-Z240 MH. The opening . 2-3 Closet door with vents *Required spacing 3"* (7.6 cm) Mobile Home - The installation must be at least twice as large as the dryer exhaust opening (such as a nearby window) should be made in .2* (155 cm2) 1 " 29" 1" 1"* 27¾" 5"* (2.5 cm) (73.66 cm...CFR, Part 3280 (formerly the Federal Standard for mobile home installations. Side view - Recessed area B. Additional Installation Requirements This dryer is available for purchase from your dealer. • Mobile home Installation Kit Part Number 346764. • Special provisions must ...
Technical Education
Page 12
...fuse in ring terminals or spade terminals with clothes dryers. Grounding through the neutral conductor is isolated from the neutral conductor. • A 4-wire power supply connection must determine the type of electrical connection you must be obtained from the external ground...supply cord, rated 120/240 volt minimum. A copy of the line. The neutral ground conductor is recommended. ELECTRICAL REQUIREMENTS U.S.A. ONLY Electric Models Only It is your dryer, you will be removed from : National Fire Protection Association, One Batterymarch Park, Quincy, MA 02269. &#...
...fuse in ring terminals or spade terminals with clothes dryers. Grounding through the neutral conductor is isolated from the neutral conductor. • A 4-wire power supply connection must determine the type of electrical connection you must be obtained from the external ground...supply cord, rated 120/240 volt minimum. A copy of the line. The neutral ground conductor is recommended. ELECTRICAL REQUIREMENTS U.S.A. ONLY Electric Models Only It is your dryer, you will be removed from : National Fire Protection Association, One Batterymarch Park, Quincy, MA 02269. &#...
Technical Education
Page 13
... four 10-gauge copper wires and match a 4-wire receptacle of least resistance for electric current. WARNING: Improper connection of the equipment-grounding conductor can result in accordance with all local codes and ordinances. • For a permanently connected dryer: This dryer must be connected to a grounded metal, permanent wiring system, or an equipment-grounding...
... four 10-gauge copper wires and match a 4-wire receptacle of least resistance for electric current. WARNING: Improper connection of the equipment-grounding conductor can result in accordance with all local codes and ordinances. • For a permanently connected dryer: This dryer must be connected to a grounded metal, permanent wiring system, or an equipment-grounding...

Technical Education
Page 14
...in length. A time-delay fuse or circuit breaker is within reach of electric shock. The plug must be grounded. A copy of the line. Connect to an individual branch circuit. • This dryer is equipped with a CSA International Certified Power Cord intended to be plugged... risk of the equipment-grounding conductor can result in accordance with the Canadian Electrical Code, C22.1-latest edition and all local codes and ordinances. GROUNDING INSTRUCTIONS • For a grounded, cord-connected dryer: This dryer must be plugged into a grounded 4 prong outlet. Do not modify the...
...in length. A time-delay fuse or circuit breaker is within reach of electric shock. The plug must be grounded. A copy of the line. Connect to an individual branch circuit. • This dryer is equipped with a CSA International Certified Power Cord intended to be plugged... risk of the equipment-grounding conductor can result in accordance with the Canadian Electrical Code, C22.1-latest edition and all local codes and ordinances. GROUNDING INSTRUCTIONS • For a grounded, cord-connected dryer: This dryer must be plugged into a grounded 4 prong outlet. Do not modify the...
Technical Education
Page 16
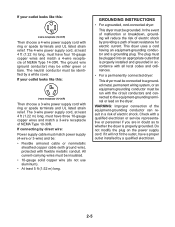
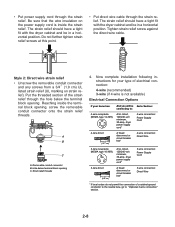
...or circuit breaker box* 4-wire connection: Direct Wire 3-wire receptacle (NEMA type 10-30R) A UL listed, 120/240-volt minimum, 30-amp, dryer power supply cord* 3-wire connection: Power Supply Cord 3-wire direct 3¹⁄2" (8.9 cm) A fused disconnect or circuit breaker box* 3-wire connection:...from a 3/4˝ (1.9 cm) UL listed strain relief (UL marking on the power supply cord is not available) Electrical Connection Options If your type of electrical connection: 4-wire (recommended) 3-wire (if 4-wire is inside the terminal block opening, screw the removable conduit connector ...
...or circuit breaker box* 4-wire connection: Direct Wire 3-wire receptacle (NEMA type 10-30R) A UL listed, 120/240-volt minimum, 30-amp, dryer power supply cord* 3-wire connection: Power Supply Cord 3-wire direct 3¹⁄2" (8.9 cm) A fused disconnect or circuit breaker box* 3-wire connection:...from a 3/4˝ (1.9 cm) UL listed strain relief (UL marking on the power supply cord is not available) Electrical Connection Options If your type of electrical connection: 4-wire (recommended) 3-wire (if 4-wire is inside the terminal block opening, screw the removable conduit connector ...
Technical Education
Page 17
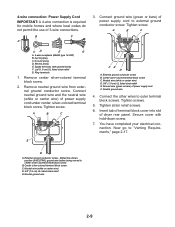
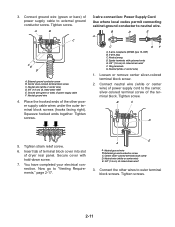
... relief G. E D A. Tighten screw. Ground prong D. Spade terminals with hold-down screw. 7. B. Connect ground wire (green or bare) of dryer rear panel. Connect neutral ground wire and the neutral wire (white or center wire) of 3-wire connections. Tighten screw. Tighten strain relief screws. 6....being moved to external ground conductor screw. Connect the other wires to "Venting Requirements," page 2-17. You have completed your electrical connection. Now go to outer terminal block screws. Dotted line shows position of power supply cord F. Center silver-colored terminal ...
... relief G. E D A. Tighten screw. Ground prong D. Spade terminals with hold-down screw. 7. B. Connect ground wire (green or bare) of dryer rear panel. Connect neutral ground wire and the neutral wire (white or center wire) of 3-wire connections. Tighten screw. Tighten strain relief screws. 6....being moved to external ground conductor screw. Connect the other wires to "Venting Requirements," page 2-17. You have completed your electrical connection. Now go to outer terminal block screws. Dotted line shows position of power supply cord F. Center silver-colored terminal ...
Technical Education
Page 18
.... 2. Remove neutral ground wire from 3 remaining wires. Direct wire cable must have 5 ft (1.52 m) of wires into a hook shape. 1. Shape ends of extra length so dryer can be moved if needed. Strip 5˝ (12.7 cm) of outer covering from end of the terminal block (hook facing right), squeeze hooked end together...
.... 2. Remove neutral ground wire from 3 remaining wires. Direct wire cable must have 5 ft (1.52 m) of wires into a hook shape. 1. Shape ends of extra length so dryer can be moved if needed. Strip 5˝ (12.7 cm) of outer covering from end of the terminal block (hook facing right), squeeze hooked end together...
Technical Education
Page 19
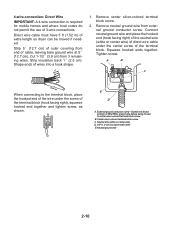
...center wire) E. 3/4" (1.9 cm) UL listed strain relief 3. 3. Tighten screw. A B C F E D A. Ground wire (green or bare) of dryer rear panel. Ring terminals G. Secure cover with upturned ends E. 3/4" (1.9 cm) UL listed strain relief F. Center silver-colored terminal block screw D. Center silver-colored...together. Loosen or remove center silver-colored terminal block screw. 2. B C D 5. You have completed your electrical connection. E A A. External ground conductor screw C. Connect the other power supply cable wires under the outer terminal block screws (hooks...
...center wire) E. 3/4" (1.9 cm) UL listed strain relief 3. 3. Tighten screw. A B C F E D A. Ground wire (green or bare) of dryer rear panel. Ring terminals G. Secure cover with upturned ends E. 3/4" (1.9 cm) UL listed strain relief F. Center silver-colored terminal block screw D. Center silver-colored...together. Loosen or remove center silver-colored terminal block screw. 2. B C D 5. You have completed your electrical connection. E A A. External ground conductor screw C. Connect the other power supply cable wires under the outer terminal block screws (hooks...

Technical Education
Page 20
...D. Tighten screws. 4. You have 5 ft (1.52 m) of dryer rear panel. Strip 3-1/2˝ (8.9 cm) of outer covering from end of the other power supply cable wires under the outer terminal block screws (hooks facing right). Direct wire cable must have completed your electrical connection. If using 3-wire cable with ground wire, cut..., as shown. 1. 4. Secure cover with outer covering. External ground conductor screw C. Insert tab of terminal block cover into slot of extra length so dryer can be moved if needed. You have completed your electrical connection.
...D. Tighten screws. 4. You have 5 ft (1.52 m) of dryer rear panel. Strip 3-1/2˝ (8.9 cm) of outer covering from end of the other power supply cable wires under the outer terminal block screws (hooks facing right). Direct wire cable must have completed your electrical connection. If using 3-wire cable with ground wire, cut..., as shown. 1. 4. Secure cover with outer covering. External ground conductor screw C. Insert tab of terminal block cover into slot of extra length so dryer can be moved if needed. You have completed your electrical connection.


