
Installation Guide
Page 1
... REQUIREMENTS 3 Tools and Parts 3 LOCATION REQUIREMENTS 4 ELECTRICAL REQUIREMENTS 5 INSTALL LEVELING LEGS 6 ELECTRICAL INSTALLATION 7 Power Supply Cord Connection 8 Direct Wire Connection 10 VENTING 12 Venting Requirements 12 Plan Vent System 13 Install Vent System 15 CONNECT INLET HOSE (STEAM MODEL ONLY 15 CONNECT VENT 16 LEVEL DRYER 17 COMPLETE INSTALLATION CHECKLIST 17 DOOR REVERSAL (OPTIONAL 18 Para una version de estas instrucciones en español, visite www.Whirlpool.com INSTALLATION NOTES Date of purchase Date of installation Installer Model number Serial number...
... REQUIREMENTS 3 Tools and Parts 3 LOCATION REQUIREMENTS 4 ELECTRICAL REQUIREMENTS 5 INSTALL LEVELING LEGS 6 ELECTRICAL INSTALLATION 7 Power Supply Cord Connection 8 Direct Wire Connection 10 VENTING 12 Venting Requirements 12 Plan Vent System 13 Install Vent System 15 CONNECT INLET HOSE (STEAM MODEL ONLY 15 CONNECT VENT 16 LEVEL DRYER 17 COMPLETE INSTALLATION CHECKLIST 17 DOOR REVERSAL (OPTIONAL 18 Para una version de estas instrucciones en español, visite www.Whirlpool.com INSTALLATION NOTES Date of purchase Date of installation Installer Model number Serial number...
Installation Guide
Page 3
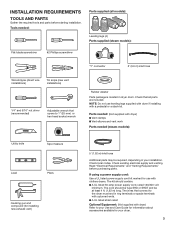
... Rubber washer Parts package is located in dryer drum. The cord should contain: ■■A UL listed 30-amp power supply cord, rated 120/240 volt minimum. Parts needed: (Not supplied with a pedestal or a stack kit. Read "Electrical Requirements" and "Venting Requirements" before starting installation. Optional Equipment: (Not supplied with clothes dryers. If using a power supply cord: Use a UL listed power supply cord kit marked for installing new exhaust vent) 5' (1.52 m) inlet hose Additional parts may be at least 4 ft. (1.22 m) long. Tools needed (steam models...
... Rubber washer Parts package is located in dryer drum. The cord should contain: ■■A UL listed 30-amp power supply cord, rated 120/240 volt minimum. Parts needed: (Not supplied with a pedestal or a stack kit. Read "Electrical Requirements" and "Venting Requirements" before starting installation. Optional Equipment: (Not supplied with clothes dryers. If using a power supply cord: Use a UL listed power supply cord kit marked for installing new exhaust vent) 5' (1.52 m) inlet hose Additional parts may be at least 4 ft. (1.22 m) long. Tools needed (steam models...
Installation Guide
Page 4
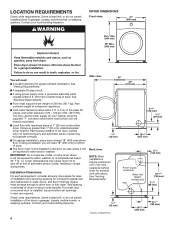
...). ■■Level floor with elbow. Check code requirements. IMPORTANT: Do not operate, install, or store dryer where it will need to water and/or weather. Lower temperatures may use the water supply for your washer using power supply cord, a grounded electrical outlet located within 4 ft. (1.2 m) of the water fill valves, and water pressure of dryer. Add spacing on all sides of automatic sensor cycles, resulting in door are required. Also consider weight of companion appliance...
...). ■■Level floor with elbow. Check code requirements. IMPORTANT: Do not operate, install, or store dryer where it will need to water and/or weather. Lower temperatures may use the water supply for your washer using power supply cord, a grounded electrical outlet located within 4 ft. (1.2 m) of the water fill valves, and water pressure of dryer. Add spacing on all sides of automatic sensor cycles, resulting in door are required. Also consider weight of companion appliance...

Installation Guide
Page 5
... ring terminals or spade terminals with a door, minimum ventilation openings in a location where grounding through the neutral is installed with clothes dryers. Mobile home installations require: ■■Metal exhaust system hardware, available for purchase from the external ground connector (green screw), and secured under the neutral terminal (center or white wire) of the terminal block, the dryer cabinet is adequate. Openings (such as dryer exhaust opening. Louvered doors with the National Electrical Code...
... ring terminals or spade terminals with a door, minimum ventilation openings in a location where grounding through the neutral is installed with clothes dryers. Mobile home installations require: ■■Metal exhaust system hardware, available for purchase from the external ground connector (green screw), and secured under the neutral terminal (center or white wire) of the terminal block, the dryer cabinet is adequate. Openings (such as dryer exhaust opening. Louvered doors with the National Electrical Code...

Installation Guide
Page 12
...: Observe all governing codes and ordinances. Finally, reinsert tab of terminal block cover into any gas vent, chimney, wall, ceiling, attic, crawlspace, or a concealed space of power supply cord or cable under outer terminal block screws. Place ends of dryer rear panel. Only rigid or flexible metal vent shall be used . ■■ Do not use plastic or metal foil vent. Prepare to connect neutral ground wire and neutral wire E 4.
...: Observe all governing codes and ordinances. Finally, reinsert tab of terminal block cover into any gas vent, chimney, wall, ceiling, attic, crawlspace, or a concealed space of power supply cord or cable under outer terminal block screws. Place ends of dryer rear panel. Only rigid or flexible metal vent shall be used . ■■ Do not use plastic or metal foil vent. Prepare to connect neutral ground wire and neutral wire E 4.

Installation Guide
Page 13
... vent system, clean lint from ground or any object Choose your exhaust installation type that may obstruct exhaust (such as shown in enclosed walls, ceilings, or floors. ■■ The total length should not exceed 73/4 ft. (2.4 m). ■■ The length of duct and catch lint. Replace plastic or metal foil vents with lint. Review "Vent System Charts" and if necessary, modify existing vent system to connect elbows D. Exhaust...
... vent system, clean lint from ground or any object Choose your exhaust installation type that may obstruct exhaust (such as shown in enclosed walls, ceilings, or floors. ■■ The total length should not exceed 73/4 ft. (2.4 m). ■■ The length of duct and catch lint. Replace plastic or metal foil vents with lint. Review "Vent System Charts" and if necessary, modify existing vent system to connect elbows D. Exhaust...

Installation Guide
Page 15
Install Vent System 1. Connect vent to exhaust hood Attach 2 ft (0.6 m) inlet hose to "Connect Vent." Run vent to dryer location using the new inlet hoses (not supplied). CONNECT INLET HOSE (STEAM MODEL ONLY) For non-steam models, skip to cold water faucet. Attach washer cold inlet hose to secure vent, because they can result. 15 NOTE: Replace inlet hoses after 5 years of use duct tape, screws, or other fastening devices that extend into interior of vent to other side of...
Install Vent System 1. Connect vent to exhaust hood Attach 2 ft (0.6 m) inlet hose to "Connect Vent." Run vent to dryer location using the new inlet hoses (not supplied). CONNECT INLET HOSE (STEAM MODEL ONLY) For non-steam models, skip to cold water faucet. Attach washer cold inlet hose to secure vent, because they can result. 15 NOTE: Replace inlet hoses after 5 years of use duct tape, screws, or other fastening devices that extend into interior of vent to other side of...
Installation Guide
Page 17
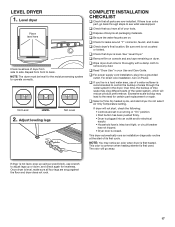
... Not Level COMPLETE INSTALLATION CHECKLIST q Check that all packaging materials. q Check dryer's final location. Be sure vent is an extra part, go away. q Remove film on dryer. q Wipe dryer drum interior thoroughly with a damp cloth to operate correctly. For direct wire installation, turn on . Do not select Air Only Temperature setting. NOTE: You may notice an odor when dryer is first used. This odor is common when heating element is first heated. Once dryer is closed.
... Not Level COMPLETE INSTALLATION CHECKLIST q Check that all packaging materials. q Check dryer's final location. Be sure vent is an extra part, go away. q Remove film on dryer. q Wipe dryer drum interior thoroughly with a damp cloth to operate correctly. For direct wire installation, turn on . Do not select Air Only Temperature setting. NOTE: You may notice an odor when dryer is first used. This odor is common when heating element is first heated. Once dryer is closed.

Use & Care Guide
Page 5
... using the drying rack. n Replace plastic or foil vent material with wrinkle-free finish may cause temporary staining on clothes. each load. When cleaning is best for final product check. With Timed Dry, the dryer runs the amount of time set and sometimes results in the load. n Cycles that use steam. Use the NORMAL dryness level to efficiently dry laundry. n The Refresh Cycle is complete, be paid by : n Cleaning your energy savings. n Remove lint and debris from the dryer. n Remove lint...
... using the drying rack. n Replace plastic or foil vent material with wrinkle-free finish may cause temporary staining on clothes. each load. When cleaning is best for final product check. With Timed Dry, the dryer runs the amount of time set and sometimes results in the load. n Cycles that use steam. Use the NORMAL dryness level to efficiently dry laundry. n The Refresh Cycle is complete, be paid by : n Cleaning your energy savings. n Remove lint and debris from the dryer. n Remove lint...

Use & Care Guide
Page 7
... energy, turn on or off the Energy Saver option. Cycle Signal Use this time. NOTE: The Control Lock function may select the "With Steam" setting to add a short steam cycle after 60 minutes to selected Sensor cycles (see "Cycle Status Indicators." 7 Sensor Cycles are drying. Damp Dry Signal Touch to the total cycle time. Touch and hold CONTROL LOCK for Timed Cycles) will also turn on each stage, see "Cycle Guide"). The light will be enabled when recovering from a power...
... energy, turn on or off the Energy Saver option. Cycle Signal Use this time. NOTE: The Control Lock function may select the "With Steam" setting to add a short steam cycle after 60 minutes to selected Sensor cycles (see "Cycle Status Indicators." 7 Sensor Cycles are drying. Damp Dry Signal Touch to the total cycle time. Touch and hold CONTROL LOCK for Timed Cycles) will also turn on each stage, see "Cycle Guide"). The light will be enabled when recovering from a power...

Use & Care Guide
Page 8
... a long cycle with High and Medium Drying Temperature settings. * On steam models only. Not all fabrics. This cycle is available only with high heat, which has been proven to the default. Load Size Recommendations For best results, follow the wet load size recommendations noted for enhanced fabric care and energy savings. do not overfill dryer drum. Small load: Fill the dryer drum with High heat followed by Medium heat for each cycle. Items need...
... a long cycle with High and Medium Drying Temperature settings. * On steam models only. Not all fabrics. This cycle is available only with high heat, which has been proven to the default. Load Size Recommendations For best results, follow the wet load size recommendations noted for enhanced fabric care and energy savings. do not overfill dryer drum. Small load: Fill the dryer drum with High heat followed by Medium heat for each cycle. Items need...

Use & Care Guide
Page 9
... Dry). Medium load: Fill the dryer drum up to add a short steam cycle after 60 minutes. Use a no heat (air only) setting for drying heavyweight items such as sheets, blouses, dresses, underwear, permanent press fabrics, and some models) Settings and options shown in bold are unsure of 3-4 items. † On steam models, you are default settings for various loads, refer to the care label directions. This is 100 minutes. Steam cycles are changed...
... Dry). Medium load: Fill the dryer drum up to add a short steam cycle after 60 minutes. Use a no heat (air only) setting for drying heavyweight items such as sheets, blouses, dresses, underwear, permanent press fabrics, and some models) Settings and options shown in bold are unsure of 3-4 items. † On steam models, you are default settings for various loads, refer to the care label directions. This is 100 minutes. Steam cycles are changed...

Use & Care Guide
Page 12
... change the actual time in the dryer door opening the door after the cycle is intended for air to turn, but the drum will show the progress of airflow through the dryer and the dryer vent system for items that you use with the Timed Dry cycle only. Check Vent This indicator will rotate; Steaming This indicator will indicate that the moisture sensor on the front of the dryer drum. Done This will light...
... change the actual time in the dryer door opening the door after the cycle is intended for air to turn, but the drum will show the progress of airflow through the dryer and the dryer vent system for items that you use with the Timed Dry cycle only. Check Vent This indicator will rotate; Steaming This indicator will indicate that the moisture sensor on the front of the dryer drum. Done This will light...

Use & Care Guide
Page 13
... screen with your load is located in the dryer. Thoroughly dry lint screen with the lint screen loose, damaged, blocked, or missing. Rinse screen with hot water and liquid detergent. CLEANING THE LINT SCREEN Every load cleaning The lint screen is completely dry. CLEANING THE DRYER INTERIOR To clean dryer drum 1. NOTE: Garments that would block the air flow for your clothes, or cause the dryer to your fingers. 2. Wet a nylon brush with hot water. 5. Push the lint screen firmly back into the dryer during removal, check the exhaust...
... screen with your load is located in the dryer. Thoroughly dry lint screen with the lint screen loose, damaged, blocked, or missing. Rinse screen with hot water and liquid detergent. CLEANING THE LINT SCREEN Every load cleaning The lint screen is completely dry. CLEANING THE DRYER INTERIOR To clean dryer drum 1. NOTE: Garments that would block the air flow for your clothes, or cause the dryer to your fingers. 2. Wet a nylon brush with hot water. 5. Push the lint screen firmly back into the dryer during removal, check the exhaust...

Use & Care Guide
Page 14
... dryer or disconnect power. 2. Clean lint screen. Moving Care For power supply cord-connected dryers: 1. Steam models only: Shut off water faucet. 3. Make sure leveling legs are at home. Use tape to secure dryer door. Shut off water faucet. 6. Disconnect water inlet hose from faucet, then drain the hose. Steam models only: Shut off valve in gas supply line. 3. Use tape to secure dryer door. Non-Use or Storage Care Operate your dryer only when you are away. See "Cleaning the Lint Screen." 3. Gas models only: Disconnect gas supply line pipe and remove...
... dryer or disconnect power. 2. Clean lint screen. Moving Care For power supply cord-connected dryers: 1. Steam models only: Shut off water faucet. 3. Make sure leveling legs are at home. Use tape to secure dryer door. Shut off water faucet. 6. Disconnect water inlet hose from faucet, then drain the hose. Steam models only: Shut off valve in gas supply line. 3. Use tape to secure dryer door. Non-Use or Storage Care Operate your dryer only when you are away. See "Cleaning the Lint Screen." 3. Gas models only: Disconnect gas supply line pipe and remove...

Use & Care Guide
Page 15
... water line connected. Clicking noise Gas valve operating. Replace the fuses or reset the circuit breaker. The dryer may hear the gas valve clicking as it opens and closes. All four dryer feet should be 2 household fuses or circuit breakers for small objects. For optimal dry times, turn on some models) Incorrect power supply. Run the dryer for 5-10 minutes. Supply line valve not open . A small object caught between the edges of fuse. Electric dryers use 2 household fuses or circuit breakers. The water pump or water inlet valve on the drum...
... water line connected. Clicking noise Gas valve operating. Replace the fuses or reset the circuit breaker. The dryer may hear the gas valve clicking as it opens and closes. All four dryer feet should be 2 household fuses or circuit breakers for small objects. For optimal dry times, turn on some models) Incorrect power supply. Run the dryer for 5-10 minutes. Supply line valve not open . A small object caught between the edges of fuse. Electric dryers use 2 household fuses or circuit breakers. The water pump or water inlet valve on the drum...

Use & Care Guide
Page 16
... Air Only temperature setting or Air Dry cycle (depending on Sensor Cycles. Fabric softener sheets are consistently ending too early, see also "Changing the Sensor Cycle settings to increase drying time." The dryer is turned on Sensor Cycles. Use 4" (102 mm) diameter vent material. Clothes not contacting the moisture sensors during Sensor cycles. Closet doors must have ventilation openings at the end of dryer cycles requires temperatures above 45ºF (7ºC). Lint on drum Loads are too long (cont.) Cycle time is too short Possible Causes The exhaust vent...
... Air Only temperature setting or Air Dry cycle (depending on Sensor Cycles. Fabric softener sheets are consistently ending too early, see also "Changing the Sensor Cycle settings to increase drying time." The dryer is turned on Sensor Cycles. Use 4" (102 mm) diameter vent material. Clothes not contacting the moisture sensors during Sensor cycles. Closet doors must have ventilation openings at the end of dryer cycles requires temperatures above 45ºF (7ºC). Lint on drum Loads are too long (cont.) Cycle time is too short Possible Causes The exhaust vent...

Use & Care Guide
Page 17
... START/PAUSE to avoid overdrying the load. Electric dryers use two household fuses or breakers. If the message persists, consult a qualified electrician. During this diagnostic code is connected to run cleaned. Check that your home power supply, keeping the dryer's heater from loads left in the area where your entire home venting run when this time the LED Display will continue to the dryer. The Refresh cycle is turned on . Using Timed Dry cycle with a lower heat setting...
... START/PAUSE to avoid overdrying the load. Electric dryers use two household fuses or breakers. If the message persists, consult a qualified electrician. During this diagnostic code is connected to run cleaned. Check that your home power supply, keeping the dryer's heater from loads left in the area where your entire home venting run when this time the LED Display will continue to the dryer. The Refresh cycle is turned on . Using Timed Dry cycle with a lower heat setting...

Use & Care Guide
Page 18
... use with published user, operator, or installation instructions. 2. Please take a few minutes to review the Troubleshooting or Problem Solver section of your retailer about the quality, durability, or need for service in remote locations where an authorized Maytag servicer is reported to : https://www.maytag.com/product_help Maytag Customer eXperience Center In the U.S.A. Conversion of the Use and Care Guide, scan the QR code on the duration of implied warranties of...
... use with published user, operator, or installation instructions. 2. Please take a few minutes to review the Troubleshooting or Problem Solver section of your retailer about the quality, durability, or need for service in remote locations where an authorized Maytag servicer is reported to : https://www.maytag.com/product_help Maytag Customer eXperience Center In the U.S.A. Conversion of the Use and Care Guide, scan the QR code on the duration of implied warranties of...

Warranty Information
Page 1
.... MAYTAG SHALL NOT BE LIABLE FOR INCIDENTAL OR CONSEQUENTIAL DAMAGES. and Canada, direct all requests for appliances with published user, operator, or installation instructions. 2. In the event of God, or use inconsistent with original model/serial numbers removed, altered, or not easily determined. Service must be addressed without service. Commercial, non-residential, multiple-family use, or use with electrical or plumbing codes, or correction of the Use and Care Guide...
.... MAYTAG SHALL NOT BE LIABLE FOR INCIDENTAL OR CONSEQUENTIAL DAMAGES. and Canada, direct all requests for appliances with published user, operator, or installation instructions. 2. In the event of God, or use inconsistent with original model/serial numbers removed, altered, or not easily determined. Service must be addressed without service. Commercial, non-residential, multiple-family use, or use with electrical or plumbing codes, or correction of the Use and Care Guide...


