
Installation Instructions
Page 2
... and others are not followed. [] It is the safety alert symbol. Always read and obey all safety messages. ELECTRIC DRYER ........ 11 install Coin Slide and Coin Box 11 Make Electrical Connection 11 Connect Vent 15 Complete Installation 15 CHANGING TO A...the safety alert symbol and either the word "DANGER" or "WARNING." GAS DRYER 10 install Coin Slide and Coin Box 10 Make Gas Connection 10 Connect Vent 10 Complete Installation 10 iNSTALLATiON iNSTRUCTiONS- TABLEOFCONTENTS DRYER SAFETY 2 iNSTALLATiON REQUIREMENTS 4 Tools and Parts 4 Location Requirements 4 Electrical...
... and others are not followed. [] It is the safety alert symbol. Always read and obey all safety messages. ELECTRIC DRYER ........ 11 install Coin Slide and Coin Box 11 Make Electrical Connection 11 Connect Vent 15 Complete Installation 15 CHANGING TO A...the safety alert symbol and either the word "DANGER" or "WARNING." GAS DRYER 10 install Coin Slide and Coin Box 10 Make Gas Connection 10 Connect Vent 10 Complete Installation 10 iNSTALLATiON iNSTRUCTiONS- TABLEOFCONTENTS DRYER SAFETY 2 iNSTALLATiON REQUIREMENTS 4 Tools and Parts 4 Location Requirements 4 Electrical...

Installation Instructions
Page 3
...Items contaminated with controls. Close supervision of children is necessary when the dryer is moving. [] Do not install or store the dryer where it shall be a T-handle type. [] A flexible gas connector, when used near children. [] Before the dryer is removed from service or discarded, remove the door to the ... and Care Guide or in published user-repair instructions that you cannot reach your gas supplier, call your gas supplier from the accumulation of lint,dust, and dirt. [] The interior of the dryer and exhaust vent should be cleaned periodically by the State of Massachusetts. [] If...
...Items contaminated with controls. Close supervision of children is necessary when the dryer is moving. [] Do not install or store the dryer where it shall be a T-handle type. [] A flexible gas connector, when used near children. [] Before the dryer is removed from service or discarded, remove the door to the ... and Care Guide or in published user-repair instructions that you cannot reach your gas supplier, call your gas supplier from the accumulation of lint,dust, and dirt. [] The interior of the dryer and exhaust vent should be cleaned periodically by the State of Massachusetts. [] If...
Installation Instructions
Page 4
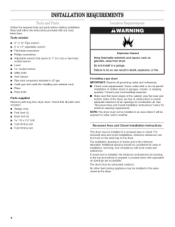
... socket wrench [] Level [] %6" socket wrench [] Utility knife [] Vent clamps [] Pipe-joint compound resistant to water and/or weather. If installing a gas dryer: iMPORTANT: Observe all parts were included. [] Wedge cone [] Foot boot (4) [] Dryer foot (4) [] %6"-18 x 21/2" bolt [] 3 pin timing cam [] 6 pin timing cam Explosion Hazard Keep flammable materials and vapors, such as the...
... socket wrench [] Level [] %6" socket wrench [] Utility knife [] Vent clamps [] Pipe-joint compound resistant to water and/or weather. If installing a gas dryer: iMPORTANT: Observe all parts were included. [] Wedge cone [] Foot boot (4) [] Dryer foot (4) [] %6"-18 x 21/2" bolt [] 3 pin timing cam [] 6 pin timing cam Explosion Hazard Keep flammable materials and vapors, such as the...

Installation Instructions
Page 5
...) _-x_;_-.v__ s_.... ?,_, N Hk / 18%" _i (46.7 crn) 251/2" (64.8 crn) t 35" (88.9 crn) I [ SIDE VIEW 77/8" (20 crn) (2.5 crn)_ O Product Dimensions 27" (68.6 cm) dryer _,:_ 27" (68.6 crn) I .........r ELEC_TRIC I (35.6 crn) / BACK VIEW 37" (94crn) 6_4" ...... (15_ 13" i_AS _-_E 4" (10.2 Crn) ,/ (12.1 cnl) _2_T.....L " P" dia, 43/4" (3.2 crn) ,_-_ 29_/4" (74...
...) _-x_;_-.v__ s_.... ?,_, N Hk / 18%" _i (46.7 crn) 251/2" (64.8 crn) t 35" (88.9 crn) I [ SIDE VIEW 77/8" (20 crn) (2.5 crn)_ O Product Dimensions 27" (68.6 cm) dryer _,:_ 27" (68.6 crn) I .........r ELEC_TRIC I (35.6 crn) / BACK VIEW 37" (94crn) 6_4" ...... (15_ 13" i_AS _-_E 4" (10.2 Crn) ,/ (12.1 cnl) _2_T.....L " P" dia, 43/4" (3.2 crn) ,_-_ 29_/4" (74...
Installation Instructions
Page 6
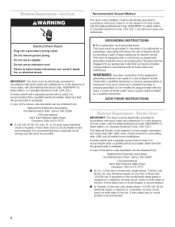
...iiiie ;ii£@:; A time-delay fuse or circuit breaker is required. A copy of electric shock by a qualified electrician. iMPORTANT: The dryer must be provided. A time-delay fuse or circuit breaker is recommended. [] In Canada: A four-wire only, single phase 115/230 volt...circuit is also recommended. Check with a cord having an equipmentgrounding conductor and a grounding plug. SAVE THESE iNSTRUCTiONS IMPORTANT: The dryer must be electrically grounded in accordance with local codes and ordinances or, in the absence of the above code standards can result...
...iiiie ;ii£@:; A time-delay fuse or circuit breaker is required. A copy of electric shock by a qualified electrician. iMPORTANT: The dryer must be provided. A time-delay fuse or circuit breaker is recommended. [] In Canada: A four-wire only, single phase 115/230 volt...circuit is also recommended. Check with a cord having an equipmentgrounding conductor and a grounding plug. SAVE THESE iNSTRUCTiONS IMPORTANT: The dryer must be electrically grounded in accordance with local codes and ordinances or, in the absence of the above code standards can result...
Installation Instructions
Page 7
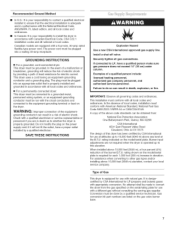
... with Canadian Electrical Code, CSA C22.1 installation codes and all local codes and ordinances. [] For a permanently connected dryer: This dryer must be obtained from the gas specified on the power supply cord: if it will reduce the risk of electric shock by CSA International for LP ...(propane and butane) gases with a qualified electrician or service representative or personnel if you are not required when the dryer is required for electric current. Gas conversion kit part numbers are equipped with the circuit conductors and connected to LP, have a proper outlet installed by a...
... with Canadian Electrical Code, CSA C22.1 installation codes and all local codes and ordinances. [] For a permanently connected dryer: This dryer must be obtained from the gas specified on the power supply cord: if it will reduce the risk of electric shock by CSA International for LP ...(propane and butane) gases with a qualified electrician or service representative or personnel if you are not required when the dryer is required for electric current. Gas conversion kit part numbers are equipped with the circuit conductors and connected to LP, have a proper outlet installed by a...
Installation Instructions
Page 8
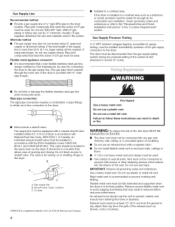
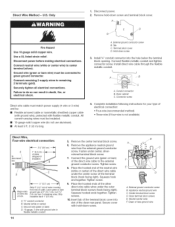
..., ANSI Z223.1. Gas supply line B. Fire Hazard Use a heavy metal vent. Failure to the dryer. [] Must include a shutoff valve: The supply line must be equipped with a manual shutoff valve installed within 6 ft. (1.8 m) of dryer in the "Location Requirements" section. Do not use a plastic vent. Exhaust hood must be...than 20 ft. (6.1 m), larger tubing will be used . Do not use duct tape. Do not use a metal foil vent. If the total length of the supply line is for gauge testing, must be installed immediately upstream of the gas supply connection to the dryer. To dryer 1-(8)TEFLON...
..., ANSI Z223.1. Gas supply line B. Fire Hazard Use a heavy metal vent. Failure to the dryer. [] Must include a shutoff valve: The supply line must be equipped with a manual shutoff valve installed within 6 ft. (1.8 m) of dryer in the "Location Requirements" section. Do not use a plastic vent. Exhaust hood must be...than 20 ft. (6.1 m), larger tubing will be used . Do not use duct tape. Do not use a metal foil vent. If the total length of the supply line is for gauge testing, must be installed immediately upstream of the gas supply connection to the dryer. To dryer 1-(8)TEFLON...
Installation Instructions
Page 9
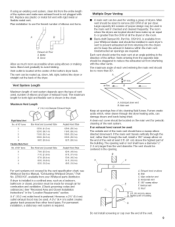
... the bottom dryer back. of 90° turns 0 1 2 3 4 Box Hood and Louvered Style 135 ft. (41.2 m) 125 ft. (38.1 m) 115 ft. (35.1 m) 106 ft. (32.3 m) 98 ft. (29.9 m) Box Hood and Louvered Style 76 ft. (23.2 rn) 71 ft. (21.6 m) 67 ft. (20.4 m) 65 ft. (19.8 rn) 63 ft. (19.2 m) Angled Hood Style 129 ft. (39.3 rn) 119 ft. (36.3 m) 109 ft. (33.2 rn...
... the bottom dryer back. of 90° turns 0 1 2 3 4 Box Hood and Louvered Style 135 ft. (41.2 m) 125 ft. (38.1 m) 115 ft. (35.1 m) 106 ft. (32.3 m) 98 ft. (29.9 m) Box Hood and Louvered Style 76 ft. (23.2 rn) 71 ft. (21.6 m) 67 ft. (20.4 m) 65 ft. (19.8 rn) 63 ft. (19.2 m) Angled Hood Style 129 ft. (39.3 rn) 119 ft. (36.3 m) 109 ft. (33.2 rn...
Installation Instructions
Page 10
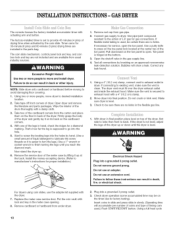
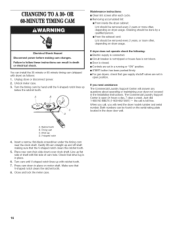
...-minute (6 pins) and 60-minute (3 pins) drying times are no kinks in the flexible gas line. Take two of the cardboard corners from under dryer. 2= Plug into final position. Firmly grasp the body of the dryer and gently lay it on its back on the floor in hand, check the ridges for... lubricate the screw threads so it up at the center top of L.R gas for proper installation.) t. Connect gas supply to screw the leveling legs into the holes by the coin slide. Pull downward on top of liquid detergent to move dryer to existing vent, make sure the vent is level. 3. Bubbles will...
...-minute (6 pins) and 60-minute (3 pins) drying times are no kinks in the flexible gas line. Take two of the cardboard corners from under dryer. 2= Plug into final position. Firmly grasp the body of the dryer and gently lay it on its back on the floor in hand, check the ridges for... lubricate the screw threads so it up at the center top of L.R gas for proper installation.) t. Connect gas supply to screw the leveling legs into the holes by the coin slide. Pull downward on top of liquid detergent to move dryer to existing vent, make sure the vent is level. 3. Bubbles will...

Installation Instructions
Page 11
... it on its back on the floor in back or other injury. U.S. Connect neutral wire (white or center wire) to move dryer to operate. For dryers using coin slides, use with a damp cloth. 3. Start to screw the leveling legs into the hole. 5. Remove cardboard or ...timer with the neutral ground wire connected to run for proper installation.) 7. Excessive Weight Hazard Use two or more people, move and install dryer. Install the money-accepting device. (Refer to green ground connector. Ground wire (green or bare wire) must be connected to manufacturer's ...
... it on its back on the floor in back or other injury. U.S. Connect neutral wire (white or center wire) to move dryer to operate. For dryers using coin slides, use with a damp cloth. 3. Start to screw the leveling legs into the hole. 5. Remove cardboard or ...timer with the neutral ground wire connected to run for proper installation.) 7. Excessive Weight Hazard Use two or more people, move and install dryer. Install the money-accepting device. (Refer to green ground connector. Ground wire (green or bare wire) must be connected to manufacturer's ...
Installation Instructions
Page 12
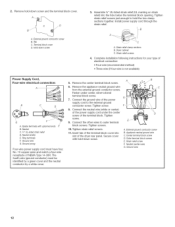
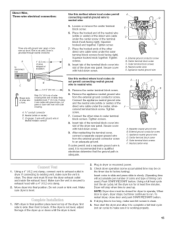
... block opening. A. Outer terminal block screws E. Strain relief screw E Neutral (center wire) G. 2. Hold-down screw. Dryer cabinet C. Tighten strain relief screws just enough to outer terminal block screws. Install power supply cord through the strain relief. ...Cord, Four-wire electrical connection: B C D G f A. Strain relief screws 4= Complete installation following instructions for your type of the dryer rear panel. Neutral(white) E. External ground conductor screw B. External ground conductor screw B. Terminal block cover D. Strain relief clamp sections ...
... block opening. A. Outer terminal block screws E. Strain relief screw E Neutral (center wire) G. 2. Hold-down screw. Dryer cabinet C. Tighten strain relief screws just enough to outer terminal block screws. Install power supply cord through the strain relief. ...Cord, Four-wire electrical connection: B C D G f A. Strain relief screws 4= Complete installation following instructions for your type of the dryer rear panel. Neutral(white) E. External ground conductor screw B. External ground conductor screw B. Terminal block cover D. Strain relief clamp sections ...

Installation Instructions
Page 13
...neutral wire (white or center) of NEMA Type 10-30R. Tighten strain relief screws. 9. Insert tab of the terminal block cover into slot of the dryer rear panel. Secure cover with hold -down screw. After reattaching the terminal cover, connect a separate copper ground wire from the external ground conductor screw.... Appliance neutral ground wire Use this method where local codes permit connecting neutral ground wire to the center, silver-colored terminal screw of the dryer rear panel. Remove the center terminal block screw. 6. Tighten screws. 8. Center terminal block screw E.
...neutral wire (white or center) of NEMA Type 10-30R. Tighten strain relief screws. 9. Insert tab of the terminal block cover into slot of the dryer rear panel. Secure cover with hold -down screw. After reattaching the terminal cover, connect a separate copper ground wire from the external ground conductor screw.... Appliance neutral ground wire Use this method where local codes permit connecting neutral ground wire to the center, silver-colored terminal screw of the dryer rear panel. Remove the center terminal block screw. 6. Tighten screws. 8. Center terminal block screw E.
Installation Instructions
Page 14
...All current-carrying wires must match power supply (4-wire or 3-wire) and be connected to do not use aluminum). [] At least 5 ft. (1.52 m) long. External ground conductor screw B. Cut 1 ½" (3.8 crn) from end of cable. Remove the appliance neutral ground...death, fire, or electrical shock. Appliance neutral ground wire C. Tab C. Install direct wire cable through the flexible metallic conduit. ! _J B A. Dryer cabinet C. Strip Sintsruiplat5io"n(12b.a7ckcrn1)" o(2f .o5ucternr ).covering A. _4" conduit connector B. Remove the center terminal block screw. 6. Connect the ...
...All current-carrying wires must match power supply (4-wire or 3-wire) and be connected to do not use aluminum). [] At least 5 ft. (1.52 m) long. External ground conductor screw B. Cut 1 ½" (3.8 crn) from end of cable. Remove the appliance neutral ground...death, fire, or electrical shock. Appliance neutral ground wire C. Tab C. Install direct wire cable through the flexible metallic conduit. ! _J B A. Dryer cabinet C. Strip Sintsruiplat5io"n(12b.a7ckcrn1)" o(2f .o5ucternr ).covering A. _4" conduit connector B. Remove the center terminal block screw. 6. Connect the ...
Installation Instructions
Page 15
... ground conductor screw. Appliance neutral ground wire D. Using a 4" (10.2 cm) clamp, connect vent to neutral wire: 5. The dryer vent must be on top of the terminal block cover into final position. Make sure the vent is grounded through neutral conductor. Do not... ground conductor screw C. tO-gauge, 3 wire with ground wire in final position place level on the timer due to operate. With dryer in flexible metallic conduit 7. When door is adequate. Remove the center terminal block screw. Outer terminal block screws D. Remove the appliance...
... ground conductor screw. Appliance neutral ground wire D. Using a 4" (10.2 cm) clamp, connect vent to neutral wire: 5. The dryer vent must be on top of the terminal block cover into final position. Make sure the vent is grounded through neutral conductor. Do not... ground conductor screw C. tO-gauge, 3 wire with ground wire in final position place level on the timer due to operate. With dryer in flexible metallic conduit 7. When door is adequate. Remove the center terminal block screw. Outer terminal block screws D. Remove the appliance...
Installation Instructions
Page 16
... D. Gently lift cam straight up flat side of shaft with dryer) as follows: t. Electrical Shock Hazard Disconnect power before making sure that gas supply shutoff valves are set in the Installation instructions. Unplug dryer or disconnect power. 2. If you will need assistance: The Commercial Laundry Support Center will answer any questions about operating or...
... D. Gently lift cam straight up flat side of shaft with dryer) as follows: t. Electrical Shock Hazard Disconnect power before making sure that gas supply shutoff valves are set in the Installation instructions. Unplug dryer or disconnect power. 2. If you will need assistance: The Commercial Laundry Support Center will answer any questions about operating or...
Installation Instructions
Page 17
... SPECIFIC LEGAL RIGHTS AND YOU MAY ALSO HAVE OTHER RIGHTS, WHICH VARY FROM STATE TO STATE OR PROVINCE TO PROVINCE. MAYTAG COMMERCIAL WASHER, DRYER, STACKED DRYER/ DRYER, COMMERCIAL STACK LAUNDRY, AND MULTI-LOAD COIN OPERATED COMMERCIAL WASHERS AND DRYERS WARRANTY LiMiTED WARRANTY ON PARTS For the first five years from the date of purchase, when this warranty. LiMiTATiONS...
... SPECIFIC LEGAL RIGHTS AND YOU MAY ALSO HAVE OTHER RIGHTS, WHICH VARY FROM STATE TO STATE OR PROVINCE TO PROVINCE. MAYTAG COMMERCIAL WASHER, DRYER, STACKED DRYER/ DRYER, COMMERCIAL STACK LAUNDRY, AND MULTI-LOAD COIN OPERATED COMMERCIAL WASHERS AND DRYERS WARRANTY LiMiTED WARRANTY ON PARTS For the first five years from the date of purchase, when this warranty. LiMiTATiONS...


