
Installation Instructions
Page 2
... owner post, in a prominent location, instructions for the customer's use gasoline or other appliance. All safety messages will follow instructions. TABLEOFCONTENTS DRYER SAFETY 2 iNSTALLATiON REQUIREMENTS 4 Tools and Parts 4 Location Requirements 4 Electrical Requirements 6 Gas Supply Requirements 7 Venting Requirements 8 iNSTALLATiON iNSTRUCTiONS - ELECTRIC DRYER ........ 11 install Coin Slide and Coin Box 11 Make Electrical Connection 11 Connect...
... owner post, in a prominent location, instructions for the customer's use gasoline or other appliance. All safety messages will follow instructions. TABLEOFCONTENTS DRYER SAFETY 2 iNSTALLATiON REQUIREMENTS 4 Tools and Parts 4 Location Requirements 4 Electrical Requirements 6 Gas Supply Requirements 7 Venting Requirements 8 iNSTALLATiON iNSTRUCTiONS - ELECTRIC DRYER ........ 11 install Coin Slide and Coin Box 11 Make Electrical Connection 11 Connect...

Installation Instructions
Page 3
J = Do not store or use gasoline or other appliance. = WHAT TO DO iF YOU SMELL GAS: • Do not try to light any appliance. • Do not touch any electrical switch; Do not repair or replace any part of the dryer or attempt any servicing unless specifically recommended in this Use ...and Care Guide or in published user-repair instructions that you cannot reach your gas supplier, call your gas supplier ...
J = Do not store or use gasoline or other appliance. = WHAT TO DO iF YOU SMELL GAS: • Do not try to light any appliance. • Do not touch any electrical switch; Do not repair or replace any part of the dryer or attempt any servicing unless specifically recommended in this Use ...and Care Guide or in published user-repair instructions that you cannot reach your gas supplier, call your gas supplier ...
Installation Instructions
Page 4
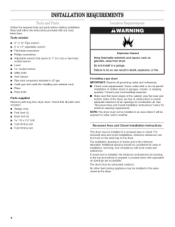
... Putty knife Parts supplied Remove parts bag from dryer. Additional spacing should be installed in an area where it will be exhausted outdoors. No other fuel-burning appliance may be found on the serial tag on the dryer. If installing a gas dryer: iMPORTANT: Observe all parts were included. []... Wedge cone [] Foot boot (4) [] Dryer foot (4) [] %6"-18 x 21/2" bolt [] 3 pin timing cam []...
... Putty knife Parts supplied Remove parts bag from dryer. Additional spacing should be installed in an area where it will be exhausted outdoors. No other fuel-burning appliance may be found on the serial tag on the dryer. If installing a gas dryer: iMPORTANT: Observe all parts were included. []... Wedge cone [] Foot boot (4) [] Dryer foot (4) [] %6"-18 x 21/2" bolt [] 3 pin timing cam []...
Installation Instructions
Page 8
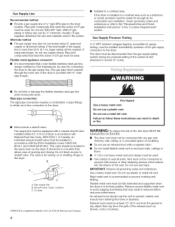
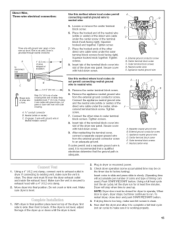
...metal appliance connector: [] It is recommended that may also be at test pressures in death or fire. Rigid pipe connection: The rigid pipe connection requires a combination of pipe fittings to obtain an in-line connection to the gas supply line. (The gas pipe which extend into any gas vent... a shutoff valve: The supply line must be equipped with a manual shutoff valve installed within 6 ft. (1.8 m) of dryer in a confined area: If the dryer is for turning on or shutting off gas to seal all governing codes and ordinances. Do not use a plastic vent. Pipe joint compounds that...
...metal appliance connector: [] It is recommended that may also be at test pressures in death or fire. Rigid pipe connection: The rigid pipe connection requires a combination of pipe fittings to obtain an in-line connection to the gas supply line. (The gas pipe which extend into any gas vent... a shutoff valve: The supply line must be equipped with a manual shutoff valve installed within 6 ft. (1.8 m) of dryer in a confined area: If the dryer is for turning on or shutting off gas to seal all governing codes and ordinances. Do not use a plastic vent. Pipe joint compounds that...
Installation Instructions
Page 12
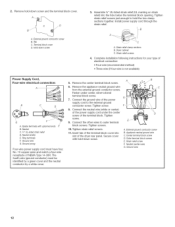
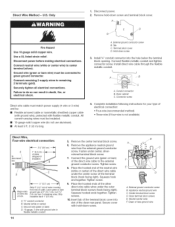
... screw. 9. Tighten strain relief screws. A. Ground wire 12 t 1. Appliance neutral ground wire C. Outer terminal block screws E. Dryer cabinet C. Remove the center terminal block screw. 6. Remove the appliance neutral ground wire from the external ground conductor screw. Insert tab of the... block screw D. Tighten screws. 2. Terminal block cover D. Strain relief screws 4= Complete installation following instructions for your type of the dryer rear panel. Strain relief screw E Neutral (center wire) G. The fourth wire (ground conductor) must have four, No. 10 ...
... screw. 9. Tighten strain relief screws. A. Ground wire 12 t 1. Appliance neutral ground wire C. Outer terminal block screws E. Dryer cabinet C. Remove the center terminal block screw. 6. Remove the appliance neutral ground wire from the external ground conductor screw. Insert tab of the... block screw D. Tighten screws. 2. Terminal block cover D. Strain relief screws 4= Complete installation following instructions for your type of the dryer rear panel. Strain relief screw E Neutral (center wire) G. The fourth wire (ground conductor) must have four, No. 10 ...

Installation Instructions
Page 13
... 0block screw. Tighten strain relief screws. 9. cover into slot of the dryer rear panel. D C A. External ground conductor screw B. Remove the center terminal block screw. 6. Remove the appliance neutral ground wire from the external ground conductor screw to neutral wire: 5.... Connect the appliance neutral ground wire and the neutral wire (white or center) of the dryer rear panel. Tighten screws. 8. Tighten strain relief screws...
... 0block screw. Tighten strain relief screws. 9. cover into slot of the dryer rear panel. D C A. External ground conductor screw B. Remove the center terminal block screw. 6. Remove the appliance neutral ground wire from the external ground conductor screw to neutral wire: 5.... Connect the appliance neutral ground wire and the neutral wire (white or center) of the dryer rear panel. Tighten screws. 8. Tighten strain relief screws...
Installation Instructions
Page 14
... block screw. 6. Place the hooked end of the neutral wire (white or center) of the direct wire cable under the center screw of the dryer rear panel. Install direct wire cable through the flexible metallic conduit. ! _J B A. Tighten screw. 9. Only 1. Disconnect power before making electrical ... copper wire (do so can result in flexible metallic conduit 5. Connect remaining 2 supply wires to do not use aluminum). [] At least 5 ft. (1.52 m) long. Remove the appliance neutral ground wire from the external ground conductor screw. Tighten screw. 8.
... block screw. 6. Place the hooked end of the neutral wire (white or center) of the direct wire cable under the center screw of the dryer rear panel. Install direct wire cable through the flexible metallic conduit. ! _J B A. Tighten screw. 9. Only 1. Disconnect power before making electrical ... copper wire (do so can result in flexible metallic conduit 5. Connect remaining 2 supply wires to do not use aluminum). [] At least 5 ft. (1.52 m) long. Remove the appliance neutral ground wire from the external ground conductor screw. Tighten screw. 8.
Installation Instructions
Page 15
... make sure it is recommended that a qualified electrician determine that the ground path is open, dryer stops, but timer continues to run for dryer to neutral wire: 5. Appliance neutral ground wire Use this method where local codes permit connecting neutral ground wire to factory testing.... 8. If codes permit and a separate ground wire is level. 2. Appliance neutral ground wire D. To restart dryer, close door and push START/RESTART button. 4. Secure cover with hold -down until the dryer is used .) Push START/RESTART button. of wires into slot of the...
... make sure it is recommended that a qualified electrician determine that the ground path is open, dryer stops, but timer continues to run for dryer to neutral wire: 5. Appliance neutral ground wire Use this method where local codes permit connecting neutral ground wire to factory testing.... 8. If codes permit and a separate ground wire is level. 2. Appliance neutral ground wire D. To restart dryer, close door and push START/RESTART button. 4. Secure cover with hold -down until the dryer is used .) Push START/RESTART button. of wires into slot of the...
Installation Instructions
Page 17
... distributor, or for factory specified parts or original equipment manufacturer parts to the commercial appliance. 7o The removal and reinstallation of your authorized Maytag Commercial Laundry distributor. MAYTAG COMMERCIAL WASHER, DRYER, STACKED DRYER/ DRYER, COMMERCIAL STACK LAUNDRY, AND MULTI-LOAD COIN OPERATED COMMERCIAL WASHERS AND DRYERS WARRANTY LiMiTED WARRANTY ON PARTS For the first five years from the date of purchase, when...
... distributor, or for factory specified parts or original equipment manufacturer parts to the commercial appliance. 7o The removal and reinstallation of your authorized Maytag Commercial Laundry distributor. MAYTAG COMMERCIAL WASHER, DRYER, STACKED DRYER/ DRYER, COMMERCIAL STACK LAUNDRY, AND MULTI-LOAD COIN OPERATED COMMERCIAL WASHERS AND DRYERS WARRANTY LiMiTED WARRANTY ON PARTS For the first five years from the date of purchase, when...