

Owners Manual
Page 1
In Canada, visit our website at www.maytag.ca or call us at www.maytag.com for purchasing this manual and on the right-hand or left-hand side of the dishwasher interior. Para obtener acceso a "Instrucciones para el usuario de la lavavajillas" en español, o para información ...adicional de su producto visite : www.maytag.com Tenga listo su número de modelo completo. Always read...
In Canada, visit our website at www.maytag.ca or call us at www.maytag.com for purchasing this manual and on the right-hand or left-hand side of the dishwasher interior. Para obtener acceso a "Instrucciones para el usuario de la lavavajillas" en español, o para información ...adicional de su producto visite : www.maytag.com Tenga listo su número de modelo completo. Always read...

Owners Manual
Page 2
...If the hot water system has not been used for several minutes. SAVE THESE INSTRUCTIONS GROUNDING INSTRUCTIONS ■ For a grounded, cord-connected dishwasher: The dishwasher must be run with the handles up to reduce the risk of cuttype injuries. ■ Do not wash plastic items unless they are not...door or lid to be washed: 1) Locate sharp items so that has not been used for such a period, before using the dishwasher. ■ Use the dishwasher only for its intended function. ■ Use only detergents or rinse agents recommended for use in accordance with all hot water faucets...
...If the hot water system has not been used for several minutes. SAVE THESE INSTRUCTIONS GROUNDING INSTRUCTIONS ■ For a grounded, cord-connected dishwasher: The dishwasher must be run with the handles up to reduce the risk of cuttype injuries. ■ Do not wash plastic items unless they are not...door or lid to be washed: 1) Locate sharp items so that has not been used for such a period, before using the dishwasher. ■ Use the dishwasher only for its intended function. ■ Use only detergents or rinse agents recommended for use in accordance with all hot water faucets...

Owners Manual
Page 3
... Alternative rack loading Lower rack ■ When loading silverware, always place sharp items pointing down . Wash only plastic items marked "dishwasher safe." ■ To avoid thumping/clattering noises during operation: Load dishes so they do not touch one another. Upper rack Lower...rack. This will improve cleaning and drying results. ■ Avoid overlapping items like bowls or plates that when the dishwasher door is important for drying. 4 Start dishwasher. Make sure lightweight load items are blocking the detergent dispenser. ■ Items should be loaded with soiled surfaces ...
... Alternative rack loading Lower rack ■ When loading silverware, always place sharp items pointing down . Wash only plastic items marked "dishwasher safe." ■ To avoid thumping/clattering noises during operation: Load dishes so they do not touch one another. Upper rack Lower...rack. This will improve cleaning and drying results. ■ Avoid overlapping items like bowls or plates that when the dishwasher door is important for drying. 4 Start dishwasher. Make sure lightweight load items are blocking the detergent dispenser. ■ Items should be loaded with soiled surfaces ...

Owners Manual
Page 4
...standard powdered detergent. fill - -- 6 5 4 --- - - -- Press the START/RESUME button, the cycle resumes automatically at the sink nearest your dishwasher. ■ Check the rinse aid indicator. gallon) [typical water softener water and some city water] ■ Depending on your fingers or inserting a ...Do not use detergent. Pre-Wash section results in the previous wash cycle. ■ You can customize your dishes and Full dishwasher interior will give good results. Follow instructions on how to repeat the same cycle and options as shown. Turn off . ...
...standard powdered detergent. fill - -- 6 5 4 --- - - -- Press the START/RESUME button, the cycle resumes automatically at the sink nearest your dishwasher. ■ Check the rinse aid indicator. gallon) [typical water softener water and some city water] ■ Depending on your fingers or inserting a ...Do not use detergent. Pre-Wash section results in the previous wash cycle. ■ You can customize your dishes and Full dishwasher interior will give good results. Follow instructions on how to repeat the same cycle and options as shown. Turn off . ...

Owners Manual
Page 5
Your dishwasher may not have all the cycles and options described. tableware. DESCRIPTIONS Depending upon which cycle is based on this 1:04 1:30 3:46 amounts of food ...
Your dishwasher may not have all the cycles and options described. tableware. DESCRIPTIONS Depending upon which cycle is based on this 1:04 1:30 3:46 amounts of food ...

Owners Manual
Page 6
... firmly within 3 seconds. Anytime IMPORTANT: The sensor in accordance with heat. Cycle time and/or water usage can be blinking. Let the dishwasher drain completely. The "Washing" indicator glows at a later time or during a cycle. Raises the water temperature in accordance with the use ... 154°F (68°C). This high temperature rinse sanitizes your dishes and glassware in the final rinse to the cycle. The dishwasher door can vary as needed ). CONTROLS AND CYCLE STATUS CONTROL PURPOSE To start of console). Press START/ RESUME. The cycle will...
... firmly within 3 seconds. Anytime IMPORTANT: The sensor in accordance with heat. Cycle time and/or water usage can be blinking. Let the dishwasher drain completely. The "Washing" indicator glows at a later time or during a cycle. Raises the water temperature in accordance with the use ... 154°F (68°C). This high temperature rinse sanitizes your dishes and glassware in the final rinse to the cycle. The dishwasher door can vary as needed ). CONTROLS AND CYCLE STATUS CONTROL PURPOSE To start of console). Press START/ RESUME. The cycle will...

Owners Manual
Page 7
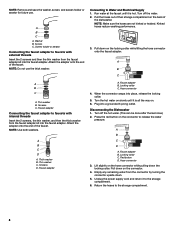
.... The rack stop . Complete Installation Instructions and the adapter are packed with your silverware. Preparing the faucet 1. Dishwasher Features Your Maytag dishwasher may have some models) WARNING Stack-Rack Fold down the extra shelf on your dishwasher, make sure the door is designed to provide optimal spacing and best cleaning performance. Be sure to...
.... The rack stop . Complete Installation Instructions and the adapter are packed with your silverware. Preparing the faucet 1. Dishwasher Features Your Maytag dishwasher may have some models) WARNING Stack-Rack Fold down the extra shelf on your dishwasher, make sure the door is designed to provide optimal spacing and best cleaning performance. Be sure to...
Owners Manual
Page 8
...4. A B C D A. A B C A. Screens C. Screens D. Locking collar C. Plug into place, release the locking collar. 5. Disconnecting the Dishwasher 1. Lift slightly on the back of their storage compartment on the hose connector while pulling down . 5. Return the hoses to the storage compartment. 6. NOTE...aerator for future use the thick washer. Attach the adapter onto the end of the faucet. Pull the hoses out of the dishwasher. A B C A B C A. Hose connector 3. Faucet adapter B. Screen holder or aerator Connecting the faucet adapter to faucets...
...4. A B C D A. A B C A. Screens C. Screens D. Locking collar C. Plug into place, release the locking collar. 5. Disconnecting the Dishwasher 1. Lift slightly on the back of their storage compartment on the hose connector while pulling down . 5. Return the hoses to the storage compartment. 6. NOTE...aerator for future use the thick washer. Attach the adapter onto the end of the faucet. Pull the hoses out of the dishwasher. A B C A B C A. Hose connector 3. Faucet adapter B. Screen holder or aerator Connecting the faucet adapter to faucets...

Owners Manual
Page 9
... damage your detergent is turned on the more slanted side of the rack for improved results. In the U.S.A., www.maytag.com In Canada, www.maytag.ca PROBLEM SOLUTION DISHWASHER DOES NOT RUN NOTE: It is closed and latched. Be sure the door is normal for service. Be sure the cycle has completed (green...
... damage your detergent is turned on the more slanted side of the rack for improved results. In the U.S.A., www.maytag.com In Canada, www.maytag.ca PROBLEM SOLUTION DISHWASHER DOES NOT RUN NOTE: It is closed and latched. Be sure the door is normal for service. Be sure the cycle has completed (green...

Owners Manual
Page 10
.... If a water softener is at the end of the cycle. ■ Improper installation will affect noise levels. Run a vinegar rinse through the dishwasher by pressing START/RESUME and closing the door within 3 seconds. NOISY NOTES: ■ Surging sounds can run a rinse cycle with the Hi Temp...softener additive designed for food obstructions in the drain or disposer. A thumping sound may not be draining properly, see "Prepare and Load the Dishwasher"). Check for service. 10 Check your water heater to loading (do not prerinse). The Pots Pans cycle with the partial load daily until ...
.... If a water softener is at the end of the cycle. ■ Improper installation will affect noise levels. Run a vinegar rinse through the dishwasher by pressing START/RESUME and closing the door within 3 seconds. NOISY NOTES: ■ Surging sounds can run a rinse cycle with the Hi Temp...softener additive designed for food obstructions in the drain or disposer. A thumping sound may not be draining properly, see "Prepare and Load the Dishwasher"). Check for service. 10 Check your water heater to loading (do not prerinse). The Pots Pans cycle with the partial load daily until ...

Owners Manual
Page 11
...in soft water. To avoid further etching, adjust the detergent amount to match the water hardness, stop pre-washing, and use in a dishwasher. Measure the detergent accurately and use only detergents designed for use water heating options only when incoming water temperature is below ). To avoid rinse... of the surface of : water that the cloudiness is removable by pre-washing. Try another brand of detergent and rinse aid. Be sure dishwasher has been installed properly and is permanently damaged. Run a normal cycle with soft water or by soaking the item in white vinegar for 5...
...in soft water. To avoid further etching, adjust the detergent amount to match the water hardness, stop pre-washing, and use in a dishwasher. Measure the detergent accurately and use only detergents designed for use water heating options only when incoming water temperature is below ). To avoid rinse... of the surface of : water that the cloudiness is removable by pre-washing. Try another brand of detergent and rinse aid. Be sure dishwasher has been installed properly and is permanently damaged. Run a normal cycle with soft water or by soaking the item in white vinegar for 5...

Owners Manual
Page 12
...scratches, dents, chips or other than normal, single-family household use of consumables or cleaning products not approved by an authorized Maytag servicer is operated and maintained according to instructions attached to or furnished with the removal from unauthorized modifications made to correct house wiring...MI 49022-2692 Please include a daytime phone number in the U.S.A., visit www.maytag.com In Canada, visit www.maytag.ca If you on the right-hand or left-hand side of the dishwasher interior. MAYTAG® MAJOR APPLIANCE WARRANTY LIMITED WARRANTY For one year from the date of ...
...scratches, dents, chips or other than normal, single-family household use of consumables or cleaning products not approved by an authorized Maytag servicer is operated and maintained according to instructions attached to or furnished with the removal from unauthorized modifications made to correct house wiring...MI 49022-2692 Please include a daytime phone number in the U.S.A., visit www.maytag.com In Canada, visit www.maytag.ca If you on the right-hand or left-hand side of the dishwasher interior. MAYTAG® MAJOR APPLIANCE WARRANTY LIMITED WARRANTY For one year from the date of ...
Installation Instructions
Page 2
... symbol and either the word "DANGER" or "WARNING." Doing so can happen if the instructions are very important. Table of Contents Dishwasher Safety 2 Installation Requirements 3 Tools and Parts 3 Location Requirements 3 Product and Cabinet Opening Dimensions 4 Drain Requirements 5 Water Supply Requirements...-Existing Utilities 6 Prepare Cabinet Opening-New Utilities 6 Prepare and Route Water Line 7 Install Drain Hose 8 Prepare Dishwasher 10 Make Power Cord Electrical Connection 11 Installation Instructions (cont.) Determine Cabinet Opening 12 Install The Door Handle 13 Choose Attachment ...
... symbol and either the word "DANGER" or "WARNING." Doing so can happen if the instructions are very important. Table of Contents Dishwasher Safety 2 Installation Requirements 3 Tools and Parts 3 Location Requirements 3 Product and Cabinet Opening Dimensions 4 Drain Requirements 5 Water Supply Requirements...-Existing Utilities 6 Prepare Cabinet Opening-New Utilities 6 Prepare and Route Water Line 7 Install Drain Hose 8 Prepare Dishwasher 10 Make Power Cord Electrical Connection 11 Installation Instructions (cont.) Determine Cabinet Opening 12 Install The Door Handle 13 Choose Attachment ...
Installation Instructions
Page 3
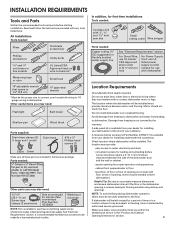
...to floor. • level floor. (If floor at front of opening for a period of your household wiring to 16 gauge wiring in dishwasher Other useful items you may also need : Flashlight Bath towel Shallow pan Wood block Parts supplied: Drain hose clamps (2) (1 large and 1...needed : Copper tubing (³⁄₈" O.D. The location must be subject to the floor. Read and follow the instructions provided with dishwasher Measuring tape or ruler Small level 10" adjustable wrench that electrical connections be installed. Make sure pipes, wires and drain hose are ...
...to floor. • level floor. (If floor at front of opening for a period of your household wiring to 16 gauge wiring in dishwasher Other useful items you may also need : Flashlight Bath towel Shallow pan Wood block Parts supplied: Drain hose clamps (2) (1 large and 1...needed : Copper tubing (³⁄₈" O.D. The location must be subject to the floor. Read and follow the instructions provided with dishwasher Measuring tape or ruler Small level 10" adjustable wrench that electrical connections be installed. Make sure pipes, wires and drain hose are ...
Installation Instructions
Page 4
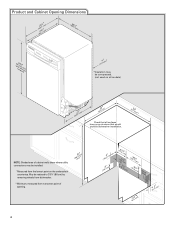
... may be compressed. (not used on all models) (532.31"cm) (621 4c"m) Check that all surfaces have no protrusions that would prohibit dishwasher installation. (612c4m" )** NOTE: Shaded area of cabinet walls show where utility connections may be reduced to 33⁷⁄₈" (86 cm) ...by removing wheels from dishwasher. **Minimum, measured from the lowest point on the underside of opening. (86m.344inc"*m) 4 (10.42"cm) (7.63"cm) (17.2 cm) (4.4 cm) ...
... may be compressed. (not used on all models) (532.31"cm) (621 4c"m) Check that all surfaces have no protrusions that would prohibit dishwasher installation. (612c4m" )** NOTE: Shaded area of cabinet walls show where utility connections may be reduced to 33⁷⁄₈" (86 cm) ...by removing wheels from dishwasher. **Minimum, measured from the lowest point on the underside of opening. (86m.344inc"*m) 4 (10.42"cm) (7.63"cm) (17.2 cm) (4.4 cm) ...
Installation Instructions
Page 5
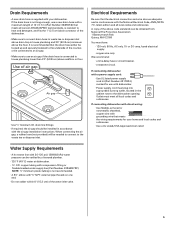
...supply line (Part Number 4396897RP) NOTE: ¹⁄₂" minimum plastic tubing is not recommended. • A 90° elbow with dishwasher. • Power supply cord must meet all local codes and ordinances. Outlet must plug into a grounded 3 prong outlet, located in conformance.... 5 Electrical Requirements Be sure that the electrical connection and wire size are adequate and in the cabinet next to the dishwasher opening. If connecting dishwasher with direct wiring: • Use flexible, armored or nonmetallic sheathed, copper wire with your home and local codes and ...
...supply line (Part Number 4396897RP) NOTE: ¹⁄₂" minimum plastic tubing is not recommended. • A 90° elbow with dishwasher. • Power supply cord must meet all local codes and ordinances. Outlet must plug into a grounded 3 prong outlet, located in conformance.... 5 Electrical Requirements Be sure that the electrical connection and wire size are adequate and in the cabinet next to the dishwasher opening. If connecting dishwasher with direct wiring: • Use flexible, armored or nonmetallic sheathed, copper wire with your home and local codes and ...

Installation Instructions
Page 6
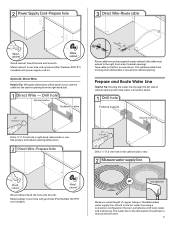
INSTALLATION INSTRUCTIONS Electrical Shock Hazard Disconnect electrical power at the fuse box or circuit breaker box before installing dishwasher. Yes-Follow instructions in cabinet side or rear. 6 See product and cabinet opening . 1 Power Supply Cord-Drill hole Optional loactaiotinon ... can result in death or electrical shock. 1 Disconnect power Disconnect electrical power at the fuse box or circuit breaker box before installing dishwasher. 2 3 Do you use? Prepare Cabinet Opening-New Utilities Prepare and route the electrical supply What type of electrical connection will you...
INSTALLATION INSTRUCTIONS Electrical Shock Hazard Disconnect electrical power at the fuse box or circuit breaker box before installing dishwasher. Yes-Follow instructions in cabinet side or rear. 6 See product and cabinet opening . 1 Power Supply Cord-Drill hole Optional loactaiotinon ... can result in death or electrical shock. 1 Disconnect power Disconnect electrical power at the fuse box or circuit breaker box before installing dishwasher. 2 3 Do you use? Prepare Cabinet Opening-New Utilities Prepare and route the electrical supply What type of electrical connection will you...
Installation Instructions
Page 7
...of cabinet opening . Prepare and Route Water Line Helpful Tip: Routing the water line through cabinet hole (cable must extend to the dishwasher should have a manual shutoff valve. 7 2 Power Supply Cord-Prepare hole 3 Direct Wire-Route cable Wood cabinet Metal cabinet Wood cabinet...: Sand the hole until smooth. Option B, Direct Wire: Helpful Tip: Wiring the dishwasher will be easier if you route the cable into cabinet opening will keep cable from moving when dishwasher is in area shown. Drill hole Optional location PPrreferrreedd lolocactaitoionn (1.9 cm) Drill a &#...
...of cabinet opening . Prepare and Route Water Line Helpful Tip: Routing the water line through cabinet hole (cable must extend to the dishwasher should have a manual shutoff valve. 7 2 Power Supply Cord-Prepare hole 3 Direct Wire-Route cable Wood cabinet Metal cabinet Wood cabinet...: Sand the hole until smooth. Option B, Direct Wire: Helpful Tip: Wiring the dishwasher will be easier if you route the cable into cabinet opening will keep cable from moving when dishwasher is in area shown. Drill hole Optional location PPrreferrreedd lolocactaitoionn (1.9 cm) Drill a &#...

Installation Instructions
Page 8
... line so that the ³⁄₄" connection is required. 1 Drill hole Slowly turn water shutoff valve to the front center of the dishwasher. 4 Flush water supply line Connect the ³⁄₈" compression fitting to the water supply line prior to installing the unit into the ... using ⁵⁄₈" open ended wrench or adjustable wrench. NOTE: Do not use a new drain hose. Attach such that it does not touch the dishwasher base, frame or motor. 8 1¹⁄₂" (3.8 cm) If needed, drill a 1¹⁄₂" (3.8 cm) diameter hole in cabinet wall or ...
... line so that the ³⁄₄" connection is required. 1 Drill hole Slowly turn water shutoff valve to the front center of the dishwasher. 4 Flush water supply line Connect the ³⁄₈" compression fitting to the water supply line prior to installing the unit into the ... using ⁵⁄₈" open ended wrench or adjustable wrench. NOTE: Do not use a new drain hose. Attach such that it does not touch the dishwasher base, frame or motor. 8 1¹⁄₂" (3.8 cm) If needed, drill a 1¹⁄₂" (3.8 cm) diameter hole in cabinet wall or ...

Installation Instructions
Page 9
... one of the disposer or a waste tee must be made before the drain trap and at least 20" (50.8 cm) above the floor where the dishwasher will be installed. Use a rubber hose (not provided) with large 4 silver drain hose clamp (provided). 3 Connect drain hose Connect drain hose to waste tee and...
... one of the disposer or a waste tee must be made before the drain trap and at least 20" (50.8 cm) above the floor where the dishwasher will be installed. Use a rubber hose (not provided) with large 4 silver drain hose clamp (provided). 3 Connect drain hose Connect drain hose to waste tee and...


