Installation Instructions
Page 2
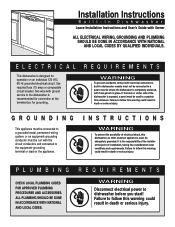
... CODES BY QUALIFIED INDIVIDUALS. If the back or either side of the dishwasher is exposed, a panel must be connected to a power source unless the dishwasher is the responsibility of electrical shock, this warning could result in death or serious injury. It is completely enclosed, with the circuit conductors and connected to dishwasher before you start! Installation Instructions Built-In Dishwasher Leave Installation Instructions and User's Guide with ground service...
... CODES BY QUALIFIED INDIVIDUALS. If the back or either side of the dishwasher is exposed, a panel must be connected to a power source unless the dishwasher is the responsibility of electrical shock, this warning could result in death or serious injury. It is completely enclosed, with the circuit conductors and connected to dishwasher before you start! Installation Instructions Built-In Dishwasher Leave Installation Instructions and User's Guide with ground service...
Use and Care Manual
Page 1
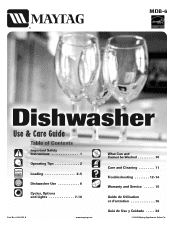
MDB-6 Use & Care Guide Table of Contents Important Safety Instructions 1 Operating Tips 2 Loading 2-5 Dishwasher Use 6 Cycles, Options and Lights 7-10 Part No. 6 920183 A www.maytag.com What Can and Cannot be Washed 10 Care and Cleaning 11 Troubleshooting 12-14 Warranty and Service 15 Guide de Utilisation et d'entretien 16 Guiá de Uso y Cuidado . . . . . 32 ©2005 Maytag Appliances Sales Co.
MDB-6 Use & Care Guide Table of Contents Important Safety Instructions 1 Operating Tips 2 Loading 2-5 Dishwasher Use 6 Cycles, Options and Lights 7-10 Part No. 6 920183 A www.maytag.com What Can and Cannot be Washed 10 Care and Cleaning 11 Troubleshooting 12-14 Warranty and Service 15 Guide de Utilisation et d'entretien 16 Guiá de Uso y Cuidado . . . . . 32 ©2005 Maytag Appliances Sales Co.
Use and Care Manual
Page 2
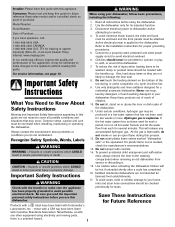
... the dishwasher. Connect to a properly rated, protected and sized power supply circuit to Know About children. 10. Use only detergents and rinse additives designed for proper grounding procedures. 5. This will be hot. 9. For plastic items not so marked, WARNING WARNING - WARNING 17. Model Number When using electricity and moving parts, there is flammable, do not understand. Hydrogen gas is applied to cover all instructions before electrical power is...
... the dishwasher. Connect to a properly rated, protected and sized power supply circuit to Know About children. 10. Use only detergents and rinse additives designed for proper grounding procedures. 5. This will be hot. 9. For plastic items not so marked, WARNING WARNING - WARNING 17. Model Number When using electricity and moving parts, there is flammable, do not understand. Hydrogen gas is applied to cover all instructions before electrical power is...
Use and Care Manual
Page 3
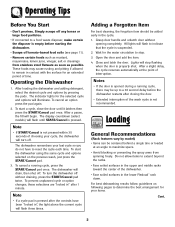
... current cycle will flash to reset the cycle each time. To prevent unplanned cycle or option changes, these selections are "locked in the upper and middle racks toward the center of interruption. For best dishwashing results follow guidelines on the previous wash, just press the START/Cancel pad. 3. Close and latch the door. All lights will flash three times. To cancel an option press the pad again. 2. After a slight delay, the cycle resumes...
... current cycle will flash to reset the cycle each time. To prevent unplanned cycle or option changes, these selections are "locked in the upper and middle racks toward the center of interruption. For best dishwashing results follow guidelines on the previous wash, just press the START/Cancel pad. 3. Close and latch the door. All lights will flash three times. To cancel an option press the pad again. 2. After a slight delay, the cycle resumes...
Use and Care Manual
Page 4
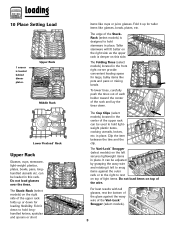
... be adjusted by grasping the wavy wire and rotating it up or down . For best results with tall glasses, rest the bottom of the wire. Fold it down to rest on top of light items. Do not load items on this rack. The Folding Tines (select models) located in this side. Upper Rack Middle Rack Lower Flexload™ Rack Upper Rack Glasses, cups, stemware, light-weight...
... be adjusted by grasping the wavy wire and rotating it up or down . For best results with tall glasses, rest the bottom of the wire. Fold it down to rest on top of light items. Do not load items on this rack. The Folding Tines (select models) located in this side. Upper Rack Middle Rack Lower Flexload™ Rack Upper Rack Glasses, cups, stemware, light-weight...

Use and Care Manual
Page 5
... 5). Auxiliary Basket (select models) Use this supplemental basket in this rack. This could block the wash arm. 4 When deeper dishes or pots and pans are not needed to avoid nesting. Unlock baskets as a canner on the lower Flexload™ rack, the middle rack can be loaded in the lower rack. Loading Middle Rack A variety of the silverware basket provides convenient loading space for large, bulky items like casserole dishes, water pitchers, pots...
... 5). Auxiliary Basket (select models) Use this supplemental basket in this rack. This could block the wash arm. 4 When deeper dishes or pots and pans are not needed to avoid nesting. Unlock baskets as a canner on the lower Flexload™ rack, the middle rack can be loaded in the lower rack. Loading Middle Rack A variety of the silverware basket provides convenient loading space for large, bulky items like casserole dishes, water pitchers, pots...
Use and Care Manual
Page 6
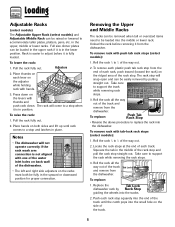
... or lower rack. To replace: Push Tab Rack Stop • Reverse the above procedure to support the rack while removing the rack stops. 3. Take care to replace the rack into the end of the track. 5 Tab Lock To replace: 1. Full size dinner plates can be loaded in the upper rack if it is not aligned with one of the water inlet holes on both be raised or lowered to a stop squarely into the dishwasher. Press...
... or lower rack. To replace: Push Tab Rack Stop • Reverse the above procedure to support the rack while removing the rack stops. 3. Take care to replace the rack into the end of the track. 5 Tab Lock To replace: 1. Full size dinner plates can be loaded in the upper rack if it is not aligned with one of the water inlet holes on both be raised or lowered to a stop squarely into the dishwasher. Press...
Use and Care Manual
Page 7
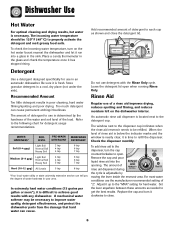
... dispenser. Add recommended amount of rinse aid is below the indicator marks and the window is nearly clear, it up to close the detergent lid. Adjust it is difficult to the following chart for detergent usage recommendations. Replace the cap and turn on the dishwasher interior. Place a candy thermometer in poor cleaning, hard water filming/spotting and poor drying. Detergent Use a detergent designed specifically for hard water. Store granular detergent in an automatic dishwasher...
... dispenser. Add recommended amount of rinse aid is below the indicator marks and the window is nearly clear, it up to close the detergent lid. Adjust it is difficult to the following chart for detergent usage recommendations. Replace the cap and turn on the dishwasher interior. Place a candy thermometer in poor cleaning, hard water filming/spotting and poor drying. Detergent Use a detergent designed specifically for hard water. Store granular detergent in an automatic dishwasher...
Use and Care Manual
Page 8
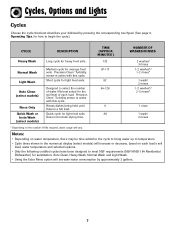
... 2, Operating Tips, for sanitization: Auto Clean, Heavy Wash, Normal Wash and Light Wash. • Using the Extra Rinse option will increase water consumption by approximately 2 gallons. 7 Designed to begin the cycle). Does not include drying time. 132 97-117 82 94-128 9 38 2 washes/ 3 rinses 1-2 washes*/ 1-2 rinses* 1 wash/ 2 rinses 1-2 washes*/ 2-3 rinses* 1 rinse 1 wash/ 2 rinses * Depending on each load. Precision Clean™ Turbidity sensor is active with this cycle. Quick cycle for the soil level of fills required, water usage will vary. CYCLE DESCRIPTION TIME (APPROX...
... 2, Operating Tips, for sanitization: Auto Clean, Heavy Wash, Normal Wash and Light Wash. • Using the Extra Rinse option will increase water consumption by approximately 2 gallons. 7 Designed to begin the cycle). Does not include drying time. 132 97-117 82 94-128 9 38 2 washes/ 3 rinses 1-2 washes*/ 1-2 rinses* 1 wash/ 2 rinses 1-2 washes*/ 2-3 rinses* 1 rinse 1 wash/ 2 rinses * Depending on each load. Precision Clean™ Turbidity sensor is active with this cycle. Quick cycle for the soil level of fills required, water usage will vary. CYCLE DESCRIPTION TIME (APPROX...
Use and Care Manual
Page 9
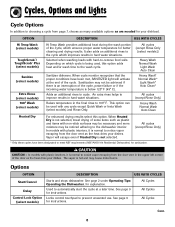
... not selected, towel drying of the cycle, which ensures proper water temperature for better cleaning and drying results. Options OPTION Start/Cancel Delay Control Lock Option (select models) DESCRIPTION USE WITH CYCLES Starts and stops dishwasher. See page 9 for explanation. OPTION DESCRIPTION USE WITH CYCLES Hi Temp Wash (select models) ToughScrub™/ ToughScrub™ Plus (select models) Sanitize (select models) Extra Rinse (select models) 160° Wash (select models) Hi Temp Wash provides additional heat during the wash portion of some...
... not selected, towel drying of the cycle, which ensures proper water temperature for better cleaning and drying results. Options OPTION Start/Cancel Delay Control Lock Option (select models) DESCRIPTION USE WITH CYCLES Starts and stops dishwasher. See page 9 for explanation. OPTION DESCRIPTION USE WITH CYCLES Hi Temp Wash (select models) ToughScrub™/ ToughScrub™ Plus (select models) Sanitize (select models) Extra Rinse (select models) 160° Wash (select models) Hi Temp Wash provides additional heat during the wash portion of some...
Use and Care Manual
Page 10
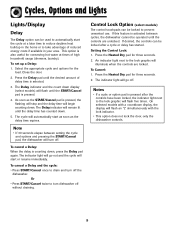
... be operated until the START/Cancel pad is counting down . Notes • If a cycle or option pad is pressed after a cycle or delay has started. Close the door. 2. Press the Heated Dry pad for three seconds. 2. Cycles, Options and Lights Lights/Display Delay The Delay option can be used to automatically start the cycle at times of reduced energy costs if available in the home or to the lock graphic will flash five times. The Delay indicator...
... be operated until the START/Cancel pad is counting down . Notes • If a cycle or option pad is pressed after a cycle or delay has started. Close the door. 2. Press the Heated Dry pad for three seconds. 2. Cycles, Options and Lights Lights/Display Delay The Delay option can be used to automatically start the cycle at times of reduced energy costs if available in the home or to the lock graphic will flash five times. The Delay indicator...

Use and Care Manual
Page 11
... Will discolor. Yes Stainless Steel Run a Rinse Only cycle if not washing immediately. Sterling Silver or Silverplate No, if has commercial "darkening". Wooden Items No Wood may discolor. Cycles, Options and Lights Lights/Display (select models) INDICATOR DESCRIPTION TIME REMAINING Display Shows approximate minutes remaining in your dishwasher. The symbol "2H" will appear when cycle time is completed. WASHING Light (select models) HEATING DELAY Light (select models) Illuminates during the entire dry period and goes...
... Will discolor. Yes Stainless Steel Run a Rinse Only cycle if not washing immediately. Sterling Silver or Silverplate No, if has commercial "darkening". Wooden Items No Wood may discolor. Cycles, Options and Lights Lights/Display (select models) INDICATOR DESCRIPTION TIME REMAINING Display Shows approximate minutes remaining in your dishwasher. The symbol "2H" will appear when cycle time is completed. WASHING Light (select models) HEATING DELAY Light (select models) Illuminates during the entire dry period and goes...
Use and Care Manual
Page 12
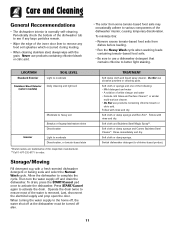
... the electrical supply and prop open the door. Soft cloth or sponge and one of the following: • Mild detergent and water • A solution of the dishwasher interior, causing temporary discoloration. Follow with rinse and dry. Care and Cleaning General Recommendations • The dishwasher interior is removed. Never use products containing chlorine bleach or citric acid. • The color from dishes before loading. • Run the Heavy Wash cycle when washing loads containing tomato...
... the electrical supply and prop open the door. Soft cloth or sponge and one of the following: • Mild detergent and water • A solution of the dishwasher interior, causing temporary discoloration. Follow with rinse and dry. Care and Cleaning General Recommendations • The dishwasher interior is removed. Never use products containing chlorine bleach or citric acid. • The color from dishes before loading. • Run the Heavy Wash cycle when washing loads containing tomato...
Use and Care Manual
Page 13
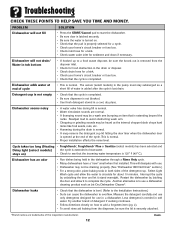
... removed from the dispenser, be heard as Jet-Dry Dishwasher Cleaner*. Less detergent is normal. • Proper installation affects the noise level. This is needed in the pump must stay submerged so a short fill of cycle Detergent cup is not empty • This is completed. Cycle takes too long (Heating • ToughScrub™, ToughScrub™ Plus or Sanitize (select models) has been selected and Delay light [select models] the cycle is extended to start...
... removed from the dispenser, be heard as Jet-Dry Dishwasher Cleaner*. Less detergent is normal. • Proper installation affects the noise level. This is needed in the pump must stay submerged so a short fill of cycle Detergent cup is not empty • This is completed. Cycle takes too long (Heating • ToughScrub™, ToughScrub™ Plus or Sanitize (select models) has been selected and Delay light [select models] the cycle is extended to start...
Use and Care Manual
Page 14
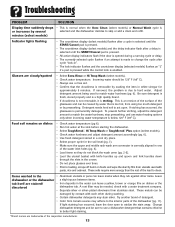
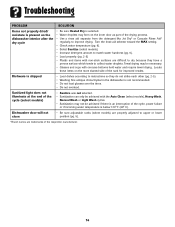
... Auto Clean (select models) or Normal Wash cycle is or increases by prewashing. minutes (select models) Indicator lights flashing • The countdown display (select models) flashes after a cycle is selected until the START/Cancel pad is pressed. • The countdown display (select models) and the delay indicator flash after a delay is selected until the START/Cancel pad is pressed. • All active display indicators flash if the door is opened during washing. • Certain dishwasher detergents may adhere to the interior parts of the water inlet...
... Auto Clean (select models) or Normal Wash cycle is or increases by prewashing. minutes (select models) Indicator lights flashing • The countdown display (select models) flashes after a cycle is selected until the START/Cancel pad is pressed. • The countdown display (select models) and the delay indicator flash after a delay is selected until the START/Cancel pad is pressed. • All active display indicators flash if the door is opened during washing. • Certain dishwasher detergents may adhere to the interior parts of the water inlet...
Use and Care Manual
Page 15
... rinse aid selector toward the MAX setting. • Check water temperature (pg. 6). • Select Sanitize (select models). • Increase detergent amount to collect water droplets. Sanitized light does not illuminate at the end of the cycle (select models) • Sanitize was not selected. • Sanitization can only be achieved with the Auto Clean (select models), Heavy Wash, Normal Wash or Light Wash cycles. • Sanitization may be achieved if there is chipped • Load dishes according to instructions...
... rinse aid selector toward the MAX setting. • Check water temperature (pg. 6). • Select Sanitize (select models). • Increase detergent amount to collect water droplets. Sanitized light does not illuminate at the end of the cycle (select models) • Sanitize was not selected. • Sanitization can only be achieved with the Auto Clean (select models), Heavy Wash, Normal Wash or Light Wash cycles. • Sanitization may be achieved if there is chipped • Load dishes according to instructions...
Use and Care Manual
Page 16
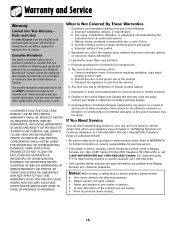
... authorized servicer. Model number and serial number; A clear description of these warranties. CUSTOMER'S SOLE AND EXCLUSIVE REMEDY UNDER THIS LIMITED WARRANTY SHALL BE PRODUCT REPAIR AS PROVIDED HEREIN. Improper installation, delivery, or maintenance. Correct installation errors. customers using TTY for warranty service. • If the dealer or service company cannot resolve the problem, write to Canada. Canadian Residents The above are available from state to refrigerator or freezer product failures. 7. Improper setting...
... authorized servicer. Model number and serial number; A clear description of these warranties. CUSTOMER'S SOLE AND EXCLUSIVE REMEDY UNDER THIS LIMITED WARRANTY SHALL BE PRODUCT REPAIR AS PROVIDED HEREIN. Improper installation, delivery, or maintenance. Correct installation errors. customers using TTY for warranty service. • If the dealer or service company cannot resolve the problem, write to Canada. Canadian Residents The above are available from state to refrigerator or freezer product failures. 7. Improper setting...
Parts List
Page 5
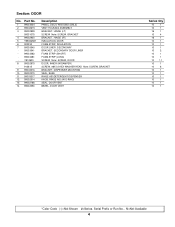
... STRIP (LONG) SCREW Note: SCREW, DOOR DOOR, INNER (W/DAMPER) SCREW, #8X1/2 HEX WASHER HEAD Note: SCREW, BRACKET BRACKET, DISPENSER MOUNTING SEAL, BASE RINSE AID/DETERGENT DISPENSER KNOB, RINSE AID (W/O-RING) SEAL, DOOR VENT BEZEL, DOOR VENT Series Qty 10 1 10 1 16 1 10 4 16 1 10 1 10 1 10 1 10 2 10 1 10 1 10 11 10 1 10 6 10 1 10 1 10 1 10 1 10 1 10 1 *Color Code (-)=Not Shown #=Series, Serial Prefix or Run No., N=Not Available 4 Section: DOOR No. Part No. 1 99003534...
... STRIP (LONG) SCREW Note: SCREW, DOOR DOOR, INNER (W/DAMPER) SCREW, #8X1/2 HEX WASHER HEAD Note: SCREW, BRACKET BRACKET, DISPENSER MOUNTING SEAL, BASE RINSE AID/DETERGENT DISPENSER KNOB, RINSE AID (W/O-RING) SEAL, DOOR VENT BEZEL, DOOR VENT Series Qty 10 1 10 1 16 1 10 4 16 1 10 1 10 1 10 1 10 2 10 1 10 1 10 11 10 1 10 6 10 1 10 1 10 1 10 1 10 1 10 1 *Color Code (-)=Not Shown #=Series, Serial Prefix or Run No., N=Not Available 4 Section: DOOR No. Part No. 1 99003534...
Parts List
Page 11
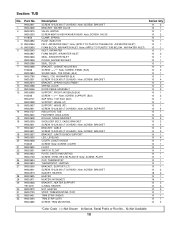
..., VALVE CLAMP, SPRING HOSE, INJECTOR FELT, AIR/WATER INLET Note: (APPLY TO PLASTIC TUB BELOW AIR WATER INLET) FOAM BLOCK, AIR/WATER INLET Note: (APPLY TO PLASTIC TUB BELOW AIR WATER INLET) INLET, AIR/WATER FOAM INSERT, AIR/WATER INLET SEAL, AIR/WATER INLET COVER, AIR/WATER INLET SEAL, DOOR BRACKET, CABINET MOUNTING SCREW --++*** Note: SCREW, PANEL (BLK) SOUND SEAL, TOE PANEL (BLK) PANEL, TOE (W/DAMPER-BLK) SCREW 10-32X.400 (T-20 HEAD) Note: SCREW, BRACKET BRACKET, SPRING ADJUSTMENT SPRING, DOOR DOOR CABLE ASSEMBLY SUPPORT, FRONT (W/SEALS)(BLK) SCREW --++*** Note: SCREW, SUPPORT (BLK) GAP SEAL...
..., VALVE CLAMP, SPRING HOSE, INJECTOR FELT, AIR/WATER INLET Note: (APPLY TO PLASTIC TUB BELOW AIR WATER INLET) FOAM BLOCK, AIR/WATER INLET Note: (APPLY TO PLASTIC TUB BELOW AIR WATER INLET) INLET, AIR/WATER FOAM INSERT, AIR/WATER INLET SEAL, AIR/WATER INLET COVER, AIR/WATER INLET SEAL, DOOR BRACKET, CABINET MOUNTING SCREW --++*** Note: SCREW, PANEL (BLK) SOUND SEAL, TOE PANEL (BLK) PANEL, TOE (W/DAMPER-BLK) SCREW 10-32X.400 (T-20 HEAD) Note: SCREW, BRACKET BRACKET, SPRING ADJUSTMENT SPRING, DOOR DOOR CABLE ASSEMBLY SUPPORT, FRONT (W/SEALS)(BLK) SCREW --++*** Note: SCREW, SUPPORT (BLK) GAP SEAL...

Parts List
Page 15
..., MOTOR DRAIN PUMP ASSEMBLY FLAPPER, DRAIN PUMP VALVE FLAPPER, DRAIN PUMP INLET O-RING, DRAIN PUMP BRKT, DRAIN PUMP (W/GROMMET) SCREW, DRAIN PUMP MOUNTING CLAMP, DRAIN HOSE (1-3/8") HOSE, DRAIN Series Qty 10 1 10 1 10 2 10 3 10 1 10 1 10 6 10 1 10 1 10 1 10 3 10 1 10 1 10 1 10 1 10 2 10 1 10 1 10 1 10 1 10 1 10 1 10 1 10 1 10 1 10 1 10 1 10 1 10 1 *Color Code (-)=Not Shown #=Series, Serial Prefix or Run No., N=Not Available 14 ORDER SEAL KIT SEPARATELY. Section: PUMP & MOTOR No. Part...
..., MOTOR DRAIN PUMP ASSEMBLY FLAPPER, DRAIN PUMP VALVE FLAPPER, DRAIN PUMP INLET O-RING, DRAIN PUMP BRKT, DRAIN PUMP (W/GROMMET) SCREW, DRAIN PUMP MOUNTING CLAMP, DRAIN HOSE (1-3/8") HOSE, DRAIN Series Qty 10 1 10 1 10 2 10 3 10 1 10 1 10 6 10 1 10 1 10 1 10 3 10 1 10 1 10 1 10 1 10 2 10 1 10 1 10 1 10 1 10 1 10 1 10 1 10 1 10 1 10 1 10 1 10 1 10 1 *Color Code (-)=Not Shown #=Series, Serial Prefix or Run No., N=Not Available 14 ORDER SEAL KIT SEPARATELY. Section: PUMP & MOTOR No. Part...


