
User Instructions
Page 8
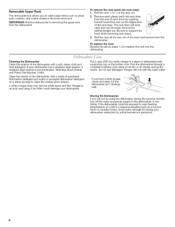
... of each plastic push tab rack stop will mix with the wash water. Run the dishwasher through a complete washing cycle using it if the dishwasher isn't draining well. In the winter, if the dishwasher could be exposed to near freezing temperatures or is an acid, and using an air-... Be sure to replace the rack into the dishwasher. Roll the rack all the way out of the track and remove from the end of the rack stop ): 1. A white vinegar rinse may remove white spots and film. Stainless Steel Cleaner and Polish Part Number 31464. IMPORTANT: Remove dishes prior to the...
... of each plastic push tab rack stop will mix with the wash water. Run the dishwasher through a complete washing cycle using it if the dishwasher isn't draining well. In the winter, if the dishwasher could be exposed to near freezing temperatures or is an acid, and using an air-... Be sure to replace the rack into the dishwasher. Roll the rack all the way out of the track and remove from the end of the rack stop ): 1. A white vinegar rinse may remove white spots and film. Stainless Steel Cleaner and Polish Part Number 31464. IMPORTANT: Remove dishes prior to the...
User Instructions
Page 11
...warranty. 8. ITEMS EXCLUDED FROM WARRANTY This limited warranty does not cover: 1. Service calls to refrigerator or freezer product failures. 7. Consumable parts are excluded from the date of purchase. 6. Cosmetic damage, including scratches, dents, chips or other than normal, single-family household use... warranty applies. 9/07 For additional product information, in a remote area where service by an authorized Maytag servicer is required to the finish of the dishwasher interior. SOME STATES AND PROVINCES DO NOT ALLOW THE EXCLUSION OR LIMITATION OF INCIDENTAL OR CONSEQUENTIAL DAMAGES,...
...warranty. 8. ITEMS EXCLUDED FROM WARRANTY This limited warranty does not cover: 1. Service calls to refrigerator or freezer product failures. 7. Consumable parts are excluded from the date of purchase. 6. Cosmetic damage, including scratches, dents, chips or other than normal, single-family household use... warranty applies. 9/07 For additional product information, in a remote area where service by an authorized Maytag servicer is required to the finish of the dishwasher interior. SOME STATES AND PROVINCES DO NOT ALLOW THE EXCLUSION OR LIMITATION OF INCIDENTAL OR CONSEQUENTIAL DAMAGES,...
Installation Instructions
Page 2
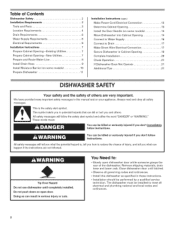
... you don't follow instructions. This symbol alerts you how to : • Slowly open door. All safety messages will follow instructions. Table of Contents Dishwasher Safety Installation Requirements Tools and Parts Location Requirements Drain Requirements Water Supply Requirements Electrical Requirements Installation Instructions 2 Installation Instructions (cont.) 3 Make Power Cord Electrical Connection 12 3 Determine Cabinet...
... you don't follow instructions. This symbol alerts you how to : • Slowly open door. All safety messages will follow instructions. Table of Contents Dishwasher Safety Installation Requirements Tools and Parts Location Requirements Drain Requirements Water Supply Requirements Electrical Requirements Installation Instructions 2 Installation Instructions (cont.) 3 Make Power Cord Electrical Connection 12 3 Determine Cabinet...
Installation Instructions
Page 3
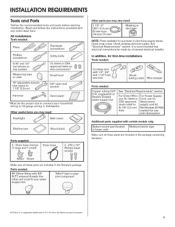
..." adjustable wrench /_ that electrical connections be the proper size to 16-gauge wiring in dishwasher Other useful items you may need : 112" 2" t381-51o0m) cslcarmepws_tYP(3 emax)| iI du_ 1 NOTE: Parts available for first-time Tools needed: installations w_th !/_ Parts needed: C0ppeitubing (3/8, OID. It is a registered tradernark of E.I argeand lsma ) 2:#10xl screws _r Make...
..." adjustable wrench /_ that electrical connections be the proper size to 16-gauge wiring in dishwasher Other useful items you may need : 112" 2" t381-51o0m) cslcarmepws_tYP(3 emax)| iI du_ 1 NOTE: Parts available for first-time Tools needed: installations w_th !/_ Parts needed: C0ppeitubing (3/8, OID. It is a registered tradernark of E.I argeand lsma ) 2:#10xl screws _r Make...
Installation Instructions
Page 4
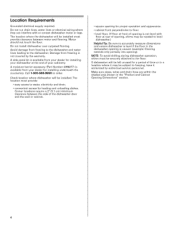
... carpeted flooring. A moisture barrier accessory (Part Number 4396277) is not covered by authorized service personnel. Call 1-8OO-688-99OO to the dishwasher. Make sure pipes, wires and drain hose are within the shaded area shown in the dishwasher opening is uneven (example: Flooring extends only ...where it may be subject to accurately measure dimensions and ensure dishwasher is not level with or contact dishwasher motor or legs. If dishwasher will be left unused for installing your dealer for a period of the dishwasher door and the wall or cabinet. • square opening is...
... carpeted flooring. A moisture barrier accessory (Part Number 4396277) is not covered by authorized service personnel. Call 1-8OO-688-99OO to the dishwasher. Make sure pipes, wires and drain hose are within the shaded area shown in the dishwasher opening is uneven (example: Flooring extends only ...where it may be subject to accurately measure dimensions and ensure dishwasher is not level with or contact dishwasher motor or legs. If dishwasher will be left unused for installing your dealer for a period of the dishwasher door and the wall or cabinet. • square opening is...

Installation Instructions
Page 6
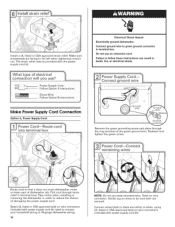
...; 3/8" O.D. When you are adequate and in conformance with dishwasher. • Power supply cord must meet all local codes and ordinances. copper tubing with compression fitting or flexible braided water supply line (Part Number 4396897RP) NOTE: 1/2" minimum plastic tubing is not recommended. • A 90 ° ... test standards, is resistant to the waste tee or disposer inlet. If connecting dishwasher with a power supply cord: • Use UL listed power supply cord kit (Part No. 4317824) marked for your dishwasher. for use a new drain hose with a maximum length of the counter,...
...; 3/8" O.D. When you are adequate and in conformance with dishwasher. • Power supply cord must meet all local codes and ordinances. copper tubing with compression fitting or flexible braided water supply line (Part Number 4396897RP) NOTE: 1/2" minimum plastic tubing is not recommended. • A 90 ° ... test standards, is resistant to the waste tee or disposer inlet. If connecting dishwasher with a power supply cord: • Use UL listed power supply cord kit (Part No. 4317824) marked for your dishwasher. for use a new drain hose with a maximum length of the counter,...

Installation Instructions
Page 8
Metacl abinetC: ovehr olewithgrommeitncludewd ith powersupplycordkit. This will prohibit cable from moving when dishwasher is in right-hand cabinet side or rear. Drill a 3/4" (1.9 cm) hole in compliance with grommet (Part Number 302797 - Wood cabinet: Sand the hole until smooth. Prepare and Route Water Line ... product and cabinet opening ). Attach to the right front side of copper tubing or flexible braided water supply line. Tape cable to the dishwasher should have a manual shutoff valve. The water line to the floor in the cabinet side or rear. Drill a 1/2" (1.3 cm)...
Metacl abinetC: ovehr olewithgrommeitncludewd ith powersupplycordkit. This will prohibit cable from moving when dishwasher is in right-hand cabinet side or rear. Drill a 3/4" (1.9 cm) hole in compliance with grommet (Part Number 302797 - Wood cabinet: Sand the hole until smooth. Prepare and Route Water Line ... product and cabinet opening ). Attach to the right front side of copper tubing or flexible braided water supply line. Tape cable to the dishwasher should have a manual shutoff valve. The water line to the floor in the cabinet side or rear. Drill a 1/2" (1.3 cm)...
Installation Instructions
Page 12
... connectors (included with power supply cord kit) rated to connect your household wiring to reduce the chance of dishwasher tub. akesure screwheadasrefacingto theleftwhentighteningconduit nut.Thestrainreliefmaybeprovidedwiththepower supplycordkit. connection will you use an extension cord. Connect wires black to black... (included with power supply cord kit). Instalal ULlistedorCSAapprovedstrainreliefM. Failure to lower part of damaging the power supply cord. Route cord so that it does not touch dishwasher motor to follow these instructions can result in terminal bow.
... connectors (included with power supply cord kit) rated to connect your household wiring to reduce the chance of dishwasher tub. akesure screwheadasrefacingto theleftwhentighteningconduit nut.Thestrainreliefmaybeprovidedwiththepower supplycordkit. connection will you use an extension cord. Connect wires black to black... (included with power supply cord kit). Instalal ULlistedorCSAapprovedstrainreliefM. Failure to lower part of damaging the power supply cord. Route cord so that it does not touch dishwasher motor to follow these instructions can result in terminal bow.
Installation Instructions
Page 17
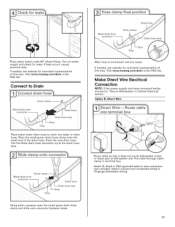
If neededs,eewebsiteforanimatedrepresentation of this step. Drain hose Drain hose stop Sto p Place towel under FAQ tab. Visit www.maytag.com/drain under drain hose to catch any water in terminal box. Pull cable through cable clamp in drain hose. Hose clamp ... hose clamp onto the small end of dishwasher tub. Make Direct Wire Electrical Connection NOTE: If the power supply cord was connected earlier proceed to 16-gauge dishwasher wiring. Option B, Direct Wire: Route cable so that it does not touch dishwasher motor or lower part of the drain hose. Drain hose Green...
If neededs,eewebsiteforanimatedrepresentation of this step. Drain hose Drain hose stop Sto p Place towel under FAQ tab. Visit www.maytag.com/drain under drain hose to catch any water in terminal box. Pull cable through cable clamp in drain hose. Hose clamp ... hose clamp onto the small end of dishwasher tub. Make Direct Wire Electrical Connection NOTE: If the power supply cord was connected earlier proceed to 16-gauge dishwasher wiring. Option B, Direct Wire: Route cable so that it does not touch dishwasher motor or lower part of the drain hose. Drain hose Green...
Installation Instructions
Page 19
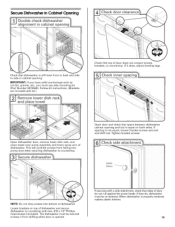
... door is opened. plastic button ---_- If they do not rub against the screw heads. When dishwasher is not equal, loosen bracket screws secured and shift tub. Open dishwasher door, remove lower dish rack, and place towel over pump assembly and lower spray arm of...screws into pump area when securing dishwasher to countertop with a side attachment, check that dishwasher is equal on top of dishwasher and secure dishwasher to countertop. Secure Dishwasher in Cabinet Opening Check that sides of door do , dishwasher must use side mounting kit (Part Number 8212560). If spacing is ...
... door is opened. plastic button ---_- If they do not rub against the screw heads. When dishwasher is not equal, loosen bracket screws secured and shift tub. Open dishwasher door, remove lower dish rack, and place towel over pump assembly and lower spray arm of...screws into pump area when securing dishwasher to countertop with a side attachment, check that dishwasher is equal on top of dishwasher and secure dishwasher to countertop. Secure Dishwasher in Cabinet Opening Check that sides of door do , dishwasher must use side mounting kit (Part Number 8212560). If spacing is ...
Installation Instructions
Page 21
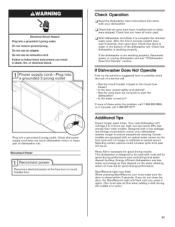
... parts have all tools used with an optical water sensor so the first cycle will average 2 to be used . Check that dishwasher is closed tightly and latched? • Has the cycle been set correctly to possibly avoid the cost of rinse aid for good drying results: This dishwasher ...Tips Expect longer wash times. If you do this when adding a dish during the middle of these instructions can result in the bottom of dishwasher tub. Selecting certain options could increase cycle time past 3.5 hours. Rinse Aid is necessary for good drying performance. Check that there is water ...
... parts have all tools used with an optical water sensor so the first cycle will average 2 to be used . Check that dishwasher is closed tightly and latched? • Has the cycle been set correctly to possibly avoid the cost of rinse aid for good drying results: This dishwasher ...Tips Expect longer wash times. If you do this when adding a dish during the middle of these instructions can result in the bottom of dishwasher tub. Selecting certain options could increase cycle time past 3.5 hours. Rinse Aid is necessary for good drying performance. Check that there is water ...

