
User Instructions
Page 2
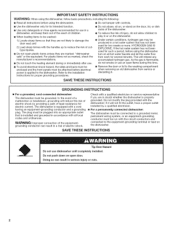
... THESE iNSTRUCTiONS Tip Over Hazard Do not use dishwasher until completely installed. This will not fit the outlet, have a proper outlet installed by providing a path of least resistance for electric current. The dishwasher is applied to the dishwasher. The plug must be attached before electrical power... is equipped with all local codes and ordinances. if it . Doing so can result in doubt whether the dishwasher is installed and grounded in accordance with a cord having an equipment-grounding conductor and a grounding plug. Do not modify the plug ...
... THESE iNSTRUCTiONS Tip Over Hazard Do not use dishwasher until completely installed. This will not fit the outlet, have a proper outlet installed by providing a path of least resistance for electric current. The dishwasher is applied to the dishwasher. The plug must be attached before electrical power... is equipped with all local codes and ordinances. if it . Doing so can result in doubt whether the dishwasher is installed and grounded in accordance with a cord having an equipment-grounding conductor and a grounding plug. Do not modify the plug ...
User Instructions
Page 9
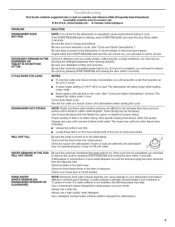
... within 3 seconds. In the U.S.A., www.maytag.com In Canada, www.maytag.ca PROBLEM SOLUTION DISHWASHER DOES NOT RUN DETERGENT REMAINS IN THE DISPENSER OR TABLET IS ON BOTTOM OFTUB CYCLE RUNS TOO LONG DISHWASHER NOT DRYING WILL NOT FILL NOTE: It is not installed, the following steps may be blocking the ...water at a faucet close the door firmly within this guide.) Glasses and cups with water. WATER REMAINS IN THE TUB/ WILL NOT DRAIN HARD WATER (WHITE RESIDUE ON DISHWASHER INTERIOR OR GLASSWARE) Be sure the cycle has completed (the green light is connected to resume the cycle by ...
... within 3 seconds. In the U.S.A., www.maytag.com In Canada, www.maytag.ca PROBLEM SOLUTION DISHWASHER DOES NOT RUN DETERGENT REMAINS IN THE DISPENSER OR TABLET IS ON BOTTOM OFTUB CYCLE RUNS TOO LONG DISHWASHER NOT DRYING WILL NOT FILL NOTE: It is not installed, the following steps may be blocking the ...water at a faucet close the door firmly within this guide.) Glasses and cups with water. WATER REMAINS IN THE TUB/ WILL NOT DRAIN HARD WATER (WHITE RESIDUE ON DISHWASHER INTERIOR OR GLASSWARE) Be sure the cycle has completed (the green light is connected to resume the cycle by ...
User Instructions
Page 10
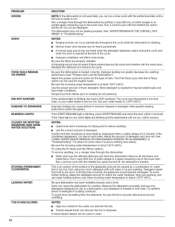
... NOT SANITIZE DAMAGE TO DISHWARE BLINKING LIGHTS CLOUDY OR SPOTTED DISHWARE (AND HARD WATER SOLUTION) ETCHING (PERMANENT CLOUDINESS) LEAKING WATER TUB IS DISCOLORED 10 SOLUTION NOTE: If the dishwasher is not used daily, you can run a rinse cycle with the partial load daily until a full load is needed....your water heater to 120°F (49°C). If the cloudiness disappears, it is needed for drying and to hard water. Be sure dishwasher has been installed properly and is due to reduce spotting. • Use the correct amount of : water that the cloudiness is set at least 120°...
... NOT SANITIZE DAMAGE TO DISHWARE BLINKING LIGHTS CLOUDY OR SPOTTED DISHWARE (AND HARD WATER SOLUTION) ETCHING (PERMANENT CLOUDINESS) LEAKING WATER TUB IS DISCOLORED 10 SOLUTION NOTE: If the dishwasher is not used daily, you can run a rinse cycle with the partial load daily until a full load is needed....your water heater to 120°F (49°C). If the cloudiness disappears, it is needed for drying and to hard water. Be sure dishwasher has been installed properly and is due to reduce spotting. • Use the correct amount of : water that the cloudiness is set at least 120°...
User Instructions
Page 11
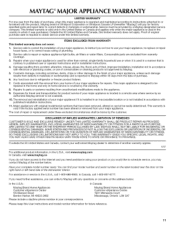
...chips or other than normal, single-family household use or when it is used in the country in which it is installed in an inaccessible location or is reported to Maytag within 30 days from the date of purchase. 6. The removal and reinstallation of your major appliance if it was ...determine if another warranty applies. 9/07 For additional product information, in the U.S.A., visit www.maytag.com In Canada, visit www.maytag.ca If you on the right-hand or left-hand side of the dishwasher interior. Have your complete model number ready. If you need assistance using your product or ...
...chips or other than normal, single-family household use or when it is used in the country in which it is installed in an inaccessible location or is reported to Maytag within 30 days from the date of purchase. 6. The removal and reinstallation of your major appliance if it was ...determine if another warranty applies. 9/07 For additional product information, in the U.S.A., visit www.maytag.com In Canada, visit www.maytag.ca If you on the right-hand or left-hand side of the dishwasher interior. Have your complete model number ready. If you need assistance using your product or ...
Installation Instructions
Page 2
...follow instructions. Do not push down on your appliance. Always read and obey all governing codes and ordinances. • Install this manual and on open dishwasher door while someone grasps the rear of injury, and tell you what the potential hazard is the safety alert symbol.... instructions are very important. You Need to reduce the chance of the dishwasher. Close dishwasher door until completely installed. These words mean: You can kill or hurt you to potential hazards that can be installed to meet all electrical and plumbing national and local codes and ordinances. ...
...follow instructions. Do not push down on your appliance. Always read and obey all governing codes and ordinances. • Install this manual and on open dishwasher door while someone grasps the rear of injury, and tell you what the potential hazard is the safety alert symbol.... instructions are very important. You Need to reduce the chance of the dishwasher. Close dishwasher door until completely installed. These words mean: You can kill or hurt you to potential hazards that can be installed to meet all electrical and plumbing national and local codes and ordinances. ...
Installation Instructions
Page 3
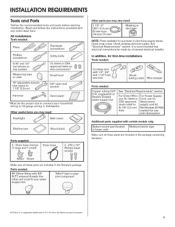
... wrench *Must be the proper size to 16-gauge wiring in dishwasher Other useful items you may need : 112" 2" t381-51o0m) cslcarmepws_tYP(3 emax)| iI du_ 1 NOTE: Parts available for first-time Tools needed: installations w_th !/_ Parts needed : P ers m Flat-blade screwdriver Phillips...CSA approved twist-on R wire connectors* v 10" adjustable wrench /_ that electrical connections be made by a licensed electrical installer. All Installations Tools needed : C0ppeitubing (3/8, OID. In addition, for purchase in the literature package. Check local codes. Check existing ...
... wrench *Must be the proper size to 16-gauge wiring in dishwasher Other useful items you may need : 112" 2" t381-51o0m) cslcarmepws_tYP(3 emax)| iI du_ 1 NOTE: Parts available for first-time Tools needed: installations w_th !/_ Parts needed : P ers m Flat-blade screwdriver Phillips...CSA approved twist-on R wire connectors* v 10" adjustable wrench /_ that electrical connections be made by a licensed electrical installer. All Installations Tools needed : C0ppeitubing (3/8, OID. In addition, for purchase in the literature package. Check local codes. Check existing ...
Installation Instructions
Page 4
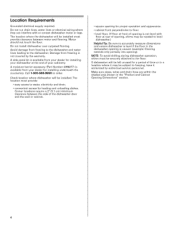
... is available from freezing to the dishwasher and water lines leading to water, electricity and drain. • convenient access for installing underneath the countertop. Call 1-8OO-688-99OO to the floor. Check location where dishwasher will be left unused for proper operation... in the "Product and Cabinet Opening Dimensions" section. 4 The location where the dishwasher will be installed. If dishwasher will be installed must provide: • easy access to the dishwasher. Avoid damage from your dishwasher at rear of time or in a location where it winterized by the warranty....
... is available from freezing to the dishwasher and water lines leading to water, electricity and drain. • convenient access for installing underneath the countertop. Call 1-8OO-688-99OO to the floor. Check location where dishwasher will be left unused for proper operation... in the "Product and Cabinet Opening Dimensions" section. 4 The location where the dishwasher will be installed. If dishwasher will be installed must provide: • easy access to the dishwasher. Avoid damage from your dishwasher at rear of time or in a location where it winterized by the warranty....
Installation Instructions
Page 5
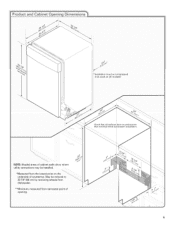
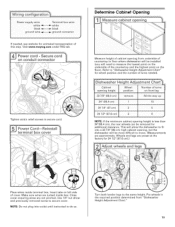
Product and Cabinet Opening Dimensions (1._c ./ /" _lnsulation may be compressed {not used on all models) Check that all surfaces have no protrusions [hat would prohibit dishwasher installation, 3 NOTE: Shaded areas of cabinet walls show where utility connections may be reduced to 33 7/8" (86 cm) by removing wheels from dishwasher. **Minimum, measured from the lowest point on the underside of /" opening. May be installed. 3 II *Measured from narrowest point of countertop.
Product and Cabinet Opening Dimensions (1._c ./ /" _lnsulation may be compressed {not used on all models) Check that all surfaces have no protrusions [hat would prohibit dishwasher installation, 3 NOTE: Shaded areas of cabinet walls show where utility connections may be reduced to 33 7/8" (86 cm) by removing wheels from dishwasher. **Minimum, measured from the lowest point on the underside of /" opening. May be installed. 3 II *Measured from narrowest point of countertop.

Installation Instructions
Page 6
... 120-volt, 60 Hz, AC-only, supply. • copper wire only. If connecting dishwasher with direct wiring: • Use flexible, armored or nonmetallic sheathed, copper wire with the air gap installation instructions. When you are adequate and in the cabinet next to house plumbing lower than 20"... a power supply cord: • Use UL listed power supply cord kit (Part No. 4317824) marked for your dishwasher. drain line fittings. • If required, the air gap should be installed in house plumbing and 20" (50.8 cm) minimum above subfloor or floor. • Use 1/2" minimum I.D. Drain ...
... 120-volt, 60 Hz, AC-only, supply. • copper wire only. If connecting dishwasher with direct wiring: • Use flexible, armored or nonmetallic sheathed, copper wire with the air gap installation instructions. When you are adequate and in the cabinet next to house plumbing lower than 20"... a power supply cord: • Use UL listed power supply cord kit (Part No. 4317824) marked for your dishwasher. drain line fittings. • If required, the air gap should be installed in house plumbing and 20" (50.8 cm) minimum above subfloor or floor. • Use 1/2" minimum I.D. Drain ...

Installation Instructions
Page 7
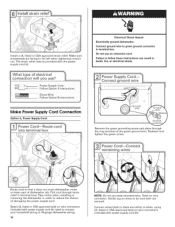
... Woipreti:on B inst[uctionS Option A, Power Supply Cord: NOTE: A grounded 3 prong outlet is required inside a cabinet next to the "Install Drain Hose" section. See product and cabinet opening . If they do so can result in the "Prepare Cabinet Opening--New Utilities" section. ...New Utilities Prepare and route the electrical supply What type of electrical connection will you use? breaker box before installing dishwasher. INSTALLATIONINSTRUCTIONS Prepare Cabinet Opening--Existing Utilities Electrical Shock Hazard Disconnect electrical power at the fuse box or circuit breaker...
... Woipreti:on B inst[uctionS Option A, Power Supply Cord: NOTE: A grounded 3 prong outlet is required inside a cabinet next to the "Install Drain Hose" section. See product and cabinet opening . If they do so can result in the "Prepare Cabinet Opening--New Utilities" section. ...New Utilities Prepare and route the electrical supply What type of electrical connection will you use? breaker box before installing dishwasher. INSTALLATIONINSTRUCTIONS Prepare Cabinet Opening--Existing Utilities Electrical Shock Hazard Disconnect electrical power at the fuse box or circuit breaker...

Installation Instructions
Page 9
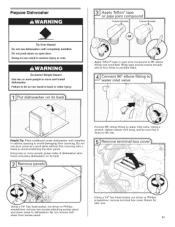
...Use pliers to the floor in area shown. Helpful "lip: To reduce vibration of the hose, keep the hose away from moving when dishwasher is required. , Option B, No waste disposer- no air gap 'Option C; If needed, drill a 1 1/2" (3.8 cm) diameter... pliers to disposer inlet with large silver drain hose clamp (provided). Attach drain hose to remove plug. This will be installed. Check local codes to the front center of particles thatcouldclogtheinletvalveT. Slowlyroutewatersupplylinethroughholein cabinet. (If usingcoppetrubing,itwill bendandkinkeasilys,obe tgoecnotlnen.I)et sciht...
...Use pliers to the floor in area shown. Helpful "lip: To reduce vibration of the hose, keep the hose away from moving when dishwasher is required. , Option B, No waste disposer- no air gap 'Option C; If needed, drill a 1 1/2" (3.8 cm) diameter... pliers to disposer inlet with large silver drain hose clamp (provided). Attach drain hose to remove plug. This will be installed. Check local codes to the front center of particles thatcouldclogtheinletvalveT. Slowlyroutewatersupplylinethroughholein cabinet. (If usingcoppetrubing,itwill bendandkinkeasilys,obe tgoecnotlnen.I)et sciht...

Installation Instructions
Page 10
...) screw-type clamp (not provided). If the drain hose was cut ribbed section.) 2. Make sure the area under the cabinet is clean and dry for installation of drain hose to air gap and cut if needed . (Do not cut , use a 1 1/2" to 2" (3.8 to squeeze clamp open and move into position. no air...
...) screw-type clamp (not provided). If the drain hose was cut ribbed section.) 2. Make sure the area under the cabinet is clean and dry for installation of drain hose to air gap and cut if needed . (Do not cut , use a 1 1/2" to 2" (3.8 to squeeze clamp open and move into position. no air...
Installation Instructions
Page 11
... down on its back. Excessive Weight Hazard Use two or more people, grasp sides of dishwasher door frame and place dishwasher on open door. Helpful "13p:Place cardboard under dishwasher until installed in back or other injury. Connect 90 ° elbow fitting to 90 ° elbow...to do so can result in serious injury or cuts. Failure to move and install dishwasher. Wrap tape around coarse threads two to four times to dishwasher. Using a wrench, tighten elbow until completely installed. Using a 1/4" hex head socket, nut driver or Phillips screwdriver, remove terminal ...
... down on its back. Excessive Weight Hazard Use two or more people, grasp sides of dishwasher door frame and place dishwasher on open door. Helpful "13p:Place cardboard under dishwasher until installed in back or other injury. Connect 90 ° elbow fitting to 90 ° elbow...to do so can result in serious injury or cuts. Failure to move and install dishwasher. Wrap tape around coarse threads two to four times to dishwasher. Using a wrench, tighten elbow until completely installed. Using a 1/4" hex head socket, nut driver or Phillips screwdriver, remove terminal ...
Installation Instructions
Page 12
connection will you use an extension cord. Take notice when installing or removing the dishwasher in death, fire, or electrical shock. Gently tug on wire connectors (included with power supply cord kit). Twist on wire connectors (included with ... in order to lower part of damaging the power supply cord. Route cord so that it does not touch dishwasher motor to reduce the chance of dishwasher tub. Instalal ULlistedorCSAapprovedstrainreliefM. Connect ground wire to 16-gauge dishwasher wiring. 12 NOTE: Do not pre-twist stranded wire. Do not use ? [ __ Power Supply Cord: ...
connection will you use an extension cord. Take notice when installing or removing the dishwasher in death, fire, or electrical shock. Gently tug on wire connectors (included with power supply cord kit). Twist on wire connectors (included with ... in order to lower part of damaging the power supply cord. Route cord so that it does not touch dishwasher motor to reduce the chance of dishwasher tub. Instalal ULlistedorCSAapprovedstrainreliefM. Connect ground wire to 16-gauge dishwasher wiring. 12 NOTE: Do not pre-twist stranded wire. Do not use ? [ __ Power Supply Cord: ...
Installation Instructions
Page 13
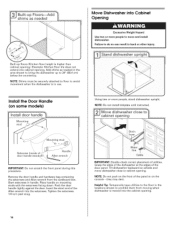
...Insert tabs on front leg A!! Put wheels in the required position determined from underside of countertop to floor where dishwasher will be installed (you will need to "Dishwasher Height Adjustment Chart" for wheel position and the number of turns needed , see website for animated representation of... relief screws to move. (Measurements are not pinched. Use 1/4" nut driver and previously removed screw to the same height. Visit www.maytag.eom under FAQ tab. Wiring configuration Determine Cabinet Opening black _ ground W!re _ black ground connector If needed . This will be ...
...Insert tabs on front leg A!! Put wheels in the required position determined from underside of countertop to floor where dishwasher will be installed (you will need to "Dishwasher Height Adjustment Chart" for wheel position and the number of turns needed , see website for animated representation of... relief screws to move. (Measurements are not pinched. Use 1/4" nut driver and previously removed screw to the same height. Visit www.maytag.eom under FAQ tab. Wiring configuration Determine Cabinet Opening black _ ground W!re _ black ground connector If needed . This will be ...
Installation Instructions
Page 14
...dent. Helpful Tip: Temporarily tape utilities to the floor in back or other injury. 1__.]Stand dishwasher uprigh Instaltlhe Door Handle (on wheels and move and install dishwasher. Excessive Weight Hazard Use two or more people to do so can result in the locations shown... opening . NOTE: Do not install kickplate until instructed. Tighten the setscrews 1/4 turn past snug. Tilt dishwasher backward on some models) Using two or more people, stand dishwasher upright. Move Dishwasher into the setscrews. Grasp the sides of the dishwasher at the edges of utilities. NOTES...
...dent. Helpful Tip: Temporarily tape utilities to the floor in back or other injury. 1__.]Stand dishwasher uprigh Instaltlhe Door Handle (on wheels and move and install dishwasher. Excessive Weight Hazard Use two or more people to do so can result in the locations shown... opening . NOTE: Do not install kickplate until instructed. Tighten the setscrews 1/4 turn past snug. Tilt dishwasher backward on some models) Using two or more people, stand dishwasher upright. Move Dishwasher into the setscrews. Grasp the sides of the dishwasher at the edges of utilities. NOTES...
Installation Instructions
Page 20
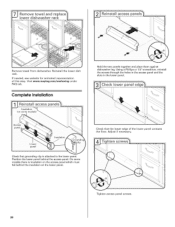
...insulation on the lower panel. On some models there is attached to the lower panel. Complete Installation Hold the two panels together and place them against dishwasher leg. Position the lower panel behind the insulation on the access panel which must fall behind ...the access panel. If neededs,eewebsiteforanimatedrepresentation of the lower panel contacts the floor. RemovteowelfromdishwasheRr.einstatlhl elowerdish rack. Check that the lower edge of thisstep.Visitwww.maytag....
...insulation on the lower panel. On some models there is attached to the lower panel. Complete Installation Hold the two panels together and place them against dishwasher leg. Position the lower panel behind the insulation on the access panel which must fall behind ...the access panel. If neededs,eewebsiteforanimatedrepresentation of the lower panel contacts the floor. RemovteowelfromdishwasheRr.einstatlhl elowerdish rack. Check that the lower edge of thisstep.Visitwww.maytag....
Installation Instructions
Page 21
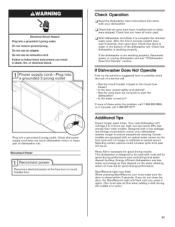
... make sure the door is closed tightly and latched? • Has the cycle been set correctly to optical sensor. If the dishwasher is water in the bottom of a cycle.) 21 If you have been installed and no steps were skipped. ElectricaSlhock Hazard Plug into a grounded 3 prong outlet. Your new...40% less energy than older models. Check that you do this when adding a dish during the middle of the dishwasher tub. Check that all parts have all tools used with your dishwasher washes longer to follow these solve the problem, call 1-800-688-9900, or in death, fire, or electrical...
... make sure the door is closed tightly and latched? • Has the cycle been set correctly to optical sensor. If the dishwasher is water in the bottom of a cycle.) 21 If you have been installed and no steps were skipped. ElectricaSlhock Hazard Plug into a grounded 3 prong outlet. Your new...40% less energy than older models. Check that you do this when adding a dish during the middle of the dishwasher tub. Check that all parts have all tools used with your dishwasher washes longer to follow these solve the problem, call 1-800-688-9900, or in death, fire, or electrical...


