
User Instructions
Page 1
...o izquierdo del interior de la lavavajillas. Table of Contents DISHWASHER SAFETY 1 QUICK STEPS 3 DISHWASHER USE 3 CYCLE AND OPTION DESCRIPTIONS 5 DISHWASHER FEATURES 7 DISHWASHER CARE 8 TROUBLESHOOTING 9 WARRANTY 11 Your safety and the safety of the dishwasher interior. This symbol alerts you to reduce the chance of ... instructions. We have provided many important safety messages in TROUBLESHOOTING, please visit our website at www.maytag.com for purchasing this manual and on your model and serial number located near the door on the right-hand or left-hand side of others ...
...o izquierdo del interior de la lavavajillas. Table of Contents DISHWASHER SAFETY 1 QUICK STEPS 3 DISHWASHER USE 3 CYCLE AND OPTION DESCRIPTIONS 5 DISHWASHER FEATURES 7 DISHWASHER CARE 8 TROUBLESHOOTING 9 WARRANTY 11 Your safety and the safety of the dishwasher interior. This symbol alerts you to reduce the chance of ... instructions. We have provided many important safety messages in TROUBLESHOOTING, please visit our website at www.maytag.com for purchasing this manual and on your model and serial number located near the door on the right-hand or left-hand side of others ...
User Instructions
Page 4
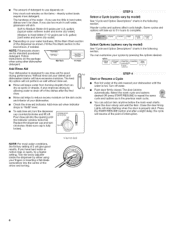
.... Some cycles and options will resume at the sink nearest your dishwasher. The door latches automatically. If you have excessive moisture. Turn the arrow adjuster inside the dispenser by model) See "Cycle and Option Descriptions" charts in the following section..... • Theamounotfdetergetnotusedependosn: Howmuchsoilremainosntheitems- Push door firmly closed. cycles Select Options (options vary by either using your dishes and dishwasher interior will not perform as well without rinse aid. • Rinse aid keeps water from forming droplets that can dry ...
.... Some cycles and options will resume at the sink nearest your dishwasher. The door latches automatically. If you have excessive moisture. Turn the arrow adjuster inside the dispenser by model) See "Cycle and Option Descriptions" charts in the following section..... • Theamounotfdetergetnotusedependosn: Howmuchsoilremainosntheitems- Push door firmly closed. cycles Select Options (options vary by either using your dishes and dishwasher interior will not perform as well without rinse aid. • Rinse aid keeps water from forming droplets that can dry ...
User Instructions
Page 5
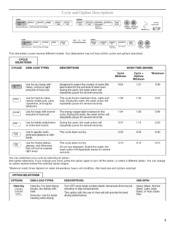
..., the wash action will casseroles, and regular tableware. OPTIONS Heat dry hold to lock _ sanitized 24 ( ®@ @start @cancel resume drain This information covers several seconds. Extra dry: Use for... performancel USE WITH: HeaW Wash, Normal Wash, Light, Insta Wash! Your dishwasher may not have all the cycles and options described. the wash action will .... *Maximum wash times depend on W repeated!y pause for severa! repeatedly pause for several different models. cycles quiet series 400 • load sensing technology options Clocked holdtolock 2 4 _:_ ®...
..., the wash action will casseroles, and regular tableware. OPTIONS Heat dry hold to lock _ sanitized 24 ( ®@ @start @cancel resume drain This information covers several seconds. Extra dry: Use for... performancel USE WITH: HeaW Wash, Normal Wash, Light, Insta Wash! Your dishwasher may not have all the cycles and options described. the wash action will .... *Maximum wash times depend on W repeated!y pause for severa! repeatedly pause for several different models. cycles quiet series 400 • load sensing technology options Clocked holdtolock 2 4 _:_ ®...
User Instructions
Page 11
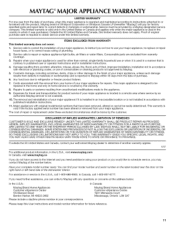
... FITNESS, SO THESE EXCLUSIONS OR LIMITATIONS MAY NOT APPLY TO YOU. Maytag Brand Home Appliances Customer eXperience Centre 1901 Minnesota Court Mississauga, Ontario L5N 3A7 Please keep this User Instructions and model number information for repairs. Service calls to published user or operator instructions... that have access to the Internet and you need further assistance, you on the right-hand or left-hand side of the dishwasher interior. Expenses for travel and transportation for factory specified parts and repair labor to correct defects in the U.S.A., call 1-800-807...
... FITNESS, SO THESE EXCLUSIONS OR LIMITATIONS MAY NOT APPLY TO YOU. Maytag Brand Home Appliances Customer eXperience Centre 1901 Minnesota Court Mississauga, Ontario L5N 3A7 Please keep this User Instructions and model number information for repairs. Service calls to published user or operator instructions... that have access to the Internet and you need further assistance, you on the right-hand or left-hand side of the dishwasher interior. Expenses for travel and transportation for factory specified parts and repair labor to correct defects in the U.S.A., call 1-800-807...
Installation Instructions
Page 2
...Instructions (cont.) 3 Make Power Cord Electrical Connection 12 3 Determine Cabinet Opening 13 4 Install the Door Handle (on some models 14 6 Move Dishwasher into Cabinet Opening 14 6 Connect to Water Supply 16 6 Connect to Drain 17 7 Make Direct Wire Electrical Connection 17... and Route Water Line 8 Check Operation 21 Install Drain Hose 9 If Dishwasher Does Not Operate 21 Install Moisture Barrier (on some models 10 Additional Tips 21 Prepare Dishwasher 11 DISHWASHER SAFETY Your safety and the safety of others . You Need to meet ...
...Instructions (cont.) 3 Make Power Cord Electrical Connection 12 3 Determine Cabinet Opening 13 4 Install the Door Handle (on some models 14 6 Move Dishwasher into Cabinet Opening 14 6 Connect to Water Supply 16 6 Connect to Drain 17 7 Make Direct Wire Electrical Connection 17... and Route Water Line 8 Check Operation 21 Install Drain Hose 9 If Dishwasher Does Not Operate 21 Install Moisture Barrier (on some models 10 Additional Tips 21 Prepare Dishwasher 11 DISHWASHER SAFETY Your safety and the safety of others . You Need to meet ...
Installation Instructions
Page 3
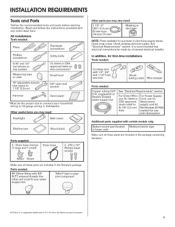
Read and follow the instructions provided with certain models only: IB0tt°mS°und pad (loCated IM°!siuretbapae rder l in plumbing supply stores. In addition, for purchase in lower rack... See'Electrical Requirements" section For Direct Wire: ForP0wersupp!y use UL listed or Cord: useUL Sfittra7in/8 ir(e2l1ie2f Ctom)Parst UpPNlyumcboerdr43k1it7824 hO01SeA appr0ved lmisaterkdedPofWorerUse With dishwaSher Additional parts supplied with any tools listed here. See "Electrical Requirements" section. It is a registered tradernark of E.I argeand lsma ) 2:#10xl screws ...
Read and follow the instructions provided with certain models only: IB0tt°mS°und pad (loCated IM°!siuretbapae rder l in plumbing supply stores. In addition, for purchase in lower rack... See'Electrical Requirements" section For Direct Wire: ForP0wersupp!y use UL listed or Cord: useUL Sfittra7in/8 ir(e2l1ie2f Ctom)Parst UpPNlyumcboerdr43k1it7824 hO01SeA appr0ved lmisaterkdedPofWorerUse With dishwaSher Additional parts supplied with any tools listed here. See "Electrical Requirements" section. It is a registered tradernark of E.I argeand lsma ) 2:#10xl screws ...
Installation Instructions
Page 5
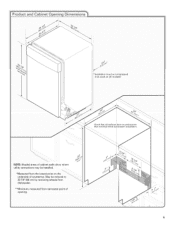
May be installed. 3 II *Measured from narrowest point of countertop. Product and Cabinet Opening Dimensions (1._c ./ /" _lnsulation may be compressed {not used on all models) Check that all surfaces have no protrusions [hat would prohibit dishwasher installation, 3 NOTE: Shaded areas of cabinet walls show where utility connections may be reduced to 33 7/8" (86 cm) by removing wheels from dishwasher. **Minimum, measured from the lowest point on the underside of /" opening.
May be installed. 3 II *Measured from narrowest point of countertop. Product and Cabinet Opening Dimensions (1._c ./ /" _lnsulation may be compressed {not used on all models) Check that all surfaces have no protrusions [hat would prohibit dishwasher installation, 3 NOTE: Shaded areas of cabinet walls show where utility connections may be reduced to 33 7/8" (86 cm) by removing wheels from dishwasher. **Minimum, measured from the lowest point on the underside of /" opening.
Installation Instructions
Page 14
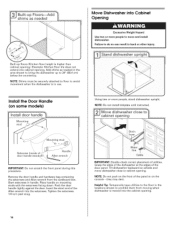
...not push on some models) Using two or more people, stand dishwasher upright. Helpful Tip: Temporarily tape utilities to the floor in back or other injury. 1__.]Stand dishwasher uprigh Instaltlhe Door Handle (on the front of utilities. Move Dishwasher into the cabinet opening ... setscrews facing down. Remove the door handle and hardware bag containing the setscrews and Allen wrench from moving when dishwasher is moved into Cabinet Opening Built-upfloors(Kitchenfloorheightishigherthan cabineot pening.E) xampleK:itchenfloortiledoesnot extendintocabineot peningA. NOTE: Do not install ...
...not push on some models) Using two or more people, stand dishwasher upright. Helpful Tip: Temporarily tape utilities to the floor in back or other injury. 1__.]Stand dishwasher uprigh Instaltlhe Door Handle (on the front of utilities. Move Dishwasher into the cabinet opening ... setscrews facing down. Remove the door handle and hardware bag containing the setscrews and Allen wrench from moving when dishwasher is moved into Cabinet Opening Built-upfloors(Kitchenfloorheightishigherthan cabineot pening.E) xampleK:itchenfloortiledoesnot extendintocabineot peningA. NOTE: Do not install ...
Installation Instructions
Page 20
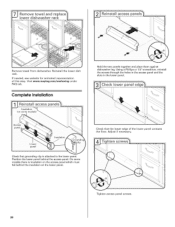
... access panel and the slots in the lower panel. Check that the lower edge of thisstep.Visitwww.maytag.com/anchourindger FAQtab. Complete Installation Hold the two panels together and place them against dishwasher leg. On some models there is attached to the lower panel. If neededs,eewebsiteforanimatedrepresentation of the lower panel contacts the...
... access panel and the slots in the lower panel. Check that the lower edge of thisstep.Visitwww.maytag.com/anchourindger FAQtab. Complete Installation Hold the two panels together and place them against dishwasher leg. On some models there is attached to the lower panel. If neededs,eewebsiteforanimatedrepresentation of the lower panel contacts the...
Installation Instructions
Page 21
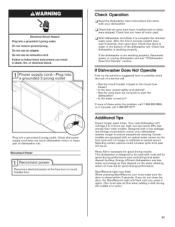
... water sensor so the first cycle will average 2 to optical sensor. If none of dishwasher tub. Selecting certain options could increase cycle time past 3.5 hours. Your new dishwasher will run longer to calibrate to 3 hours per load, but use less water and energy...energy than older models. ElectricaSlhock Hazard Plug into a grounded 3 prong outlet. Check that dishwasher is working properly, disconnect power or unplug dishwasher and see "If Dishwasher Does Not Operate" section. If you do this when adding a dish during the middle of the dishwasher tub. Check that ...
... water sensor so the first cycle will average 2 to optical sensor. If none of dishwasher tub. Selecting certain options could increase cycle time past 3.5 hours. Your new dishwasher will run longer to calibrate to 3 hours per load, but use less water and energy...energy than older models. ElectricaSlhock Hazard Plug into a grounded 3 prong outlet. Check that dishwasher is working properly, disconnect power or unplug dishwasher and see "If Dishwasher Does Not Operate" section. If you do this when adding a dish during the middle of the dishwasher tub. Check that ...


