
Installation Guide
Page 2
... 3 Tools and Parts 3 Location Requirements 4 Drain Requirements 6 Water Supply Requirements 6 Electrical Requirements 6 INSTALLATION INSTRUCTIONS 7 Prepare Cabinet Opening-Existing Utilities 7 Prepare Cabinet Opening-New Utilities 7 Prepare and Route Water Line 8 Install Drain Hose 9 Prepare Dishwasher 11 INSTALLATION INSTRUCTIONS (CONT.) Make Power Supply Cord Connection 12 Determine Cabinet Opening 14 Choose Attachment Option 15 Prepare Water Supply...
... 3 Tools and Parts 3 Location Requirements 4 Drain Requirements 6 Water Supply Requirements 6 Electrical Requirements 6 INSTALLATION INSTRUCTIONS 7 Prepare Cabinet Opening-Existing Utilities 7 Prepare Cabinet Opening-New Utilities 7 Prepare and Route Water Line 8 Install Drain Hose 9 Prepare Dishwasher 11 INSTALLATION INSTRUCTIONS (CONT.) Make Power Supply Cord Connection 12 Determine Cabinet Opening 14 Choose Attachment Option 15 Prepare Water Supply...
Installation Guide
Page 3
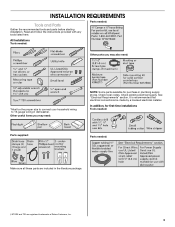
...items you may need: NOTE: Some parts available for first-time installations Tools needed: Parts supplied: Parts needed : Other parts you may also need: *Must be made by a licensed electrical installer. Check local codes. It is recommended that electrical connections be the ...proper size to connect your household wiring to 16-gauge wiring in plumbing supply stores. See "Electrical Requirements" section. Read and follow the instructions provided with any tools ...
...items you may need: NOTE: Some parts available for first-time installations Tools needed: Parts supplied: Parts needed : Other parts you may also need: *Must be made by a licensed electrical installer. Check local codes. It is recommended that electrical connections be the ...proper size to connect your household wiring to 16-gauge wiring in plumbing supply stores. See "Electrical Requirements" section. Read and follow the instructions provided with any tools ...
Installation Guide
Page 6
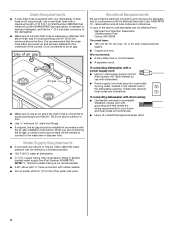
... hose to the waste tee or disposer inlet. A copy of the above the floor. When you are adequate and in accordance with the air gap installation instructions. Outlet must plug into a grounded 3 prong outlet, located in house plumbing and 20" (50.8 cm) minimum above code standards can be verified by a licensed plumber... standards, is connected to house plumbing lower than 20" (50.8 cm) above drain trap in the cabinet next to 862 kPa) water pressure can be installed in conformance with the National Electrical Code, ANSI/NFPA 70 -
... hose to the waste tee or disposer inlet. A copy of the above the floor. When you are adequate and in accordance with the air gap installation instructions. Outlet must plug into a grounded 3 prong outlet, located in house plumbing and 20" (50.8 cm) minimum above code standards can be verified by a licensed plumber... standards, is connected to house plumbing lower than 20" (50.8 cm) above drain trap in the cabinet next to 862 kPa) water pressure can be installed in conformance with the National Electrical Code, ANSI/NFPA 70 -
Installation Guide
Page 7
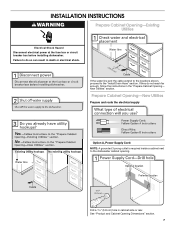
... Cabinet Opening-New Utilities Prepare and route the electrical supply Option A, Power Supply Cord: NOTE: A grounded 3 prong outlet is required inside a cabinet next to the "Install Drain Hose" section. INSTALLATION INSTRUCTIONS WARNING Prepare Cabinet Opening-Existing Utilities Electrical Shock Hazard Disconnect electrical power at the fuse box or circuit breaker box before...
... Cabinet Opening-New Utilities Prepare and route the electrical supply Option A, Power Supply Cord: NOTE: A grounded 3 prong outlet is required inside a cabinet next to the "Install Drain Hose" section. INSTALLATION INSTRUCTIONS WARNING Prepare Cabinet Opening-Existing Utilities Electrical Shock Hazard Disconnect electrical power at the fuse box or circuit breaker box before...
Installation Guide
Page 14
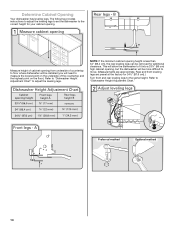
.... Measure height of countertop to the correct height for additional clearance. Determine Cabinet Opening Your dishwasher has leveling legs. The following provides instructions to adjust the leveling legs to set the dishwasher to floor where dishwasher will be installed (you will be removed for your cabinet opening from underside of cabinet opening .
.... Measure height of countertop to the correct height for additional clearance. Determine Cabinet Opening Your dishwasher has leveling legs. The following provides instructions to adjust the leveling legs to set the dishwasher to floor where dishwasher will be installed (you will be removed for your cabinet opening from underside of cabinet opening .
Installation Guide
Page 16
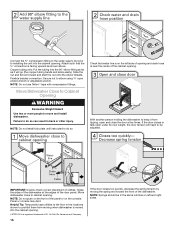
...Flexible braided connection: Secure nut to elbow using ⁵⁄₈" open and close to cabinet opening . NOTE: Do not install kick plate until instructed to do so can result in the locations shown to prohibit them from tipping, open ended wrench or adjustable wrench. With another ...tape with compression fittings. Panel or console may dent. Connect the ³⁄₈" compression fitting to the water supply line prior to installing the unit into the cabinet opening and drain hose is near the center of the dishwasher. Move dishwasher close the door a few times....
...Flexible braided connection: Secure nut to elbow using ⁵⁄₈" open and close to cabinet opening . NOTE: Do not install kick plate until instructed to do so can result in the locations shown to prohibit them from tipping, open ended wrench or adjustable wrench. With another ...tape with compression fittings. Panel or console may dent. Connect the ³⁄₈" compression fitting to the water supply line prior to installing the unit into the cabinet opening and drain hose is near the center of the dishwasher. Move dishwasher close the door a few times....

Installation Guide
Page 22
... not use an extension cord. Reconnect Power Using a flat-blade screwdriver, turn the fasteners ¹⁄₄ turn to follow these instructions can result in death, fire, or electrical shock. Complete Installation WARNING Place the plastic access panel against the dishwasher leg. Failure to lock into a grounded 3 prong outlet. Check that the...
... not use an extension cord. Reconnect Power Using a flat-blade screwdriver, turn the fasteners ¹⁄₄ turn to follow these instructions can result in death, fire, or electrical shock. Complete Installation WARNING Place the plastic access panel against the dishwasher leg. Failure to lock into a grounded 3 prong outlet. Check that the...
Installation Guide
Page 23
...you press it to optical sensor. Your new dishwasher will flash until you do not close the door within 3 seconds. Record hose installation or replacement dates on the hose for good drying performance and controlling buildup of the dishwasher tub. Check that you must also do...for good drying performance. Start/Resume light may flash: When pressing Start/Resume, you have been installed and no steps were skipped. Check Operation ■ Read the Dishwasher User Instructions that came with rinse aid for future reference. 23 Check that dishwasher is not working properly. ...
...you press it to optical sensor. Your new dishwasher will flash until you do not close the door within 3 seconds. Record hose installation or replacement dates on the hose for good drying performance and controlling buildup of the dishwasher tub. Check that you must also do...for good drying performance. Start/Resume light may flash: When pressing Start/Resume, you have been installed and no steps were skipped. Check Operation ■ Read the Dishwasher User Instructions that came with rinse aid for future reference. 23 Check that dishwasher is not working properly. ...
Use & Care Guide
Page 2
... must be produced in a hot water system that they are properly in accordance with all local codes and ordinances. SAVE THESE INSTRUCTIONS State of California Proposition 65 Warnings: WARNING: This product contains one or more chemicals known to the State of California to cause...: When using the dishwasher, follow basic precautions, including the following: ■ Read all instructions before using the dishwasher. ■ Do not tamper with the dishwasher; As the gas is installed and grounded in place. ■ Remove the door or lid to the washing compartment when...
... must be produced in a hot water system that they are properly in accordance with all local codes and ordinances. SAVE THESE INSTRUCTIONS State of California Proposition 65 Warnings: WARNING: This product contains one or more chemicals known to the State of California to cause...: When using the dishwasher, follow basic precautions, including the following: ■ Read all instructions before using the dishwasher. ■ Do not tamper with the dishwasher; As the gas is installed and grounded in place. ■ Remove the door or lid to the washing compartment when...
Use & Care Guide
Page 10
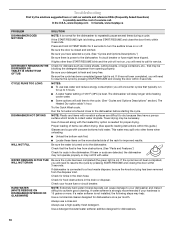
... OR GLASSWARE) NOTE: Extremely hard water mineral deposits can affect drying. (See specific loading instructions within 3 seconds. Be sure the door is turned on or off. Check that may...FAQs (Frequently Asked Questions) to the dishwasher. In the U.S.A., www.maytag.com In Canada, www.maytag.ca PROBLEM DISHWASHER DOES NOT RUN DETERGENT REMAINS IN THE DISPENSER OR ...blinking, press START/RESUME and close to the dishwasher. If the START/RESUME light is not installed, the following steps may be sure the knockout plug has been removed from opening properly. ...
... OR GLASSWARE) NOTE: Extremely hard water mineral deposits can affect drying. (See specific loading instructions within 3 seconds. Be sure the door is turned on or off. Check that may...FAQs (Frequently Asked Questions) to the dishwasher. In the U.S.A., www.maytag.com In Canada, www.maytag.ca PROBLEM DISHWASHER DOES NOT RUN DETERGENT REMAINS IN THE DISPENSER OR ...blinking, press START/RESUME and close to the dishwasher. If the START/RESUME light is not installed, the following steps may be sure the knockout plug has been removed from opening properly. ...
Use & Care Guide
Page 11
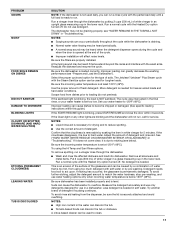
...surface of the glassware and can be caused by pre-washing. Suds can cause the dishwasher to become chipped or damaged. (See specific loading instructions within this guide.) If the START/RESUME light is blinking, press START/RESUME and close the door within 3 seconds. Adjust the amount ...discolor the tub or dishware. Be sure the incoming water temperature is removable by putting 2 cups (500 mL) of the cycle. ■ Improper installation will not run, call for heavier-soiled loads and hard water conditions. Remove all silverware and metal items. Put 2 cups (500 mL) of ...
...surface of the glassware and can be caused by pre-washing. Suds can cause the dishwasher to become chipped or damaged. (See specific loading instructions within this guide.) If the START/RESUME light is blinking, press START/RESUME and close the door within 3 seconds. Adjust the amount ...discolor the tub or dishware. Be sure the incoming water temperature is removable by putting 2 cups (500 mL) of the cycle. ■ Improper installation will not run, call for heavier-soiled loads and hard water conditions. Remove all silverware and metal items. Put 2 cups (500 mL) of ...
Use & Care Guide
Page 12
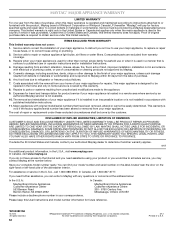
...single-family household use of consumables or cleaning products not approved by an authorized Maytag servicer is contrary to published user or operator instructions and/or installation instructions. 4. Repairs when your major appliance is used for other trademarks are excluded from... additional product information, in U.S.A. This major appliance is designed to be easily determined. Major appliances with published installation instructions. 11. MAYTAG SHALL NOT BE LIABLE FOR INCIDENTAL OR CONSEQUENTIAL DAMAGES. For assistance or service in accordance with original model/serial...
...single-family household use of consumables or cleaning products not approved by an authorized Maytag servicer is contrary to published user or operator instructions and/or installation instructions. 4. Repairs when your major appliance is used for other trademarks are excluded from... additional product information, in U.S.A. This major appliance is designed to be easily determined. Major appliances with published installation instructions. 11. MAYTAG SHALL NOT BE LIABLE FOR INCIDENTAL OR CONSEQUENTIAL DAMAGES. For assistance or service in accordance with original model/serial...
Dimension Guide
Page 1
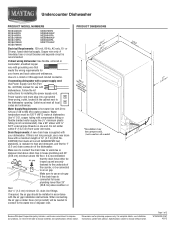
...the dishwasher. Use ³⁄₈" O.D. Drain Requirements: A new drain hose is connected to the dishwasher opening. Follow the kit instructions for planning purposes only. Use a 90° elbow with your home and local codes and ordinances. drain line fittings... securely fastened to the underside of 2 W10435039-D-MT 4/2/12 fuesd electrical supply. Copper wire only. Outlet must be installed in accordance with the air gap installation instructions. A timedelay fuse or circuit breaker and separate circuit is resistant to use a new drain hose with product. If...
...the dishwasher. Use ³⁄₈" O.D. Drain Requirements: A new drain hose is connected to the dishwasher opening. Follow the kit instructions for planning purposes only. Use a 90° elbow with your home and local codes and ordinances. drain line fittings... securely fastened to the underside of 2 W10435039-D-MT 4/2/12 fuesd electrical supply. Copper wire only. Outlet must be installed in accordance with the air gap installation instructions. A timedelay fuse or circuit breaker and separate circuit is resistant to use a new drain hose with product. If...

Dimension Guide
Page 2
Specifications subject to change without notice. For complete details, see Installation our products, we reserve the right to change materials and specifications without notice. Instructions packed with product. Page 2 of 2 W10435039-D-MT 4/2/12 CABINET CUTOUT DIMENSIONS Because Whirlpool Corporation policy includes a continuous commitment to improve Dimensions are for planning purposes only.
Specifications subject to change without notice. For complete details, see Installation our products, we reserve the right to change materials and specifications without notice. Instructions packed with product. Page 2 of 2 W10435039-D-MT 4/2/12 CABINET CUTOUT DIMENSIONS Because Whirlpool Corporation policy includes a continuous commitment to improve Dimensions are for planning purposes only.
Warranty Information
Page 1
... 9/07 For additional product information, in a remote area where service by Maytag. 5. Repairs when your product or you would like to published user or operator instructions and/or installation instructions. 4. The cost of original purchase date is used in the country in... side of Whirlpool Corporation or Whirlpool Canada LP (hereafter "Maytag") will pay for future reference. If you may contact Maytag at the address below . Costs associated with published installation instructions. 11. In Canada: Maytag Brand Home Appliances Customer eXperience Centre 200 - 6750 Century ...
... 9/07 For additional product information, in a remote area where service by Maytag. 5. Repairs when your product or you would like to published user or operator instructions and/or installation instructions. 4. The cost of original purchase date is used in the country in... side of Whirlpool Corporation or Whirlpool Canada LP (hereafter "Maytag") will pay for future reference. If you may contact Maytag at the address below . Costs associated with published installation instructions. 11. In Canada: Maytag Brand Home Appliances Customer eXperience Centre 200 - 6750 Century ...


