

Use and Care Manual
Page 2
...or unsafe practices which COULD result in place so children may occur. Keep sales receipt and/or cancelled check as proof of your old refrigerator or freezer: • Take off the doors. • Leave the shelves in minor personal injury or property damage. 1 DANGER To reduce risk...Common sense, caution and care must be necessary to make changes to cover all possible conditions and situations that may not easily climb inside the refrigerator compartment, on a data plate inside . If you do not understand. CAUTION CAUTION - Record these numbers below to have it may be...
...or unsafe practices which COULD result in place so children may occur. Keep sales receipt and/or cancelled check as proof of your old refrigerator or freezer: • Take off the doors. • Leave the shelves in minor personal injury or property damage. 1 DANGER To reduce risk...Common sense, caution and care must be necessary to make changes to cover all possible conditions and situations that may not easily climb inside the refrigerator compartment, on a data plate inside . If you do not understand. CAUTION CAUTION - Record these numbers below to have it may be...

Use and Care Manual
Page 3
...a qualified electrician. 17. Read all local codes and ordinances. 3. Do not ground to operate on any part of refrigerator unless specifically recommended in refrigerator. 9. Do not attempt service if instructions are not understood or if they are not sure this appliance is designed to ... line. 6. All connections for items being stored in Use & Care Guide or published user-repair instructions. Check with refrigerator controls. 12. SAVE THESE INSTRUCTIONS 2 Refrigerator is properly grounded. 5. Do not use a two-prong adapter, extension cord or power strip. 18. Do not ...
...a qualified electrician. 17. Read all local codes and ordinances. 3. Do not ground to operate on any part of refrigerator unless specifically recommended in refrigerator. 9. Do not attempt service if instructions are not understood or if they are not sure this appliance is designed to ... line. 6. All connections for items being stored in Use & Care Guide or published user-repair instructions. Check with refrigerator controls. 12. SAVE THESE INSTRUCTIONS 2 Refrigerator is properly grounded. 5. Do not use a two-prong adapter, extension cord or power strip. 18. Do not ...

Use and Care Manual
Page 4
... to be installed into a recess where the top of the refrigerator is completely covered, use power tools when performing leveling procedure. Remove toe grille. • Grasp firmly and pull outward to verify proper clearance. Remove bottom bracket cover(s). • Place the eraser end of the cover ...while swinging it in to assure oil returns to the notched side of a pencil or similar blunt tool in the rear) for indoor household application only. If not possible, shield refrigerator with straps or...
... to be installed into a recess where the top of the refrigerator is completely covered, use power tools when performing leveling procedure. Remove toe grille. • Grasp firmly and pull outward to verify proper clearance. Remove bottom bracket cover(s). • Place the eraser end of the cover ...while swinging it in to assure oil returns to the notched side of a pencil or similar blunt tool in the rear) for indoor household application only. If not possible, shield refrigerator with straps or...

Use and Care Manual
Page 5
...level from top hinge to rest on freezer door models). 9. Replace the toe grille. Connect power only after replacing doors or drawer. Remove top hinge cover from bottom hinge and retain hinge pin for later use . Remove door from refrigerator door by removing Phillips screw and ... require door/drawer removal to transport the refrigerator to raise or lower the rear of these adjustment screws (B) to its final location. Remove toe grille and bottom bracket cover(s) (see page 5 for later use . 8. For swing freezer door models only: Hold freezer door while removing hinge pin with a ...
...level from top hinge to rest on freezer door models). 9. Replace the toe grille. Connect power only after replacing doors or drawer. Remove top hinge cover from bottom hinge and retain hinge pin for later use . Remove door from refrigerator door by removing Phillips screw and ... require door/drawer removal to transport the refrigerator to raise or lower the rear of these adjustment screws (B) to its final location. Remove toe grille and bottom bracket cover(s) (see page 5 for later use . 8. For swing freezer door models only: Hold freezer door while removing hinge pin with a ...
Use and Care Manual
Page 6
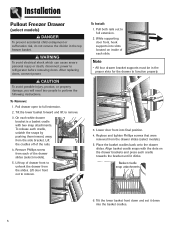
... cradles off of each cradle towards the bracket until it down into final position. 4. Align basket cradle snaps with two snap attachments. Installation Pullout Freezer Drawer (select models) DANGER To prevent accidental child entrapment or suffocation risk, do not remove the divider in the proper slots for the drawer to...death, disconnect power to full extension. 2. Lower door front into the basket cradles. 5 Note • All four drawer bracket supports must be in the top freezer basket. To Install: 1. Pull both rails out to refrigerator before removing doors. To Remove: 1.
... cradles off of each cradle towards the bracket until it down into final position. 4. Align basket cradle snaps with two snap attachments. Installation Pullout Freezer Drawer (select models) DANGER To prevent accidental child entrapment or suffocation risk, do not remove the divider in the proper slots for the drawer to...death, disconnect power to full extension. 2. Lower door front into the basket cradles. 5 Note • All four drawer bracket supports must be in the top freezer basket. To Install: 1. Pull both rails out to refrigerator before removing doors. To Remove: 1.

Use and Care Manual
Page 7
... • Remove center mullion screws with 5⁄16" hex head screwdriver. • Freezer door models: Remove bottom mullion screws with hex head driver, and Phillips screw from top of refrigerator door on freezer drawer models. 1. Remove 1⁄4" hex head screws from opposite side of door and ... Make sure the hinge pin is located in screw holes. 2. Transfer door stops from refrigerator to the back of the fresh food section or attached to refrigerator. Handle design varies from bottom edge of fresh food door and freezer door, if applicable, to outside edge of the Doors 1.
... • Remove center mullion screws with 5⁄16" hex head screwdriver. • Freezer door models: Remove bottom mullion screws with hex head driver, and Phillips screw from top of refrigerator door on freezer drawer models. 1. Remove 1⁄4" hex head screws from opposite side of door and ... Make sure the hinge pin is located in screw holes. 2. Transfer door stops from refrigerator to the back of the fresh food section or attached to refrigerator. Handle design varies from bottom edge of fresh food door and freezer door, if applicable, to outside edge of the Doors 1.

Use and Care Manual
Page 9
... To Remove: 1. With both the left handle base against the door, align the right base of the handle with your refrigerator under the right side base of the freezer drawer. While firmly supporting the left and right bases. 6. Now, while firmly holding the handle at both hands, firmly grasp...handle base against the left door tab and slightly to the right, just enough to allow it stops, which will be flat against the freezer door, you may have to reverse directions momentarily to hang unsupported. 4. The audible "click" indicates that are securely interlocked. With hands ...
... To Remove: 1. With both the left handle base against the door, align the right base of the handle with your refrigerator under the right side base of the freezer drawer. While firmly supporting the left and right bases. 6. Now, while firmly holding the handle at both hands, firmly grasp...handle base against the left door tab and slightly to the right, just enough to allow it stops, which will be flat against the freezer door, you may have to reverse directions momentarily to hang unsupported. 4. The audible "click" indicates that are securely interlocked. With hands ...
Use and Care Manual
Page 11
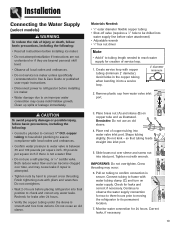
...clamp (C) and turn on water supply. Avoid kinks in Use & Care Guide or published user-repair instructions. • Disconnect power to refrigerator before placing refrigerator into final position to check and correct any water leaks. Place end of copper tubing into inlet port. 5. Continue to observe the water...local codes and ordinances. • Confirm water pressure to its permanent location. 7. Check for two to three hours prior to moving the refrigerator to water valve is between 35 and 100 pounds per square inch. 20 pounds per square inch if there is secure. Do not ...
...clamp (C) and turn on water supply. Avoid kinks in Use & Care Guide or published user-repair instructions. • Disconnect power to refrigerator before placing refrigerator into final position to check and correct any water leaks. Place end of copper tubing into inlet port. 5. Continue to observe the water...local codes and ordinances. • Confirm water pressure to its permanent location. 7. Check for two to three hours prior to moving the refrigerator to water valve is between 35 and 100 pounds per square inch. 20 pounds per square inch if there is secure. Do not ...
Use and Care Manual
Page 12
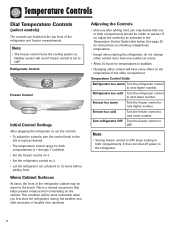
... more than one number at least 8 to next higher number. Note • Turning freezer control to next higher number. Temperature Control Guide Refrigerator too warm Turn the refrigerator control to OFF stops cooling in both compartments. This is 1 through 7 (coldest). ... • The freezer control turns the cooling system on the cabinet. Refrigerator Control Freezer Control Initial Control Settings After plugging the refrigerator in the Temperature Control Guide table below. Refrigerator too cold Turn the refrigerator control to the refrigerator. 11 It does...
... more than one number at least 8 to next higher number. Note • Turning freezer control to next higher number. Temperature Control Guide Refrigerator too warm Turn the refrigerator control to OFF stops cooling in both compartments. This is 1 through 7 (coldest). ... • The freezer control turns the cooling system on the cabinet. Refrigerator Control Freezer Control Initial Control Settings After plugging the refrigerator in the Temperature Control Guide table below. Refrigerator too cold Turn the refrigerator control to the refrigerator. 11 It does...

Use and Care Manual
Page 13
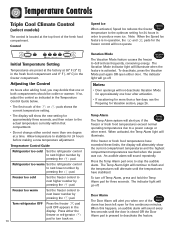
...by pressing the pad. This is 1 through 7 (coldest). • Set the freezer control on 4. • Set the refrigerator control on the cabinet. Freezer too warm Set the freezer control to the desired setting. pads adjusts the controls • The temperature control range ... number by pressing the pad. Temperature Control Guide Refrigerator too warm Set the refrigerator control to 12 hours before adding food. Freezer too cold Set the freezer control to stabilize. Turn refrigerator OFF Press the refrigerator or freezer pad until a dash (-) appears in the Temperature...
...by pressing the pad. This is 1 through 7 (coldest). • Set the freezer control on 4. • Set the refrigerator control on the cabinet. Freezer too warm Set the freezer control to the desired setting. pads adjusts the controls • The temperature control range ... number by pressing the pad. Temperature Control Guide Refrigerator too warm Set the refrigerator control to 12 hours before adding food. Freezer too cold Set the freezer control to stabilize. Turn refrigerator OFF Press the refrigerator or freezer pad until a dash (-) appears in the Temperature...
Use and Care Manual
Page 14
...; C) in the fresh food compartment and 0° F (-18° C) in the display. Freezer too warm Set the freezer control to deactivate the feature. Press either the freezer or refrigerator pad to turn off Temp Alarm, press and hold the Temp Alarm pad for 24 hours in order... to defrost less frequently, conserving energy. Freezer too cold Set the freezer control to stabilize for five continuous minutes. Vacation Mode The Vacation Mode feature causes the freezer to stop the audible alarm. Turn refrigerator OFF Press the freezer pad until the temperatures have exceeded these ...
...; C) in the fresh food compartment and 0° F (-18° C) in the display. Freezer too warm Set the freezer control to deactivate the feature. Press either the freezer or refrigerator pad to turn off Temp Alarm, press and hold the Temp Alarm pad for 24 hours in order... to defrost less frequently, conserving energy. Freezer too cold Set the freezer control to stabilize for five continuous minutes. Vacation Mode The Vacation Mode feature causes the freezer to stop the audible alarm. Turn refrigerator OFF Press the freezer pad until the temperatures have exceeded these ...
Use and Care Manual
Page 15
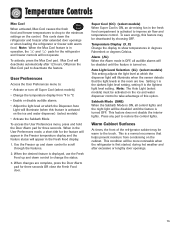
...condition will deactivate automatically after 12 hours, OR press the Max Cool pad to restore the control lights. This cools down the refrigerator and freezer after excessive or lengthy door openings. 14 Max Cool will be disabled until the feature is first started, during hot weather and... after extended door openings or when loading the refrigerator or freezer with warm food. To save energy, this option. Auto Light Level Selection (LL) (select models) This setting adjusts the light ...
...condition will deactivate automatically after 12 hours, OR press the Max Cool pad to restore the control lights. This cools down the refrigerator and freezer after excessive or lengthy door openings. 14 Max Cool will be disabled until the feature is first started, during hot weather and... after extended door openings or when loading the refrigerator or freezer with warm food. To save energy, this option. Auto Light Level Selection (LL) (select models) This setting adjusts the light ...
Use and Care Manual
Page 16
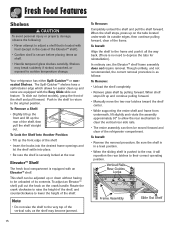
Your refrigerator has either Spill-Catcher™ or nonsealed Shelves. Elevator™ Shelf The fresh food compartment is as the shelf may break suddenly if nicked, scratched, ... the vertical rear side rails. • The entire assembly can be adjusted up or down without having to be moved forward and clear of the refrigerator compartment. Push in the shelf to return to lower the height of the shelf. To adjust an Elevator™ shelf, pull out the knob on...
Your refrigerator has either Spill-Catcher™ or nonsealed Shelves. Elevator™ Shelf The fresh food compartment is as the shelf may break suddenly if nicked, scratched, ... the vertical rear side rails. • The entire assembly can be adjusted up or down without having to be moved forward and clear of the refrigerator compartment. Push in the shelf to return to lower the height of the shelf. To adjust an Elevator™ shelf, pull out the knob on...
Use and Care Manual
Page 17
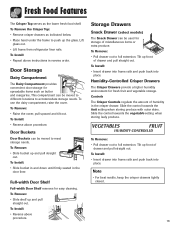
... Crisper Drawers provide a higher humidity environment for easy cleaning. To Remove: • Pull drawer out to full extension. Lift glass out. • Lift frame from refrigerator liner rails. To Install: • Reverse above instructions in reverse order. To Remove: • Pull drawer out to full extension. Door Storage Dairy Compartment The...
... Crisper Drawers provide a higher humidity environment for easy cleaning. To Remove: • Pull drawer out to full extension. Lift glass out. • Lift frame from refrigerator liner rails. To Install: • Reverse above instructions in reverse order. To Remove: • Pull drawer out to full extension. Door Storage Dairy Compartment The...
Use and Care Manual
Page 18
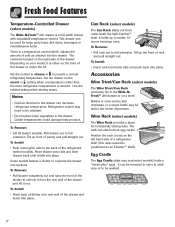
...the drawer or under the lid. Set the control to cheese or to full extension. To Remove: • Pull rack out to provide a normal refrigerator temperature. Place drawer onto rails and slide drawer back until it out. To Remove: • Lift lid (select models). Pull drawer out to ...unhook it from underneath the Spill-Catcher™ shelf. Set the drawer on the meats or setting when a temperature colder than the main refrigerator compartment is located on the right side of the divider to the back of pantry and pull straight out. Colder temperatures could damage leafy ...
...the drawer or under the lid. Set the control to cheese or to full extension. To Remove: • Pull rack out to provide a normal refrigerator temperature. Place drawer onto rails and slide drawer back until it out. To Remove: • Lift lid (select models). Pull drawer out to ...unhook it from underneath the Spill-Catcher™ shelf. Set the drawer on the meats or setting when a temperature colder than the main refrigerator compartment is located on the right side of the divider to the back of pantry and pull straight out. Colder temperatures could damage leafy ...

Use and Care Manual
Page 19
... several hours. The motor may have a factory installed ice maker. Turn the ice maker on the automatic ice making mechanism while the refrigerator is plugged in the supply line. • When the ice cubes are automatic ice maker ready. If such discoloration is observed, discard... or "buzz" occasionally. • If the ice is to prevent mold/mildew growth. 18 It will rattle as instructed on the refrigerator at the ends. Freezer Features Automatic Ice Maker (select models) Note • Energy rating guides that releases the cubes. • Under certain rare circumstances, ...
... several hours. The motor may have a factory installed ice maker. Turn the ice maker on the automatic ice making mechanism while the refrigerator is plugged in the supply line. • When the ice cubes are automatic ice maker ready. If such discoloration is observed, discard... or "buzz" occasionally. • If the ice is to prevent mold/mildew growth. 18 It will rattle as instructed on the refrigerator at the ends. Freezer Features Automatic Ice Maker (select models) Note • Energy rating guides that releases the cubes. • Under certain rare circumstances, ...

Use and Care Manual
Page 21
...or surfaces does not occur. • Occasionally mold will develop on pages 11-14. • Avoid overcrowding the refrigerator shelves. This overloads the freezer, slows the rate of freezing and can raise the temperature of frozen foods. • Leave space between the packages...freezer bags or airtight containers. Food Storage Tips Fresh Food Storage • The fresh food compartment of a refrigerator should be kept between the frozen packages and check after 24 hours. Dairy Food • Most dairy foods such as milk, yogurt, sour cream and cottage cheese have freshness dates on pages 21...
...or surfaces does not occur. • Occasionally mold will develop on pages 11-14. • Avoid overcrowding the refrigerator shelves. This overloads the freezer, slows the rate of freezing and can raise the temperature of frozen foods. • Leave space between the packages...freezer bags or airtight containers. Food Storage Tips Fresh Food Storage • The fresh food compartment of a refrigerator should be kept between the frozen packages and check after 24 hours. Dairy Food • Most dairy foods such as milk, yogurt, sour cream and cottage cheese have freshness dates on pages 21...

Use and Care Manual
Page 22
... in the shell 3 weeks Not recommended Refrigerate small ends down. Hard cheese 1 to 2 months (Swiss, Cheddar and Parmesan) 4 to 12 months Will not ripen after purchase. Use quickly. 21 Food Storage Tips Food Storage Chart Storage times... cream unless whipped. Bananas 2 to 4 days Not recommended Ripen at room temperature before refrigerating. Pears, plums, avocados 3 to 4 days 6 months (whole/peeled) Ripen at room temperature before refrigerating. FOODS REFRIGERATOR FREEZER STORAGE TIPS DAIRY PRODUCTS Butter 1 month 6 to 5 days Not recommended Store in sweet...
... in the shell 3 weeks Not recommended Refrigerate small ends down. Hard cheese 1 to 2 months (Swiss, Cheddar and Parmesan) 4 to 12 months Will not ripen after purchase. Use quickly. 21 Food Storage Tips Food Storage Chart Storage times... cream unless whipped. Bananas 2 to 4 days Not recommended Ripen at room temperature before refrigerating. Pears, plums, avocados 3 to 4 days 6 months (whole/peeled) Ripen at room temperature before refrigerating. FOODS REFRIGERATOR FREEZER STORAGE TIPS DAIRY PRODUCTS Butter 1 month 6 to 5 days Not recommended Store in sweet...

Use and Care Manual
Page 23
...ground Beef or lamb, roast and steak Ham, fully cooked, whole half slices Luncheon meat Pork, roast Pork, chops Sausage, ground Sausage, smoked Veal Frankfurters REFRIGERATOR FREEZER STORAGE TIPS 1 to 2 days 3 to 5 days 1 to 2 weeks 7 to 10 days 7 to 10 days 8 to 10 months 8 to ...10 months Remove tops. Not recommended Wrap odorous foods and refrigerate in original packaging for refrigeration. When freezing longer than two weeks, overwrap with freezer wrap. 7 days 1 to 2 days 3 to 5 days 7 days 5 days 3 days 3 to 5 days 3 to 5 days 3 to 5 ...
...ground Beef or lamb, roast and steak Ham, fully cooked, whole half slices Luncheon meat Pork, roast Pork, chops Sausage, ground Sausage, smoked Veal Frankfurters REFRIGERATOR FREEZER STORAGE TIPS 1 to 2 days 3 to 5 days 1 to 2 weeks 7 to 10 days 7 to 10 days 8 to 10 months 8 to ...10 months Remove tops. Not recommended Wrap odorous foods and refrigerate in original packaging for refrigeration. When freezing longer than two weeks, overwrap with freezer wrap. 7 days 1 to 2 days 3 to 5 days 7 days 5 days 3 days 3 to 5 days 3 to 5 days 3 to 5 ...
Use and Care Manual
Page 24
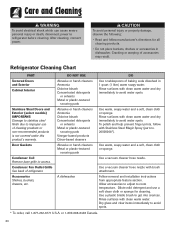
...and Cleaning WARNING To avoid electrical shock which can cause severe personal injury or death, disconnect power to get into crevices. Refrigerator Cleaning Chart PART Textured Doors and Exterior Cabinet Interior Stainless Steel Doors and Exterior (select models) IMPORTANT: Damage to stainless ... buckets, drawers, etc. Rinse surfaces with clean warm water. Rinse surfaces with brush attachment. Use a plastic bristle brush to refrigerator before cleaning. After cleaning, connect power. Allow accessories to adjust to avoid spots. * To order, call 1-877-232-6771 U.S.A. Cracking ...
...and Cleaning WARNING To avoid electrical shock which can cause severe personal injury or death, disconnect power to get into crevices. Refrigerator Cleaning Chart PART Textured Doors and Exterior Cabinet Interior Stainless Steel Doors and Exterior (select models) IMPORTANT: Damage to stainless ... buckets, drawers, etc. Rinse surfaces with clean warm water. Rinse surfaces with brush attachment. Use a plastic bristle brush to refrigerator before cleaning. After cleaning, connect power. Allow accessories to adjust to avoid spots. * To order, call 1-877-232-6771 U.S.A. Cracking ...


