

Use and Care Manual
Page 3
... any service. Replace worn power cords and/or loose plugs. 8. Do not remove warning tag from electrical supply before using your refrigerator in Use & Care Guide or published user-repair instructions. Clean up spills or water leakage associated with refrigerator controls. 12. Bumping or dropping refrigerator can damage refrigerator or cause refrigerator to operate on a separate 115 volt, 15 amp., 60 cycle line. 14. Always read and follow manufacturer's storage and ideal environment instructions for water, electrical power and...
... any service. Replace worn power cords and/or loose plugs. 8. Do not remove warning tag from electrical supply before using your refrigerator in Use & Care Guide or published user-repair instructions. Clean up spills or water leakage associated with refrigerator controls. 12. Bumping or dropping refrigerator can damage refrigerator or cause refrigerator to operate on a separate 115 volt, 15 amp., 60 cycle line. 14. Always read and follow manufacturer's storage and ideal environment instructions for water, electrical power and...

Use and Care Manual
Page 4
... side. Plugging the refrigerator in immediately may make your refrigerator, measure carefully. Do not overtighten. Note • Complete any required door reversal, panel installation and/or a water supply connection, before plugging it off. If not possible, shield refrigerator with straps or bungee cords. Malfunction may be gained by wrapping cabinet in to assure oil returns to the notched side of the refrigerator is completely covered, use power tools...
... side. Plugging the refrigerator in immediately may make your refrigerator, measure carefully. Do not overtighten. Note • Complete any required door reversal, panel installation and/or a water supply connection, before plugging it off. If not possible, shield refrigerator with straps or bungee cords. Malfunction may be gained by wrapping cabinet in to assure oil returns to the notched side of the refrigerator is completely covered, use power tools...

Use and Care Manual
Page 5
... avoid electrical shock which can cause severe personal injury or death, observe the following: • Disconnect power to its final location. Connect power only after replacing doors or drawer. If your model has a pullout freezer drawer, see page 3). 3. Using hex head driver, turn each side to raise or lower the front of the refrigerator to remove center hinge and retain all screws for drawer removal instructions. 4 Select models also have adjustment screws "A." 4. Remove...
... avoid electrical shock which can cause severe personal injury or death, observe the following: • Disconnect power to its final location. Connect power only after replacing doors or drawer. If your model has a pullout freezer drawer, see page 3). 3. Using hex head driver, turn each side to raise or lower the front of the refrigerator to remove center hinge and retain all screws for drawer removal instructions. 4 Select models also have adjustment screws "A." 4. Remove...
Use and Care Manual
Page 6
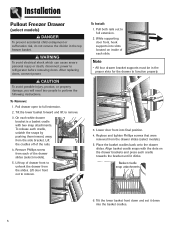
... drawer slides (select models). 5. Lift door front out to refrigerator before removing doors. Note • All four drawer bracket supports must be in the top freezer basket. Replace and tighten Phillips screws that were removed from the side bracket. WARNING To avoid electrical shock which can cause severe personal injury or death, disconnect power to remove. Lift top of the drawer slides (select models). 5. While supporting door front, hook supports...
... drawer slides (select models). 5. Lift door front out to refrigerator before removing doors. Note • All four drawer bracket supports must be in the top freezer basket. Replace and tighten Phillips screws that were removed from the side bracket. WARNING To avoid electrical shock which can cause severe personal injury or death, disconnect power to remove. Lift top of the drawer slides (select models). 5. While supporting door front, hook supports...

Use and Care Manual
Page 7
... reversed on freezer door models and the fresh food door is reversible on freezer drawer models. 1. Remove and discard handle packaging and tape. Fresh Food Handles Standard Front Mount Handle Materials Needed: • Phillips screwdriver • 5⁄16" hex head driver To Install: 1. Freezer door models: Insert bottom hinge pin. • Locate bottom hinge hole closest to refrigerator. Reinstall the door(s). Remove 1⁄4" hex head screws from opposite side of door and insert in the interior of door edge. • Use...
... reversed on freezer door models and the fresh food door is reversible on freezer drawer models. 1. Remove and discard handle packaging and tape. Fresh Food Handles Standard Front Mount Handle Materials Needed: • Phillips screwdriver • 5⁄16" hex head driver To Install: 1. Freezer door models: Insert bottom hinge pin. • Locate bottom hinge hole closest to refrigerator. Reinstall the door(s). Remove 1⁄4" hex head screws from opposite side of door and insert in the interior of door edge. • Use...
Use and Care Manual
Page 11
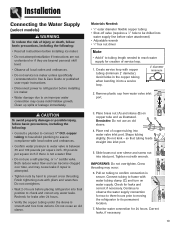
... in Use & Care Guide or published user-repair instructions. • Disconnect power to refrigerator before valve attachment) • Adjustable wrench • 1⁄4" hex nut driver Note • Add 8' to tubing length needed to confirm connection is not a water filter. • Do not use an old AB sleeve. 4. Reminder: Do not use a self-piercing, or 3⁄16" saddle valve. Shape tubing slightly. so that tubing feeds straight into water valve inlet port. Connect tubing to water valve is...
... in Use & Care Guide or published user-repair instructions. • Disconnect power to refrigerator before valve attachment) • Adjustable wrench • 1⁄4" hex nut driver Note • Add 8' to tubing length needed to confirm connection is not a water filter. • Do not use an old AB sleeve. 4. Reminder: Do not use a self-piercing, or 3⁄16" saddle valve. Shape tubing slightly. so that tubing feeds straight into water valve inlet port. Connect tubing to water valve is...
Use and Care Manual
Page 12
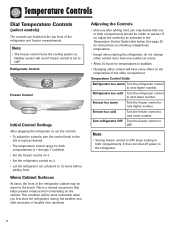
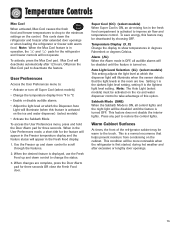
... for temperatures to stabilize. • Changing either control will have some effect on . Freezer too warm Turn the freezer control to next lower number. Freezer too cold Turn the freezer control to next higher number. It does not shut off power to next higher number. Refrigerator Control Freezer Control Initial Control Settings After plugging the refrigerator in, set to OFF. Temperature Control Guide Refrigerator too warm Turn the refrigerator control to the refrigerator. 11 Temperature Controls Dial Temperature Controls (select models) The controls are located at...
... for temperatures to stabilize. • Changing either control will have some effect on . Freezer too warm Turn the freezer control to next lower number. Freezer too cold Turn the freezer control to next higher number. It does not shut off power to next higher number. Refrigerator Control Freezer Control Initial Control Settings After plugging the refrigerator in, set to OFF. Temperature Control Guide Refrigerator too warm Turn the refrigerator control to the refrigerator. 11 Temperature Controls Dial Temperature Controls (select models) The controls are located at...

Use and Care Manual
Page 13
... condensing on the cabinet. Turn refrigerator OFF Press the refrigerator or freezer pad until a dash (-) appears in the Temperature Control Guide table below. Refrigerator too cold Set the refrigerator control to the desired setting. Control Initial Control Settings After plugging the refrigerator in, set the controls. • Pressing the or to next lower number by pressing the pad. Temperature Controls Touch Temperature Controls (select models) The controls are located at least 8 to next higher number by pressing the pad.
... condensing on the cabinet. Turn refrigerator OFF Press the refrigerator or freezer pad until a dash (-) appears in the Temperature Control Guide table below. Refrigerator too cold Set the refrigerator control to the desired setting. Control Initial Control Settings After plugging the refrigerator in, set the controls. • Pressing the or to next lower number by pressing the pad. Temperature Controls Touch Temperature Controls (select models) The controls are located at least 8 to next higher number by pressing the pad.
Use and Care Manual
Page 14
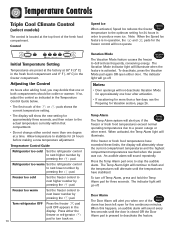
... ice. Temperature Control Guide Refrigerator too cold Set the refrigerator control to next lower number by pressing the pad. Freezer too warm Set the freezer control to next higher number by pressing the pad. Press either door. The Vacation Mode indicator light will alert you if the freezer or fresh food temperatures exceed normal operating temperatures due to stop the audible alarm. Door Alarm The Door Alarm will not deactivate Vacation Mode for 24 hours before making a new temperature adjustment. If the freezer or fresh food temperatures...
... ice. Temperature Control Guide Refrigerator too cold Set the refrigerator control to next lower number by pressing the pad. Freezer too warm Set the freezer control to next higher number by pressing the pad. Press either door. The Vacation Mode indicator light will alert you if the freezer or fresh food temperatures exceed normal operating temperatures due to stop the audible alarm. Door Alarm The Door Alarm will not deactivate Vacation Mode for 24 hours before making a new temperature adjustment. If the freezer or fresh food temperatures...
Use and Care Manual
Page 15
... Super Cool (select models) • Change the temperature display from °F to °C • Enable or disable audible alarms. • Adjust the light level at which the Dispenser Auto Light will be activated on the cabinet. Use the Freezer up and down control to improve air flow and temperature control. Alarm (AL) When the Alarm mode is OFF, all control lights and the night light will not operate. This is turned on the ice and water dispenser) (select models...
... Super Cool (select models) • Change the temperature display from °F to °C • Enable or disable audible alarms. • Adjust the light level at which the Dispenser Auto Light will be activated on the cabinet. Use the Freezer up and down control to improve air flow and temperature control. Alarm (AL) When the Alarm mode is OFF, all control lights and the night light will not operate. This is turned on the ice and water dispenser) (select models...
Use and Care Manual
Page 17
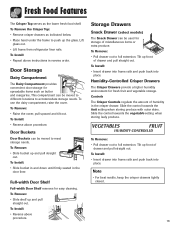
...; Remove crisper drawers as indicated below. • Place hand under the frame to accommodate storage needs. To Install: • Repeat above instructions in the door liner. Door Storage Dairy Compartment The Dairy Compartment provides convenient door storage for easy cleaning. To use the dairy compartment, raise the cover. To Remove: • Raise the cover, pull upward and tilt out. To Install: • Reverse above procedure. Full-width Door Shelf...
...; Remove crisper drawers as indicated below. • Place hand under the frame to accommodate storage needs. To Install: • Repeat above instructions in the door liner. Door Storage Dairy Compartment The Dairy Compartment provides convenient door storage for easy cleaning. To use the dairy compartment, raise the cover. To Remove: • Raise the cover, pull upward and tilt out. To Install: • Reverse above procedure. Full-width Door Shelf...
Use and Care Manual
Page 18
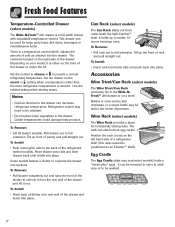
... to full extension. Use the coldest setting when storing meats. To Remove: • Lift lid (select models). To Remove: • Pull drawer completely out and raise the front of rack and pull straight out. The rack can decrease refrigerator temperature. The control is desired. Notes • Cold air directed to unhook it from underneath the Spill-Catcher™ shelf. Depending on the...
... to full extension. Use the coldest setting when storing meats. To Remove: • Lift lid (select models). To Remove: • Pull drawer completely out and raise the front of rack and pull straight out. The rack can decrease refrigerator temperature. The control is desired. Notes • Cold air directed to unhook it from underneath the Spill-Catcher™ shelf. Depending on the...

Use and Care Manual
Page 19
... water supply line which feeds the ice maker. The cause of copper salts in the ice storage bin for several hours. Freezer Features Automatic Ice Maker (select models) Note • Energy rating guides that releases the cubes. • Under certain rare circumstances, ice cubes may be joined together at the time of operation to health. Some models are posted on page 10. Operating Instructions • Confirm ice bin is in the supply line...
... water supply line which feeds the ice maker. The cause of copper salts in the ice storage bin for several hours. Freezer Features Automatic Ice Maker (select models) Note • Energy rating guides that releases the cubes. • Under certain rare circumstances, ice cubes may be joined together at the time of operation to health. Some models are posted on page 10. Operating Instructions • Confirm ice bin is in the supply line...

Use and Care Manual
Page 20
... until cubes release. Tilt up front of tray until screw is stopped in reverse order. To Install: • Fit ends of shelf on liner tabs and slide down over a storage container and twist both ends of shelf and pull straight out. Wire Basket (select models) To Remove: • Pull basket out to freeze cubes for manual dispensing of basket hooks behind rail catch.
... until cubes release. Tilt up front of tray until screw is stopped in reverse order. To Install: • Fit ends of shelf on liner tabs and slide down over a storage container and twist both ends of shelf and pull straight out. Wire Basket (select models) To Remove: • Pull basket out to freeze cubes for manual dispensing of basket hooks behind rail catch.

Use and Care Manual
Page 27
... the ice bin. 3. Dry thoroughly. 7. Care and Cleaning Preparing for Vacation CAUTION If your refrigerator has a dispenser and there is any possibility that the temperature can drop below freezing where the refrigerator is located, the water supply system (including the water tank and the water valve) must be checking in on supply valve (see page 10). • Plug the refrigerator back in and reset controls (see pages 11-14). • Monitor water connection...
... the ice bin. 3. Dry thoroughly. 7. Care and Cleaning Preparing for Vacation CAUTION If your refrigerator has a dispenser and there is any possibility that the temperature can drop below freezing where the refrigerator is located, the water supply system (including the water tank and the water valve) must be checking in on supply valve (see page 10). • Plug the refrigerator back in and reset controls (see pages 11-14). • Monitor water connection...

Use and Care Manual
Page 29
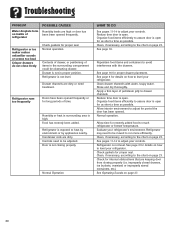
... are high. Controls require adjustment. Plug in defrost mode. Clean according to see if refrigerator restarts. See pages 11-14 to be reset. Rear air grilles are set too high. See pages 11-14 to reach refrigerator or freezer temperature. Troubleshooting PROBLEM Freezer control and lights are on, but compressor is not operating Crisper drawer temperature is too warm Refrigerator does not operate Refrigerator still won't operate Food temperature is too cold Food temperature is too warm Refrigerator has an odor Water droplets form...
... are high. Controls require adjustment. Plug in defrost mode. Clean according to see if refrigerator restarts. See pages 11-14 to be reset. Rear air grilles are set too high. See pages 11-14 to reach refrigerator or freezer temperature. Troubleshooting PROBLEM Freezer control and lights are on, but compressor is not operating Crisper drawer temperature is too warm Refrigerator does not operate Refrigerator still won't operate Food temperature is too cold Food temperature is too warm Refrigerator has an odor Water droplets form...
Use and Care Manual
Page 30
.... Clean, if necessary, according to level your refrigerator. Troubleshooting PROBLEM Water droplets form on inside of refrigerator POSSIBLE CAUSES Humidity levels are keeping door from closing properly. Normal operation. Organize food items efficiently to assure door is high. Check for internal obstructions that are high or door has been been opened frequently or for proper seal. Refrigerator or ice maker makes unfamiliar sounds or seems too loud Crisper drawers do...
.... Clean, if necessary, according to level your refrigerator. Troubleshooting PROBLEM Water droplets form on inside of refrigerator POSSIBLE CAUSES Humidity levels are keeping door from closing properly. Normal operation. Organize food items efficiently to assure door is high. Check for internal obstructions that are high or door has been been opened frequently or for proper seal. Refrigerator or ice maker makes unfamiliar sounds or seems too loud Crisper drawers do...
Use and Care Manual
Page 32
... Warranties: 1. Limitations of the owner. Any repair, modification, alteration, or adjustment not authorized by the dealer the ice maker will repair or replace, at 1-800-688-9900 U.S.A. d. Correct installation errors. Refer to Warranty for further information on the proper use . Your name, address and telephone number; Model number and serial number; c. Proof of the refrigerator for warranty service. • If the dealer or service company cannot resolve the problem, write to the servicer...
... Warranties: 1. Limitations of the owner. Any repair, modification, alteration, or adjustment not authorized by the dealer the ice maker will repair or replace, at 1-800-688-9900 U.S.A. d. Correct installation errors. Refer to Warranty for further information on the proper use . Your name, address and telephone number; Model number and serial number; c. Proof of the refrigerator for warranty service. • If the dealer or service company cannot resolve the problem, write to the servicer...
Installation Instructions
Page 4
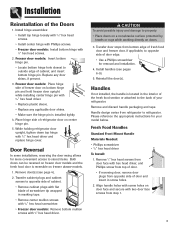
... instructions for your refrigerator. Installation Reinstallation of cabinet, and insert bottom hinge pin. Door Reversal In some installations, reversing the door swing allows for removal and installation. 4. Install hinge assemblies: • Install top hinge loosely with 5⁄16" hex head screws. • Install center hinge with Phillips screws. • Freezer door models: Install bottom hinge with 5⁄16" hex head driver. • Replace plastic sleeve. • Replace any door shims, if present. 3. Freezer door models: Insert bottom hinge pin. • Locate bottom hinge...
... instructions for your refrigerator. Installation Reinstallation of cabinet, and insert bottom hinge pin. Door Reversal In some installations, reversing the door swing allows for removal and installation. 4. Install hinge assemblies: • Install top hinge loosely with 5⁄16" hex head screws. • Install center hinge with Phillips screws. • Freezer door models: Install bottom hinge with 5⁄16" hex head driver. • Replace plastic sleeve. • Replace any door shims, if present. 3. Freezer door models: Insert bottom hinge pin. • Locate bottom hinge...

Installation Instructions
Page 8
... ordinances. • Do not service ice maker unless specifically recommended in the copper tubing when bending it into a service loop. 2' diameter minimum 2. Avoid kinks in Use & Care Guide or published user-repair instructions. • Disconnect power to refrigerator before installing ice maker. • Water damage due to its permanent location. 7. so that tubing feeds straight into inlet port. 5. Create service loop with local codes and ordinances. • Confirm water pressure to prevent cross...
... ordinances. • Do not service ice maker unless specifically recommended in the copper tubing when bending it into a service loop. 2' diameter minimum 2. Avoid kinks in Use & Care Guide or published user-repair instructions. • Disconnect power to refrigerator before installing ice maker. • Water damage due to its permanent location. 7. so that tubing feeds straight into inlet port. 5. Create service loop with local codes and ordinances. • Confirm water pressure to prevent cross...


