
Owners Manual
Page 1
... killed or seriously injured if you and others are not followed. You will need assistance, call us at www.maytag.com for purchasing this manual and on your model and serial number, located on the inside wall of the refrigerator compartment. This is , tell you how to ...You can kill or hurt you don't immediately follow instructions. All safety messages will follow instructions. In Canada, visit our website at www.maytag.ca or call us at 1-800-807-6777. Always read and obey all safety messages. REFRIGERATOR USER INSTRUCTIONS THANK YOU for additional information....
... killed or seriously injured if you and others are not followed. You will need assistance, call us at www.maytag.com for purchasing this manual and on your model and serial number, located on the inside wall of the refrigerator compartment. This is , tell you how to ...You can kill or hurt you don't immediately follow instructions. All safety messages will follow instructions. In Canada, visit our website at www.maytag.ca or call us at 1-800-807-6777. Always read and obey all safety messages. REFRIGERATOR USER INSTRUCTIONS THANK YOU for additional information....

Owners Manual
Page 2
.... ■ Do not use an extension cord. ■ Disconnect power before servicing. ■ Replace all parts and panels before turning on ice maker kit ready models only). Important information to know about glass shelves and covers: Do not clean glass shelves or covers with warm water when they will sit for...
.... ■ Do not use an extension cord. ■ Disconnect power before servicing. ■ Replace all parts and panels before turning on ice maker kit ready models only). Important information to know about glass shelves and covers: Do not clean glass shelves or covers with warm water when they will sit for...

Owners Manual
Page 3
...176;C). ¹⁄₂" (1.25 cm) Electrical Shock Hazard Plug into its final location, it is recommended that a separate circuit serving only your model, turn the refrigerator to the word OFF, or press the Freezer down arrow or minus sign touch pad until a dash (-) appears in death, ...radiator, or other heat source. Use an outlet that you have the proper electrical connection. Failure to swing open. Depending on the hinge side (some models require more easily. ■ Use copper tubing and check for a ¹⁄₂" (1.25 cm) space at least every 6 months. 3 ...
...176;C). ¹⁄₂" (1.25 cm) Electrical Shock Hazard Plug into its final location, it is recommended that a separate circuit serving only your model, turn the refrigerator to the word OFF, or press the Freezer down arrow or minus sign touch pad until a dash (-) appears in death, ...radiator, or other heat source. Use an outlet that you have the proper electrical connection. Failure to swing open. Depending on the hinge side (some models require more easily. ■ Use copper tubing and check for a ¹⁄₂" (1.25 cm) space at least every 6 months. 3 ...

Owners Manual
Page 4
...40 to 60 psi (276 to 414 kPa): ■ Check to clear line of copper tubing you begin. If you have questions about your model, the water line may come down from the top or up from collecting in the cold water pipe you have selected . Connect the Water ...8324;" drilled hole in conjunction with a "P" clamp. Slip the compression sleeve and compression nut on water supply to refill after heavy usage. ■ If your model. Do not overtighten. 8. Follow the connection instructions for your refrigerator has a water filter, it will go. Correct any leaks. 4 IMPORTANT: If you may ...
...40 to 60 psi (276 to 414 kPa): ■ Check to clear line of copper tubing you begin. If you have questions about your model, the water line may come down from the top or up from collecting in the cold water pipe you have selected . Connect the Water ...8324;" drilled hole in conjunction with a "P" clamp. Slip the compression sleeve and compression nut on water supply to refill after heavy usage. ■ If your model. Do not overtighten. 8. Follow the connection instructions for your refrigerator has a water filter, it will go. Correct any leaks. 4 IMPORTANT: If you may ...

Owners Manual
Page 5
... and replace the doors, see "Remove Door(s) and Hinges" and "Replace Door(s) and Hinges." ■ Before you keep it from the lower end of your model. ■ All graphics referenced in the following instructions are down to refrigerator cabinet with either a freezer door or freezer drawer, or French doors (Style 2). Correct...
... and replace the doors, see "Remove Door(s) and Hinges" and "Replace Door(s) and Hinges." ■ Before you keep it from the lower end of your model. ■ All graphics referenced in the following instructions are down to refrigerator cabinet with either a freezer door or freezer drawer, or French doors (Style 2). Correct...

Owners Manual
Page 6
... Freezer door 1. Remove freezer door handle seal screw. Remove door stop . Attach handle to hold the door in Top Hinge graphic. Freezer drawer models 1. Do not tighten screws completely. Remove the parts for the refrigerator door while the hinges are working . 3. Lift the refrigerator door free from... hinge is reversed. NOTE: Remove the hinge pin cover from the bottom hinge pin and keep it opens from the cabinet. 5. Freezer door models 1. Tighten screws. NOTE: The green, ground wire remains attached to opposite side of the refrigerator door. Move to the hinge. 6. Remove ...
... Freezer door 1. Remove freezer door handle seal screw. Remove door stop . Attach handle to hold the door in Top Hinge graphic. Freezer drawer models 1. Do not tighten screws completely. Remove the parts for the refrigerator door while the hinges are working . 3. Lift the refrigerator door free from... hinge is reversed. NOTE: Remove the hinge pin cover from the bottom hinge pin and keep it opens from the cabinet. 5. Freezer door models 1. Tighten screws. NOTE: The green, ground wire remains attached to opposite side of the refrigerator door. Move to the hinge. 6. Remove ...

Owners Manual
Page 7
... out of each door so that the mounting clips are working . 3. Final Steps 1. Do not use an extension cord. Return all the screws. 3. Freezer door models 1. Tighten screws. Tighten screws. Tighten all screws. See Plastic Handle graphic 2. ■ To replace the handle, position the handle so that the bottom of the...
... out of each door so that the mounting clips are working . 3. Final Steps 1. Do not use an extension cord. Return all the screws. 3. Freezer door models 1. Tighten screws. Tighten screws. Tighten all screws. See Plastic Handle graphic 2. ■ To replace the handle, position the handle so that the bottom of the...

Owners Manual
Page 8
... Screws C. Trim Screw B. Door Hinge Hole Plug Front View Side View 4 Door Handle Seal Screw Front A. Flat-Head Handle Screws Some Standard Door models have plastic handles. See French Doors graphic. 5-2 A A. Top Hinge Center Hinge A B C A. Hinge Screws Bottom Hinge A B C D ... Center Hinge C. Bottom Hinge C. ³⁄₈" Hex-Head Hinge Screws D. Handle Screws C. Door Stop Screws A B B. Hinge Pin Shim (on some models) B. Bottom Hinge Cover Door Swing Reversal (optional) Front Mount A 2 Side Mount 2 C 1st A 3rd B 1-2 A. Top Trim D. Door Hinge Hole ...
... Screws C. Trim Screw B. Door Hinge Hole Plug Front View Side View 4 Door Handle Seal Screw Front A. Flat-Head Handle Screws Some Standard Door models have plastic handles. See French Doors graphic. 5-2 A A. Top Hinge Center Hinge A B C A. Hinge Screws Bottom Hinge A B C D ... Center Hinge C. Bottom Hinge C. ³⁄₈" Hex-Head Hinge Screws D. Handle Screws C. Door Stop Screws A B B. Hinge Pin Shim (on some models) B. Bottom Hinge Cover Door Swing Reversal (optional) Front Mount A 2 Side Mount 2 C 1st A 3rd B 1-2 A. Top Trim D. Door Hinge Hole ...

Owners Manual
Page 10
... the door again to keep the refrigerator from rolling forward when the freezer drawer is firmly against the top of the refrigerator. Style 2-Freezer Drawer Models 1. Insert the eraser end of the cover while swinging it into place. 7. NOTE: Having someone push against the floor to make sure that side of...: It may take several more to raise or lower that it toward you should turn both leveling screws clockwise. Roller adjustment screw B. Style1-Freezer Door Models 1. Replace the bracket cover. A. Adjust the Door Depending on your...
... the door again to keep the refrigerator from rolling forward when the freezer drawer is firmly against the top of the refrigerator. Style 2-Freezer Drawer Models 1. Insert the eraser end of the cover while swinging it into place. 7. NOTE: Having someone push against the floor to make sure that side of...: It may take several more to raise or lower that it toward you should turn both leveling screws clockwise. Roller adjustment screw B. Style1-Freezer Door Models 1. Replace the bracket cover. A. Adjust the Door Depending on your...

Owners Manual
Page 11
...the leveling screw counterclockwise. This makes it is too warm or too cold in both the refrigerator and freezer displays. Using the Controls Your model may take several more turns, and you notice moisture on the left refrigerator door. ■ When the left side door is a vertically...someone push against the top of the refrigerator. Electronic and Dial Controls For your refrigerator, make sure that side of the refrigerator takes some models) The humidity control turns on a heater to raise or lower that it closes as easily as shown. If not, tilt the refrigerator ...
...the leveling screw counterclockwise. This makes it is too warm or too cold in both the refrigerator and freezer displays. Using the Controls Your model may take several more turns, and you notice moisture on the left refrigerator door. ■ When the left side door is a vertically...someone push against the top of the refrigerator. Electronic and Dial Controls For your refrigerator, make sure that side of the refrigerator takes some models) The humidity control turns on a heater to raise or lower that it closes as easily as shown. If not, tilt the refrigerator ...

Owners Manual
Page 13
...name will appear in the Freezer display and the preference status (F or C) or (ON or OFF) will appear in the moisture-sealed crisper. Set your model, adjust the control to activate this feature. VEGETABLES / HIGH (closed or Door Alarm is closed ) for 3 seconds, until the refrigerator returns to restore all...lower the wire shutoff arm. All control panel lights, interior lights and alarm tones will not hear the alarm sound. As ice is on some models) Turning the Ice Maker On/Off To turn on or off this feature. Do not force the wire shutoff arm up ) position. Digital ...
...name will appear in the Freezer display and the preference status (F or C) or (ON or OFF) will appear in the moisture-sealed crisper. Set your model, adjust the control to activate this feature. VEGETABLES / HIGH (closed or Door Alarm is closed ) for 3 seconds, until the refrigerator returns to restore all...lower the wire shutoff arm. All control panel lights, interior lights and alarm tones will not hear the alarm sound. As ice is on some models) Turning the Ice Maker On/Off To turn on or off this feature. Do not force the wire shutoff arm up ) position. Digital ...

Owners Manual
Page 14
... Dispensing Water 1. Water Filtration System The water filter is on some households. When the yellow (Order) light is located in some models) IMPORTANT: ■ After connecting the refrigerator to produce the first batch of ice approximately every 3 hours. ■ To increase ... filter should be used on , a new water filter should be filtered. Replacing the Water Filter To purchase a replacement water filter, model UKF8001AXX-750, contact your water dispenser or ice maker decreases noticeably. IMPORTANT: Air trapped in the ice storage bin. Always dispense water...
... Dispensing Water 1. Water Filtration System The water filter is on some households. When the yellow (Order) light is located in some models) IMPORTANT: ■ After connecting the refrigerator to produce the first batch of ice approximately every 3 hours. ■ To increase ... filter should be used on , a new water filter should be filtered. Replacing the Water Filter To purchase a replacement water filter, model UKF8001AXX-750, contact your water dispenser or ice maker decreases noticeably. IMPORTANT: Air trapped in the ice storage bin. Always dispense water...

Owners Manual
Page 15
...of your stainless steel, keep your refrigerator. To help avoid corrosion of food, wrap or cover foods tightly. ■ For stainless steel models, stainless steel is corrosionresistant and not corrosion-proof. Clean the exterior surfaces. NOTE: When cleaning stainless steel, always wipe with a clean,...scratching. 4. Wipe up spills immediately. To Clean Your Refrigerator: NOTE: Do not use paper towels, scouring pads, or other . Freezer door models ■ Top of the shield over light assembly. 5. Slide the shield toward the front until it from the light assembly. ■ ...
...of your stainless steel, keep your refrigerator. To help avoid corrosion of food, wrap or cover foods tightly. ■ For stainless steel models, stainless steel is corrosionresistant and not corrosion-proof. Clean the exterior surfaces. NOTE: When cleaning stainless steel, always wipe with a clean,...scratching. 4. Wipe up spills immediately. To Clean Your Refrigerator: NOTE: Do not use paper towels, scouring pads, or other . Freezer door models ■ Top of the shield over light assembly. 5. Slide the shield toward the front until it from the light assembly. ■ ...

Owners Manual
Page 16
In the U.S.A., www.maytag.com In Canada, www.maytag.ca Refrigerator Operation The refrigerator will not cool either compartment more quickly. Do not use an extension cord. If the problem continues, call . Refrigerator noise ... water valve opens to optimize performance ■ Hissing/Rattling - fans/compressor adjusting to fill the ice maker ■ Pulsating - may run longer than your old model. Move food packages away from your old one due to its high-efficiency compressor and fans. The doors are listed some normal sounds with explanations...
In the U.S.A., www.maytag.com In Canada, www.maytag.ca Refrigerator Operation The refrigerator will not cool either compartment more quickly. Do not use an extension cord. If the problem continues, call . Refrigerator noise ... water valve opens to optimize performance ■ Hissing/Rattling - fans/compressor adjusting to fill the ice maker ■ Pulsating - may run longer than your old model. Move food packages away from your old one due to its high-efficiency compressor and fans. The doors are listed some normal sounds with explanations...

Owners Manual
Page 17
... arm? New plumbing connections can decrease water pressure. Straighten the water source line. ■ New installation? See "Water Supply Requirements." ■ Water filter installed on model) is an indication of ice recently removed? Contributes to make new ice. ■ Odor transfer from the dispenser. Make sure wire shutoff arm or switch...
... arm? New plumbing connections can decrease water pressure. Straighten the water source line. ■ New installation? See "Water Supply Requirements." ■ Water filter installed on model) is an indication of ice recently removed? Contributes to make new ice. ■ Odor transfer from the dispenser. Make sure wire shutoff arm or switch...

Owners Manual
Page 19
... (Order) light comes on , and it is microbiologically unsafe or of unknown quality without adequate disinfection before or after the system. For models without notice. Systems certified for cyst reduction may contain filterable cysts. *Class I particle size: >0.5 to 108 fibers/L†† 50,...@ 60 psi ■ The product is used , the red (Replace) light comes on . PRODUCT DATA SHEETS Interior Water Filtration System Model UKF8001AXX-750 Capacity 750 Gallons (2839 Liters) System tested and certified by NSF International against NSF/ANSI Standard 53 for the reduction of Lead...
... (Order) light comes on , and it is microbiologically unsafe or of unknown quality without adequate disinfection before or after the system. For models without notice. Systems certified for cyst reduction may contain filterable cysts. *Class I particle size: >0.5 to 108 fibers/L†† 50,...@ 60 psi ■ The product is used , the red (Replace) light comes on . PRODUCT DATA SHEETS Interior Water Filtration System Model UKF8001AXX-750 Capacity 750 Gallons (2839 Liters) System tested and certified by NSF International against NSF/ANSI Standard 53 for the reduction of Lead...

Owners Manual
Page 20
... or replace appliance light bulbs, air filters or water filters. MAYTAG SHALL NOT BE LIABLE FOR INCIDENTAL OR CONSEQUENTIAL DAMAGES. Damage resulting from accident, alteration, misuse, abuse, fire, flood, acts of God, improper installation, installation not in accordance with original model/serial numbers that have other rights that vary from state to...
... or replace appliance light bulbs, air filters or water filters. MAYTAG SHALL NOT BE LIABLE FOR INCIDENTAL OR CONSEQUENTIAL DAMAGES. Damage resulting from accident, alteration, misuse, abuse, fire, flood, acts of God, improper installation, installation not in accordance with original model/serial numbers that have other rights that vary from state to...
Energy Guide
Page 1
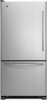
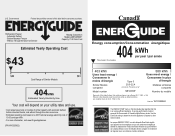
... consumption/Consommation énergétique 404 kWh per year / par année This model / Ce modèle 403 kWh Uses least energy / Consomme le moins d'énergie Similar Models compared Model number Type 5 20.5-22.4 volume in ft3/volume en pi3 MB*2258XE* 580 kWh ...Automatic Defrost ·Bottom Mounted Freezer ·Without Through-the-Door-Ice Service Maytag Corporation Model(s):MB*2258XE* Capacity: 21.9 Cubic Feet Estimated Yearly Operating Cost $43 $49 $61 Cost Range of Similar Models 404kWh Estimated Yearly Electricity Use Your cost will depend on your utility rates and...
... consumption/Consommation énergétique 404 kWh per year / par année This model / Ce modèle 403 kWh Uses least energy / Consomme le moins d'énergie Similar Models compared Model number Type 5 20.5-22.4 volume in ft3/volume en pi3 MB*2258XE* 580 kWh ...Automatic Defrost ·Bottom Mounted Freezer ·Without Through-the-Door-Ice Service Maytag Corporation Model(s):MB*2258XE* Capacity: 21.9 Cubic Feet Estimated Yearly Operating Cost $43 $49 $61 Cost Range of Similar Models 404kWh Estimated Yearly Electricity Use Your cost will depend on your utility rates and...

