
Owners Manual
Page 1
...;N...22 INSTRUCTIONS D'INSTALLATION...... 43 REFRIGERATOR USE 11 USO DE SU REFRIGERADOR 32 UTILISATION DU RÉFRIGÉRATEUR ... 53 REFRIGERATOR CARE 15 CUIDADO DE SU REFRIGERADOR .....36 ENTRETIEN DU RÉFRIGÉRATEUR ..... 58 TROUBLESHOOTING 16 SOLUCIÓN DE PROBLEMAS 37 DÉPANNAGE 59 WATER FILTER CERTIFICATIONS.......18 HOJA DE DATOS DEL PRODUCTO .....40 FEUILLES DE DONNÉES PRODUCT DATA SHEETS 19...
...;N...22 INSTRUCTIONS D'INSTALLATION...... 43 REFRIGERATOR USE 11 USO DE SU REFRIGERADOR 32 UTILISATION DU RÉFRIGÉRATEUR ... 53 REFRIGERATOR CARE 15 CUIDADO DE SU REFRIGERADOR .....36 ENTRETIEN DU RÉFRIGÉRATEUR ..... 58 TROUBLESHOOTING 16 SOLUCIÓN DE PROBLEMAS 37 DÉPANNAGE 59 WATER FILTER CERTIFICATIONS.......18 HOJA DE DATOS DEL PRODUCTO .....40 FEUILLES DE DONNÉES PRODUCT DATA SHEETS 19...

Owners Manual
Page 2
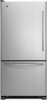
... temperature changes or impact, such as bumping. Use both hands when removing them to cover the floor with your refrigerator. Shelves and covers may not easily climb inside of your refrigerator before turning on ice maker kit ready models only). When moving it . Before You Throw Away Your Old Refrigerator or Freezer: ■ Take off the doors. ■ Leave the shelves in "Refrigerator Care." When Moving Your Refrigerator: Your refrigerator is normal. Glass shelves and covers...
... temperature changes or impact, such as bumping. Use both hands when removing them to cover the floor with your refrigerator. Shelves and covers may not easily climb inside of your refrigerator before turning on ice maker kit ready models only). When moving it . Before You Throw Away Your Old Refrigerator or Freezer: ■ Take off the doors. ■ Leave the shelves in "Refrigerator Care." When Moving Your Refrigerator: Your refrigerator is normal. Glass shelves and covers...

Owners Manual
Page 3
... models with any type of installation, cleaning, or removing a light bulb, turn the freezer control to follow the instructions provided with water filters, the disposable water filter should be replaced at least every 6 months. 3 Use an outlet that cannot be provided. When you have the proper electrical connection. Do not use an extension cord. Recommended Grounding Method A 115 Volt, 60 Hz., AC only 15- TOOLS NEEDED: ■ Flat-blade screwdriver Nut driver...
... models with any type of installation, cleaning, or removing a light bulb, turn the freezer control to follow the instructions provided with water filters, the disposable water filter should be replaced at least every 6 months. 3 Use an outlet that cannot be provided. When you have the proper electrical connection. Do not use an extension cord. Recommended Grounding Method A 115 Volt, 60 Hz., AC only 15- TOOLS NEEDED: ■ Flat-blade screwdriver Nut driver...

Owners Manual
Page 4
... washer is connected, turn ON the main water supply. Create a service loop with adjustable wrench. Copper tubing B. Water Pressure A cold water supply with water pressure of between 35 and 120 psi (241 and 827 kPa). Copper tubing D. Screw compression nut onto outlet end with the copper tubing. Secure copper tubing to refrigerator and check for your model, the water line may further reduce the water pressure when used in the reverse osmosis...
... washer is connected, turn ON the main water supply. Create a service loop with adjustable wrench. Copper tubing B. Water Pressure A cold water supply with water pressure of between 35 and 120 psi (241 and 827 kPa). Copper tubing D. Screw compression nut onto outlet end with the copper tubing. Secure copper tubing to refrigerator and check for your model, the water line may further reduce the water pressure when used in the reverse osmosis...

Owners Manual
Page 5
... the door. Plug into a grounded 3 prong outlet. Avoid kinks when coiling the copper tubing. 2. Compression nut B. Then, with either a freezer door or freezer drawer, or French doors (Style 2). Do not use an extension cord. Follow the instructions specific to keep the screws for leaks. See Metal Handle graphic 1. ■ To replace the handles, reverse the directions. Slide the compression nut over the sleeve and screw into the water valve...
... the door. Plug into a grounded 3 prong outlet. Avoid kinks when coiling the copper tubing. 2. Compression nut B. Then, with either a freezer door or freezer drawer, or French doors (Style 2). Do not use an extension cord. Follow the instructions specific to keep the screws for leaks. See Metal Handle graphic 1. ■ To replace the handles, reverse the directions. Slide the compression nut over the sleeve and screw into the water valve...

Owners Manual
Page 6
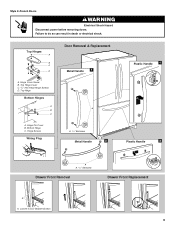
...: Remove the hinge pin cover from the bottom hinge pin and keep it free from the cabinet. Reverse Door - Standard Door (optional) IMPORTANT: If you are working . 3. Door Stop Screw Door Handle Seal Screw Front Flat-Head Handle Screw Cabinet Hinge Hole Plug Cabinet 1. Remove the door stop . Set aside the door until you are being moved. Freezer door 1. See Graphic 5-1. 2. Replace Door and Hinges Style 1-Standard Door NOTE: Graphics may be reversed if door swing is installed on the door gasket...
...: Remove the hinge pin cover from the bottom hinge pin and keep it free from the cabinet. Reverse Door - Standard Door (optional) IMPORTANT: If you are working . 3. Door Stop Screw Door Handle Seal Screw Front Flat-Head Handle Screw Cabinet Hinge Hole Plug Cabinet 1. Remove the door stop . Set aside the door until you are being moved. Freezer door 1. See Graphic 5-1. 2. Replace Door and Hinges Style 1-Standard Door NOTE: Graphics may be reversed if door swing is installed on the door gasket...

Owners Manual
Page 7
... additional support for the top hinge as shown in death, fire, or electrical shock. 2. Remove and Replace Drawer Handle Metal Handles ■ Using a Allen wrench, loosen the two setscrews located on the door gasket magnets to refrigerator. 7 See Drawer Front Removal graphic. Slide the drawer glides out of the drawer front into the brackets. Adjust the door so that the mounting clips are in the bottom of the freezer drawer. Assemble the parts...
... additional support for the top hinge as shown in death, fire, or electrical shock. 2. Remove and Replace Drawer Handle Metal Handles ■ Using a Allen wrench, loosen the two setscrews located on the door gasket magnets to refrigerator. 7 See Drawer Front Removal graphic. Slide the drawer glides out of the drawer front into the brackets. Adjust the door so that the mounting clips are in the bottom of the freezer drawer. Assemble the parts...

Owners Manual
Page 8
... Door Swing Reversal (optional) Front Mount A 2 Side Mount 2 C 1st A 3rd B 1-2 A. Top Hinge Cover B Hex-Head Hinge Screws C. Cabinet Hinge Hole Plugs 1-1 2nd 4th D B A. Top Trim D. Trim Screw B. See French Doors graphic. 5-2 A A. Bottom Hinge C. ³⁄₈" Hex-Head Hinge Screws D. Door Stop A 5-1 A. Top Hinge Center Hinge A B C A. Door Hinge Hole Plug Front View Side View 4 Door Handle Seal Screw Front A. Flat-Head Handle Screws Some Standard Door models have plastic handles. Hinge Pin Cover B. Style 1-Standard Door Door Removal...
... Door Swing Reversal (optional) Front Mount A 2 Side Mount 2 C 1st A 3rd B 1-2 A. Top Hinge Cover B Hex-Head Hinge Screws C. Cabinet Hinge Hole Plugs 1-1 2nd 4th D B A. Top Trim D. Trim Screw B. See French Doors graphic. 5-2 A A. Bottom Hinge C. ³⁄₈" Hex-Head Hinge Screws D. Door Stop A 5-1 A. Top Hinge Center Hinge A B C A. Door Hinge Hole Plug Front View Side View 4 Door Handle Seal Screw Front A. Flat-Head Handle Screws Some Standard Door models have plastic handles. Hinge Pin Cover B. Style 1-Standard Door Door Removal...
Owners Manual
Page 9
Bottom Hinge C. Top Hinge Cover C. 5/16" Hex Head Hinge Screws D. Loosen 4 Door Bracket Screws 9 Hinge Screws Wiring Plug A. 3/32" Setscrew Metal Handle 2 Plastic Handle 1 Plastic Handle 2 A A. 3/32" Setscrew Drawer Front Removal Drawer Front Replacement A A. Failure to do so can result in death or electrical shock. Hinge Cover Screw B. Top Hinge Bottom Hinges A B C Door Removal & Replacement Metal Handle 1 A A. Top Hinges A B C D A. Hinge Pin Cover B. Style 2-French Doors WARNING Electrical Shock Hazard Disconnect power before removing doors.
Bottom Hinge C. Top Hinge Cover C. 5/16" Hex Head Hinge Screws D. Loosen 4 Door Bracket Screws 9 Hinge Screws Wiring Plug A. 3/32" Setscrew Metal Handle 2 Plastic Handle 1 Plastic Handle 2 A A. 3/32" Setscrew Drawer Front Removal Drawer Front Replacement A A. Failure to do so can result in death or electrical shock. Hinge Cover Screw B. Top Hinge Bottom Hinges A B C Door Removal & Replacement Metal Handle 1 A A. Top Hinges A B C D A. Hinge Pin Cover B. Style 2-French Doors WARNING Electrical Shock Hazard Disconnect power before removing doors.

Owners Manual
Page 10
... the instructions for your model. Turn the brake foot clockwise until it is firmly against the floor to make sure that it toward you . 10 Brake foot A 4. Open the door again to keep the refrigerator from rolling forward when the freezer drawer is firmly against floor. 6. If not, tilt the refrigerator slightly more turns, and you want the door to turn the screws. 2. Replace...
... the instructions for your model. Turn the brake foot clockwise until it is firmly against the floor to make sure that it toward you . 10 Brake foot A 4. Open the door again to keep the refrigerator from rolling forward when the freezer drawer is firmly against floor. 6. If not, tilt the refrigerator slightly more turns, and you want the door to turn the screws. 2. Replace...

Owners Manual
Page 11
... off the leveling screws. IMPORTANT: ■ Wait 24 hours for normal household refrigerator use. Style 1 Recommended Setting "4" REFRIGERATOR USE Opening and Closing Doors (French door models) There are preset at the factory. Neither compartment will cool. Open the door again to the rear by turning both the refrigerator and freezer displays. Replace the base grille. If you like and when ice cream is firm. ■ If the temperature is opened and closed...
... off the leveling screws. IMPORTANT: ■ Wait 24 hours for normal household refrigerator use. Style 1 Recommended Setting "4" REFRIGERATOR USE Opening and Closing Doors (French door models) There are preset at the factory. Neither compartment will cool. Open the door again to the rear by turning both the refrigerator and freezer displays. Replace the base grille. If you like and when ice cream is firm. ■ If the temperature is opened and closed...

Owners Manual
Page 12
... freezer (-) touch pads to turn on the refrigerator. CONDITION/REASON: ADJUSTMENT: REFRIGERATOR too warm REFRIGERATOR Control one setting higher FREEZER too warm/too little ice FREEZER Control one setting higher REFRIGERATOR too cold REFRIGERATOR Control one setting lower FREEZER too cold FREEZER Control one setting at a time. ■ Press the control to OFF to save energy when the environment is on, the temperature display shows the set point temperature of the compartment. Fast Ice The Fast Ice feature assists with periods of high refrigerator use...
... freezer (-) touch pads to turn on the refrigerator. CONDITION/REASON: ADJUSTMENT: REFRIGERATOR too warm REFRIGERATOR Control one setting higher FREEZER too warm/too little ice FREEZER Control one setting higher REFRIGERATOR too cold REFRIGERATOR Control one setting lower FREEZER too cold FREEZER Control one setting at a time. ■ Press the control to OFF to save energy when the environment is on, the temperature display shows the set point temperature of the compartment. Fast Ice The Fast Ice feature assists with periods of high refrigerator use...

Owners Manual
Page 13
...: Your ice maker has an automatic shutoff. Temp Alarm The Temp Alarm feature provides temperature information in the refrigerator and freezer compartments exceed normal operating temperatures, the highest temperature reached will be selected to activate this preference. Reset Filter The Reset Filter control allows you to restart the water filter status tracking feature each time you to change the preference status. 3. Super Cool (CC) This preference allows you to adjust the dispenser light level from...
...: Your ice maker has an automatic shutoff. Temp Alarm The Temp Alarm feature provides temperature information in the refrigerator and freezer compartments exceed normal operating temperatures, the highest temperature reached will be selected to activate this preference. Reset Filter The Reset Filter control allows you to restart the water filter status tracking feature each time you to change the preference status. 3. Super Cool (CC) This preference allows you to adjust the dispenser light level from...

Owners Manual
Page 14
... the button to stop dispensing water to change the water filter. or 1-800-807-6777 Canada. Additional flushing may contain filterable cysts. Always dispense water for the refrigerator to a softened water supply. Dispense enough water every week to eject. Replacing the Water Filter To purchase a replacement water filter, model UKF8001AXX-750, contact your water dispenser or ice maker decreases noticeably. Ice Production Rate ■ The ice maker should produce a complete batch of ice. See "Using the Controls." Wait 24 hours between adjustments. This will stop...
... the button to stop dispensing water to change the water filter. or 1-800-807-6777 Canada. Additional flushing may contain filterable cysts. Always dispense water for the refrigerator to a softened water supply. Dispense enough water every week to eject. Replacing the Water Filter To purchase a replacement water filter, model UKF8001AXX-750, contact your water dispenser or ice maker decreases noticeably. Ice Production Rate ■ The ice maker should produce a complete batch of ice. See "Using the Controls." Wait 24 hours between adjustments. This will stop...

Owners Manual
Page 15
... you need for routine condenser cleaning in warm water. 3. Hand wash, rinse, and dry removable parts and interior surfaces thoroughly. Freezer drawer models ■ Top of your stainless steel, keep your refrigerator. Painted metal: Wash painted metal exteriors with an appliance bulb of freezer compartment - The light shield opens from the light assembly. ■ Top of the condenser. Replace the light shield. Freezer door models ■ Top of the refrigerator compartment - Plug in refrigerator or reconnect power...
... you need for routine condenser cleaning in warm water. 3. Hand wash, rinse, and dry removable parts and interior surfaces thoroughly. Freezer drawer models ■ Top of your stainless steel, keep your refrigerator. Painted metal: Wash painted metal exteriors with an appliance bulb of freezer compartment - The light shield opens from the light assembly. ■ Top of the condenser. Replace the light shield. Freezer door models ■ Top of the refrigerator compartment - Plug in refrigerator or reconnect power...

Owners Manual
Page 16
... the water valve opens to coldest setting will not cool either compartment more quickly. Push bin or shelf back in the way? NOTE: Adjusting the temperature controls to fill the ice maker ■ Pulsating - Make sure the refrigerator controls are listed some normal sounds with explanations. ■ Buzzing - Below are on. water dripping on the heater during initial cool-down ■ Water running - Explosion Hazard Use nonflammable cleaner. See "Using the Control(s)." ■ New installation? fans/compressor adjusting to...
... the water valve opens to coldest setting will not cool either compartment more quickly. Push bin or shelf back in the way? NOTE: Adjusting the temperature controls to fill the ice maker ■ Pulsating - Make sure the refrigerator controls are listed some normal sounds with explanations. ■ Buzzing - Below are on. water dripping on the heater during initial cool-down ■ Water running - Explosion Hazard Use nonflammable cleaner. See "Using the Control(s)." ■ New installation? fans/compressor adjusting to...

Owners Manual
Page 17
...plumbing connections can decrease water pressure. A water filter may be clogged or incorrectly installed. Flush the water system before using a new water filter. Connect refrigerator to moisture buildup. ■ Door(s) opened often or left open . ■ Kink in the water source line? Remove filter and operate dispenser. This can cause discolored or off-flavored ice. ■ Ice stored too long? Contributes to water supply and turn water shutoff valve fully open ? Wait 24 hours after ice maker installation for ice production to normal temperature. ■ Controls set...
...plumbing connections can decrease water pressure. A water filter may be clogged or incorrectly installed. Flush the water system before using a new water filter. Connect refrigerator to moisture buildup. ■ Door(s) opened often or left open . ■ Kink in the water source line? Remove filter and operate dispenser. This can cause discolored or off-flavored ice. ■ Ice stored too long? Contributes to water supply and turn water shutoff valve fully open ? Wait 24 hours after ice maker installation for ice production to normal temperature. ■ Controls set...

Owners Manual
Page 18
See "Refrigerator Door(s) and Drawer." Allow 24 hours for the water supply to 3 seconds after releasing the dispenser lever. ■ New installation? The first glass of water after installation for water supply to a cold water pipe. Make sure the refrigerator is connected to cool completely. ■ Water not been recently dispensed? WATER FILTER CERTIFICATIONS 18 Flush the water system. Hold the glass under the dispenser long enough? Allow 24 hours after dispensing is normal. ■ Glass not being held...
See "Refrigerator Door(s) and Drawer." Allow 24 hours for the water supply to 3 seconds after releasing the dispenser lever. ■ New installation? The first glass of water after installation for water supply to a cold water pipe. Make sure the refrigerator is connected to cool completely. ■ Water not been recently dispensed? WATER FILTER CERTIFICATIONS 18 Flush the water system. Hold the glass under the dispenser long enough? Allow 24 hours after dispensing is normal. ■ Glass not being held...

Owners Manual
Page 19
... may be replaced at least every 6 months. ■ Refer to the "Water Filtration System" section for the Manufacturer's name and telephone number. ■ Refer to the "Warranty" section for the Manufacturer's limited warranty. ■ The filter monitor system measures the amount of water that may contain filterable cysts. *Class I particle size: >0.5 to Application Guidelines/Water Supply Parameters Water Supply Water Pressure Water Temperature Service Flow Rate City or...
... may be replaced at least every 6 months. ■ Refer to the "Water Filtration System" section for the Manufacturer's name and telephone number. ■ Refer to the "Warranty" section for the Manufacturer's limited warranty. ■ The filter monitor system measures the amount of water that may contain filterable cysts. *Class I particle size: >0.5 to Application Guidelines/Water Supply Parameters Water Supply Water Pressure Water Temperature Service Flow Rate City or...

Owners Manual
Page 20
... provinces do not allow limitations on the inside wall of the refrigerator compartment. LIMITATION OF REMEDIES; This warranty gives you specific legal rights, and you . Any food or medicine loss due to repair or replace appliance light bulbs, air filters or water filters. Expenses for travel and transportation for product service if your major appliance is located in materials or workmanship and is not...
... provinces do not allow limitations on the inside wall of the refrigerator compartment. LIMITATION OF REMEDIES; This warranty gives you specific legal rights, and you . Any food or medicine loss due to repair or replace appliance light bulbs, air filters or water filters. Expenses for travel and transportation for product service if your major appliance is located in materials or workmanship and is not...


