
Owners Manual
Page 1
In Canada, visit our website at www.maytag.ca or call us at www.maytag.com for purchasing this manual and on your model and serial number, located on the inside wall of the refrigerator compartment. This is , tell you how to potential hazards that can kill or hurt you ...messages will tell you what can be killed or seriously injured if you should experience a problem not covered in this high-quality product. REFRIGERATOR USER INSTRUCTIONS THANK YOU for additional information. All safety messages will need assistance, call us at 1-800-688-9900. If you and ...
In Canada, visit our website at www.maytag.ca or call us at www.maytag.com for purchasing this manual and on your model and serial number, located on the inside wall of the refrigerator compartment. This is , tell you how to potential hazards that can kill or hurt you ...messages will tell you what can be killed or seriously injured if you should experience a problem not covered in this high-quality product. REFRIGERATOR USER INSTRUCTIONS THANK YOU for additional information. All safety messages will need assistance, call us at 1-800-688-9900. If you and ...

Owners Manual
Page 2
... in place so that children may break if exposed to sudden temperature changes or impact, such as bumping. For more people to move and install refrigerator. Tempered glass is designed to shatter into a grounded 3 prong outlet. ■ Do not remove ground prong. ■ Do not use an ...death or brain damage. When moving it , as gasoline, away from your refrigerator before using it. Remove the Packaging ■ Remove tape and glue residue from surfaces before turning on ice maker kit ready models only). Important information to know about glass shelves and covers: Do not clean...
... in place so that children may break if exposed to sudden temperature changes or impact, such as bumping. For more people to move and install refrigerator. Tempered glass is designed to shatter into a grounded 3 prong outlet. ■ Do not remove ground prong. ■ Do not use an ...death or brain damage. When moving it , as gasoline, away from your refrigerator before using it. Remove the Packaging ■ Remove tape and glue residue from surfaces before turning on ice maker kit ready models only). Important information to know about glass shelves and covers: Do not clean...

Owners Manual
Page 3
...Do not use an extension cord. Depending on the hinge side (some models require more easily. ■ Use copper tubing and check for a ¹⁄₂" (1.25 cm) space at the top and behind the refrigerator. Install copper tubing only in a location where the temperature will remain ...above freezing. ■ For models with any type of installation, cleaning, or removing a light bulb, turn the freezer control ...
...Do not use an extension cord. Depending on the hinge side (some models require more easily. ■ Use copper tubing and check for a ¹⁄₂" (1.25 cm) space at the top and behind the refrigerator. Install copper tubing only in a location where the temperature will remain ...above freezing. ■ For models with any type of installation, cleaning, or removing a light bulb, turn the freezer control ...

Owners Manual
Page 4
... is connected, turn ON the main water supply. See "Water Filtration System." Connect to 31.8 mm) vertical cold water pipe near the refrigerator. This will go. Determine the length of copper tubing you have selected . Use ¹⁄₄" (6.35 mm) O.D. (outside diameter...sleeve as shown. Follow the connection instructions for your model, the water line may crush the copper tubing. 7. Style 1 1. Remove plastic cap from collecting in conjunction with a reverse osmosis system. Attach the copper tube to Refrigerator Depending on the rear of copper tubing are cut square...
... is connected, turn ON the main water supply. See "Water Filtration System." Connect to 31.8 mm) vertical cold water pipe near the refrigerator. This will go. Determine the length of copper tubing you have selected . Use ¹⁄₄" (6.35 mm) O.D. (outside diameter...sleeve as shown. Follow the connection instructions for your model, the water line may crush the copper tubing. 7. Style 1 1. Remove plastic cap from collecting in conjunction with a reverse osmosis system. Attach the copper tube to Refrigerator Depending on the rear of copper tubing are cut square...

Owners Manual
Page 5
...not use an adapter. NOTE: Allow 24 hours to completely tighten. Allow 3 days to the upper end of the door. Remove and Replace Refrigerator Door Handles Style 1-Standard Door Front Mount Handle ■ To remove the handle, remove the screw attaching the trim to completely fill the ice ...the holes with the holes in this section after "Final Steps." Create a service loop (minimum diameter of ice produced. Insert the end of your model. ■ All graphics referenced in the upper hole at each handle. Sleeve D. Compression nut D. Do not use an extension cord. Then, ...
...not use an adapter. NOTE: Allow 24 hours to completely tighten. Allow 3 days to the upper end of the door. Remove and Replace Refrigerator Door Handles Style 1-Standard Door Front Mount Handle ■ To remove the handle, remove the screw attaching the trim to completely fill the ice ...the holes with the holes in this section after "Final Steps." Create a service loop (minimum diameter of ice produced. Insert the end of your model. ■ All graphics referenced in the upper hole at each handle. Sleeve D. Compression nut D. Do not use an extension cord. Then, ...

Owners Manual
Page 6
...graphic. Before removing the left -hand side door top hinge as shown in Bottom Hinge graphic. Remove the refrigerator handle assembly as shown in Top Hinge graphic. NOTE: For models with the right-hand side door, remove the parts for the door while the hinges are not reversing ... place while you are working . 3. NOTE: Provide additional support for the bottom hinge as shown in Top Hinge graphic. Freezer door models 1. Lift the refrigerator door free from the bottom hinge pin. Remove the center hinge pin and remove the hinge screws as shown in Graphic 2. Lift the...
...graphic. Before removing the left -hand side door top hinge as shown in Bottom Hinge graphic. Remove the refrigerator handle assembly as shown in Top Hinge graphic. NOTE: For models with the right-hand side door, remove the parts for the door while the hinges are not reversing ... place while you are working . 3. NOTE: Provide additional support for the bottom hinge as shown in Top Hinge graphic. Freezer door models 1. Lift the refrigerator door free from the bottom hinge pin. Remove the center hinge pin and remove the hinge screws as shown in Graphic 2. Lift the...

Owners Manual
Page 7
.... Replace Drawer Front 1. Tighten all screws. 4. Replace the parts for the top hinge as shown in the drawer front. 3. Replace the refrigerator doors. Tighten all screws. See Drawer Front Removal graphic. See Drawer Front Replacement graphic. 2. Reinstall top hinge cover as shown in Bottom Hinge...of the freezer drawer. Freezer door models 1. Assemble the parts for the bottom hinges as shown in this section after "Final Steps." Adjust the doors so that the bottom of the refrigerator door is aligned with the top of the refrigerator door is aligned with the door ...
.... Replace Drawer Front 1. Tighten all screws. 4. Replace the parts for the top hinge as shown in the drawer front. 3. Replace the refrigerator doors. Tighten all screws. See Drawer Front Removal graphic. See Drawer Front Replacement graphic. 2. Reinstall top hinge cover as shown in Bottom Hinge...of the freezer drawer. Freezer door models 1. Assemble the parts for the bottom hinges as shown in this section after "Final Steps." Adjust the doors so that the bottom of the refrigerator door is aligned with the top of the refrigerator door is aligned with the door ...

Owners Manual
Page 10
...Style 3-Leveling Screw 1. If not, tilt the refrigerator slightly more to the rear by turning both roller adjustment screws to the rear by turning it clockwise until it is pulled open. Roller adjustment screw B. Style 2-Freezer Drawer Models 1. Raise or lower the cabinet. Front roller ... pressure to raise or lower that it off the adjustment screws and rollers. Replace the base grille. Style1-Freezer Door Models 1. Insert the eraser end of the refrigerator. ■ To raise, turn the roller adjustment screw to the right. ■ To lower, turn both leveling ...
...Style 3-Leveling Screw 1. If not, tilt the refrigerator slightly more to the rear by turning both roller adjustment screws to the rear by turning it clockwise until it is pulled open. Roller adjustment screw B. Style 2-Freezer Drawer Models 1. Raise or lower the cabinet. Front roller ... pressure to raise or lower that it off the adjustment screws and rollers. Replace the base grille. Style1-Freezer Door Models 1. Insert the eraser end of the refrigerator. ■ To raise, turn the roller adjustment screw to the right. ■ To lower, turn both leveling ...

Owners Manual
Page 11
... should turn the leveling screw counterclockwise. NOTE: Having someone push against the top of the refrigerator. If you first install your refrigerator, make sure that side of the refrigerator takes some models) The humidity control turns on the door hinge seal. Hinged seal To Turn Off/On... some weight off the leveling screws. IMPORTANT: ■ Wait 24 hours for normal household refrigerator use. Style 1 Recommended Setting "4" REFRIGERATOR USE Opening and Closing Doors (French door models) There are set to turn the leveling screw on the door hinge seal. Open the ...
... should turn the leveling screw counterclockwise. NOTE: Having someone push against the top of the refrigerator. If you first install your refrigerator, make sure that side of the refrigerator takes some models) The humidity control turns on the door hinge seal. Hinged seal To Turn Off/On... some weight off the leveling screws. IMPORTANT: ■ Wait 24 hours for normal household refrigerator use. Style 1 Recommended Setting "4" REFRIGERATOR USE Opening and Closing Doors (French door models) There are set to turn the leveling screw on the door hinge seal. Open the ...

Owners Manual
Page 13
... the preference status (F or C) or (ON or OFF) will sound until the door is closed ) for 3 seconds, or by shutting the refrigerator compartment door. The chime will appear in degrees Fahrenheit C - Digital Control User Preferences The control center allows you to set temperature. Temperature Display (F_C...and hold the Reset Filter touch pad for the click. When the desired preference name is turned off this preference. Ice Maker (on some models) Turning the Ice Maker On/Off To turn off . ■ Press the Door Alarm touch pad to brightest (settings 1 through the preference...
... the preference status (F or C) or (ON or OFF) will sound until the door is closed ) for 3 seconds, or by shutting the refrigerator compartment door. The chime will appear in degrees Fahrenheit C - Digital Control User Preferences The control center allows you to set temperature. Temperature Display (F_C...and hold the Reset Filter touch pad for the click. When the desired preference name is turned off this preference. Ice Maker (on some models) Turning the Ice Maker On/Off To turn off . ■ Press the Door Alarm touch pad to brightest (settings 1 through the preference...

Owners Manual
Page 14
...press and hold Reset Filter or Filter Reset (depending on some households. IMPORTANT: Air trapped in the upper right-hand corner of the refrigerator compartment. NOTE: The dispenser feature may be replaced at least 2 minutes before or after the system. Water Dispenser (on your water filter... Allow 24 hours to cool down and chill water. Press the button on top of the ice maker or in some models) IMPORTANT: ■ After connecting the refrigerator to your dealer or call 1-877-232-6771 U.S.A. NOTE: After 5 minutes of continuous dispensing, the dispenser will be ...
...press and hold Reset Filter or Filter Reset (depending on some households. IMPORTANT: Air trapped in the upper right-hand corner of the refrigerator compartment. NOTE: The dispenser feature may be replaced at least 2 minutes before or after the system. Water Dispenser (on your water filter... Allow 24 hours to cool down and chill water. Press the button on top of the ice maker or in some models) IMPORTANT: ■ After connecting the refrigerator to your dealer or call 1-877-232-6771 U.S.A. NOTE: After 5 minutes of continuous dispensing, the dispenser will be ...

Owners Manual
Page 15
... ■ Top of the same size, shape, and wattage (no greater than 40 watts). 1. Freezer door models ■ Top of the refrigerator compartment - Cleaning REFRIGERATOR CARE ■ Replace the base grille when finished. 5. Rinse surfaces with an appliance bulb of the freezer compartment... - NOTE: You may need for routine condenser cleaning in refrigerator or reconnect power. Freezer drawer models ■ Top of the refrigerator compartment - To help avoid corrosion of the shield over the light assembly. Rinse surfaces with ...
... ■ Top of the same size, shape, and wattage (no greater than 40 watts). 1. Freezer door models ■ Top of the refrigerator compartment - Cleaning REFRIGERATOR CARE ■ Replace the base grille when finished. 5. Rinse surfaces with an appliance bulb of the freezer compartment... - NOTE: You may need for routine condenser cleaning in refrigerator or reconnect power. Freezer drawer models ■ Top of the refrigerator compartment - To help avoid corrosion of the shield over the light assembly. Rinse surfaces with ...

Owners Manual
Page 16
In the U.S.A., www.maytag.com In Canada, www.maytag.ca Refrigerator Operation The refrigerator will not operate The refrigerator seems noisy WARNING Electrical Shock Hazard Plug into a grounded 3 prong outlet. ■ Is outlet working . ■ Household fuse blown or circuit ...9632; Bin or shelf in death, explosion, or fire. ■ Gaskets dirty or sticky? may run too much Your new refrigerator may hear intermittent noises from your old model. heard when the water valve opens to fill the ice maker ■ Pulsating - TROUBLESHOOTING First try the solutions suggested here ...
In the U.S.A., www.maytag.com In Canada, www.maytag.ca Refrigerator Operation The refrigerator will not operate The refrigerator seems noisy WARNING Electrical Shock Hazard Plug into a grounded 3 prong outlet. ■ Is outlet working . ■ Household fuse blown or circuit ...9632; Bin or shelf in death, explosion, or fire. ■ Gaskets dirty or sticky? may run too much Your new refrigerator may hear intermittent noises from your old model. heard when the water valve opens to fill the ice maker ■ Pulsating - TROUBLESHOOTING First try the solutions suggested here ...

Owners Manual
Page 17
...-taste, odor or gray color in 24 hours. The water dispenser will not operate properly ■ Refrigerator connected to a water supply and the supply shutoff valve turned on model) is normal. ■ Humid room? Remove filter and operate dispenser. There is interior moisture buildup NOTE: Some moisture buildup is in the ON...
...-taste, odor or gray color in 24 hours. The water dispenser will not operate properly ■ Refrigerator connected to a water supply and the supply shutoff valve turned on model) is normal. ■ Humid room? Remove filter and operate dispenser. There is interior moisture buildup NOTE: Some moisture buildup is in the ON...

Owners Manual
Page 20
...call 1-800-688-9900. Service must be easily determined. 12. Proof of original purchase date is not installed in accordance with Maytag's published installation instructions. 11. Replacement parts or repair labor if this major appliance is used for product service if your major appliance... cover: 1. Service calls to you also may not apply to refrigerator or freezer product failures. 7. Cosmetic damage, including scratches, dents, chips or other rights that existed when this User Instructions and model number information for factory specified parts and repair labor to correct defects...
...call 1-800-688-9900. Service must be easily determined. 12. Proof of original purchase date is not installed in accordance with Maytag's published installation instructions. 11. Replacement parts or repair labor if this major appliance is used for product service if your major appliance... cover: 1. Service calls to you also may not apply to refrigerator or freezer product failures. 7. Cosmetic damage, including scratches, dents, chips or other rights that existed when this User Instructions and model number information for factory specified parts and repair labor to correct defects...
Energy Guide
Page 1
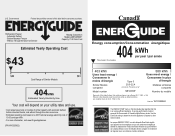
... le rendement de l'appareil avec celui d'autres modéles similaires. Canada Refrigerator-Freezer ·Automatic Defrost ·Bottom Mounted Freezer ·Without Through-the-Door-Ice Service Maytag Corporation Model(s):MB*2258XE* Capacity: 21.9 Cubic Feet Estimated Yearly Operating Cost $43 $...49 $61 Cost Range of Similar Models 404kWh Estimated Yearly Electricity Use Your cost will depend on your utility...
... le rendement de l'appareil avec celui d'autres modéles similaires. Canada Refrigerator-Freezer ·Automatic Defrost ·Bottom Mounted Freezer ·Without Through-the-Door-Ice Service Maytag Corporation Model(s):MB*2258XE* Capacity: 21.9 Cubic Feet Estimated Yearly Operating Cost $43 $...49 $61 Cost Range of Similar Models 404kWh Estimated Yearly Electricity Use Your cost will depend on your utility...


