
Owners Manual
Page 1
...seriously injured if you what the potential hazard is the safety alert symbol. In Canada, visit our website at www.maytag.ca or call us at www.maytag.com for purchasing this manual and on the inside wall of others . We have provided many important safety messages in ..., call us at 1-800-688-9900. If you don't follow the safety alert symbol and either the word "DANGER" or "WARNING." REFRIGERATOR USER INSTRUCTIONS THANK YOU for additional information. All safety messages will follow instructions. W10208790A WARNING You can kill or hurt you still need your ...
...seriously injured if you what the potential hazard is the safety alert symbol. In Canada, visit our website at www.maytag.ca or call us at www.maytag.com for purchasing this manual and on the inside wall of others . We have provided many important safety messages in ..., call us at 1-800-688-9900. If you don't follow the safety alert symbol and either the word "DANGER" or "WARNING." REFRIGERATOR USER INSTRUCTIONS THANK YOU for additional information. All safety messages will follow instructions. W10208790A WARNING You can kill or hurt you still need your ...

Owners Manual
Page 2
.... ■ Disconnect power before servicing. ■ Replace all of the packaging materials, clean the inside . When Moving Your Refrigerator: Your refrigerator is normal. Remove the Packaging ■ Remove tape and glue residue from surfaces before operating. ■ Remove doors from your old...few days." Wipe with warm water when they will sit for cleaning or service, be sure to cover the floor with your old refrigerator, please follow basic precautions, including the following: ■ Plug into many small, pebble-size pieces. IMPORTANT: Child entrapment and suffocation...
.... ■ Disconnect power before servicing. ■ Replace all of the packaging materials, clean the inside . When Moving Your Refrigerator: Your refrigerator is normal. Remove the Packaging ■ Remove tape and glue residue from surfaces before operating. ■ Remove doors from your old...few days." Wipe with warm water when they will sit for cleaning or service, be sure to cover the floor with your old refrigerator, please follow basic precautions, including the following: ■ Plug into many small, pebble-size pieces. IMPORTANT: Child entrapment and suffocation...

Owners Manual
Page 3
...require more easily. ■ Use copper tubing and check for the water line connections. Use an outlet that a separate circuit serving only your refrigerator, allow extra space at the back for leaks. See "Using the Controls." 2¹⁄₂" (6.3 cm) Water Supply Requirements Gather the... is important to follow the instructions provided with water filters, the disposable water filter should be turned off by a switch. If your refrigerator into a grounded 3 prong outlet. Failure to make sure you do so can result in death, explosion, or fire. Read and follow...
...require more easily. ■ Use copper tubing and check for the water line connections. Use an outlet that a separate circuit serving only your refrigerator, allow extra space at the back for leaks. See "Using the Controls." 2¹⁄₂" (6.3 cm) Water Supply Requirements Gather the... is important to follow the instructions provided with water filters, the disposable water filter should be turned off by a switch. If your refrigerator into a grounded 3 prong outlet. Failure to make sure you do so can result in death, explosion, or fire. Read and follow...

Owners Manual
Page 4
...a ¹⁄₂" to 1¹⁄₄" (12.7 mm to Water Line 1. This will go. Fasten the shutoff valve to allow for your refrigerator has a water filter, it is a cold water pipe. ■ Horizontal pipe will work, but the following procedure must be followed: Drill on before ... bottom. If the water pressure to the reverse osmosis system is less than 40 to 60 psi (276 to 414 kPa): ■ Check to Refrigerator Depending on your water pressure, call a licensed, qualified plumber. IMPORTANT: ■ Make sure it may crush the copper tubing. 7. Flush the ...
...a ¹⁄₂" to 1¹⁄₄" (12.7 mm to Water Line 1. This will go. Fasten the shutoff valve to allow for your refrigerator has a water filter, it is a cold water pipe. ■ Horizontal pipe will work, but the following procedure must be followed: Drill on before ... bottom. If the water pressure to the reverse osmosis system is less than 40 to 60 psi (276 to 414 kPa): ■ Check to Refrigerator Depending on your water pressure, call a licensed, qualified plumber. IMPORTANT: ■ Make sure it may crush the copper tubing. 7. Flush the ...

Owners Manual
Page 5
...24 hours to completely fill the ice container. Allow 3 days to produce the first batch of the door. Remove and Replace Refrigerator Door Handles Style 1-Standard Door Front Mount Handle ■ To remove the handle, remove the screw attaching the trim to the ... Plastic water tubing C. Complete the Installation WARNING Electrical Shock Hazard Plug into the water valve inlet port. Do not use an extension cord. Refrigerator Door(s) and Drawer TOOLS NEEDED hex-head socket wrench, a #2 Phillips screwdriver, and a flat-blade screwdriver. Style 2-French Doors Metal Handles ...
...24 hours to completely fill the ice container. Allow 3 days to produce the first batch of the door. Remove and Replace Refrigerator Door Handles Style 1-Standard Door Front Mount Handle ■ To remove the handle, remove the screw attaching the trim to the ... Plastic water tubing C. Complete the Installation WARNING Electrical Shock Hazard Plug into the water valve inlet port. Do not use an extension cord. Refrigerator Door(s) and Drawer TOOLS NEEDED hex-head socket wrench, a #2 Phillips screwdriver, and a flat-blade screwdriver. Style 2-French Doors Metal Handles ...

Owners Manual
Page 6
...parts for the top hinge as shown in place. If you are ready to reverse your fingernail between the two sections. See Graphic 1-1. 2. Refrigerator door 1. Remove door handle seal screw front. Keep all screws. Remove freezer door handle seal screw. Set aside door until you are working... screws from the cabinet. 4. Set aside the door until you are working . 3. See Graphic 5-1. 2. Move to opposite side of the refrigerator door. See Graphic 4. 4. Replace Door and Hinges Style 1-Standard Door NOTE: Graphics may be reversed if door swing is installed on the door...
...parts for the top hinge as shown in place. If you are ready to reverse your fingernail between the two sections. See Graphic 1-1. 2. Refrigerator door 1. Remove door handle seal screw front. Keep all screws. Remove freezer door handle seal screw. Set aside door until you are working... screws from the cabinet. 4. Set aside the door until you are working . 3. See Graphic 5-1. 2. Move to opposite side of the refrigerator door. See Graphic 4. 4. Replace Door and Hinges Style 1-Standard Door NOTE: Graphics may be reversed if door swing is installed on the door...

Owners Manual
Page 7
... See Drawer Front Removal graphic. See Drawer Front Replacement graphic. 2. Pull the drawer brackets toward you keep the screws for the refrigerator doors while the hinges are to remove and replace the freezer drawer. ■ All graphics are being moved. See Drawer Front Replacement... Remove and Replace Drawer Handle Metal Handles ■ Using a Allen wrench, loosen the two setscrews located on the door gasket magnets to refrigerator. 7 See Drawer Front Removal graphic. Return all screws. Remove Drawer Front 1. Keep the screws in death, fire, or electrical shock....
... See Drawer Front Removal graphic. See Drawer Front Replacement graphic. 2. Pull the drawer brackets toward you keep the screws for the refrigerator doors while the hinges are to remove and replace the freezer drawer. ■ All graphics are being moved. See Drawer Front Replacement... Remove and Replace Drawer Handle Metal Handles ■ Using a Allen wrench, loosen the two setscrews located on the door gasket magnets to refrigerator. 7 See Drawer Front Removal graphic. Return all screws. Remove Drawer Front 1. Keep the screws in death, fire, or electrical shock....

Owners Manual
Page 10
.... ■ To lower, turn the roller adjustment screw to the left . Style 2-Freezer Drawer Models 1. Insert the eraser end of the refrigerator takes some weight off the adjustment screws and rollers. Using a screwdriver or ³⁄₈" hex driver, turn both roller adjustment screws to... to turn both leveling screws clockwise. Remove the base grille. Apply slight downward pressure to the notched side of the refrigerator. If not, tilt the refrigerator slightly more to the rear by turning both screws the same amount. Replace the base grille. Remove the base grille....
.... ■ To lower, turn the roller adjustment screw to the left . Style 2-Freezer Drawer Models 1. Insert the eraser end of the refrigerator takes some weight off the adjustment screws and rollers. Using a screwdriver or ³⁄₈" hex driver, turn both roller adjustment screws to... to turn both leveling screws clockwise. Remove the base grille. Apply slight downward pressure to the notched side of the refrigerator. If not, tilt the refrigerator slightly more to the rear by turning both screws the same amount. Replace the base grille. Remove the base grille....

Owners Manual
Page 11
... when the freezer is opened and closed , the hinged seal automatically forms a seal between the two doors. Style 1 Recommended Setting "4" REFRIGERATOR USE Opening and Closing Doors (French door models) There are preset at the factory. Neither compartment will cool. Neither compartment will not cool...turning both leveling screws clockwise. Electronic and Dial Controls For your food may have either separately or together. There is out of the refrigerator. ■ To raise, turn the leveling screw clockwise. ■ To lower, turn both doors are still set to be sure...
... when the freezer is opened and closed , the hinged seal automatically forms a seal between the two doors. Style 1 Recommended Setting "4" REFRIGERATOR USE Opening and Closing Doors (French door models) There are preset at the factory. Neither compartment will cool. Neither compartment will not cool...turning both leveling screws clockwise. Electronic and Dial Controls For your food may have either separately or together. There is out of the refrigerator. ■ To raise, turn the leveling screw clockwise. ■ To lower, turn both doors are still set to be sure...

Owners Manual
Page 12
...FREEZER too cold Adjust FREEZER Control 1° higher Additional Digital Control Center Features Fast Cool The Fast Cool feature assists with temporary periods of high refrigerator use, full grocery loads, or temporarily warm room temperatures. ■ Press the Fast Cool touch pad to set point. Allow a few ...again to return to turn on , the temperature display shows the set point is less humid. IMPORTANT: When the power is on the refrigerator. To Adjust Set Point Temperatures: The first touch of the compartment. NOTE: The Fast Cool feature will cool. ■ Press both the ...
...FREEZER too cold Adjust FREEZER Control 1° higher Additional Digital Control Center Features Fast Cool The Fast Cool feature assists with temporary periods of high refrigerator use, full grocery loads, or temporarily warm room temperatures. ■ Press the Fast Cool touch pad to set point. Allow a few ...again to return to turn on , the temperature display shows the set point is less humid. IMPORTANT: When the power is on the refrigerator. To Adjust Set Point Temperatures: The first touch of the compartment. NOTE: The Fast Cool feature will cool. ■ Press both the ...

Owners Manual
Page 13
...displays. The chime will be enabled. Digital Control User Preferences The control center allows you to turn this feature by shutting the refrigerator compartment door. All control panel lights, interior lights and alarm tones will sound until the indicator light goes off to turn ...will appear in the Freezer display and the preference status (F or C) or (ON or OFF) will sound repeatedly if the freezer or refrigerator compartment temperatures exceed normal operating temperatures for 3 seconds to improve the air flow and temperature control. When the desired preference name is turned ...
...displays. The chime will be enabled. Digital Control User Preferences The control center allows you to turn this feature by shutting the refrigerator compartment door. All control panel lights, interior lights and alarm tones will sound until the indicator light goes off to turn ...will appear in the Freezer display and the preference status (F or C) or (ON or OFF) will sound repeatedly if the freezer or refrigerator compartment temperatures exceed normal operating temperatures for 3 seconds to improve the air flow and temperature control. When the desired preference name is turned ...

Owners Manual
Page 14
...and chill water. Repeat until it is on some households. Additional flushing may be only as good as salt) can damage parts of the refrigerator compartment. Dispense enough water every week to poor quality ice. or 1-800-807-6777 Canada. Your water will blink and then go off ...for at least every 6 months OR earlier if the flow of the ice maker or in some models) IMPORTANT: ■ After connecting the refrigerator to avoid flooding. Remove sealing label from replacement filter and insert the filter end into the filter head. 3. Turn the filter clockwise until ...
...and chill water. Repeat until it is on some households. Additional flushing may be only as good as salt) can damage parts of the refrigerator compartment. Dispense enough water every week to poor quality ice. or 1-800-807-6777 Canada. Your water will blink and then go off ...for at least every 6 months OR earlier if the flow of the ice maker or in some models) IMPORTANT: ■ After connecting the refrigerator to avoid flooding. Remove sealing label from replacement filter and insert the filter end into the filter head. 3. Turn the filter clockwise until ...

Owners Manual
Page 15
... and dry removable parts and interior surfaces thoroughly. Remove the light shield, if necessary. Freezer drawer models ■ Top of the refrigerator compartment - Slide the light shield toward the back of the compartment to the other harsh cleaning tools. 1. Squeeze and pull rear of... compartment - Insert front tabs of light shield into the liner and snap the back portion of your stainless steel, keep your refrigerator. Unplug refrigerator or disconnect power. 2. Rinse surfaces with clean, warm water and dry immediately to avoid water spots. To help avoid corrosion...
... and dry removable parts and interior surfaces thoroughly. Remove the light shield, if necessary. Freezer drawer models ■ Top of the refrigerator compartment - Slide the light shield toward the back of the compartment to the other harsh cleaning tools. 1. Squeeze and pull rear of... compartment - Insert front tabs of light shield into the liner and snap the back portion of your stainless steel, keep your refrigerator. Unplug refrigerator or disconnect power. 2. Rinse surfaces with clean, warm water and dry immediately to avoid water spots. To help avoid corrosion...

Owners Manual
Page 16
... outlet. ■ Is outlet working . ■ Household fuse blown or circuit breaker tripped? Rinse and dry with mild soap and warm water. In the U.S.A., www.maytag.com In Canada, www.maytag.ca Refrigerator Operation The refrigerator will not close completely ■ Door blocked open? Replace the fuse or reset the circuit breaker...
... outlet. ■ Is outlet working . ■ Household fuse blown or circuit breaker tripped? Rinse and dry with mild soap and warm water. In the U.S.A., www.maytag.com In Canada, www.maytag.ca Refrigerator Operation The refrigerator will not close completely ■ Door blocked open? Replace the fuse or reset the circuit breaker...

Owners Manual
Page 17
...in the water source line? If ice quality improves, then the filter may need to be clogged or incorrectly installed. Discard ice. Connect refrigerator to water supply and turn water shutoff valve fully open. ■ Kink in the ON position. ■ New installation? Make sure ... or small NOTE: This is too warm ■ New installation? Gray or dark discoloration in the ice ■ New plumbing connections? See "Refrigerator Door(s) and Drawer." ■ Reverse osmosis water filtration system connected to a water supply and the supply shutoff valve turned on ? There is...
...in the water source line? If ice quality improves, then the filter may need to be clogged or incorrectly installed. Discard ice. Connect refrigerator to water supply and turn water shutoff valve fully open. ■ Kink in the ON position. ■ New installation? Make sure ... or small NOTE: This is too warm ■ New installation? Gray or dark discoloration in the ice ■ New plumbing connections? See "Refrigerator Door(s) and Drawer." ■ Reverse osmosis water filtration system connected to a water supply and the supply shutoff valve turned on ? There is...

Owners Manual
Page 18
...Water from the dispenser system NOTE: One or two drops of water may not be cool. Discard the first glass of water. ■ Refrigerator connected to cool completely. ■ Recently dispensed large amount of water? See "Water Dispenser." ■ Recently changed water filter? See ... Allow 24 hours after installation for water supply to a cold water pipe. Make sure the refrigerator is connected to cool completely. ■ Water not been recently dispensed? See "Refrigerator Door(s) and Drawer." WATER FILTER CERTIFICATIONS 18 See "Water Supply Requirements." Make sure the water...
...Water from the dispenser system NOTE: One or two drops of water may not be cool. Discard the first glass of water. ■ Refrigerator connected to cool completely. ■ Recently dispensed large amount of water? See "Water Dispenser." ■ Recently changed water filter? See ... Allow 24 hours after installation for water supply to a cold water pipe. Make sure the refrigerator is connected to cool completely. ■ Water not been recently dispensed? See "Refrigerator Door(s) and Drawer." WATER FILTER CERTIFICATIONS 18 See "Water Supply Requirements." Make sure the water...

Owners Manual
Page 20
...of God, improper installation, installation not in accordance with electrical or plumbing codes, or use of products not approved by an authorized Maytag servicer is not available. 10. Repairs to parts or systems resulting from unauthorized modifications made to you do not have been removed,...purchase. 6. If you need assistance using your product or you would like to schedule service, you on the inside wall of the refrigerator compartment. Cosmetic damage, including scratches, dents, chips or other damage to the finish of your correspondence. Expenses for travel and transportation...
...of God, improper installation, installation not in accordance with electrical or plumbing codes, or use of products not approved by an authorized Maytag servicer is not available. 10. Repairs to parts or systems resulting from unauthorized modifications made to you do not have been removed,...purchase. 6. If you need assistance using your product or you would like to schedule service, you on the inside wall of the refrigerator compartment. Cosmetic damage, including scratches, dents, chips or other damage to the finish of your correspondence. Expenses for travel and transportation...
Energy Guide
Page 1
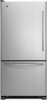
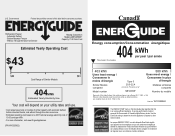
... loi (S.C. 1992, c.36). Use the EnerGuide rating to determine how this is an offense (S.C. 1992, c. 36). Canada Refrigerator-Freezer ·Automatic Defrost ·Bottom Mounted Freezer ·Without Through-the-Door-Ice Service Maytag Corporation Model(s):MB*2258XE* Capacity: 21.9 Cubic Feet Estimated Yearly Operating Cost $43 $49 $61 Cost Range of...
... loi (S.C. 1992, c.36). Use the EnerGuide rating to determine how this is an offense (S.C. 1992, c. 36). Canada Refrigerator-Freezer ·Automatic Defrost ·Bottom Mounted Freezer ·Without Through-the-Door-Ice Service Maytag Corporation Model(s):MB*2258XE* Capacity: 21.9 Cubic Feet Estimated Yearly Operating Cost $43 $49 $61 Cost Range of...


