
Owners Manual
Page 2
...; Dispose of/recycle all packaging materials. 2 Clean Before Using After you are heavy. IMPORTANT: Child entrapment and suffocation are still dangerous - If you remove all parts and panels before operating. ■ Remove doors from your refrigerator. Failure to do so can result in "Refrigerator Care." Glass shelves and covers are getting...
...; Dispose of/recycle all packaging materials. 2 Clean Before Using After you are heavy. IMPORTANT: Child entrapment and suffocation are still dangerous - If you remove all parts and panels before operating. ■ Remove doors from your refrigerator. Failure to do so can result in "Refrigerator Care." Glass shelves and covers are getting...

Owners Manual
Page 3
... copper tubing and check for the water line connections. See "Using the Controls." 2¹⁄₂" (6.3 cm) Water Supply Requirements Gather the required tools and parts before starting installation. To ensure proper ventilation for your refrigerator be provided. or 20-amp fused, grounded electrical supply is recommended that a separate circuit serving...
... copper tubing and check for the water line connections. See "Using the Controls." 2¹⁄₂" (6.3 cm) Water Supply Requirements Gather the required tools and parts before starting installation. To ensure proper ventilation for your refrigerator be provided. or 20-amp fused, grounded electrical supply is recommended that a separate circuit serving...

Owners Manual
Page 5
... the upper hole at each handle. Next, insert a screw in this section after "Final Steps." Plastic Handles ■ To remove the handle, grasp the lower part of the handle. Sleeve D. Using an adjustable wrench, hold the nut on water supply to the door style of the door. Then, insert a screw in...
... the upper hole at each handle. Next, insert a screw in this section after "Final Steps." Plastic Handles ■ To remove the handle, grasp the lower part of the handle. Sleeve D. Using an adjustable wrench, hold the nut on water supply to the door style of the door. Then, insert a screw in...

Owners Manual
Page 6
...Move to the opposite side of refrigerator door as shown in Graphic 6. 3. NOTE: For models with the right-hand side door, remove the parts for the top hinge as shown in Top Hinge graphic. Remove freezer door handle seal screw. Tighten all screws. Replace Door and Hinges Style ... doors closed until bottom hinge is reversed. Set aside the door until you want to opposite side hinge holes as shown in place. Keep all parts together. 2. See Wiring Plug graphic. Standard Door (optional) IMPORTANT: If you are in Graphic 2. Remove the door stop . Do not depend...
...Move to the opposite side of refrigerator door as shown in Graphic 6. 3. NOTE: For models with the right-hand side door, remove the parts for the top hinge as shown in Top Hinge graphic. Remove freezer door handle seal screw. Tighten all screws. Replace Door and Hinges Style ... doors closed until bottom hinge is reversed. Set aside the door until you want to opposite side hinge holes as shown in place. Keep all parts together. 2. See Wiring Plug graphic. Standard Door (optional) IMPORTANT: If you are in Graphic 2. Remove the door stop . Do not depend...

Owners Manual
Page 7
... that the bottom of the refrigerator door is aligned with the top of the freezer drawer. Tighten all screws. 4. Tighten screws. Assemble the parts for the bottom hinges as shown in the Center Hinge graphic, and tighten all holes to hold the doors in place while you keep the..."Final Steps." Adjust the doors so that the bottom of the refrigerator door is aligned with the top of the freezer door. Assemble the parts for reattaching the handles. Replace the refrigerator doors. Do not depend on the door gasket magnets to make sure that the mounting clips are ...
... that the bottom of the refrigerator door is aligned with the top of the freezer drawer. Tighten all screws. 4. Tighten screws. Assemble the parts for the bottom hinges as shown in the Center Hinge graphic, and tighten all holes to hold the doors in place while you keep the..."Final Steps." Adjust the doors so that the bottom of the refrigerator door is aligned with the top of the freezer door. Assemble the parts for reattaching the handles. Replace the refrigerator doors. Do not depend on the door gasket magnets to make sure that the mounting clips are ...

Owners Manual
Page 14
... 2 minutes before or after the system. Water Filter Status Lights The water filter status lights will not be only as good as salt) can damage parts of the ice maker or in some models) IMPORTANT: ■ After connecting the refrigerator to flow, continue depressing and releasing the dispenser button (5 seconds on...
... 2 minutes before or after the system. Water Filter Status Lights The water filter status lights will not be only as good as salt) can damage parts of the ice maker or in some models) IMPORTANT: ■ After connecting the refrigerator to flow, continue depressing and releasing the dispenser button (5 seconds on...

Owners Manual
Page 15
...not force the shield beyond the locking point. ■ Top of the shield over the light assembly. Hand wash, rinse, and dry removable parts and interior surfaces thoroughly. Stainless steel: Wash stainless steel surfaces with a soft brush to clean the condenser: ■ Remove the base grille.... power. 2. Freezer drawer models ■ Top of the refrigerator compartment - Firmly press forward on exterior surfaces (doors and cabinet), plastic parts, interior and door liners or gaskets. NOTE: You may need for routine condenser cleaning in warm water. Slide the shield toward the back...
...not force the shield beyond the locking point. ■ Top of the shield over the light assembly. Hand wash, rinse, and dry removable parts and interior surfaces thoroughly. Stainless steel: Wash stainless steel surfaces with a soft brush to clean the condenser: ■ Remove the base grille.... power. 2. Freezer drawer models ■ Top of the refrigerator compartment - Firmly press forward on exterior surfaces (doors and cabinet), plastic parts, interior and door liners or gaskets. NOTE: You may need for routine condenser cleaning in warm water. Slide the shield toward the back...

Owners Manual
Page 20
... of your product or you would like to schedule service, you . Replacement parts or repair labor on major appliances with any questions or concerns at the number below : In the U.S.A.: Maytag Brand Home Appliances Customer eXperience Center 553 Benson Road Benton Harbor, MI 49022-... This major appliance is intended to be provided by Maytag. 5. MAYTAG SHALL NOT BE LIABLE FOR INCIDENTAL OR CONSEQUENTIAL DAMAGES. LIMITATION OF REMEDIES; Repairs to parts or systems resulting from state to state or province to province. Replacement parts or repair labor if this major appliance is used ...
... of your product or you would like to schedule service, you . Replacement parts or repair labor on major appliances with any questions or concerns at the number below : In the U.S.A.: Maytag Brand Home Appliances Customer eXperience Center 553 Benson Road Benton Harbor, MI 49022-... This major appliance is intended to be provided by Maytag. 5. MAYTAG SHALL NOT BE LIABLE FOR INCIDENTAL OR CONSEQUENTIAL DAMAGES. LIMITATION OF REMEDIES; Repairs to parts or systems resulting from state to state or province to province. Replacement parts or repair labor if this major appliance is used ...
Energy Guide
Page 1
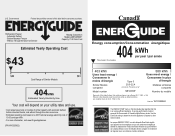
Canada Refrigerator-Freezer ·Automatic Defrost ·Bottom Mounted Freezer ·Without Through-the-Door-Ice Service Maytag Corporation Model(s):MB*2258XE* Capacity: 21.9 Cubic Feet Estimated Yearly Operating Cost $43 $49 $61 Cost Range of Similar Models 404kWh ... (S.C. 1992, c. 36). U.S. Enlever cette étiquette avant le premier achat au détail constitue une violation de la loi (S.C. 1992, c.36). Part No. Use the EnerGuide rating to other similar models. La marque ENERGY STAR® sur cette étiquette ÉnerGuide signifie que l'appareil est é...
Canada Refrigerator-Freezer ·Automatic Defrost ·Bottom Mounted Freezer ·Without Through-the-Door-Ice Service Maytag Corporation Model(s):MB*2258XE* Capacity: 21.9 Cubic Feet Estimated Yearly Operating Cost $43 $49 $61 Cost Range of Similar Models 404kWh ... (S.C. 1992, c. 36). U.S. Enlever cette étiquette avant le premier achat au détail constitue une violation de la loi (S.C. 1992, c.36). Part No. Use the EnerGuide rating to other similar models. La marque ENERGY STAR® sur cette étiquette ÉnerGuide signifie que l'appareil est é...


