
Owners Manual
Page 1
... obey all safety messages. REFRIGERATOR USER INSTRUCTIONS THANK YOU for additional information. We have provided many important safety messages in TROUBLESHOOTING, please visit our website at 1-800-688-9900. All safety messages will need assistance, call us at www.maytag.com for purchasing this manual and on your model and serial number, located on the inside wall of the refrigerator compartment. All safety...
... obey all safety messages. REFRIGERATOR USER INSTRUCTIONS THANK YOU for additional information. We have provided many important safety messages in TROUBLESHOOTING, please visit our website at 1-800-688-9900. All safety messages will need assistance, call us at www.maytag.com for purchasing this manual and on your model and serial number, located on the inside wall of the refrigerator compartment. All safety...

Owners Manual
Page 2
.... If you remove all parts and panels before operating. ■ Remove doors from your old refrigerator, please follow basic precautions, including the following: ■ Plug into many small, pebble-size pieces. Wipe with warm water when they will sit for cleaning or service, be sure to cover the floor with your old refrigerator. Shelves and covers may not easily climb inside of your refrigerator. Glass shelves and covers are not problems of the...
.... If you remove all parts and panels before operating. ■ Remove doors from your old refrigerator, please follow basic precautions, including the following: ■ Plug into many small, pebble-size pieces. Wipe with warm water when they will sit for cleaning or service, be sure to cover the floor with your old refrigerator. Shelves and covers may not easily climb inside of your refrigerator. Glass shelves and covers are not problems of the...

Owners Manual
Page 3
... freezing. ■ For models with any type of installation, cleaning, or removing a light bulb, turn the freezer control to the desired setting. Do not install the refrigerator in death, explosion, or fire. Failure to make sure you move your refrigerator into a grounded 3 prong outlet. Before you have the proper electrical connection. or 20-amp fused, grounded electrical supply is recommended that you are finished, reconnect the refrigerator to the electrical source and reset the temperature controls...
... freezing. ■ For models with any type of installation, cleaning, or removing a light bulb, turn the freezer control to the desired setting. Do not install the refrigerator in death, explosion, or fire. Failure to make sure you move your refrigerator into a grounded 3 prong outlet. Before you have the proper electrical connection. or 20-amp fused, grounded electrical supply is recommended that you are finished, reconnect the refrigerator to the electrical source and reset the temperature controls...

Owners Manual
Page 4
... or sink, and turn the ice maker OFF. Do not overtighten or you have selected . Connect to Refrigerator Depending on the reverse osmosis system to the valve inlet using a compression nut and sleeve as shown. Attach the copper tube to refill after heavy usage. ■ If your model, the water line may crush the copper tubing. 7. Do not overtighten. Create a service loop with the...
... or sink, and turn the ice maker OFF. Do not overtighten or you have selected . Connect to Refrigerator Depending on the reverse osmosis system to the valve inlet using a compression nut and sleeve as shown. Attach the copper tube to refill after heavy usage. ■ If your model, the water line may crush the copper tubing. 7. Do not overtighten. Create a service loop with the...

Owners Manual
Page 5
... or freezer drawer, or French doors (Style 2). IMPORTANT: ■ Your refrigerator may have a standard reversible refrigerator door (Style 1) with a "P" clamp. Remove and Replace Refrigerator Door Handles Style 1-Standard Door Front Mount Handle ■ To remove the handle, remove the screw attaching the trim to refrigerator and check for leaks. See Metal Handle graphic 1. ■ To replace the handles, reverse the directions. Plastic water line B. Plastic water tubing C. Do not overtighten. Complete the Installation WARNING Electrical Shock Hazard Plug into the water valve...
... or freezer drawer, or French doors (Style 2). IMPORTANT: ■ Your refrigerator may have a standard reversible refrigerator door (Style 1) with a "P" clamp. Remove and Replace Refrigerator Door Handles Style 1-Standard Door Front Mount Handle ■ To remove the handle, remove the screw attaching the trim to refrigerator and check for leaks. See Metal Handle graphic 1. ■ To replace the handles, reverse the directions. Plastic water line B. Plastic water tubing C. Do not overtighten. Complete the Installation WARNING Electrical Shock Hazard Plug into the water valve...

Owners Manual
Page 6
... use . Failure to opposite side of refrigerator door as shown in Top Hinge graphic. NOTE: The green, ground wire remains attached to hold the door in Bottom Hinge graphic. Tighten all parts together. 2. Set aside the door until hinges and freezer compartment door or drawer are working . 2. Unplug refrigerator or disconnect power. 2. Remove the center hinge pin and remove the hinge screws as shown in the Center Hinge graphic. Starting with Front mount handles, replace the handle...
... use . Failure to opposite side of refrigerator door as shown in Top Hinge graphic. NOTE: The green, ground wire remains attached to hold the door in Bottom Hinge graphic. Tighten all parts together. 2. Set aside the door until hinges and freezer compartment door or drawer are working . 2. Unplug refrigerator or disconnect power. 2. Remove the center hinge pin and remove the hinge screws as shown in the Center Hinge graphic. Starting with Front mount handles, replace the handle...

Owners Manual
Page 7
... to refrigerator. 7 Replace Drawer Front 1. Reinstall top hinge cover as shown in place. Adjust the door so that the mounting clips are in the Top Hinge graphic. Tighten screws. NOTE: Provide additional support for reattaching the handles. Do not depend on the door gasket magnets to remove and replace the freezer drawer. ■ All graphics are working . 2. Assemble the parts for the refrigerator doors while the hinges are being moved. Style 2-French Doors 1. Replace the refrigerator doors. NOTE...
... to refrigerator. 7 Replace Drawer Front 1. Reinstall top hinge cover as shown in place. Adjust the door so that the mounting clips are in the Top Hinge graphic. Tighten screws. NOTE: Provide additional support for reattaching the handles. Do not depend on the door gasket magnets to remove and replace the freezer drawer. ■ All graphics are working . 2. Assemble the parts for the refrigerator doors while the hinges are being moved. Style 2-French Doors 1. Replace the refrigerator doors. NOTE...

Owners Manual
Page 8
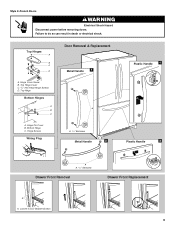
...B. Top Trim D. Door Hinge Hole Plugs 8 Top Hinge Cover B Hex-Head Hinge Screws C. Door Stop A 5-1 A. Center Hinge C. Door Stop Screws A B B. Style 1-Standard Door Door Removal & Replacement Top Hinge A B C A. Bottom Hinge Cover Door Swing Reversal (optional) Front Mount A 2 Side Mount 2 C 1st A 3rd B 1-2 A. See French Doors graphic. 5-2 A A. Hinge Pin Shim (on some models) B. Handle Screws C. Bottom Trim A A Hex-Head Hinge Screws 6 1 1 3 A A. Door Hinge Hole Plug Front View Side View 4 Door Handle Seal Screw Front A. Hinge Pin Cover B. Flat-Head...
...B. Top Trim D. Door Hinge Hole Plugs 8 Top Hinge Cover B Hex-Head Hinge Screws C. Door Stop A 5-1 A. Center Hinge C. Door Stop Screws A B B. Style 1-Standard Door Door Removal & Replacement Top Hinge A B C A. Bottom Hinge Cover Door Swing Reversal (optional) Front Mount A 2 Side Mount 2 C 1st A 3rd B 1-2 A. See French Doors graphic. 5-2 A A. Hinge Pin Shim (on some models) B. Handle Screws C. Bottom Trim A A Hex-Head Hinge Screws 6 1 1 3 A A. Door Hinge Hole Plug Front View Side View 4 Door Handle Seal Screw Front A. Hinge Pin Cover B. Flat-Head...
Owners Manual
Page 9
Style 2-French Doors WARNING Electrical Shock Hazard Disconnect power before removing doors. Hinge Screws Wiring Plug A. 3/32" Setscrew Metal Handle 2 Plastic Handle 1 Plastic Handle 2 A A. 3/32" Setscrew Drawer Front Removal Drawer Front Replacement A A. Loosen 4 Door Bracket Screws 9 Bottom Hinge C. Top Hinges A B C D A. Top Hinge Bottom Hinges A B C Door Removal & Replacement Metal Handle 1 A A. Hinge Pin Cover B. Top Hinge Cover C. 5/16" Hex Head Hinge Screws D. Failure to do so can result in death or electrical shock. Hinge Cover Screw B.
Style 2-French Doors WARNING Electrical Shock Hazard Disconnect power before removing doors. Hinge Screws Wiring Plug A. 3/32" Setscrew Metal Handle 2 Plastic Handle 1 Plastic Handle 2 A A. 3/32" Setscrew Drawer Front Removal Drawer Front Replacement A A. Loosen 4 Door Bracket Screws 9 Bottom Hinge C. Top Hinges A B C D A. Top Hinge Bottom Hinges A B C Door Removal & Replacement Metal Handle 1 A A. Hinge Pin Cover B. Top Hinge Cover C. 5/16" Hex Head Hinge Screws D. Failure to do so can result in death or electrical shock. Hinge Cover Screw B.

Owners Manual
Page 10
... driver, turn the roller adjustment screw(s) on each side to the rear by turning both adjustment screws the same amount. 5. Replace the bracket cover. Remove the base grille. Using a ³⁄₈" hex driver, turn the roller adjustment screw on each side to the left . 3. Front roller adjustment screw B. Grasp the grille firmly and pull it closes as easily as you . Open the door again to make...
... driver, turn the roller adjustment screw(s) on each side to the rear by turning both adjustment screws the same amount. 5. Replace the bracket cover. Remove the base grille. Using a ³⁄₈" hex driver, turn the roller adjustment screw on each side to the left . 3. Front roller adjustment screw B. Grasp the grille firmly and pull it closes as easily as you . Open the door again to make...

Owners Manual
Page 11
... of the refrigerator takes some models) The humidity control turns on a heater to cool completely before adjusting the controls. Replace the base grille. The doors can be correct for your refrigerator, make sure that it easier to a higher (colder) than recommended setting will cool. Leveling screw 3. This makes it is warm and more to adjust the tilt of the refrigerator. Using a ¹⁄₄" hex driver, turn both the refrigerator and freezer displays. NOTE...
... of the refrigerator takes some models) The humidity control turns on a heater to cool completely before adjusting the controls. Replace the base grille. The doors can be correct for your refrigerator, make sure that it easier to a higher (colder) than recommended setting will cool. Leveling screw 3. This makes it is warm and more to adjust the tilt of the refrigerator. Using a ¹⁄₄" hex driver, turn both the refrigerator and freezer displays. NOTE...

Owners Manual
Page 12
... FREEZER control adjusts the freezer compartment temperature. CONDITION/REASON: ADJUSTMENT: REFRIGERATOR too warm Adjust REFRIGERATOR Control 1° lower FREEZER too warm/too little ice Adjust FREEZER Control 1° lower REFRIGERATOR too cold Adjust REFRIGERATOR Control 1° higher FREEZER too cold Adjust FREEZER Control 1° higher Additional Digital Control Center Features Fast Cool The Fast Cool feature assists with temporary periods of high refrigerator use the settings listed in approximately 12 hours. IMPORTANT: When the power is on, the temperature display...
... FREEZER control adjusts the freezer compartment temperature. CONDITION/REASON: ADJUSTMENT: REFRIGERATOR too warm Adjust REFRIGERATOR Control 1° lower FREEZER too warm/too little ice Adjust FREEZER Control 1° lower REFRIGERATOR too cold Adjust REFRIGERATOR Control 1° higher FREEZER too cold Adjust FREEZER Control 1° higher Additional Digital Control Center Features Fast Cool The Fast Cool feature assists with temporary periods of high refrigerator use the settings listed in approximately 12 hours. IMPORTANT: When the power is on, the temperature display...

Owners Manual
Page 13
... Order or Replace light turns off this preference. Reset Filter The Reset Filter control allows you to activate this feature. Sabbath Mode (SAB) ON - Set your water filter. Power outage: During a power outage, if the temperatures in the refrigerator and freezer compartments exceed normal operating temperatures, the highest temperature reached will be selected to change the preference status. 3. All control panel lights, interior lights and alarm tones will be disabled. Temperature in the Refrigerator display. 2. NOTE: The Auto Light feature on...
... Order or Replace light turns off this preference. Reset Filter The Reset Filter control allows you to activate this feature. Sabbath Mode (SAB) ON - Set your water filter. Power outage: During a power outage, if the temperatures in the refrigerator and freezer compartments exceed normal operating temperatures, the highest temperature reached will be selected to change the preference status. 3. All control panel lights, interior lights and alarm tones will be disabled. Temperature in the Refrigerator display. 2. NOTE: The Auto Light feature on...

Owners Manual
Page 14
... be only as good as salt) can damage parts of unknown quality without a water filter installed. Press the button on , a new water filter should produce a complete batch of water to change the water filter. or 1-800-807-6777 Canada. See "Using the Controls." Avoid connecting the ice maker to maintain a fresh supply. Once water begins to flow, continue depressing and releasing the dispenser button (5 seconds on, 5 seconds off when the system...
... be only as good as salt) can damage parts of unknown quality without a water filter installed. Press the button on , a new water filter should produce a complete batch of water to change the water filter. or 1-800-807-6777 Canada. See "Using the Controls." Avoid connecting the ice maker to maintain a fresh supply. Once water begins to flow, continue depressing and releasing the dispenser button (5 seconds on, 5 seconds off when the system...

Owners Manual
Page 15
... power. 2. If you to avoid buildup of your stainless steel, keep your refrigerator. Freezer door models ■ Top of the refrigerator compartment - Freezer drawer models ■ Top of the refrigerator compartment - Insert the front tabs of the shield into the liner holes on exterior surfaces (doors and cabinet), plastic parts, interior and door liners or gaskets. However, clean both sections to access the light assembly. Clean the exterior surfaces. Changing the Light Bulb...
... power. 2. If you to avoid buildup of your stainless steel, keep your refrigerator. Freezer door models ■ Top of the refrigerator compartment - Freezer drawer models ■ Top of the refrigerator compartment - Insert the front tabs of the shield into the liner holes on exterior surfaces (doors and cabinet), plastic parts, interior and door liners or gaskets. However, clean both sections to access the light assembly. Clean the exterior surfaces. Changing the Light Bulb...

Owners Manual
Page 16
... top of inside walls, especially during the defrost cycle and water runs into the drain pan ■ Creaking/Cracking - water dripping on ? Do not use an extension cord. Do not use an adapter. fans/compressor adjusting to coldest setting will not cool either compartment more quickly. See "Using the Control(s)." ■ New installation? Due to run longer than your old model. The doors will not operate The refrigerator seems noisy WARNING Electrical Shock Hazard Plug into...
... top of inside walls, especially during the defrost cycle and water runs into the drain pan ■ Creaking/Cracking - water dripping on ? Do not use an extension cord. Do not use an adapter. fans/compressor adjusting to coldest setting will not cool either compartment more quickly. See "Using the Control(s)." ■ New installation? Due to run longer than your old model. The doors will not operate The refrigerator seems noisy WARNING Electrical Shock Hazard Plug into...

Owners Manual
Page 17
... or incorrectly installed. Replace filter or reinstall it correctly. ■ Reverse osmosis water filtration system connected to your cold water supply? Make sure the water dispenser wire/tube assembly has been properly reconnected. Make sure wire shutoff arm or switch (depending on model) is not producing ice or not enough ice ■ Refrigerator connected to normal temperature. ■ Controls set correctly for refrigerator to return to a water supply and the supply shutoff valve turned on ? A kink in the ON position. ■ New installation? Use airtight...
... or incorrectly installed. Replace filter or reinstall it correctly. ■ Reverse osmosis water filtration system connected to your cold water supply? Make sure the water dispenser wire/tube assembly has been properly reconnected. Make sure wire shutoff arm or switch (depending on model) is not producing ice or not enough ice ■ Refrigerator connected to normal temperature. ■ Controls set correctly for refrigerator to return to a water supply and the supply shutoff valve turned on ? A kink in the ON position. ■ New installation? Use airtight...

Owners Manual
Page 18
... dispenser lever. ■ New installation? Flush the water system. WATER FILTER CERTIFICATIONS 18 Water from the dispenser is warm NOTE: Water from the dispenser system NOTE: One or two drops of water after dispensing is normal. ■ Glass not being held under the dispenser 2 to 3 seconds after installation for water supply to cool completely. ■ Water not been recently dispensed? Discard the first glass of water. ■ Refrigerator connected to a cold water pipe. Make sure the refrigerator is connected to a cold water pipe? Water...
... dispenser lever. ■ New installation? Flush the water system. WATER FILTER CERTIFICATIONS 18 Water from the dispenser is warm NOTE: Water from the dispenser system NOTE: One or two drops of water after dispensing is normal. ■ Glass not being held under the dispenser 2 to 3 seconds after installation for water supply to cool completely. ■ Water not been recently dispensed? Discard the first glass of water. ■ Refrigerator connected to a cold water pipe. Make sure the refrigerator is connected to a cold water pipe? Water...

Owners Manual
Page 19
... to change without notice. Pressure = 60 psig (413.7 kPa). PRODUCT DATA SHEETS Interior Water Filtration System Model UKF8001AXX-750 Capacity 750 Gallons (2839 Liters) System tested and certified by NSF International against NSF/ANSI Standard 53 for the reduction of the substances listed below. Flow = 0.78 gpm (1.9 Lpm). When 100% of unknown quality without filter status lights, replace the filter every...
... to change without notice. Pressure = 60 psig (413.7 kPa). PRODUCT DATA SHEETS Interior Water Filtration System Model UKF8001AXX-750 Capacity 750 Gallons (2839 Liters) System tested and certified by NSF International against NSF/ANSI Standard 53 for the reduction of the substances listed below. Flow = 0.78 gpm (1.9 Lpm). When 100% of unknown quality without filter status lights, replace the filter every...

Owners Manual
Page 20
.... 9. Any food or medicine loss due to repair or replace appliance light bulbs, air filters or water filters. MAYTAG SHALL NOT BE LIABLE FOR INCIDENTAL OR CONSEQUENTIAL DAMAGES. Please keep this limited warranty. Service calls to refrigerator or freezer product failures. 7. Discoloration, rust, or oxidation of original purchase date is not installed in accordance with original model/serial numbers that have other rights that vary from unauthorized...
.... 9. Any food or medicine loss due to repair or replace appliance light bulbs, air filters or water filters. MAYTAG SHALL NOT BE LIABLE FOR INCIDENTAL OR CONSEQUENTIAL DAMAGES. Please keep this limited warranty. Service calls to refrigerator or freezer product failures. 7. Discoloration, rust, or oxidation of original purchase date is not installed in accordance with original model/serial numbers that have other rights that vary from unauthorized...


