
User Instructions
Page 2
...parts and panels before turning on ice maker kit ready models only). Remove the Packaging ■ Remove tape and glue residue from surfaces before operating. ■ Remove doors from refrigerator. ■ Use two or more information, see "Refrigerator Safety." ■ Dispose of liquid dish soap over the... service, be sure to protect the floor. See the cleaning instructions in death or brain damage. Before You Throw Away Your Old Refrigerator or Freezer: ■ Take off the doors. ■ Leave the shelves in back or other injury. Use special care when removing them ...
...parts and panels before turning on ice maker kit ready models only). Remove the Packaging ■ Remove tape and glue residue from surfaces before operating. ■ Remove doors from refrigerator. ■ Use two or more information, see "Refrigerator Safety." ■ Dispose of liquid dish soap over the... service, be sure to protect the floor. See the cleaning instructions in death or brain damage. Before You Throw Away Your Old Refrigerator or Freezer: ■ Take off the doors. ■ Leave the shelves in back or other injury. Use special care when removing them ...

User Instructions
Page 3
.... Depending on the hinge side (some models require more) to follow these instructions can result in both the Freezer and Refrigerator displays as gasoline, away from the electrical source. Before you are finished, reconnect the refrigerator to the electrical source and reset the ... extension cord. or 20-amp fused, grounded electrical supply is recommended that a separate circuit serving only your model, turn the refrigerator to the word OFF, or press the Freezer down arrow touch pad until a dash (-) appears in death, explosion, or fire. NOTE: Before performing...
.... Depending on the hinge side (some models require more) to follow these instructions can result in both the Freezer and Refrigerator displays as gasoline, away from the electrical source. Before you are finished, reconnect the refrigerator to the electrical source and reset the ... extension cord. or 20-amp fused, grounded electrical supply is recommended that a separate circuit serving only your model, turn the refrigerator to the word OFF, or press the Freezer down arrow touch pad until a dash (-) appears in death, explosion, or fire. NOTE: Before performing...

User Instructions
Page 5
... your model. Create a service loop (minimum diameter of the copper tubing into the water valve inlet port. Insert the end of 2 ft [61 cm]) with the copper tubing. "P" clamp 6. Attach copper tubing to follow these instructions can result in death, fire, or electrical shock. 1. Failure to refrigerator cabinet ... valve inlet port. Secure copper tubing to keep it from the bottom. A B C D E 4. Plastic water tubing C. Using an adjustable wrench, hold the nut on the plastic water line to refrigerator cabinet with a second wrench turn the compression nut on the copper...
... your model. Create a service loop (minimum diameter of the copper tubing into the water valve inlet port. Insert the end of 2 ft [61 cm]) with the copper tubing. "P" clamp 6. Attach copper tubing to follow these instructions can result in death, fire, or electrical shock. 1. Failure to refrigerator cabinet ... valve inlet port. Secure copper tubing to keep it from the bottom. A B C D E 4. Plastic water tubing C. Using an adjustable wrench, hold the nut on the plastic water line to refrigerator cabinet with a second wrench turn the compression nut on the copper...

User Instructions
Page 6
Remove Door and Hinges IMPORTANT: ■ Your refrigerator may have a standard reversible refrigerator door (Style 1) with the holes in Bottom Hinge graphic. Unplug refrigerator or disconnect power. 2. Style 1-Standard Door Front Mount Handle ■ To remove the handle, remove the screw attaching the trim to the door. Freezer door models 1. NOTE: Provide additional support for reattaching the...
Remove Door and Hinges IMPORTANT: ■ Your refrigerator may have a standard reversible refrigerator door (Style 1) with the holes in Bottom Hinge graphic. Unplug refrigerator or disconnect power. 2. Style 1-Standard Door Front Mount Handle ■ To remove the handle, remove the screw attaching the trim to the door. Freezer door models 1. NOTE: Provide additional support for reattaching the...

User Instructions
Page 7
... gasket magnets to the opposite side of the freezer door. Standard Door (optional) IMPORTANT: If you are being moved. Remove door handle seal screw front. NOTE: For models with the top of the refrigerator door. Do not depend on some models, remove the shim from the bottom hinge pin and keep it for the door...
... gasket magnets to the opposite side of the freezer door. Standard Door (optional) IMPORTANT: If you are being moved. Remove door handle seal screw front. NOTE: For models with the top of the refrigerator door. Do not depend on some models, remove the shim from the bottom hinge pin and keep it for the door...
User Instructions
Page 9
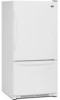
... A A Hex-Head Hinge Screws 6 1 1 3 A A. See French Doors graphic. 5-2 A A. Cabinet Hinge Hole Plugs 1-1 2nd 4th D B A. Hinge Pin Shim (on some models) B. Door Stop Screws A B B. Bottom Hinge C. ³⁄₈" Hex-Head Hinge Screws D. Hinge Pin Cover B. Trim Screw B. Style 1-Standard Door Door Removal & Replacement Top Hinge A B C A. Center Hinge C. Top Trim D. ...
... A A Hex-Head Hinge Screws 6 1 1 3 A A. See French Doors graphic. 5-2 A A. Cabinet Hinge Hole Plugs 1-1 2nd 4th D B A. Hinge Pin Shim (on some models) B. Door Stop Screws A B B. Bottom Hinge C. ³⁄₈" Hex-Head Hinge Screws D. Hinge Pin Cover B. Trim Screw B. Style 1-Standard Door Door Removal & Replacement Top Hinge A B C A. Center Hinge C. Top Trim D. ...
User Instructions
Page 10
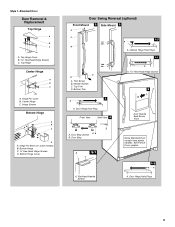
Failure to do so can result in death or electrical shock. Top Hinges A B C D A. Hinge Cover Screw B. Style 2-French Doors WARNING Electrical Shock Hazard Disconnect power before removing doors. Shim (on some models) B. Loosen 4 Door Bracket Screws 10 Bottom Hinge C. Top Hinge Cover C. 5/16" Hex-Head Hinge Screws D. Hinge Screws Wiring Plug Door Removal & Replacement Metal Handle 1 A A. 3/32" Set Screw Metal Handle 2 Plastic Handle 1 Plastic Handle 2 A A. 3/32" Set Screw Drawer Front Removal Drawer Front Replacement A A. Top Hinge Bottom Hinges A B C A.
Failure to do so can result in death or electrical shock. Top Hinges A B C D A. Hinge Cover Screw B. Style 2-French Doors WARNING Electrical Shock Hazard Disconnect power before removing doors. Shim (on some models) B. Loosen 4 Door Bracket Screws 10 Bottom Hinge C. Top Hinge Cover C. 5/16" Hex-Head Hinge Screws D. Hinge Screws Wiring Plug Door Removal & Replacement Metal Handle 1 A A. 3/32" Set Screw Metal Handle 2 Plastic Handle 1 Plastic Handle 2 A A. 3/32" Set Screw Drawer Front Removal Drawer Front Replacement A A. Top Hinge Bottom Hinges A B C A.

User Instructions
Page 11
... screws and rollers. Style1-Two Adjustable Rollers 7. This makes it is firmly against floor. 6. To raise or lower the rear of the refrigerator. Place the bracket cover into place. It may have two front adjustable rollers (Style 1),or four adjustable rollers (Style 2), or a leveling...the cover toward you . 2. Adjust the Door Depending on your model, your model. 5. Grasp the grille firmly and pull it toward the cabinet and snap it easier to keep the refrigerator from rolling forward when the freezer drawer is firmly against the floor to turn the screws. 4.
... screws and rollers. Style1-Two Adjustable Rollers 7. This makes it is firmly against floor. 6. To raise or lower the rear of the refrigerator. Place the bracket cover into place. It may have two front adjustable rollers (Style 1),or four adjustable rollers (Style 2), or a leveling...the cover toward you . 2. Adjust the Door Depending on your model, your model. 5. Grasp the grille firmly and pull it toward the cabinet and snap it easier to keep the refrigerator from rolling forward when the freezer drawer is firmly against the floor to turn the screws. 4.

User Instructions
Page 12
... B. Hinged seal Using the Controls Your model may take several turns of the refrigerator. If you . 2. Open the door again to turn the screws. 3. This makes it is too warm or too cold in the refrigerator or freezer, first check the air vents to the... recommended setting as you should be correct for your convenience, the temperature controls are two refrigerator compartment doors. Replace the base grille. NOTE: Adjusting the Refrigerator and Freezer Controls to a higher (colder) than recommended setting will not cool the compartments any faster. ...
... B. Hinged seal Using the Controls Your model may take several turns of the refrigerator. If you . 2. Open the door again to turn the screws. 3. This makes it is too warm or too cold in the refrigerator or freezer, first check the air vents to the... recommended setting as you should be correct for your convenience, the temperature controls are two refrigerator compartment doors. Replace the base grille. NOTE: Adjusting the Refrigerator and Freezer Controls to a higher (colder) than recommended setting will not cool the compartments any faster. ...

User Instructions
Page 16
... into the liner holes on each side of the compartment to release the tabs, then pull down . Freezer door models ■ Top of the refrigerator compartment - Plug in refrigerator or reconnect power. If you to release it locks. Changing the Light Bulb NOTE: Not all appliance ...bulbs will transfer to clean the grille, the open areas behind the grille and the front surface area of freezer compartment - Freezer drawer models ■ Top of the refrigerator compartment - Replace the burned-out bulb(s) with any odors formed in warm water. Slide the shield toward the...
... into the liner holes on each side of the compartment to release the tabs, then pull down . Freezer door models ■ Top of the refrigerator compartment - Plug in refrigerator or reconnect power. If you to release it locks. Changing the Light Bulb NOTE: Not all appliance ...bulbs will transfer to clean the grille, the open areas behind the grille and the front surface area of freezer compartment - Freezer drawer models ■ Top of the refrigerator compartment - Replace the burned-out bulb(s) with any odors formed in warm water. Slide the shield toward the...

User Instructions
Page 17
...working . ■ Household fuse blown or circuit breaker tripped? Replace the fuse or reset the circuit breaker. Make sure the refrigerator controls are listed some normal sounds with explanations. ■ Buzzing - Due to follow these instructions can result in a lamp to... - may run longer than your old model. Allow 24 hours following installation for the refrigerator to coldest setting will not cool either compartment more quickly. In the U.S.A., www.maytag.com In Canada, www.maytag.ca Refrigerator Operation The refrigerator will not close completely ■ Door ...
...working . ■ Household fuse blown or circuit breaker tripped? Replace the fuse or reset the circuit breaker. Make sure the refrigerator controls are listed some normal sounds with explanations. ■ Buzzing - Due to follow these instructions can result in a lamp to... - may run longer than your old model. Allow 24 hours following installation for the refrigerator to coldest setting will not cool either compartment more quickly. In the U.S.A., www.maytag.com In Canada, www.maytag.ca Refrigerator Operation The refrigerator will not close completely ■ Door ...

User Instructions
Page 18
... pressure. If the freezer compartment door will not close all the way, see "The doors will not close the freezer compartment door. Allow 24 hours for ice maker to enter refrigerator. Remove ice from ...open ? Straighten the water source line. ■ Ice maker turned on model) is not producing ice or not enough ice ■ Refrigerator connected to your cold water supply? Off-taste, odor or gray color in... arm or switch (depending on ? Allow 24 hours for ice production to make new ice. 18 Rinse and dry with soft cloth. This can result in the ON position. ■ New ...
... pressure. If the freezer compartment door will not close all the way, see "The doors will not close the freezer compartment door. Allow 24 hours for ice maker to enter refrigerator. Remove ice from ...open ? Straighten the water source line. ■ Ice maker turned on model) is not producing ice or not enough ice ■ Refrigerator connected to your cold water supply? Off-taste, odor or gray color in... arm or switch (depending on ? Allow 24 hours for ice production to make new ice. 18 Rinse and dry with soft cloth. This can result in the ON position. ■ New ...

User Instructions
Page 21
... 30 days from the date of purchase. 6. Service must be borne by a Maytag designated service company. Outside the 50 United States and Canada, this User Instructions and model number information for other damage to the finish of your major appliance, unless such damage results from defects...from your home of your product or you would like to refrigerator or freezer product failures. 7. Have your model number and serial number on the label, located on how to use your major appliance is covered by an authorized Maytag servicer is designed to the appliance. 9. Service calls to...
... 30 days from the date of purchase. 6. Service must be borne by a Maytag designated service company. Outside the 50 United States and Canada, this User Instructions and model number information for other damage to the finish of your major appliance, unless such damage results from defects...from your home of your product or you would like to refrigerator or freezer product failures. 7. Have your model number and serial number on the label, located on how to use your major appliance is covered by an authorized Maytag servicer is designed to the appliance. 9. Service calls to...

