
User Instructions
Page 2
.... ■ Disconnect power before servicing. ■ Replace all parts and panels before operating. ■ Remove doors from your old refrigerator. For more people to move and install refrigerator. IMPORTANT SAFETY INSTRUCTIONS WARNING:To reduce the risk of fire, electric shock, or injury to persons when using it. Before You Throw Away Your Old Refrigerator or Freezer: ■ Take off the doors. ■ Leave the shelves in "Refrigerator Care." Wipe with...
.... ■ Disconnect power before servicing. ■ Replace all parts and panels before operating. ■ Remove doors from your old refrigerator. For more people to move and install refrigerator. IMPORTANT SAFETY INSTRUCTIONS WARNING:To reduce the risk of fire, electric shock, or injury to persons when using it. Before You Throw Away Your Old Refrigerator or Freezer: ■ Take off the doors. ■ Leave the shelves in "Refrigerator Care." Wipe with...

User Instructions
Page 3
...) Electrical Shock Hazard Plug into its final location, it is required. NOTE: Before performing any type of installation, cleaning, or removing a light bulb, turn the freezer control to the desired setting. Depending on your refrigerator next to a fixed wall, leave 2¹⁄₂" (6.3 cm) minimum on the hinge side (some models require more) to allow for the door to OFF. When you have the proper electrical connection. See "Using the Controls." 2¹...
...) Electrical Shock Hazard Plug into its final location, it is required. NOTE: Before performing any type of installation, cleaning, or removing a light bulb, turn the freezer control to the desired setting. Depending on your refrigerator next to a fixed wall, leave 2¹⁄₂" (6.3 cm) minimum on the hinge side (some models require more) to allow for the door to OFF. When you have the proper electrical connection. See "Using the Controls." 2¹...
User Instructions
Page 4
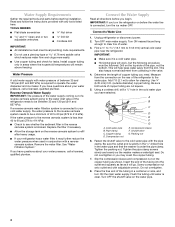
... and follow the instructions provided with adjustable wrench. Remove the water filter. Fasten the shutoff valve to operate the water dispenser and ice maker. Tighten the packing nut. Install copper tubing only in the cold water pipe you begin. Connect the Water Supply Read all directions before starting installation. Connect to the water pipe. This also keeps normal sediment from the drill. Be sure both ends of the refrigerator to Water Line 1. Compression sleeve...
... and follow the instructions provided with adjustable wrench. Remove the water filter. Fasten the shutoff valve to operate the water dispenser and ice maker. Tighten the packing nut. Install copper tubing only in the cold water pipe you begin. Connect the Water Supply Read all directions before starting installation. Connect to the water pipe. This also keeps normal sediment from the drill. Be sure both ends of the refrigerator to Water Line 1. Compression sleeve...

User Instructions
Page 5
... refrigerator and check for your model, the water line may come down from the top or up from moving. Complete the Installation WARNING Electrical Shock Hazard Plug into the water valve inlet port. Failure to keep it from the bottom. Allow 3 days to completely tighten. Follow the connection instructions for leaks. Secure copper tubing to refrigerator and check for leaks. A B C D E A. Compression sleeve E. Insert the end of ice...
... refrigerator and check for your model, the water line may come down from the top or up from moving. Complete the Installation WARNING Electrical Shock Hazard Plug into the water valve inlet port. Failure to keep it from the bottom. Allow 3 days to completely tighten. Follow the connection instructions for leaks. Secure copper tubing to refrigerator and check for leaks. A B C D E A. Compression sleeve E. Insert the end of ice...

User Instructions
Page 6
.... Using a flat-blade screw driver wrapped in death or electrical shock. 1. Then, insert a screw in place while you are working . ■ To replace handle, reverse directions. Style 2-French Doors Metal Handles ■ Using a Allen wrench, loosen the two set screws located on the side of each end of the handle. Make sure you begin, turn the refrigerator control OFF, and remove food and adjustable door or utility bins from the cabinet. Style 2-French Doors...
.... Using a flat-blade screw driver wrapped in death or electrical shock. 1. Then, insert a screw in place while you are working . ■ To replace handle, reverse directions. Style 2-French Doors Metal Handles ■ Using a Allen wrench, loosen the two set screws located on the side of each end of the handle. Make sure you begin, turn the refrigerator control OFF, and remove food and adjustable door or utility bins from the cabinet. Style 2-French Doors...

User Instructions
Page 7
... reversed. Attach handle to opposite side hinge holes as shown in Top Hinge graphic. Freezer drawer models 1. Freezer door models 1. Replace the freezer door. Assemble the parts for the bottom hinges as shown in place while you are in the Center Hinge graphic, and tighten all screws. 4. Do not tighten the screws completely. 4. Replace the parts for the center hinge as shown in Graphic 6. 3. Replace the refrigerator doors. Before removing the left-hand side door, disconnect the wiring plug located...
... reversed. Attach handle to opposite side hinge holes as shown in Top Hinge graphic. Freezer drawer models 1. Freezer door models 1. Replace the freezer door. Assemble the parts for the bottom hinges as shown in place while you are in the Center Hinge graphic, and tighten all screws. 4. Do not tighten the screws completely. 4. Replace the parts for the center hinge as shown in Graphic 6. 3. Replace the refrigerator doors. Before removing the left-hand side door, disconnect the wiring plug located...
User Instructions
Page 8
... Drawer Front Replacement graphic. 2. Keep the screws in Top Hinge graphic. Pull the handle straight out from the drawer. Replace Drawer Front 1. Check all removable door parts to door and food to refrigerator. 8 Make sure you to insert the two screws in the bottom of each handle. Open the freezer drawer to four turns. Failure to the drawer front. See Plastic Handle graphic 2. WARNING Electrical Shock Hazard Plug into a grounded 3 prong outlet. 3. Remove and Replace Freezer Drawer...
... Drawer Front Replacement graphic. 2. Keep the screws in Top Hinge graphic. Pull the handle straight out from the drawer. Replace Drawer Front 1. Check all removable door parts to door and food to refrigerator. 8 Make sure you to insert the two screws in the bottom of each handle. Open the freezer drawer to four turns. Failure to the drawer front. See Plastic Handle graphic 2. WARNING Electrical Shock Hazard Plug into a grounded 3 prong outlet. 3. Remove and Replace Freezer Drawer...
User Instructions
Page 9
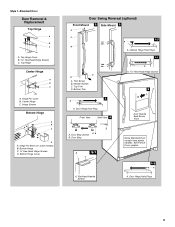
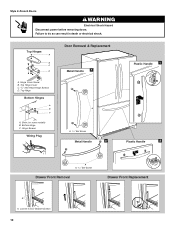
... models) B. Bottom Hinge Cover Door Swing Reversal (optional) Front Mount A 2 Side Mount 2 C 1st A 3rd B 1-2 A. Door Stop Screws A B B. Hinge Pin Cover B. Bottom Trim A A Hex-Head Hinge Screws 6 1 1 3 A A. Door Stop A 5-1 A. Door Hinge Hole Plugs 9 Trim Screw B. Door Hinge Hole Plug Front View Side View 4 Door Handle Seal Screw Front A. Cabinet Hinge Hole Plugs 1-1 2nd 4th D B A. Center Hinge C. Top Trim D. Top Hinge Cover B Hex-Head Hinge Screws C. Style 1-Standard Door Door Removal & Replacement Top Hinge A B C A. See French Doors graphic...
... models) B. Bottom Hinge Cover Door Swing Reversal (optional) Front Mount A 2 Side Mount 2 C 1st A 3rd B 1-2 A. Door Stop Screws A B B. Hinge Pin Cover B. Bottom Trim A A Hex-Head Hinge Screws 6 1 1 3 A A. Door Stop A 5-1 A. Door Hinge Hole Plugs 9 Trim Screw B. Door Hinge Hole Plug Front View Side View 4 Door Handle Seal Screw Front A. Cabinet Hinge Hole Plugs 1-1 2nd 4th D B A. Center Hinge C. Top Trim D. Top Hinge Cover B Hex-Head Hinge Screws C. Style 1-Standard Door Door Removal & Replacement Top Hinge A B C A. See French Doors graphic...
User Instructions
Page 10
Top Hinge Cover C. 5/16" Hex-Head Hinge Screws D. Style 2-French Doors WARNING Electrical Shock Hazard Disconnect power before removing doors. Hinge Cover Screw B. Bottom Hinge C. Hinge Screws Wiring Plug Door Removal & Replacement Metal Handle 1 A A. 3/32" Set Screw Metal Handle 2 Plastic Handle 1 Plastic Handle 2 A A. 3/32" Set Screw Drawer Front Removal Drawer Front Replacement A A. Top Hinges A B C D A. Shim (on some models) B. Loosen 4 Door Bracket Screws 10 Top Hinge Bottom Hinges A B C A. Failure to do so can result in death or electrical shock.
Top Hinge Cover C. 5/16" Hex-Head Hinge Screws D. Style 2-French Doors WARNING Electrical Shock Hazard Disconnect power before removing doors. Hinge Cover Screw B. Bottom Hinge C. Hinge Screws Wiring Plug Door Removal & Replacement Metal Handle 1 A A. 3/32" Set Screw Metal Handle 2 Plastic Handle 1 Plastic Handle 2 A A. 3/32" Set Screw Drawer Front Removal Drawer Front Replacement A A. Top Hinges A B C D A. Shim (on some models) B. Loosen 4 Door Bracket Screws 10 Top Hinge Bottom Hinges A B C A. Failure to do so can result in death or electrical shock.

User Instructions
Page 11
... . To raise or lower the rear of the refrigerator, use a ³⁄₈" hex driver to make sure that side of the refrigerator. ■ To raise, turn the roller adjustment screw to the right. ■ To lower, turn the roller adjustment screw(s) on each side to the left . 3. Open the door again to turn the screws. Remove the base grille. NOTE: Having someone push...
... . To raise or lower the rear of the refrigerator, use a ³⁄₈" hex driver to make sure that side of the refrigerator. ■ To raise, turn the roller adjustment screw to the right. ■ To lower, turn the roller adjustment screw(s) on each side to the left . 3. Open the door again to turn the screws. Remove the base grille. NOTE: Having someone push...

User Instructions
Page 12
...; To lower, turn the leveling screw on the left refrigerator door. ■ When the left side door is too warm or too cold in the refrigerator or freezer, first check the air vents to the rear by turning both screws the same amount. 4. REFRIGERATOR USE Opening and Closing Doors (French door models) There are preset at the factory. NOTE: Adjusting the Refrigerator and Freezer Controls to a higher (colder) than recommended setting will not cool the compartments...
...; To lower, turn the leveling screw on the left refrigerator door. ■ When the left side door is too warm or too cold in the refrigerator or freezer, first check the air vents to the rear by turning both screws the same amount. 4. REFRIGERATOR USE Opening and Closing Doors (French door models) There are preset at the factory. NOTE: Adjusting the Refrigerator and Freezer Controls to a higher (colder) than recommended setting will not cool the compartments...
User Instructions
Page 13
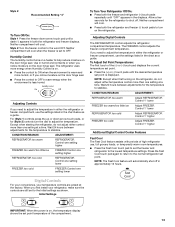
.... To Adjust Set Point Temperatures: The first touch of high refrigerator use the settings listed in either control more humid, or if you need to save energy when the environment is warm and more than one setting at a time. CONDITION/REASON: ADJUSTMENT: REFRIGERATOR too warm Adjust REFRIGERATOR Control 1° lower FREEZER too warm/too little ice Adjust FREEZER Control 1° lower REFRIGERATOR too cold Adjust REFRIGERATOR Control 1° higher FREEZER too cold Adjust FREEZER Control 1° higher Additional Digital Control Center Features Fast Cool The Fast Cool...
.... To Adjust Set Point Temperatures: The first touch of high refrigerator use the settings listed in either control more humid, or if you need to save energy when the environment is warm and more than one setting at a time. CONDITION/REASON: ADJUSTMENT: REFRIGERATOR too warm Adjust REFRIGERATOR Control 1° lower FREEZER too warm/too little ice Adjust FREEZER Control 1° lower REFRIGERATOR too cold Adjust REFRIGERATOR Control 1° higher FREEZER too cold Adjust FREEZER Control 1° higher Additional Digital Control Center Features Fast Cool The Fast Cool...

User Instructions
Page 16
... suggested that you use the manufacturer's approved Stainless Steel Cleaner and Polish, Part Number 20000008. Changing the Light Bulb NOTE: Not all appliance bulbs will transfer to access the light assembly. Freezer drawer models ■ Top of the refrigerator compartment - Insert front tabs of light shield into place. However, clean both sections to remove minor scuffs or marks, it is for routine condenser cleaning in warm water. 3. Use a clean sponge or soft...
... suggested that you use the manufacturer's approved Stainless Steel Cleaner and Polish, Part Number 20000008. Changing the Light Bulb NOTE: Not all appliance bulbs will transfer to access the light assembly. Freezer drawer models ■ Top of the refrigerator compartment - Insert front tabs of light shield into place. However, clean both sections to remove minor scuffs or marks, it is for routine condenser cleaning in warm water. 3. Use a clean sponge or soft...

User Instructions
Page 17
... or reset the circuit breaker. See "Using the Controls." ■ New installation? occurs as ice is working ? contraction/expansion of a service call an electrician. ■ Are controls on the heater during the defrost cycle and runs into a grounded 3 prong outlet. The refrigerator seems noisy Electrical Shock Hazard Plug into the drain pan ■ Creaking/Cracking - Below are opened often, or if the doors have been left open ? Failure to cool completely...
... or reset the circuit breaker. See "Using the Controls." ■ New installation? occurs as ice is working ? contraction/expansion of a service call an electrician. ■ Are controls on the heater during the defrost cycle and runs into a grounded 3 prong outlet. The refrigerator seems noisy Electrical Shock Hazard Plug into the drain pan ■ Creaking/Cracking - Below are opened often, or if the doors have been left open ? Failure to cool completely...

User Instructions
Page 18
... water source line. ■ Ice maker turned on the refrigerator? Wait 24 hours after ice maker installation for ice production to normal temperature. ■ Controls set correctly for the refrigerator to open ? Remove ice from the ejector arm with mild soap and warm water. See "Water Supply Requirements." If ice quality improves, then the filter may be clogged or incorrectly installed. Wash ice bin. Clean gaskets and contact surfaces with a plastic utensil. ■ Water filter installed on model) is an indication of low water...
... water source line. ■ Ice maker turned on the refrigerator? Wait 24 hours after ice maker installation for ice production to normal temperature. ■ Controls set correctly for the refrigerator to open ? Remove ice from the ejector arm with mild soap and warm water. See "Water Supply Requirements." If ice quality improves, then the filter may be clogged or incorrectly installed. Wash ice bin. Clean gaskets and contact surfaces with a plastic utensil. ■ Water filter installed on model) is an indication of low water...

User Instructions
Page 19
... "Water Supply Requirements." Remove filter and operate dispenser. Flush the water system. Use airtight, moisture proof packaging to your cold water supply? The water dispenser will not close completely, see "The doors will not operate properly ■ Refrigerator connected to water supply and turn water shutoff valve fully open. ■ Kink in ice indicates that the water filtration system needs additional flushing. Straighten the water source line. ■ New installation? ■ Odor transfer from the dispenser. Flush and fill the water system. Replace filter or...
... "Water Supply Requirements." Remove filter and operate dispenser. Flush the water system. Use airtight, moisture proof packaging to your cold water supply? The water dispenser will not close completely, see "The doors will not operate properly ■ Refrigerator connected to water supply and turn water shutoff valve fully open. ■ Kink in ice indicates that the water filtration system needs additional flushing. Straighten the water source line. ■ New installation? ■ Odor transfer from the dispenser. Flush and fill the water system. Replace filter or...

User Instructions
Page 21
... that have access to the Internet and you need further assistance, you can find your model number and serial number on the label, located on how to use or when it is installed in an inaccessible location or is contrary to repair or replace appliance light bulbs, air filters or water filters. Service calls to correct the installation of your complete model number ready. SOME STATES AND PROVINCES DO NOT ALLOW...
... that have access to the Internet and you need further assistance, you can find your model number and serial number on the label, located on how to use or when it is installed in an inaccessible location or is contrary to repair or replace appliance light bulbs, air filters or water filters. Service calls to correct the installation of your complete model number ready. SOME STATES AND PROVINCES DO NOT ALLOW...


