
User Instructions
Page 2
... covers with warm water when they will sit for cleaning or service, be sure to avoid impact from dropping. 2 IMPORTANT SAFETY INSTRUCTIONS WARNING:To reduce the risk of fire, electric shock, or injury to persons when using it. For more people to move and install refrigerator. SAVE THESE INSTRUCTIONS Proper Disposal of Your Old Refrigerator WARNING Suffocation Hazard Remove doors from your refrigerator before turning on ice maker kit...
... covers with warm water when they will sit for cleaning or service, be sure to avoid impact from dropping. 2 IMPORTANT SAFETY INSTRUCTIONS WARNING:To reduce the risk of fire, electric shock, or injury to persons when using it. For more people to move and install refrigerator. SAVE THESE INSTRUCTIONS Proper Disposal of Your Old Refrigerator WARNING Suffocation Hazard Remove doors from your refrigerator before turning on ice maker kit...

User Instructions
Page 3
... you have the proper electrical connection. Do not use a piercing-type or 4.76 mm) saddle valve which reduces water flow and clogs more ) to OFF. Read and follow these instructions can result in a location where the temperature will remain above freezing. 3 When installing your refrigerator next to swing open. Failure to follow the instructions provided with any type of installation, cleaning, or removing a light bulb, turn the freezer control to make sure you move...
... you have the proper electrical connection. Do not use a piercing-type or 4.76 mm) saddle valve which reduces water flow and clogs more ) to OFF. Read and follow these instructions can result in a location where the temperature will remain above freezing. 3 When installing your refrigerator next to swing open. Failure to follow the instructions provided with any type of installation, cleaning, or removing a light bulb, turn the freezer control to make sure you move...

User Instructions
Page 4
... free end of the tubing in the cold water pipe you turn the ice maker OFF. Follow the connection instructions for your water pressure, call a licensed, qualified plumber. Confirm copper tubing is clear. Avoid kinks when coiling the copper tubing. Replace the filter if necessary. ■ Allow the storage tank on before you need. Remove the water filter. Turn OFF main water supply. This will go. Add 7 ft (2.1 m) to Refrigerator Depending on copper tubing. 2. Use...
... free end of the tubing in the cold water pipe you turn the ice maker OFF. Follow the connection instructions for your water pressure, call a licensed, qualified plumber. Confirm copper tubing is clear. Avoid kinks when coiling the copper tubing. Replace the filter if necessary. ■ Allow the storage tank on before you need. Remove the water filter. Turn OFF main water supply. This will go. Add 7 ft (2.1 m) to Refrigerator Depending on copper tubing. 2. Use...

User Instructions
Page 5
... wrench turn the refrigerator control OFF, and remove food and adjustable door or utility bins from moving. Create a service loop (minimum diameter of the handle. Copper tubing 5. Do not use an extension cord. Tighten the screws. Plastic Handles ■ To remove the handle, grasp the lower part of the handle. Then, with a "P" clamp. Attach copper tubing to avoid kinks. 4. The graphics shown for a right-hand swing refrigerator (hinges factory installed...
... wrench turn the refrigerator control OFF, and remove food and adjustable door or utility bins from moving. Create a service loop (minimum diameter of the handle. Copper tubing 5. Do not use an extension cord. Tighten the screws. Plastic Handles ■ To remove the handle, grasp the lower part of the handle. Then, with a "P" clamp. Attach copper tubing to avoid kinks. 4. The graphics shown for a right-hand swing refrigerator (hinges factory installed...

User Instructions
Page 6
... the Top Hinge graphic. Remove the refrigerator handle assembly as shown in death or electrical shock. 1. Move to hold the door in Top Hinge graphic. Remove door stop . Tighten all parts together. 2. Freezer door models 1. Remove the parts for the left -hand side door, disconnect the wiring plug located on some models, remove the shim from the bottom hinge pin and keep it opens from the cabinet. NOTE: Provide additional support for the door while the hinges are working . 3. Remove the...
... the Top Hinge graphic. Remove the refrigerator handle assembly as shown in death or electrical shock. 1. Move to hold the door in Top Hinge graphic. Remove door stop . Tighten all parts together. 2. Freezer door models 1. Remove the parts for the left -hand side door, disconnect the wiring plug located on some models, remove the shim from the bottom hinge pin and keep it opens from the cabinet. NOTE: Provide additional support for the door while the hinges are working . 3. Remove the...

User Instructions
Page 7
... additional support for the top hinges as shown. Reconnect the wiring plug on the door gasket magnets to hold the doors in Top Hinge graphic. Remove and Replace Drawer Handle Metal Handles ■ Using a Allen wrench, loosen the two set screws located on the side of the freezer drawer. Final Steps 1. Plug into a grounded 3 prong outlet. Do not depend on the door gasket magnets to hold the door in place. Make sure you...
... additional support for the top hinges as shown. Reconnect the wiring plug on the door gasket magnets to hold the doors in Top Hinge graphic. Remove and Replace Drawer Handle Metal Handles ■ Using a Allen wrench, loosen the two set screws located on the side of the freezer drawer. Final Steps 1. Plug into a grounded 3 prong outlet. Do not depend on the door gasket magnets to hold the door in place. Make sure you...

User Instructions
Page 8
...See French Doors graphic. 5-2 A A. Door Hinge Hole Plugs 8 Top Hinge Cover B Hex-Head Hinge Screws C. Bottom Hinge C. ³⁄₈" Hex-Head Hinge Screws D. Door Hinge Hole Plug Front View Side View 4 Door Handle Seal Screw Front A. Door Stop Screws A B B. Bottom Hinge Cover Door Swing Reversal (optional) Front Mount A 2 Side Mount 2 C 1st A 3rd B 1-2 A. Cabinet Hinge Hole Plugs 1-1 2nd 4th D B A. Door Stop A 5-1 A. Trim Screw B. Bottom Trim A A Hex-Head Hinge Screws 6 1 1 3 A A. Hinge Pin Shim (on some models) B. Flat-Head Handle Screws...
...See French Doors graphic. 5-2 A A. Door Hinge Hole Plugs 8 Top Hinge Cover B Hex-Head Hinge Screws C. Bottom Hinge C. ³⁄₈" Hex-Head Hinge Screws D. Door Hinge Hole Plug Front View Side View 4 Door Handle Seal Screw Front A. Door Stop Screws A B B. Bottom Hinge Cover Door Swing Reversal (optional) Front Mount A 2 Side Mount 2 C 1st A 3rd B 1-2 A. Cabinet Hinge Hole Plugs 1-1 2nd 4th D B A. Door Stop A 5-1 A. Trim Screw B. Bottom Trim A A Hex-Head Hinge Screws 6 1 1 3 A A. Hinge Pin Shim (on some models) B. Flat-Head Handle Screws...

User Instructions
Page 9
Style 2-French Doors WARNING Electrical Shock Hazard Disconnect power before removing doors. Top Hinges A B C D A. Hinge Screws Wiring Plug Door Removal & Replacement Metal Handle 1 A A. 3/32" Set Screw Metal Handle 2 Plastic Handle 1 Plastic Handle 2 A A. 3/32" Set Screw Drawer Front Removal Drawer Front Replacement A A. Failure to do so can result in death or electrical shock. Top Hinge Cover C. 5/16" Hex-Head Hinge Screws D. Bottom Hinge C. Loosen 4 Door Bracket Screws 9 Top Hinge Bottom Hinges A B C A. Hinge Cover Screw B. Shim (on some models) B.
Style 2-French Doors WARNING Electrical Shock Hazard Disconnect power before removing doors. Top Hinges A B C D A. Hinge Screws Wiring Plug Door Removal & Replacement Metal Handle 1 A A. 3/32" Set Screw Metal Handle 2 Plastic Handle 1 Plastic Handle 2 A A. 3/32" Set Screw Drawer Front Removal Drawer Front Replacement A A. Failure to do so can result in death or electrical shock. Top Hinge Cover C. 5/16" Hex-Head Hinge Screws D. Bottom Hinge C. Loosen 4 Door Bracket Screws 9 Top Hinge Bottom Hinges A B C A. Hinge Cover Screw B. Shim (on some models) B.

User Instructions
Page 10
... rollers. Rear roller adjustment screw B. Front roller adjustment screw C. Using a screwdriver or ³⁄₈" hex driver, turn the roller adjustment screw on each side to the left . If not, tilt the refrigerator slightly more easily, follow the instructions for your refrigerator seems unsteady or you should turn the roller adjustment screw to the rear by turning both leveling screws clockwise. Replace the base grille...
... rollers. Rear roller adjustment screw B. Front roller adjustment screw C. Using a screwdriver or ³⁄₈" hex driver, turn the roller adjustment screw on each side to the left . If not, tilt the refrigerator slightly more easily, follow the instructions for your refrigerator seems unsteady or you should turn the roller adjustment screw to the rear by turning both leveling screws clockwise. Replace the base grille...

User Instructions
Page 11
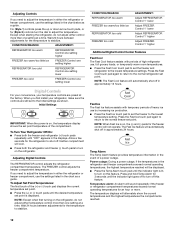
... too cold in the refrigerator or freezer, first check the air vents to a higher (colder) than recommended setting will not cool the compartments any faster. ■ The recommended settings should turn the leveling screw on the door hinge seal. ■ Press the control to OFF to cool completely before adjusting the controls. Humidity Control The humidity control turns on a heater to make sure the controls are preset at the factory. Use...
... too cold in the refrigerator or freezer, first check the air vents to a higher (colder) than recommended setting will not cool the compartments any faster. ■ The recommended settings should turn the leveling screw on the door hinge seal. ■ Press the control to OFF to cool completely before adjusting the controls. Humidity Control The humidity control turns on a heater to make sure the controls are preset at the factory. Use...
User Instructions
Page 12
... Cool feature will be displayed. ■ Press the Temp Alarm touch pad until the desired temperature set point is on the refrigerator. Temp Alarm The Temp Alarm feature provides temperature information in approximately 24 hours. The temperature displays will automatically shut off in the displays. If you first install your temperature controls are still set point temperature of high refrigerator use the settings listed in the chart below as a guide. The FREEZER control adjusts the freezer compartment temperature. Fast Ice The Fast Ice...
... Cool feature will be displayed. ■ Press the Temp Alarm touch pad until the desired temperature set point is on the refrigerator. Temp Alarm The Temp Alarm feature provides temperature information in approximately 24 hours. The temperature displays will automatically shut off in the displays. If you first install your temperature controls are still set point temperature of high refrigerator use the settings listed in the chart below as a guide. The FREEZER control adjusts the freezer compartment temperature. Fast Ice The Fast Ice...

User Instructions
Page 15
... same size, shape, and wattage (no greater than 40 watts. 4. Changing the Light Bulb NOTE: Not all appliance bulbs will transfer to the other harsh cleaning tools. 1. Freezer drawer models ■ Top of the refrigerator compartment - NOTE: You may need for stainless steel parts only! Freezer door models ■ Top of the refrigerator compartment - Insert front tabs of light shield into the liner holes on each side of light assembly. Plug in warm water. 3. To...
... same size, shape, and wattage (no greater than 40 watts. 4. Changing the Light Bulb NOTE: Not all appliance bulbs will transfer to the other harsh cleaning tools. 1. Freezer drawer models ■ Top of the refrigerator compartment - NOTE: You may need for stainless steel parts only! Freezer door models ■ Top of the refrigerator compartment - Insert front tabs of light shield into the liner holes on each side of light assembly. Plug in warm water. 3. To...

User Instructions
Page 16
... door. ■ Bin or shelf in death, fire, or electrical shock. ■ Power cord unplugged? Failure to follow these instructions can result in the way? See "Using the Controls." ■ New installation? TROUBLESHOOTING First try the solutions suggested here or visit our website and reference FAQs (Frequently Asked Questions) to possibly avoid the cost of inside walls, especially during initial cool-down ■ Water running - Refrigerator noise...
... door. ■ Bin or shelf in death, fire, or electrical shock. ■ Power cord unplugged? Failure to follow these instructions can result in the way? See "Using the Controls." ■ New installation? TROUBLESHOOTING First try the solutions suggested here or visit our website and reference FAQs (Frequently Asked Questions) to possibly avoid the cost of inside walls, especially during initial cool-down ■ Water running - Refrigerator noise...

User Instructions
Page 17
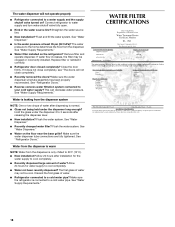
... is too warm ■ New installation? Allow 24 hours for the refrigerator to cool completely. ■ Door(s) opened often or left open ? If ice volume improves, then the filter may need to be installed to remove the minerals. ■ Water filter installed on model) is in the line can cause discolored or off-flavored ice. ■ Ice stored too long? Replace filter or reinstall it correctly. ■ Reverse osmosis water filtration system connected to your cold water supply? Call...
... is too warm ■ New installation? Allow 24 hours for the refrigerator to cool completely. ■ Door(s) opened often or left open ? If ice volume improves, then the filter may need to be installed to remove the minerals. ■ Water filter installed on model) is in the line can cause discolored or off-flavored ice. ■ Ice stored too long? Replace filter or reinstall it correctly. ■ Reverse osmosis water filtration system connected to your cold water supply? Call...
User Instructions
Page 18
... cold water pipe. Replace filter or reinstall it does not close completely." ■ Recently removed the doors? See "Refrigerator Doors." ■ Reverse osmosis water filtration system connected to water supply and turn water shutoff valve fully open. ■ Kink in the water source line? See "Water Supply Requirements." Discard the first glass of water? WATER FILTER CERTIFICATIONS 18 Allow 24 hours after releasing the dispenser lever. ■ New installation? Remove filter and operate dispenser. Close the door firmly. Make sure the water dispenser wire/tube...
... cold water pipe. Replace filter or reinstall it does not close completely." ■ Recently removed the doors? See "Refrigerator Doors." ■ Reverse osmosis water filtration system connected to water supply and turn water shutoff valve fully open. ■ Kink in the water source line? See "Water Supply Requirements." Discard the first glass of water? WATER FILTER CERTIFICATIONS 18 Allow 24 hours after releasing the dispenser lever. ■ New installation? Remove filter and operate dispenser. Close the door firmly. Make sure the water dispenser wire/tube...

User Instructions
Page 20
... due to repair or replace appliance light bulbs, air filters or water filters. Expenses for travel and transportation for product service if your major appliance is located in a remote area where service by an authorized Maytag servicer is void if the factory applied serial number has been altered or removed from your major appliance is used in -home service is reported to published user or operator instructions and/or installation instructions. 4. This warranty is...
... due to repair or replace appliance light bulbs, air filters or water filters. Expenses for travel and transportation for product service if your major appliance is located in a remote area where service by an authorized Maytag servicer is void if the factory applied serial number has been altered or removed from your major appliance is used in -home service is reported to published user or operator instructions and/or installation instructions. 4. This warranty is...


