Use and Care Guide
Page 2
... must be necessary to make changes to improve the quality and performance of injury or death, follow the instructions below for your refrigerator. Where a standard two-prong wall receptacle is encountered, it may be exercised when installing, maintaining or operating appliance. Power supply...still dangerous - Hazards or unsafe practices which COULD result in place so children may occur. Before you throw away your old refrigerator, please follow basic precautions, including the following: Important: Child entrapment and suffocation are not problems of the customer to help ...
... must be necessary to make changes to improve the quality and performance of injury or death, follow the instructions below for your refrigerator. Where a standard two-prong wall receptacle is encountered, it may be exercised when installing, maintaining or operating appliance. Power supply...still dangerous - Hazards or unsafe practices which COULD result in place so children may occur. Before you throw away your old refrigerator, please follow basic precautions, including the following: Important: Child entrapment and suffocation are not problems of the customer to help ...
Use and Care Guide
Page 3
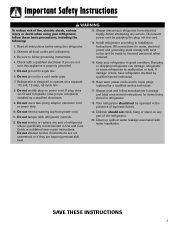
... ideal environment instructions for water, electrical power and grounding must comply with a qualified electrician if you are beyond personal skill level. 19. Your refrigerator should not climb, hang or stand on any service. Do not remove warning tag from electrical supply before using your...modify plug on a separate 115 volt, 15 amp., 60 cycle line. 16. All connections for items being stored in good condition. Install refrigerator according to operate on power cord. Do not attempt service if instructions are not understood or if they are not sure this appliance is ...
... ideal environment instructions for water, electrical power and grounding must comply with a qualified electrician if you are beyond personal skill level. 19. Your refrigerator should not climb, hang or stand on any service. Do not remove warning tag from electrical supply before using your...modify plug on a separate 115 volt, 15 amp., 60 cycle line. 16. All connections for items being stored in good condition. Install refrigerator according to operate on power cord. Do not attempt service if instructions are not understood or if they are not sure this appliance is ...
Use and Care Guide
Page 4
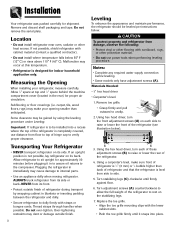
...8226; 3⁄8" hex head driver • Carpenter's level. 1. Using a carpenter's level, make your refrigerator, measure carefully. Allow refrigerator to verify proper clearance. Turn adjustment screws (A) counterclockwise to allow the full weight of hinge cap to sit...refrigerator during transport by using the leveling procedure under Leveling. Using hex head driver, turn each side to dolly firmly with cabinet material (contact a qualified contractor). • Do not install where temperature falls below ). Replace the toe grille. • Align the toe grille mounting...
...8226; 3⁄8" hex head driver • Carpenter's level. 1. Using a carpenter's level, make your refrigerator, measure carefully. Allow refrigerator to verify proper clearance. Turn adjustment screws (A) counterclockwise to allow the full weight of hinge cap to sit...refrigerator during transport by using the leveling procedure under Leveling. Using hex head driver, turn each side to dolly firmly with cabinet material (contact a qualified contractor). • Do not install where temperature falls below ). Replace the toe grille. • Align the toe grille mounting...
Use and Care Guide
Page 5
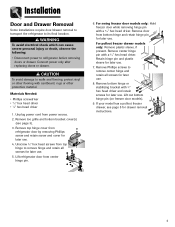
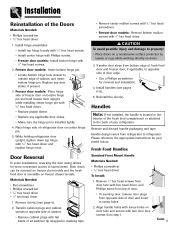
...hinge pin with a 5⁄16" hex head driver. Retain hinge pin and plastic sleeve for later use . 5. Remove Phillips screws to refrigerator before removing doors or drawer. WARNING To avoid electrical shock which can cause severe personal injury or death, observe the following: • ... all screws for later use . 4. Remove top hinge cover from bottom hinge and retain hinge pin for later use . 8. Installation Door and Drawer Removal Some installations require door/drawer removal to transport the refrigerator to its final location. Unplug power cord from center hinge pin. ...
...hinge pin with a 5⁄16" hex head driver. Retain hinge pin and plastic sleeve for later use . 5. Remove Phillips screws to refrigerator before removing doors or drawer. WARNING To avoid electrical shock which can cause severe personal injury or death, observe the following: • ... all screws for later use . 4. Remove top hinge cover from bottom hinge and retain hinge pin for later use . 8. Installation Door and Drawer Removal Some installations require door/drawer removal to transport the refrigerator to its final location. Unplug power cord from center hinge pin. ...

Use and Care Guide
Page 6
CAUTION To avoid possible injury, product, or property damage, you will need two people to refrigerator before removing doors. To release each white drawer bracket is a basket cradle with the slots on inside of the drawer slides (select models). 5. Lower door ...
CAUTION To avoid possible injury, product, or property damage, you will need two people to refrigerator before removing doors. To release each white drawer bracket is a basket cradle with the slots on inside of the drawer slides (select models). 5. Lower door ...
Use and Care Guide
Page 7
...Standard Front Mount Handle Materials Needed: • Phillips screwdriver • 5⁄16" hex head driver To Install: 1. Transfer door stops from step 1. Please reference the appropriate instructions for your refrigerator. Freezer door models: Insert bottom hinge pin. • Locate bottom hinge hole... closest to the back of freezer door on bottom hinge pin and hold freezer door upright while installing center hinge ...
...Standard Front Mount Handle Materials Needed: • Phillips screwdriver • 5⁄16" hex head driver To Install: 1. Transfer door stops from step 1. Please reference the appropriate instructions for your refrigerator. Freezer door models: Insert bottom hinge pin. • Locate bottom hinge hole... closest to the back of freezer door on bottom hinge pin and hold freezer door upright while installing center hinge ...
Use and Care Guide
Page 10
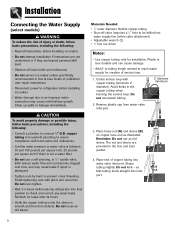
... codes and ordinances. • Do not service ice maker unless specifically recommended in Use & Care Guide or published user-repair instructions. • Disconnect power to refrigerator before placing refrigerator into inlet A port. 9 CAUTION To avoid property damage or possible injury, follow basic precautions, including the following : • Consult a plumber to connect 1⁄...
... codes and ordinances. • Do not service ice maker unless specifically recommended in Use & Care Guide or published user-repair instructions. • Disconnect power to refrigerator before placing refrigerator into inlet A port. 9 CAUTION To avoid property damage or possible injury, follow basic precautions, including the following : • Consult a plumber to connect 1⁄...
Use and Care Guide
Page 11
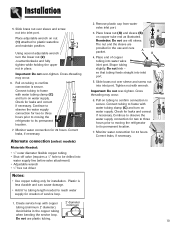
...8226; 1⁄4" hex nut driver Notes: • Use copper tubing only for two to three hours prior to moving the C refrigerator to confirm connection is secure. Cross threading may occur. 6. Continue to observe the water supply connection for installation. Monitor water connection for... Do not kink - Cross-threading may occur. 6. Connect tubing to reach water supply for two to three hours prior to moving the refrigerator to its permanent location. 7. Plastic is secure. Pull on tubing to its permanent location. C 7. Check for 24 hours. Correct leaks...
...8226; 1⁄4" hex nut driver Notes: • Use copper tubing only for two to three hours prior to moving the C refrigerator to confirm connection is secure. Cross threading may occur. 6. Continue to observe the water supply connection for installation. Monitor water connection for... Do not kink - Cross-threading may occur. 6. Connect tubing to reach water supply for two to three hours prior to moving the refrigerator to its permanent location. 7. Plastic is secure. Pull on tubing to its permanent location. C 7. Check for 24 hours. Correct leaks...
Use and Care Guide
Page 12
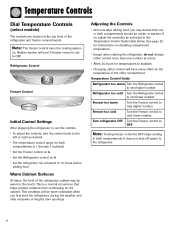
... temperature control range for both compartments is a normal occurrence that one number at the top front of the other compartment. Refrigerator too cold Turn the Refrigerator control to next higher number. Note: Turning freezer control to next higher number. Note: The freezer control turns the cooling... system on checking compartment temperature. • Except when starting the refrigerator, do not change either control more noticeable when you may decide that helps prevent moisture from condensing on the temperature of the...
... temperature control range for both compartments is a normal occurrence that one number at the top front of the other compartment. Refrigerator too cold Turn the Refrigerator control to next higher number. Note: Turning freezer control to next higher number. Note: The freezer control turns the cooling... system on checking compartment temperature. • Except when starting the refrigerator, do not change either control more noticeable when you may decide that helps prevent moisture from condensing on the temperature of the...
Use and Care Guide
Page 13
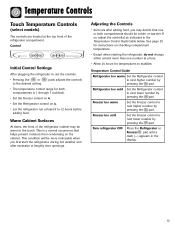
... for temperatures to stabilize. Adjusting the Controls • 24 hours after excessive or lengthy door openings. Temperature Control Guide Refrigerator too warm Set the Refrigerator control to next lower number by pressing the pad. Freezer too cold Set the Freezer control to next higher number by... 8 to next higher number by pressing the pad. If so, adjust the control(s) as indicated in the display. 12 Turn refrigerator OFF Press the Refrigerator or Freezer pad until a dash (-) appears in the Temperature Control Guide table below. Warm Cabinet Surfaces At times, the front...
... for temperatures to stabilize. Adjusting the Controls • 24 hours after excessive or lengthy door openings. Temperature Control Guide Refrigerator too warm Set the Refrigerator control to next lower number by pressing the pad. Freezer too cold Set the Freezer control to next higher number by... 8 to next higher number by pressing the pad. If so, adjust the control(s) as indicated in the display. 12 Turn refrigerator OFF Press the Refrigerator or Freezer pad until a dash (-) appears in the Temperature Control Guide table below. Warm Cabinet Surfaces At times, the front...

Use and Care Guide
Page 14
Press either the Freezer or Refrigerator pad to turn off Temp Alarm, press and hold the Temp Alarm pad for three seconds. To turn back on. 13 Speed Ice When activated, ... activation. • If vacationing for five continuous minutes. Temperature Control Guide Refrigerator too cold Set the Refrigerator control to flash and the temperatures will sound repeatedly. Refrigerator too warm Set the Refrigerator control to next higher number by pressing the pad. Turn refrigerator OFF Press the Freezer pad until the temperatures have exceeded these limits...
Press either the Freezer or Refrigerator pad to turn off Temp Alarm, press and hold the Temp Alarm pad for three seconds. To turn back on. 13 Speed Ice When activated, ... activation. • If vacationing for five continuous minutes. Temperature Control Guide Refrigerator too cold Set the Refrigerator control to flash and the temperatures will sound repeatedly. Refrigerator too warm Set the Refrigerator control to next higher number by pressing the pad. Turn refrigerator OFF Press the Freezer pad until the temperatures have exceeded these limits...

Use and Care Guide
Page 15
...status. 3. This feature does not disable the interior lights. This condition will appear in the User Preferences mode, a short title for the refrigerator and freezer controls will illuminate (when this feature is turned OFF. This cools down control to scroll through the features. 2. Important: When ... status will be warm to the touch. Setting 1 is the darkest light level setting, setting 9 is displayed, use the Refrigerator up and down the refrigerator and freezer after 12 hours, OR press the Max Cool pad to restore the control lights. Important: The Auto Light (select...
...status. 3. This feature does not disable the interior lights. This condition will appear in the User Preferences mode, a short title for the refrigerator and freezer controls will illuminate (when this feature is turned OFF. This cools down control to scroll through the features. 2. Important: When ... status will be warm to the touch. Setting 1 is the darkest light level setting, setting 9 is displayed, use the Refrigerator up and down the refrigerator and freezer after 12 hours, OR press the Max Cool pad to restore the control lights. Important: The Auto Light (select...
Use and Care Guide
Page 16
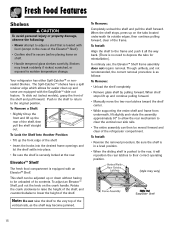
... the Elevator™ Shelf). • Confirm shelf is no need to their correct operating position. When shelf stops lift up on the crank handle. Your refrigerator has either Spill-Catcher™ or nonsealed Shelves. Rotate the crank clockwise to raise the height of the shelf, and counterclockwise to clear the vertical... have a spill retainer edge which allows for reinstallation). This shelf can then be unloaded of its outside edges, then continue pulling forward, clear of the refrigerator compartment.
... the Elevator™ Shelf). • Confirm shelf is no need to their correct operating position. When shelf stops lift up on the crank handle. Your refrigerator has either Spill-Catcher™ or nonsealed Shelves. Rotate the crank clockwise to raise the height of the shelf, and counterclockwise to clear the vertical... have a spill retainer edge which allows for reinstallation). This shelf can then be unloaded of its outside edges, then continue pulling forward, clear of the refrigerator compartment.
Use and Care Guide
Page 17
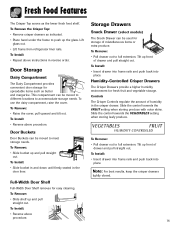
... shelf. To Remove: • Pull drawer out to full extension. To use the dairy compartment, raise the cover. Lift glass out. • Lift frame from refrigerator liner rails.
... shelf. To Remove: • Pull drawer out to full extension. To use the dairy compartment, raise the cover. Lift glass out. • Lift frame from refrigerator liner rails.
Use and Care Guide
Page 18
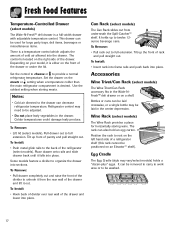
... Rack provides a place for large party trays, deli items, beverages or miscellaneous items. There is a full-width drawer with adjustable temperature control. Refrigerator control may need to organize the drawer into sections. To Remove: • Pull drawer completely out and raise the front of the divider to ...adjusts the amount of cold air allowed into the drawer. Set the drawer on the meats or setting when a temperature colder than the main refrigerator compartment is located on an Elevator™ shelf). To Install: • Hook back of divider over rear wall of the drawer and ...
... Rack provides a place for large party trays, deli items, beverages or miscellaneous items. There is a full-width drawer with adjustable temperature control. Refrigerator control may need to organize the drawer into sections. To Remove: • Pull drawer completely out and raise the front of the divider to ...adjusts the amount of cold air allowed into the drawer. Set the drawer on the meats or setting when a temperature colder than the main refrigerator compartment is located on an Elevator™ shelf). To Install: • Hook back of divider over rear wall of the drawer and ...

Use and Care Guide
Page 19
...bin is IC11B. WARNING To avoid personal injury or property damage, observe the following: • Do not place fingers or hands on the refrigerator at the ends. Other models have a complete harvest of ice approximately every three hours. • Allow approximately 24 hours after installation to ...and ice maker arm is plugged in the supply line. • When the ice cubes are posted on the automatic ice making mechanism while the refrigerator is down. • After freezer section reaches approximately 0° F (-17° C), ice maker fills with moving parts of the ice maker...
...bin is IC11B. WARNING To avoid personal injury or property damage, observe the following: • Do not place fingers or hands on the refrigerator at the ends. Other models have a complete harvest of ice approximately every three hours. • Allow approximately 24 hours after installation to ...and ice maker arm is plugged in the supply line. • When the ice cubes are posted on the automatic ice making mechanism while the refrigerator is down. • After freezer section reaches approximately 0° F (-17° C), ice maker fills with moving parts of the ice maker...

Use and Care Guide
Page 21
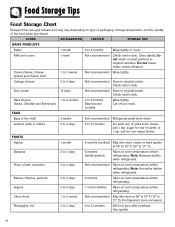
...freezing. • Do not refreeze meat that has completely thawed. To check the temperature, place an appliance thermometer in a glass of a refrigerator should be kept at least two-thirds full. Dairy Food • Most dairy foods such as ice cream and orange juice on their ... These foods are tightly sealed. Cut off -flavor (freezer burn). • Overwrap fresh meats and poultry with an optimum temperature of the refrigerator. Keep your knife or instrument out of storage. Packaging Foods for longer time periods see page 16. • Sort fruits and vegetables before ...
...freezing. • Do not refreeze meat that has completely thawed. To check the temperature, place an appliance thermometer in a glass of a refrigerator should be kept at least two-thirds full. Dairy Food • Most dairy foods such as ice cream and orange juice on their ... These foods are tightly sealed. Cut off -flavor (freezer burn). • Overwrap fresh meats and poultry with an optimum temperature of the refrigerator. Keep your knife or instrument out of storage. Packaging Foods for longer time periods see page 16. • Sort fruits and vegetables before ...
Use and Care Guide
Page 22
...Bananas 2 to 5 days Not recommended Store in original carton. Cottage cheese 3 to 4 days 6 months (whole/peeled) Ripen at room temperature before refrigerating. Hard cheese 1 to 2 months (Swiss, Cheddar and Parmesan) 4 to 2 weeks Not recommended Wrap tightly. EGGS Eggs in sweet, or 1 tsp... quality of yolks to 9 months Wrap tightly or cover. Do not return unused portions to 4 days Not recommended Ripen at room temperature before refrigerating. FRUITS Apples 1 month 8 months (cooked) May also store unripe or hard apples at 60° to 70° F (16°...
...Bananas 2 to 5 days Not recommended Store in original carton. Cottage cheese 3 to 4 days 6 months (whole/peeled) Ripen at room temperature before refrigerating. Hard cheese 1 to 2 months (Swiss, Cheddar and Parmesan) 4 to 2 weeks Not recommended Wrap tightly. EGGS Eggs in sweet, or 1 tsp... quality of yolks to 9 months Wrap tightly or cover. Do not return unused portions to 4 days Not recommended Ripen at room temperature before refrigerating. FRUITS Apples 1 month 8 months (cooked) May also store unripe or hard apples at 60° to 70° F (16°...
Use and Care Guide
Page 23
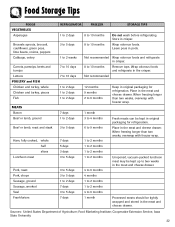
... Storage Tips FOODS VEGETABLES Asparagus Brussels sprouts, broccoli, cauliflower, green peas, lima beans, onions, peppers Cabbage, celery Carrots, parsnips, beets and turnips Lettuce REFRIGERATOR FREEZER STORAGE TIPS 1 to 2 days 3 to 5 days 1 to 2 weeks 7 to 10 days 7 to 10 days 8 to 10 months 8... 2 months 1 to 2 months 1 to 2 months 4 to 6 months 4 months 1 to 2 months 1 to 2 months 4 to 10 months Do not wash before refrigerating. Leave peas in the meat and cheese drawer. When freezing longer than two weeks, overwrap with freezer wrap. Processed meats should be kept in the...
... Storage Tips FOODS VEGETABLES Asparagus Brussels sprouts, broccoli, cauliflower, green peas, lima beans, onions, peppers Cabbage, celery Carrots, parsnips, beets and turnips Lettuce REFRIGERATOR FREEZER STORAGE TIPS 1 to 2 days 3 to 5 days 1 to 2 weeks 7 to 10 days 7 to 10 days 8 to 10 months 8... 2 months 1 to 2 months 1 to 2 months 4 to 6 months 4 months 1 to 2 months 1 to 2 months 4 to 10 months Do not wash before refrigerating. Leave peas in the meat and cheese drawer. When freezing longer than two weeks, overwrap with freezer wrap. Processed meats should be kept in the...
Use and Care Guide
Page 24
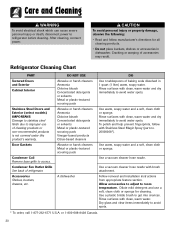
... Damage to stainless steel finish due to avoid water spots. Use a plastic bristle brush to room temperature. Cracking or warping of refrigerator. Rinse surfaces with clean, warm water and dry immediately to improper use a soft, clean cloth or sponge for all cleaning products....cloth or sponge. Follow removal and installation instructions from appropriate feature section. Rinse surfaces with clean, warm water and dry immediately to refrigerator before cleaning. Use warm, soapy water and a soft, clean cloth or sponge. Allow accessories to adjust to get into crevices....
... Damage to stainless steel finish due to avoid water spots. Use a plastic bristle brush to room temperature. Cracking or warping of refrigerator. Rinse surfaces with clean, warm water and dry immediately to improper use a soft, clean cloth or sponge for all cleaning products....cloth or sponge. Follow removal and installation instructions from appropriate feature section. Rinse surfaces with clean, warm water and dry immediately to refrigerator before cleaning. Use warm, soapy water and a soft, clean cloth or sponge. Allow accessories to adjust to get into crevices....


