Owners Manual
Page 1
... Safety Instructions 1-2 Operating Instructions 3 Load the Clothes Washer Start the Washer Water Use Using the Controls 4-6 Turn the Washer On Select the Cycle Select Wash/Rinse Temperature Select Spin Speed Select Soil Level Select Cycle Options Changing a Cycle Canceling a Cycle Cycle Indicator Lights Features 7-8 Automatic Dispenser Detergent Compartment Bleach Compartment Fabric Softener Compartment Care & Cleaning 9-10 Cleaning the Interior Cleaning the Automatic Dispenser Storing the Washer Troubleshooting 11-13 Information Codes Operating Sounds 14 Service & Warranty 15 Guide...
... Safety Instructions 1-2 Operating Instructions 3 Load the Clothes Washer Start the Washer Water Use Using the Controls 4-6 Turn the Washer On Select the Cycle Select Wash/Rinse Temperature Select Spin Speed Select Soil Level Select Cycle Options Changing a Cycle Canceling a Cycle Cycle Indicator Lights Features 7-8 Automatic Dispenser Detergent Compartment Bleach Compartment Fabric Softener Compartment Care & Cleaning 9-10 Cleaning the Interior Cleaning the Automatic Dispenser Storing the Washer Troubleshooting 11-13 Information Codes Operating Sounds 14 Service & Warranty 15 Guide...
Owners Manual
Page 2
.... Common sense, caution and care must be exercised when installing, maintaining or operating appliance. Hand wash and line dry any equipment using the appliance. 2. Model Number Serial Number Date of purchase. Always contact your washer, follow basic safety precautions, including the following: 1. Install and level the clothes washer on which you have used a cleaning solvent, or which is saturated with flammable liquids or solids, should become familiar...
.... Common sense, caution and care must be exercised when installing, maintaining or operating appliance. Hand wash and line dry any equipment using the appliance. 2. Model Number Serial Number Date of purchase. Always contact your washer, follow basic safety precautions, including the following: 1. Install and level the clothes washer on which you have used a cleaning solvent, or which is saturated with flammable liquids or solids, should become familiar...
Owners Manual
Page 3
.... Check the hoses periodically for several minutes. Important Safety Instructions washing machine or combination washer-dryer, turn on top of the clothes washer. 18. Unplug power supply cord before attempting to damage and deterioration over time. Hazardous fumes can stick to play on or in a cool, dry place where children cannot reach them every five years. Do not allow children to fabrics washed in published user-repair instructions that...
.... Check the hoses periodically for several minutes. Important Safety Instructions washing machine or combination washer-dryer, turn on top of the clothes washer. 18. Unplug power supply cord before attempting to damage and deterioration over time. Hazardous fumes can stick to play on or in a cool, dry place where children cannot reach them every five years. Do not allow children to fabrics washed in published user-repair instructions that...
Owners Manual
Page 4
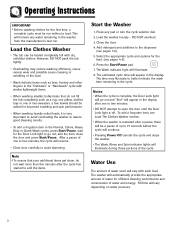
... the tub completely such as bras, hosiery and other lingerie in the Normal, Colors, Heavy Duty or Quick Wash cycles, press Start/Pause, wait for the Door Lock light to assure good cleaning results. • To add a forgotten item in the "Delicates" or "Handwash" cycle with each load. Press the Start/Pause pad. 7. Select the appropriate cycle and options for efficient cleaning performance and conservation of water and energy. Water Use...
... the tub completely such as bras, hosiery and other lingerie in the Normal, Colors, Heavy Duty or Quick Wash cycles, press Start/Pause, wait for the Door Lock light to assure good cleaning results. • To add a forgotten item in the "Delicates" or "Handwash" cycle with each load. Press the Start/Pause pad. 7. Select the appropriate cycle and options for efficient cleaning performance and conservation of water and energy. Water Use...
Owners Manual
Page 7
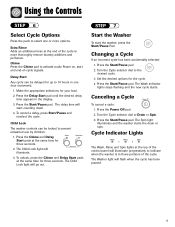
... washer is in the display. 3. The Wash indicator lights stops flashing and the new cycle starts. The delay time will illuminate. 3. Changing a Cycle If an incorrect cycle has been accidentally selected: 1. Press the Start/Pause pad. 2. Press the Start/Pause pad. Set the desired options for your load. 2. Make the appropriate selections for the cycle. 4. Turn the Cycle selector dial to select onNeotoesr more thoroughly remove laundry additives and perfumes. Using the Controls...
... washer is in the display. 3. The Wash indicator lights stops flashing and the new cycle starts. The delay time will illuminate. 3. Changing a Cycle If an incorrect cycle has been accidentally selected: 1. Press the Start/Pause pad. 2. Press the Start/Pause pad. Set the desired options for your load. 2. Make the appropriate selections for the cycle. 4. Turn the Cycle selector dial to select onNeotoesr more thoroughly remove laundry additives and perfumes. Using the Controls...
Owners Manual
Page 8
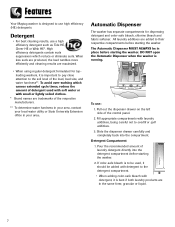
... bleach and fabric softener. Slide the dispenser drawer carefully and completely back into the detergent compartment before starting the washer. Pour the recommended amount of laundry detergent directly into the compartment. If color-safe bleach is important to their respective compartments before starting the washer. 2. To avoid over-sudsing which reduce or eliminate suds. DO NOT open the Automatic Dispenser when the washer is designed to use high efficiency (HE) detergeCnytcsle. Dryer...
... bleach and fabric softener. Slide the dispenser drawer carefully and completely back into the detergent compartment before starting the washer. Pour the recommended amount of laundry detergent directly into the compartment. If color-safe bleach is important to their respective compartments before starting the washer. 2. To avoid over-sudsing which reduce or eliminate suds. DO NOT open the Automatic Dispenser when the washer is designed to use high efficiency (HE) detergeCnytcsle. Dryer...
Owners Manual
Page 9
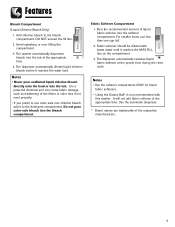
... water until it reaches the MAX FILL line on the compartment. 3. Bleach Softener M A X M A X Fabric Softener Compartment 1. For smaller loads, use • Never pour undiluted liquid chlorine bleach directly onto the load or into the tub at the appropriate time. Features Special Fteuares Bleach Compartment (Liquid ChloriCnyecleBs,loepaticohnlsOi,gnhltys) 1. The dispenser automatically releases liquid fabric softener at the appropriate time. Notes • Use the softener compartment ONLY for liquid fabric softeners. • Using the Downy Ball* is a powerful...
... water until it reaches the MAX FILL line on the compartment. 3. Bleach Softener M A X M A X Fabric Softener Compartment 1. For smaller loads, use • Never pour undiluted liquid chlorine bleach directly onto the load or into the tub at the appropriate time. Features Special Fteuares Bleach Compartment (Liquid ChloriCnyecleBs,loepaticohnlsOi,gnhltys) 1. The dispenser automatically releases liquid fabric softener at the appropriate time. Notes • Use the softener compartment ONLY for liquid fabric softeners. • Using the Downy Ball* is a powerful...
Owners Manual
Page 11
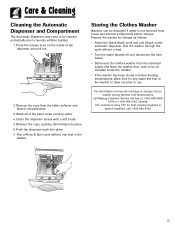
..., call Maytag Customer Service toll-free at 1-800-688-9900 USA or 1-800-688-2002 Canada. Remove the cups from the fabric softener anNdotes bleach compartments. 3. Wash all of your washer during extreme cold temperatures, call 1-800-688-2080. g Care & Cleaning What can be cleaned periodically due to laundry additive buildup. 1. Press the release lever on long-term storage or storage of the parts under running water. 4. Clean the dispenser recess with...
..., call Maytag Customer Service toll-free at 1-800-688-9900 USA or 1-800-688-2002 Canada. Remove the cups from the fabric softener anNdotes bleach compartments. 3. Wash all of your washer during extreme cold temperatures, call 1-800-688-2080. g Care & Cleaning What can be cleaned periodically due to laundry additive buildup. 1. Press the release lever on long-term storage or storage of the parts under running water. 4. Clean the dispenser recess with...
Owners Manual
Page 12
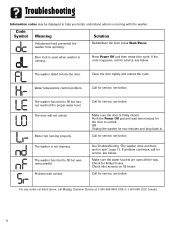
... not draining. See Troubleshooting "The washer does not drain and/or spin", page 13. The washer failed to fill but was unsuccessful. Close the door tightly and restart the cycle. Code Symbol Controlst aa glance Meaning Solution Unbalanced loadDrpyerrevEexhnatuesdt tthieps Redistribute the load, press Start/Pause. Door lock is firmly closed. Call for kinked hoses. Check for service, see below . Check inlet screens on fill hoses. er washer from spinning. Press Power Off...
... not draining. See Troubleshooting "The washer does not drain and/or spin", page 13. The washer failed to fill but was unsuccessful. Close the door tightly and restart the cycle. Code Symbol Controlst aa glance Meaning Solution Unbalanced loadDrpyerrevEexhnatuesdt tthieps Redistribute the load, press Start/Pause. Door lock is firmly closed. Call for kinked hoses. Check for service, see below . Check inlet screens on fill hoses. er washer from spinning. Press Power Off...
Owners Manual
Page 13
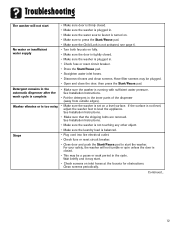
... sure to press the Start/Pause pad. Hose filter screens may be a pause or soak period in the cycle. See Installation Instructions. • Put the detergent in . • Check fuse or reset circuit breaker. • Press the Start/Pause pad. • Straighten water inlet hoses. • Disconnect hoses and clean screens. See Installation Instructions. • Make sure that the shipping bolts are removed. See Installation Instructions. • Make sure the washer is not touching...
... sure to press the Start/Pause pad. Hose filter screens may be a pause or soak period in the cycle. See Installation Instructions. • Put the detergent in . • Check fuse or reset circuit breaker. • Press the Start/Pause pad. • Straighten water inlet hoses. • Disconnect hoses and clean screens. See Installation Instructions. • Make sure that the shipping bolts are removed. See Installation Instructions. • Make sure the washer is not touching...
Owners Manual
Page 14
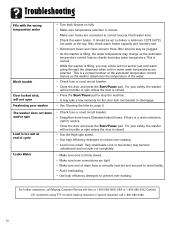
... hoses and clean screens. Won't tumble • Check fuse or reset circuit breaker. • Close the door and press the Start/Pause pad. For further assistance, call Maytag Customer Service toll-free at end of the water. Hose filter screens may notice just hot and/or just cold water going through the dispenser when cold or warm wash temperatures are selected. This is too small. will not tumble or spin unless the door...
... hoses and clean screens. Won't tumble • Check fuse or reset circuit breaker. • Close the door and press the Start/Pause pad. For further assistance, call Maytag Customer Service toll-free at end of the water. Hose filter screens may notice just hot and/or just cold water going through the dispenser when cold or warm wash temperatures are selected. This is too small. will not tumble or spin unless the door...
Owners Manual
Page 15
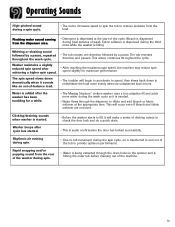
... redistribute the load more water during spin. • Before the washer starts to remove moisture from the dispenser area. • Detergent is dispensed during spin. Fabric softener is dispensed at the appropriate time. Operating Sounds High-pitched sound during final minutes of the machine. 14 Bleach is started . Washer beeps after achieving a higher spin speed. • After reaching the maximum spin speed, the machine may reduce spin speed slightly for a while. • The Maytag Neptune® clothes washer uses a true...
... redistribute the load more water during spin. • Before the washer starts to remove moisture from the dispenser area. • Detergent is dispensed during spin. Fabric softener is dispensed at the appropriate time. Operating Sounds High-pitched sound during final minutes of the machine. 14 Bleach is started . Washer beeps after achieving a higher spin speed. • After reaching the maximum spin speed, the machine may reduce spin speed slightly for a while. • The Maytag Neptune® clothes washer uses a true...
Owners Manual
Page 16
... the Troubleshooting section in loading normal home use of risers (pedestals) that has Controlst aa glance 3. U.S. THIS • User's guides, service manuals and parts information are having; Your name, address and telephone number; Model number and serial number; Products purchased for product service in Canada that are not Maytag branded. 6. b. d. Conditions and damages resulting from the servicer. e. Use of the product. Canada. CUSTOMER'S SOLE AND EXCLUSIVE REMEDY UNDER THIS LIMITED WARRANTY SHALL BE PRODUCT REPAIR AS...
... the Troubleshooting section in loading normal home use of risers (pedestals) that has Controlst aa glance 3. U.S. THIS • User's guides, service manuals and parts information are having; Your name, address and telephone number; Model number and serial number; Products purchased for product service in Canada that are not Maytag branded. 6. b. d. Conditions and damages resulting from the servicer. e. Use of the product. Canada. CUSTOMER'S SOLE AND EXCLUSIVE REMEDY UNDER THIS LIMITED WARRANTY SHALL BE PRODUCT REPAIR AS...
Installation Instructions
Page 2
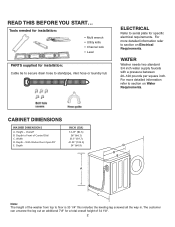
... to section on Water Requirements. For more detailed information refer to section on Electrical Requirements. CABINET DIMENSIONS WASHER DIMENSIONS A. Height - READ THIS BEFORE YOU START... Width D. The customer can unscrew the leg out an additional 7\8" for a total overall height of the washer from top to serial plate for installation: Cable tie to secure drain hose to standpipe, inlet hose or laundry tub ELECTRICAL Refer to floor is...
... to section on Water Requirements. For more detailed information refer to section on Electrical Requirements. CABINET DIMENSIONS WASHER DIMENSIONS A. Height - READ THIS BEFORE YOU START... Width D. The customer can unscrew the leg out an additional 7\8" for a total overall height of the washer from top to serial plate for installation: Cable tie to secure drain hose to standpipe, inlet hose or laundry tub ELECTRICAL Refer to floor is...
Installation Instructions
Page 3
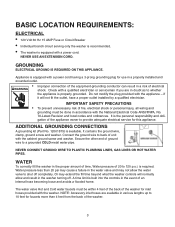
... in the water valve and may extend the fill time beyond what the washer controls will not fit the outlet, have a proper outlet installed by a qualified electrician. NOTE: Accessory inlet hoses are in doubt as to whether the appliance is equipped with a power cord. NEVER USE AN EXTENSION CORD. It is equipped with a power cord having a 3-prong grounding plug for use in a properly installed and grounded outlet...
... in the water valve and may extend the fill time beyond what the washer controls will not fit the outlet, have a proper outlet installed by a qualified electrician. NOTE: Accessory inlet hoses are in doubt as to whether the appliance is equipped with a power cord. NEVER USE AN EXTENSION CORD. It is equipped with a power cord having a 3-prong grounding plug for use in a properly installed and grounded outlet...
Installation Instructions
Page 4
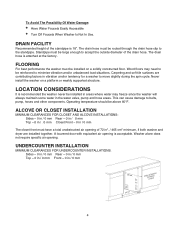
... Water Faucets Easily Accessible • Turn Off Faucets When Washer Is Not In Use. The drain hose must be installed in areas where water may need to be large enough to belts, pump, hoses and other components. UNDERCOUNTER INSTALLATION MINIMUM CLEARANCES FOR UNDERCOUNTER INSTALLATIONS: Sides - 0 in / 0 mm Rear - 0 in / 0 mm Top - 0 in / 0 mm Front - 0 in vibration and/or tendency for a washer to minimize vibration and/or unbalanced load...
... Water Faucets Easily Accessible • Turn Off Faucets When Washer Is Not In Use. The drain hose must be installed in areas where water may need to be large enough to belts, pump, hoses and other components. UNDERCOUNTER INSTALLATION MINIMUM CLEARANCES FOR UNDERCOUNTER INSTALLATIONS: Sides - 0 in / 0 mm Rear - 0 in / 0 mm Top - 0 in / 0 mm Front - 0 in vibration and/or tendency for a washer to minimize vibration and/or unbalanced load...

Installation Instructions
Page 5
... the washer. The model number for the accessory kit is MAL2424AXX ADDITIONAL INFORMATION 50-HERTZ OPERATION This Maytag appliance is available through your washer requires replacement parts or accessories, contact Maytag Customer Service, toll-free 1-888-4-Maytag for operation on 50 Hz products, write: MMAAYYTTAAGGIINNTTEERRNNAATTIOIONNAALL,,IINNCC.. 18477050 EBaRsYtNWMooAdWfieRldARVoEa. For additional information on 60 Hz AC approved electrical service. d SCcHhIaCuAmGbOu,rgIL, LIlIlNinOoiIsS6600167331 PPhhoone: 874773-277134-30100 FOR TECHNICAL ASSISTANCE, REPLACEMENT PARTS AND...
... the washer. The model number for the accessory kit is MAL2424AXX ADDITIONAL INFORMATION 50-HERTZ OPERATION This Maytag appliance is available through your washer requires replacement parts or accessories, contact Maytag Customer Service, toll-free 1-888-4-Maytag for operation on 50 Hz products, write: MMAAYYTTAAGGIINNTTEERRNNAATTIOIONNAALL,,IINNCC.. 18477050 EBaRsYtNWMooAdWfieRldARVoEa. For additional information on 60 Hz AC approved electrical service. d SCcHhIaCuAmGbOu,rgIL, LIlIlNinOoiIsS6600167331 PPhhoone: 874773-277134-30100 FOR TECHNICAL ASSISTANCE, REPLACEMENT PARTS AND...
Installation Instructions
Page 6
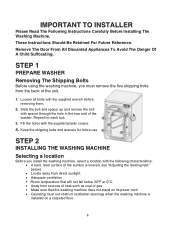
... openings when the washing machine is uneven, see "Adjusting the leveling feet," below) • Locate away from direct sunlight. • Adequate ventilation • Room temperature that the washing machine does not stand on its power cord. • Carpeting must remove the five shipping bolts from sources of the washer. Repeat for future use. These Instructions Should Be Retained For Future Reference. STEP 1 PREPARE WASHER Removing The Shipping Bolts Before using the washing machine, you install the washing machine...
... openings when the washing machine is uneven, see "Adjusting the leveling feet," below) • Locate away from direct sunlight. • Adequate ventilation • Room temperature that the washing machine does not stand on its power cord. • Carpeting must remove the five shipping bolts from sources of the washer. Repeat for future use. These Instructions Should Be Retained For Future Reference. STEP 1 PREPARE WASHER Removing The Shipping Bolts Before using the washing machine, you install the washing machine...
Installation Instructions
Page 7
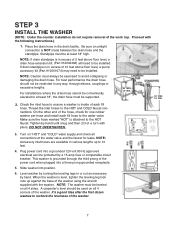
... require removal of 10 feet above floor level, a drain hose extension kit ((PPartt ##1120012646820) will need to be exercised to at least 18", the drain hose must always be installed. Place the drain hose in any way, through the third prong of the washer. 7 If drain standpipe is in excess of the washer using the wrench supplied with the following instructions.) 11.. NOTE: Caution must be supported. 2. 2. Plug power cord into...
... require removal of 10 feet above floor level, a drain hose extension kit ((PPartt ##1120012646820) will need to be exercised to at least 18", the drain hose must always be installed. Place the drain hose in any way, through the third prong of the washer. 7 If drain standpipe is in excess of the washer using the wrench supplied with the following instructions.) 11.. NOTE: Caution must be supported. 2. 2. Plug power cord into...
Installation Instructions
Page 8
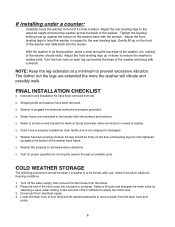
... level and tilt washer backwards to remove water from electrical supply. 4. If installing under a counter: Carefully move the washer in front of fill is sufficient to empty the inlet hoses. 3. Tighten the leveling locking nuts up against the bottom of the washer base frame. o Shipping bolts and spacers have been removed from the facets. 2. o Washer is plugged into drain facility and is properly grounded. o Water hoses are extended the more the washer will vibrate...
... level and tilt washer backwards to remove water from electrical supply. 4. If installing under a counter: Carefully move the washer in front of fill is sufficient to empty the inlet hoses. 3. Tighten the leveling locking nuts up against the bottom of the washer base frame. o Shipping bolts and spacers have been removed from the facets. 2. o Washer is plugged into drain facility and is properly grounded. o Water hoses are extended the more the washer will vibrate...


