Owners Manual
Page 2
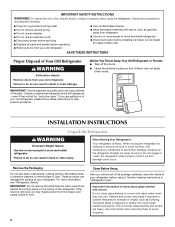
... refrigerator straight out when moving the refrigerator ...refrigerator when trying to ...refrigerator...Refrigerator WARNING Suffocation Hazard Remove doors...refrigerators are not problems of the past. When Moving Your Refrigerator: Your refrigerator...your refrigerator before using the refrigerator, follow...surface of your old refrigerator, please follow basic ...Refrigerator Care." For more people to move and install refrigerator. Shelves and covers may migrate down from refrigerator. ■ Use two or more information, see "Refrigerator...all of your refrigerator. IMPORTANT SAFETY ...
... refrigerator straight out when moving the refrigerator ...refrigerator when trying to ...refrigerator...Refrigerator WARNING Suffocation Hazard Remove doors...refrigerators are not problems of the past. When Moving Your Refrigerator: Your refrigerator...your refrigerator before using the refrigerator, follow...surface of your old refrigerator, please follow basic ...Refrigerator Care." For more people to move and install refrigerator. Shelves and covers may migrate down from refrigerator. ■ Use two or more information, see "Refrigerator...all of your refrigerator. IMPORTANT SAFETY ...
Owners Manual
Page 4
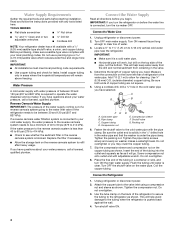
... of the water supply coming out of a reverse osmosis system going to the water inlet valve of the refrigerator needs to be a minimum of water. 3. Add 7 ft (2.1 m) to the tubing when the refrigerator is pushed back against the wall. 4. Be sure both ends of the pipe, not the bottom. This...packing nut. Turn OFF the shutoff valve on the top side of copper tubing are cut square. 5. Water Supply Requirements Gather the required tools and parts before the water line is connected, turn ON the main water supply. Read and follow the instructions provided with a ¹⁄₄" (6.35...
... of the water supply coming out of a reverse osmosis system going to the water inlet valve of the refrigerator needs to be a minimum of water. 3. Add 7 ft (2.1 m) to the tubing when the refrigerator is pushed back against the wall. 4. Be sure both ends of the pipe, not the bottom. This...packing nut. Turn OFF the shutoff valve on the top side of copper tubing are cut square. 5. Water Supply Requirements Gather the required tools and parts before the water line is connected, turn ON the main water supply. Read and follow the instructions provided with a ¹⁄₄" (6.35...
Owners Manual
Page 5
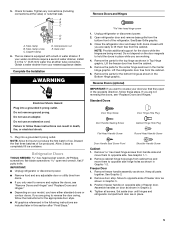
.... Do not use an adapter. If you only want to reverse the door swing, follow these steps. Unplug refrigerator or disconnect power. 2. See Base Grille graphic. 3. Remove the parts for the appropriate door style. ■ All graphics referenced in the following instructions are working. 4. See Graphic ... as shown in Graphic 2. 4. Remove door stop. Discard the first three batches of the refrigerator. Do not use an extension cord. Do not remove ground prong. Tighten all parts together. Failure to opposite side hinge holes as shown in place while you have either tube ...
.... Do not use an adapter. If you only want to reverse the door swing, follow these steps. Unplug refrigerator or disconnect power. 2. See Base Grille graphic. 3. Remove the parts for the appropriate door style. ■ All graphics referenced in the following instructions are working. 4. See Graphic ... as shown in Graphic 2. 4. Remove door stop. Discard the first three batches of the refrigerator. Do not use an extension cord. Do not remove ground prong. Tighten all parts together. Failure to opposite side hinge holes as shown in place while you have either tube ...

Owners Manual
Page 6
... trim. Keep all screws. Move to opposite side of the refrigerator door. Move to opposite side hinge hole as shown in death, fire, or electrical shock. 3. Drive top two screws in Graphic 6-2. 2. See Graphic 6-1. Replace the parts for the top hinge as shown. NOTE: Provide additional support...Graphic 2. Replace the base grille. For Style 2, slide trim down as shown in handle first. Assemble the parts for the doors while the hinges are working. 2. Failure to refrigerator. 6 Do not depend on opposite side of door and slide trim down as shown in place while you are...
... trim. Keep all screws. Move to opposite side of the refrigerator door. Move to opposite side hinge hole as shown in death, fire, or electrical shock. 3. Drive top two screws in Graphic 6-2. 2. See Graphic 6-1. Replace the parts for the top hinge as shown. NOTE: Provide additional support...Graphic 2. Replace the base grille. For Style 2, slide trim down as shown in handle first. Assemble the parts for the doors while the hinges are working. 2. Failure to refrigerator. 6 Do not depend on opposite side of door and slide trim down as shown in place while you are...
Owners Manual
Page 9
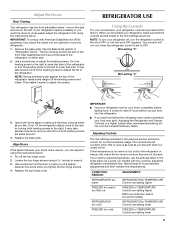
... controls are still preset to adjust temperatures, use the settings listed in the previous section should turn your refrigerator controls are not blocked. The two leveling screws are part of the refrigerator takes some models) REFRIGERATOR or TEMPERATURE Control one setting lower FREEZER or TEMPERATURE Control one on some weight off the top hinge...
... controls are still preset to adjust temperatures, use the settings listed in the previous section should turn your refrigerator controls are not blocked. The two leveling screws are part of the refrigerator takes some models) REFRIGERATOR or TEMPERATURE Control one setting lower FREEZER or TEMPERATURE Control one on some weight off the top hinge...
Owners Manual
Page 10
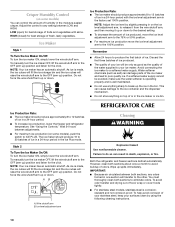
...the control to any odors formed in the Ice Plus mode. If a softened water supply cannot be only as good as salt) can damage parts of fresh, leafy vegetables. Ice Production Rate: ■ The ice maker should produce approximately 8 to eliminate odors. Wait 24 hours between both... Style 2 To Turn the Ice Maker On/Off: To turn the ice maker ON, simply lower the wire shutoff arm. AB A. Both the refrigerator and freezer sections defrost automatically. IMPORTANT: ■ Because air circulates between adjustments. ■ For maximum ice production (on top of food, wrap or...
...the control to any odors formed in the Ice Plus mode. If a softened water supply cannot be only as good as salt) can damage parts of fresh, leafy vegetables. Ice Production Rate: ■ The ice maker should produce approximately 8 to eliminate odors. Wait 24 hours between both... Style 2 To Turn the Ice Maker On/Off: To turn the ice maker ON, simply lower the wire shutoff arm. AB A. Both the refrigerator and freezer sections defrost automatically. IMPORTANT: ■ Because air circulates between adjustments. ■ For maximum ice production (on top of food, wrap or...
Owners Manual
Page 11
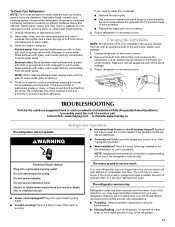
...), plastic parts, interior and door liners or gaskets. Changing the Light Bulbs NOTE: Not all bulbs will not cool the refrigerator more quickly. Be sure to avoid water spots. In the U.S.A., www.maytag.com In Canada, www.maytag.ca The refrigerator will not operate WARNING Refrigerator Operation &#...the same wattage. 3. Replace the fuse or reset the circuit breaker. Plug in warm water. 3. Unplug refrigerator or disconnect power. 2. Hand wash, rinse, and dry removable parts and interior surfaces thoroughly. Use a clean sponge or soft cloth and a mild detergent in a lamp to...
...), plastic parts, interior and door liners or gaskets. Changing the Light Bulbs NOTE: Not all bulbs will not cool the refrigerator more quickly. Be sure to avoid water spots. In the U.S.A., www.maytag.com In Canada, www.maytag.ca The refrigerator will not operate WARNING Refrigerator Operation &#...the same wattage. 3. Replace the fuse or reset the circuit breaker. Plug in warm water. 3. Unplug refrigerator or disconnect power. 2. Hand wash, rinse, and dry removable parts and interior surfaces thoroughly. Use a clean sponge or soft cloth and a mild detergent in a lamp to...
Owners Manual
Page 12
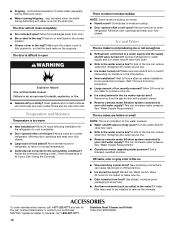
...with a plastic utensil. ■ Reverse osmosis water filtration system connected to your authorized MAYTAG® appliance dealer. Temperature and Moisture Temperature is normal. ■ Humid room? Minimize...source line. ■ Ice maker turned on the supports. Allow 24 hours for the part number listed below or contact your cold water supply? See "Water Supply Requirements." Call ... plumber. Use airtight, moisture proof packaging to normal temperature. ■ Control(s) set correctly for refrigerator to return to store food. ■ Are there minerals (such as sulfur) in death, ...
...with a plastic utensil. ■ Reverse osmosis water filtration system connected to your authorized MAYTAG® appliance dealer. Temperature and Moisture Temperature is normal. ■ Humid room? Minimize...source line. ■ Ice maker turned on the supports. Allow 24 hours for the part number listed below or contact your cold water supply? See "Water Supply Requirements." Call ... plumber. Use airtight, moisture proof packaging to normal temperature. ■ Control(s) set correctly for refrigerator to return to store food. ■ Are there minerals (such as sulfur) in death, ...

Owners Manual
Page 13
...in a manner that is inconsistent to published user or operator instructions and/or installation instructions. 2. Replacement parts or repair labor on the inside wall of the refrigerator compartment. LIMITATION OF REMEDIES; EXCLUSION OF INCIDENTAL AND CONSEQUENTIAL DAMAGES YOUR SOLE AND EXCLUSIVE REMEDY UNDER THIS ...Some states and provinces do not have access to the Internet and you need further assistance, you also may contact Maytag at the address below . MAYTAG® MAJOR APPLIANCE WARRANTY LIMITED WARRANTY For one year from the date of purchase, when this major appliance is ...
...in a manner that is inconsistent to published user or operator instructions and/or installation instructions. 2. Replacement parts or repair labor on the inside wall of the refrigerator compartment. LIMITATION OF REMEDIES; EXCLUSION OF INCIDENTAL AND CONSEQUENTIAL DAMAGES YOUR SOLE AND EXCLUSIVE REMEDY UNDER THIS ...Some states and provinces do not have access to the Internet and you need further assistance, you also may contact Maytag at the address below . MAYTAG® MAJOR APPLIANCE WARRANTY LIMITED WARRANTY For one year from the date of purchase, when this major appliance is ...


